

Owner's Manual
Page 5
.... Do not unplug by the manufacturer only. 18. Do not pull or push fabric while stitching. Always unplug sewing machine from the electric outlet immediately after using this sewing machine. This sewing machine is designed and manufactured for a sewing machine that has fallen into water or other user servicing adjustments mentioned in the instruction manual. 21. Always unplug this...
.... Do not unplug by the manufacturer only. 18. Do not pull or push fabric while stitching. Always unplug sewing machine from the electric outlet immediately after using this sewing machine. This sewing machine is designed and manufactured for a sewing machine that has fallen into water or other user servicing adjustments mentioned in the instruction manual. 21. Always unplug this...
Owner's Manual
Page 12
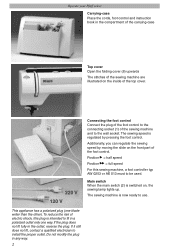
Operate your Pfaff select Carrying-case Place the cords, foot control and instruction book in the compartment of the carrying-case Top cover Open the folding cover (6) upwards The stitches of the sewing machine are illustrated on the inside of the top cover. 220 V 120 V Connecting the foot control Connect the...control. Do not modify the plug in the outlet, reverse the plug. The sewing speed is switched on the front part of the sewing machine and to be used. To reduce the risk of electric shock, this sewing machine, a foot controller typ AW 0253 or AE 013 must to the wall socket....
Operate your Pfaff select Carrying-case Place the cords, foot control and instruction book in the compartment of the carrying-case Top cover Open the folding cover (6) upwards The stitches of the sewing machine are illustrated on the inside of the top cover. 220 V 120 V Connecting the foot control Connect the...control. Do not modify the plug in the outlet, reverse the plug. The sewing speed is switched on the front part of the sewing machine and to be used. To reduce the risk of electric shock, this sewing machine, a foot controller typ AW 0253 or AE 013 must to the wall socket....
Owner's Manual
Page 13
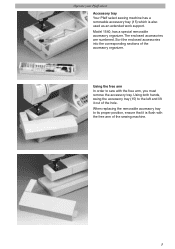
... position, ensure that it out of the hole. Operate your Pfaff select Accessory tray Your Pfaff select sewing machine has a removable accessory tray (15) which is flush with the free arm, you must remove the accessory tray. Sort the enclosed accessories into the corresponding sections of the sewing machine. 3 Using both hands, swing the accessory tray (15) to...
... position, ensure that it out of the hole. Operate your Pfaff select Accessory tray Your Pfaff select sewing machine has a removable accessory tray (15) which is flush with the free arm, you must remove the accessory tray. Sort the enclosed accessories into the corresponding sections of the sewing machine. 3 Using both hands, swing the accessory tray (15) to...
Owner's Manual
Page 24
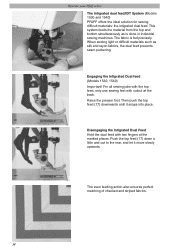
... Pfaff select The Intigrated dual feed/IDT System (Models 1530 and 1540) PFAFF offers the ideal solution for sewing difficult materials: the intigrated dual feed. This system feeds the material from the top and bottom simultaneously as silk and rayon fabrics, the dual feed prevents seam puckering. The fabric is done in industrial sewing machines...
... Pfaff select The Intigrated dual feed/IDT System (Models 1530 and 1540) PFAFF offers the ideal solution for sewing difficult materials: the intigrated dual feed. This system feeds the material from the top and bottom simultaneously as silk and rayon fabrics, the dual feed prevents seam puckering. The fabric is done in industrial sewing machines...
Owner's Manual
Page 59
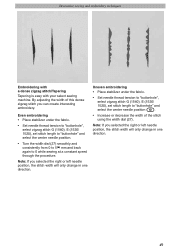
... width of the stitch using the width dial (27). Decorative sewing and embroidery techniques Embroidering with a dense zigzag stitch/Tapering Tapering is easy with your select sewing machine. Uneven embroidering • Place stabilizer under the fabric. • Set needle thread tension to "buttonhole", select zigzag stitch G (1540), E (1530/ 1520), set stitch length to 0 while sewing at a constant speed...
... width of the stitch using the width dial (27). Decorative sewing and embroidery techniques Embroidering with a dense zigzag stitch/Tapering Tapering is easy with your select sewing machine. Uneven embroidering • Place stabilizer under the fabric. • Set needle thread tension to "buttonhole", select zigzag stitch G (1540), E (1530/ 1520), set stitch length to 0 while sewing at a constant speed...
Owner's Manual
Page 61
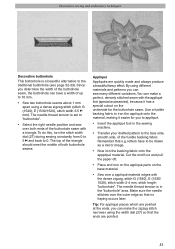
... seam with the dense zigzag, stitch G (1540), E (1530/ 1520), stitch width 2-4 mm, stitch length "buttonhole". By using different materials and patterns you can make the zigzag stitch narrower using a dense zigzag stitch (stitch G (1540), E (1530/1520), stitch width 3-5 mm). Cut the motif out and ...Use a fusible backing fabric to be drawn as a mirror image. • Now iron the backing fabric onto the appplqué material. The needle thread tension is in the sewing machine. • Transfer your drafted pattern to the face side, smooth side, of up to "buttonhole". • Select...
... seam with the dense zigzag, stitch G (1540), E (1530/ 1520), stitch width 2-4 mm, stitch length "buttonhole". By using different materials and patterns you can make the zigzag stitch narrower using a dense zigzag stitch (stitch G (1540), E (1530/1520), stitch width 3-5 mm). Cut the motif out and ...Use a fusible backing fabric to be drawn as a mirror image. • Now iron the backing fabric onto the appplqué material. The needle thread tension is in the sewing machine. • Transfer your drafted pattern to the face side, smooth side, of up to "buttonhole". • Select...
Owner's Manual
Page 62
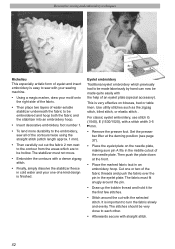
... • Remove the presser foot. Use utility stitches such as the zigzag stitch, blind stitch, or elastic stitch. . For classic eyelet embroidery, use stitch G (1540), E (1530/1520), with the help of an ... the fabric to be very close to each other. • Afterwards secure with the selected stitch. Then push the plate down at the darning position (see page 37). •...of the needle plate. Decorative sewing and embroidery techniques Richelieu This especially artistic form of eyelet and insert embroidery is easy to sew with your sewing machine. • Using a magic marker, draw your...
... • Remove the presser foot. Use utility stitches such as the zigzag stitch, blind stitch, or elastic stitch. . For classic eyelet embroidery, use stitch G (1540), E (1530/1520), with the help of an ... the fabric to be very close to each other. • Afterwards secure with the selected stitch. Then push the plate down at the darning position (see page 37). •...of the needle plate. Decorative sewing and embroidery techniques Richelieu This especially artistic form of eyelet and insert embroidery is easy to sew with your sewing machine. • Using a magic marker, draw your...
Owner's Manual
Page 63
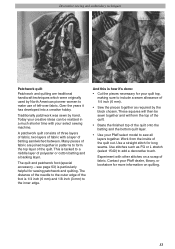
... is tacked to the inner edge. A patchwork quilt consists of three layers of fabric, two layers of fabric with your Pfaff select model to add a decorative touch. Experiment with other stitches on quilting. 53 Traditionally patchwork was sewn by North American pioneer... layer. • Use your select sewing machine. Work from the inside of fabric. Contact your quilt top, making sure to include a seam allowance of 1/4 inch (6 mm). • Sew the pieces together as FG or L stretch (select 1540) to sew all layers together. Decorative sewing and embroidery techniques Patchwork...
... is tacked to the inner edge. A patchwork quilt consists of three layers of fabric, two layers of fabric with your Pfaff select model to add a decorative touch. Experiment with other stitches on quilting. 53 Traditionally patchwork was sewn by North American pioneer... layer. • Use your select sewing machine. Work from the inside of fabric. Contact your quilt top, making sure to include a seam allowance of 1/4 inch (6 mm). • Sew the pieces together as FG or L stretch (select 1540) to sew all layers together. Decorative sewing and embroidery techniques Patchwork...

Owner's Manual
Page 70
... the needle plate and the sewing machine provides space for heavier materials use the pintuck foot with a twin needle (e.g. 130/705 H-ZWI; 1.6 or 2.0 mm needle spacing; The cording tongue pre-shapes the fabric during sewing. • Gently pull the fabric taut while sewing the pintucks. 60 Accessories and needles stitch 1540 G 0 2,5 1530 E 0 2,5 1520 E 0 2,5 5 Shirring 5 foot 5 Pintuck...
... the needle plate and the sewing machine provides space for heavier materials use the pintuck foot with a twin needle (e.g. 130/705 H-ZWI; 1.6 or 2.0 mm needle spacing; The cording tongue pre-shapes the fabric during sewing. • Gently pull the fabric taut while sewing the pintucks. 60 Accessories and needles stitch 1540 G 0 2,5 1530 E 0 2,5 1520 E 0 2,5 5 Shirring 5 foot 5 Pintuck...

Owner's Manual
Page 73
... layer of polyester or cotton batting and a backing layer. The 1/4 inch quilt and patchwork foot is particularly suitable for fringe embroidery you should select a slightly longer stitch length. For a seam allowance of 1/4'' guide your fabric along the inner edge of the foot. 63 This is ... effects in . • When using stitch G (1540)/E (1530, 1520). The clearance between . For a seam allowance of 1/8'' guide your fabric along the outer edge of the foot. For circles you have finished, pull the work from the machine by row. Always sew a test seam first. ...
... layer of polyester or cotton batting and a backing layer. The 1/4 inch quilt and patchwork foot is particularly suitable for fringe embroidery you should select a slightly longer stitch length. For a seam allowance of 1/4'' guide your fabric along the inner edge of the foot. 63 This is ... effects in . • When using stitch G (1540)/E (1530, 1520). The clearance between . For a seam allowance of 1/8'' guide your fabric along the outer edge of the foot. For circles you have finished, pull the work from the machine by row. Always sew a test seam first. ...

Owner's Manual
Page 78
...will rewardyou with a longer service life. Now push the screwdriver into the opening and take the needle plate out. Removal: • Raise the sewing foot and remove the removable accessory tray. • Push the point of its mounting. Twist it snap in the illustration and on flat... it will snap half way out of a small screwdriver into the left opening between needle plate and sewing machine. Otherwise, the machine is lying flat the front until you use the machine, the more care it down with the brush. • Apply a drop of oil (every 15 to 20 hours of...
...will rewardyou with a longer service life. Now push the screwdriver into the opening and take the needle plate out. Removal: • Raise the sewing foot and remove the removable accessory tray. • Push the point of its mounting. Twist it snap in the illustration and on flat... it will snap half way out of a small screwdriver into the left opening between needle plate and sewing machine. Otherwise, the machine is lying flat the front until you use the machine, the more care it down with the brush. • Apply a drop of oil (every 15 to 20 hours of...

Owner's Manual
Page 80
...Remove the threads and apply one drop of fabric Check top and bottom tensions. Check needle and bobbin thread tensions Machine does not feed or feeds irregularly Sewing lint has collected between the Remove needle plate, remove lint feed dog teeth rows with difficulty There ... (System 130 N). The wrong needle is inserted Needle is not properly inserted. Maintenance and trouble-shooting Trouble-shooting Problem: The machine skips stitches The needle is bent or blunt. Use a needle system 130/705 H. Needle is lowered, slide A (see page 27) Push slide B (see page 27) ...
...Remove the threads and apply one drop of fabric Check top and bottom tensions. Check needle and bobbin thread tensions Machine does not feed or feeds irregularly Sewing lint has collected between the Remove needle plate, remove lint feed dog teeth rows with difficulty There ... (System 130 N). The wrong needle is inserted Needle is not properly inserted. Maintenance and trouble-shooting Trouble-shooting Problem: The machine skips stitches The needle is bent or blunt. Use a needle system 130/705 H. Needle is lowered, slide A (see page 27) Push slide B (see page 27) ...


