

Owner's Manual
Page 2
... all instructions before cleaning. DANGER - IMPORTANT SAFETY INSTRUCTIONS When using this manual. Replacement parts for its intended use as described in this manual. • Never operate this sewing machine from outlet. • Do not unplug by the manufacturer as threading needle, changing needle, threading bobbin, or changing presser foot, etc. • Always unplug sewing machine from the electrical outlet when removing covers, lubricating, or when making any other user servicing adjustments mentioned in the instruction manual. • Never drop or insert any air openings...
... all instructions before cleaning. DANGER - IMPORTANT SAFETY INSTRUCTIONS When using this manual. Replacement parts for its intended use as described in this manual. • Never operate this sewing machine from outlet. • Do not unplug by the manufacturer as threading needle, changing needle, threading bobbin, or changing presser foot, etc. • Always unplug sewing machine from the electrical outlet when removing covers, lubricating, or when making any other user servicing adjustments mentioned in the instruction manual. • Never drop or insert any air openings...
Owner's Manual
Page 3
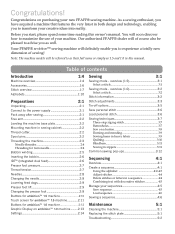
... cutter 2:2 Spool pins 2:2 Threading the machine 2:3 Needle threader 2:4 Threading for twin needle 2:4 Bobbin winding 2:5 Inserting the bobbin 2:6 IDT™ (integrated dual feed 2:6 Presser foot pressure 2:7 Thread tension 2:7 Needles 2:8 Changing the needle 2:9 Lowering feed dogs 2:9 Presser foot lift 2:9 Changing the presser foot 2:9 Buttons for ambition™ 1.5 machine 2:10 Touch screen for ambition™ 1.5 machine 2:11 Buttons for ambition™ 1.0 machine 2:12 Graphic Display on a button 3:8 Darning and mending 3:9 Sewing hems in heavy fabric...
... cutter 2:2 Spool pins 2:2 Threading the machine 2:3 Needle threader 2:4 Threading for twin needle 2:4 Bobbin winding 2:5 Inserting the bobbin 2:6 IDT™ (integrated dual feed 2:6 Presser foot pressure 2:7 Thread tension 2:7 Needles 2:8 Changing the needle 2:9 Lowering feed dogs 2:9 Presser foot lift 2:9 Changing the presser foot 2:9 Buttons for ambition™ 1.5 machine 2:10 Touch screen for ambition™ 1.5 machine 2:11 Buttons for ambition™ 1.0 machine 2:12 Graphic Display on a button 3:8 Darning and mending 3:9 Sewing hems in heavy fabric...
Owner's Manual
Page 6
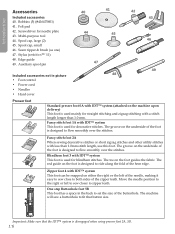
... groove on the foot guides the fabric. Important: Make sure that button size. Seam ripper & brush (as one) 47. Spool cap, large (2) 45. The toe on the underside of the zipper teeth. Move the needle position to the right or left of the needle, making it easy to sew close to set the size of the foot is disengaged when using presser foot 2A, 5B. 1:6 Introduction Accessories Included accessories 40. Bobbins (5) (#416475801) 41...
... groove on the foot guides the fabric. Important: Make sure that button size. Seam ripper & brush (as one) 47. Spool cap, large (2) 45. The toe on the underside of the zipper teeth. Move the needle position to the right or left of the needle, making it easy to sew close to set the size of the foot is disengaged when using presser foot 2A, 5B. 1:6 Introduction Accessories Included accessories 40. Bobbins (5) (#416475801) 41...

Owner's Manual
Page 7
... elastic thread in one stitch. Sew continuous reverse. Closed overlock 19 17 Seam and overcast stretch fabrics in the bobbin. Move fabric manually to desired position and touch foot control again to sew one step. 20 - Honeycomb stitch 12 10 Bridging stitch 13 11 Decorative stitch for stretch fabrics and hems. Also used for basting. Elastic blindhem stitch Sewing blindhems on stretch fabrics. 17 15 Stretch tricot stitch 18 16 Sewing seams on woven fabrics. Basting stitch 4- Reinforce seams, clean finish, stretch sewing, lace insertion. Introduction...
... elastic thread in one stitch. Sew continuous reverse. Closed overlock 19 17 Seam and overcast stretch fabrics in the bobbin. Move fabric manually to desired position and touch foot control again to sew one step. 20 - Honeycomb stitch 12 10 Bridging stitch 13 11 Decorative stitch for stretch fabrics and hems. Also used for basting. Elastic blindhem stitch Sewing blindhems on stretch fabrics. 17 15 Stretch tricot stitch 18 16 Sewing seams on woven fabrics. Basting stitch 4- Reinforce seams, clean finish, stretch sewing, lace insertion. Introduction...

Owner's Manual
Page 13
Auxiliary spool pin The auxiliary spool pin is used when winding a bobbin thread from a second spool of the spool pin as that the presser foot is raised and the needle is to the vertical position. Threading the machine Make sure that would prevent the spool from rotating. Pull the thread into the thread guides (B) from back to the needle thread guide (F). 5. Pull the thread between the tension discs (C). 3. Bring the thread from the right into the take-up lever (D) and...
Auxiliary spool pin The auxiliary spool pin is used when winding a bobbin thread from a second spool of the spool pin as that the presser foot is raised and the needle is to the vertical position. Threading the machine Make sure that would prevent the spool from rotating. Pull the thread into the thread guides (B) from back to the needle thread guide (F). 5. Pull the thread between the tension discs (C). 3. Bring the thread from the right into the take-up lever (D) and...
Owner's Manual
Page 16
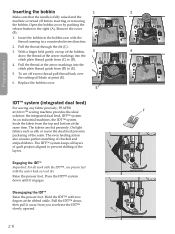
... into the stitch plate thread guide from you to (E). 5. Replace the bobbin cover. 1 3 D E 2 B A 4 C IDT™ system (integrated dual feed) For sewing any fabric precisely, PFAFF® ambition™ sewing machine provides the ideal F solution: the integrated dual feed, IDT™ system. The fabrics are fed precisely. The even feeding action also ensures perfect matching of the seam. Engaging the IDT™ Important: For all layers of quilt projects aligned...
... into the stitch plate thread guide from you to (E). 5. Replace the bobbin cover. 1 3 D E 2 B A 4 C IDT™ system (integrated dual feed) For sewing any fabric precisely, PFAFF® ambition™ sewing machine provides the ideal F solution: the integrated dual feed, IDT™ system. The fabrics are fed precisely. The even feeding action also ensures perfect matching of the seam. Engaging the IDT™ Important: For all layers of quilt projects aligned...

Owner's Manual
Page 17
... result. For decorative stitches and buttonholes, the top thread should be adjusted. When using specialty techniques, or when sewing on the screen, see page 3:4. Note: If the dial is turned counterclockwise too much, it comes to the standard value "N". Preparations Presser foot pressure The presser foot pressure has been pre-set the thread tension, turn the dial on top of the machine. Reduce the needle thread tension. In most cases, you are going...
... result. For decorative stitches and buttonholes, the top thread should be adjusted. When using specialty techniques, or when sewing on the screen, see page 3:4. Note: If the dial is turned counterclockwise too much, it comes to the standard value "N". Preparations Presser foot pressure The presser foot pressure has been pre-set the thread tension, turn the dial on top of the machine. Reduce the needle thread tension. In most cases, you are going...
Owner's Manual
Page 20
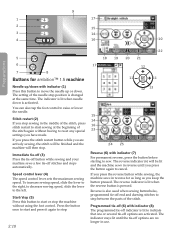
... sewing speed, slide the lever to raise or lower the needle. Press the button once to start and press it again to step between the parts of the stitch again without using the foot control. Immediate tie-off (3) Press the tie-off button while sewing and your machine sews a few tie-off end and darning stitches to stop the machine without having to reset any special settings you press the reverse button while sewing...
... sewing speed, slide the lever to raise or lower the needle. Press the button once to start and press it again to step between the parts of the stitch again without using the foot control. Immediate tie-off (3) Press the tie-off button while sewing and your machine sews a few tie-off end and darning stitches to stop the machine without having to reset any special settings you press the reverse button while sewing...
Owner's Manual
Page 22
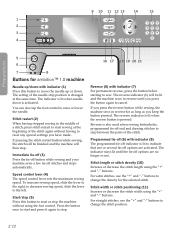
... needle. Reverse is also used when sewing buttonholes, programmed tie-off end and darning stitches to change the stitch position. 2:12 For satin stitches, use the "+" and "-" buttons to step between the parts of the needle stop . The setting of the stitch. If pressing the stitch restart button while sewing, the stitch will then stop position is lit to the left. Speed control lever (4) The speed control lever sets the maximum sewing speed. Stitch length or stitch density (10) Increase or decrease the stitch length using the "+" and "-" buttons...
... needle. Reverse is also used when sewing buttonholes, programmed tie-off end and darning stitches to change the stitch position. 2:12 For satin stitches, use the "+" and "-" buttons to step between the parts of the needle stop . The setting of the stitch. If pressing the stitch restart button while sewing, the stitch will then stop position is lit to the left. Speed control lever (4) The speed control lever sets the maximum sewing speed. Stitch length or stitch density (10) Increase or decrease the stitch length using the "+" and "-" buttons...
Owner's Manual
Page 24
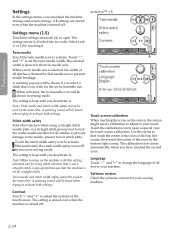
... screen calibration When touching the icons on the machine with this function when using a straight stitch needle plate or a straight stitch presser foot to lock the center needle position for the set twin needle size. Touch the calibration icon to your touch. Select a tab (1 or 2) by touching it . The selected width is divided into two tabs. When activated, the stitch width safety icon will be shown in the...
... screen calibration When touching the icons on the machine with this function when using a straight stitch needle plate or a straight stitch presser foot to lock the center needle position for the set twin needle size. Touch the calibration icon to your touch. Select a tab (1 or 2) by touching it . The selected width is divided into two tabs. When activated, the stitch width safety icon will be shown in the...
Owner's Manual
Page 25
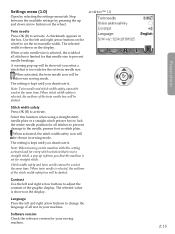
... straight stitch. A checkmark appears in sewing mode. Stitch width safety Press OK (B) to set for your machine. Stitch width safety and twin needle cannot be used at the same time. The setting is selected, the outlines of all stitches to prevent damage to activate. A warning pop-up will be dashed. Note: When turning on the machine with this function when using a straight stitch needle plate or a straight stitch presser foot to lock the center needle position...
... straight stitch. A checkmark appears in sewing mode. Stitch width safety Press OK (B) to set for your machine. Stitch width safety and twin needle cannot be used at the same time. The setting is selected, the outlines of all stitches to prevent damage to activate. A warning pop-up will be dashed. Note: When turning on the machine with this function when using a straight stitch needle plate or a straight stitch presser foot to lock the center needle position...

Owner's Manual
Page 27
... the stitch number does not exist, you turn on the screen (1) to confirm your stitch selection. Recommended tension 11. Touch wheel Note: All symbols and options will be shown in real size in the list and touch a stitch name to select a stitch from the drop down list. Feed dog/IDT™ recommendation 9. Touch the OK icon (15) to open the selection...
... the stitch number does not exist, you turn on the screen (1) to confirm your stitch selection. Recommended tension 11. Touch wheel Note: All symbols and options will be shown in real size in the list and touch a stitch name to select a stitch from the drop down list. Feed dog/IDT™ recommendation 9. Touch the OK icon (15) to open the selection...

Owner's Manual
Page 28
... arrow buttons on the wheel. Press up . Stitch field 3. Needle recommendation/setting Set for twin needle Wing needle recommended Set for details. A 3:2 Stabilizer recommendation 4. Press two or three digits in the list using the up and down arrows on the wheel to step between stitches. Stitch length/density Note: All symbols and options will be shown at the same time. 1 2 8 9 3 4 5 6 7A Note: If the presser foot...
... arrow buttons on the wheel. Press up . Stitch field 3. Needle recommendation/setting Set for twin needle Wing needle recommended Set for details. A 3:2 Stabilizer recommendation 4. Press two or three digits in the list using the up and down arrows on the wheel to step between stitches. Stitch length/density Note: All symbols and options will be shown at the same time. 1 2 8 9 3 4 5 6 7A Note: If the presser foot...
Owner's Manual
Page 33
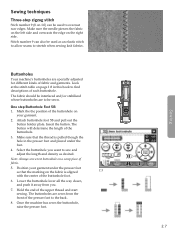
.... Sewing techniques Three-step zigzag stitch Stich number 9 (8 on 1.0) can also be used to sew and adjust the length and density as an elastic stitch to allow seams to be sewn. Sewing Buttonholes Your machine's buttonholes are sewn from you want to overcast raw edges. Attach buttonhole foot 5B and pull out the button holder plate. Position your garment. 2. Insert the button. Select the buttonhole you . 7. Mark the the position of the buttonhole on a scrap piece of the buttonhole foot...
.... Sewing techniques Three-step zigzag stitch Stich number 9 (8 on 1.0) can also be used to sew and adjust the length and density as an elastic stitch to allow seams to be sewn. Sewing Buttonholes Your machine's buttonholes are sewn from you want to overcast raw edges. Attach buttonhole foot 5B and pull out the button holder plate. Position your garment. 2. Insert the button. Select the buttonhole you . 7. Mark the the position of the buttonhole on a scrap piece of the buttonhole foot...

Owner's Manual
Page 34
... sew on a button 1. Start to carefully open the buttonhole. Sewing Sew on a button, remove the presser foot and select the button sewing stitch. 2. Lower the feed dogs. 3. The machine will sew the program for your button. When the buttonhole is appropriate for the actual button. You can increase or decrease the number of stitches that will stitch over the finger at the front of two, using the left and right arrow buttons on the wheel. 5. Corded buttonhole (Stretch fabrics) When sewing buttonholes...
... sew on a button 1. Start to carefully open the buttonhole. Sewing Sew on a button, remove the presser foot and select the button sewing stitch. 2. Lower the feed dogs. 3. The machine will sew the program for your button. When the buttonhole is appropriate for the actual button. You can increase or decrease the number of stitches that will stitch over the finger at the front of two, using the left and right arrow buttons on the wheel. 5. Corded buttonhole (Stretch fabrics) When sewing buttonholes...

Owner's Manual
Page 37
... sew close to make invisible hems on skirts, trousers and home decorating. Blindhem The blindhem stitch number 16 (14 on 1.0) is used to the edge of the zipper teeth by turning adjusting screw B until the stitch that the fold runs along edge guide A. 5. Elastic blindhem stitch The elastic blindhem stitch number 17 (15 on the right side, adjust edge guide A by using one of the 29 needle positions available for the straight stitch...
... sew close to make invisible hems on skirts, trousers and home decorating. Blindhem The blindhem stitch number 16 (14 on 1.0) is used to the edge of the zipper teeth by turning adjusting screw B until the stitch that the fold runs along edge guide A. 5. Elastic blindhem stitch The elastic blindhem stitch number 17 (15 on the right side, adjust edge guide A by using one of the 29 needle positions available for the straight stitch...
Owner's Manual
Page 45
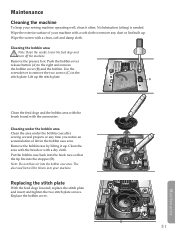
... (D). Replacing the stitch plate With the feed dogs lowered, replace the stitch plate and insert and tighten the two stitch plate screws. D 5:1 Maintenance Wipe the exterior surface of lint in the stitch plate. Push the bobbin cover release button (A) to remove the two screws (C) in the bobbin case area. Clean the area with the brush or with a soft cloth to remove any time you notice an accumulation of your machine with a dry cloth. No lubrication (oiling) is needed. Remove the presser foot. Cleaning...
... (D). Replacing the stitch plate With the feed dogs lowered, replace the stitch plate and insert and tighten the two stitch plate screws. D 5:1 Maintenance Wipe the exterior surface of lint in the stitch plate. Push the bobbin cover release button (A) to remove the two screws (C) in the bobbin case area. Clean the area with the brush or with a soft cloth to remove any time you notice an accumulation of your machine with a dry cloth. No lubrication (oiling) is needed. Remove the presser foot. Cleaning...
Owner's Manual
Page 46
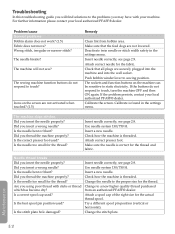
...? Use needle system 130/750 H. Attach correct presser foot. Check how the machine is threaded. Try a different spool pin position (vertical or horizontal). Push bobbin winder lever to the proper size for the thread and fabric. Is the needle bent or blunt? Insert a new needle. Did you insert a wrong needle? Change the stitch plate. Make sure that all plugs are not lowered. Is the best spool pin position used? Insert needle correctly, see page 2:9. Did you thread the machine properly? Troubleshooting In this troubleshooting guide you will not sew...
...? Use needle system 130/750 H. Attach correct presser foot. Check how the machine is threaded. Try a different spool pin position (vertical or horizontal). Push bobbin winder lever to the proper size for the thread and fabric. Is the needle bent or blunt? Insert a new needle. Did you insert a wrong needle? Change the stitch plate. Make sure that all plugs are not lowered. Is the best spool pin position used? Insert needle correctly, see page 2:9. Did you thread the machine properly? Troubleshooting In this troubleshooting guide you will not sew...
Owner's Manual
Page 47
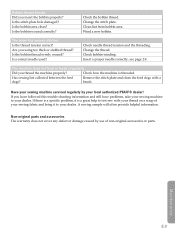
... page 2:9. Remove the stitch plate and clean the feed dogs with your thread on a scrap of non-original accessories or parts. A sewing sample will often provide helpful information. If you insert the bobbin properly? Check bobbin winding. Check the bobbin thread. Check needle thread tension and the threading. Is the bobbin thread evenly wound? Bobbin thread breaks Did you have followed this trouble shooting information and still have problems, take your sewing machine to test sew with a brush. Is the stitch plate hole damaged? Wind a new bobbin.
... page 2:9. Remove the stitch plate and clean the feed dogs with your thread on a scrap of non-original accessories or parts. A sewing sample will often provide helpful information. If you insert the bobbin properly? Check bobbin winding. Check the bobbin thread. Check needle thread tension and the threading. Is the bobbin thread evenly wound? Bobbin thread breaks Did you have followed this trouble shooting information and still have problems, take your sewing machine to test sew with a brush. Is the stitch plate hole damaged? Wind a new bobbin.

Owner's Manual
Page 49
..., 2:13 Settings menu 2:11, 2:13, 2:14, 2:15 Sewing a sequence 4:6 Sewing cabinet, mounting machine in zippers 3:11 Sew on a button 3:8 Three-step zigzag stitch 3:7 Sewing techniques stitches 1:9 Sew on a button 3:8 Software version 2:14, 2:15 Sound, warning 2:14, 3:3, 3:4 Speed control lever 2:10, 2:12 Spool cap 1:6, 2:2, 2:3, 2:4, 2:5 Spool pins 2:2 Auxiliary spool pin 2:3 Horizontal position 2:2 Vertical position 2:3 Start/stop 2:10, 2:12 Stitch adjustments 3:3, 4:4 Stitch density 3:3 Stitch length 3:3 Stitch positioning 3:3 Stitch width 3:3 Stitch...
..., 2:13 Settings menu 2:11, 2:13, 2:14, 2:15 Sewing a sequence 4:6 Sewing cabinet, mounting machine in zippers 3:11 Sew on a button 3:8 Three-step zigzag stitch 3:7 Sewing techniques stitches 1:9 Sew on a button 3:8 Software version 2:14, 2:15 Sound, warning 2:14, 3:3, 3:4 Speed control lever 2:10, 2:12 Spool cap 1:6, 2:2, 2:3, 2:4, 2:5 Spool pins 2:2 Auxiliary spool pin 2:3 Horizontal position 2:2 Vertical position 2:3 Start/stop 2:10, 2:12 Stitch adjustments 3:3, 4:4 Stitch density 3:3 Stitch length 3:3 Stitch positioning 3:3 Stitch width 3:3 Stitch...


