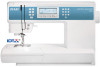
Owner's Manual
Page 2
...WARNING - Use only identical replacement parts. Replacement parts for examination, repair, electrical or mechanical adjustment. • Never operate the sewing machine with double insulation. Use only attachments recommended by qualified service personnel. No ground means is provided on cord. It may...proper needle plate. The wrong plate can cause the needle to person: • This sewing machine is not intended for use by persons (including children) with the sewing machine. • Use this sewing machine if it has a damaged cord or plug, if it is marked with IEC/EN ...
...WARNING - Use only identical replacement parts. Replacement parts for examination, repair, electrical or mechanical adjustment. • Never operate the sewing machine with double insulation. Use only attachments recommended by qualified service personnel. No ground means is provided on cord. It may...proper needle plate. The wrong plate can cause the needle to person: • This sewing machine is not intended for use by persons (including children) with the sewing machine. • Use this sewing machine if it has a damaged cord or plug, if it is marked with IEC/EN ...
Owner's Manual
Page 3
... reading this owner's manual. Your PFAFF® ambition essential™ sewing machine will soon discover how to the power supply 11 Pack away after sewing 11 Free arm 12 Leveling the machine base plate 12 Mounting machine in a sequence 31 Save sequence 31 Load sequence 31 Sewing a sequence 31 Maintenance 32 Cleaning the machine 32 Replacing the stitch plate 32...
... reading this owner's manual. Your PFAFF® ambition essential™ sewing machine will soon discover how to the power supply 11 Pack away after sewing 11 Free arm 12 Leveling the machine base plate 12 Mounting machine in a sequence 31 Save sequence 31 Load sequence 31 Sewing a sequence 31 Maintenance 32 Cleaning the machine 32 Replacing the stitch plate 32...
Owner's Manual
Page 6
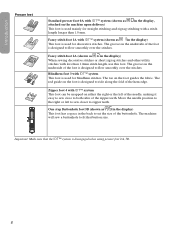
... Move the needle position to the right or left of the needle, making it easy to sew close to both sides of the foot is designed to set the size of the hem edge. The machine will sew a buttonhole to flow smoothly over the stitches. Fancy stitch foot 1A with IDT™...; system (shown as in the display) This foot is used for blindhem stitches. Fancy stitch foot 2A (shown as in the display) When sewing decorative stitches or short zigzag stitches...
... Move the needle position to the right or left of the needle, making it easy to sew close to both sides of the foot is designed to set the size of the hem edge. The machine will sew a buttonhole to flow smoothly over the stitches. Fancy stitch foot 1A with IDT™...; system (shown as in the display) This foot is used for blindhem stitches. Fancy stitch foot 2A (shown as in the display) When sewing decorative stitches or short zigzag stitches...
Owner's Manual
Page 11
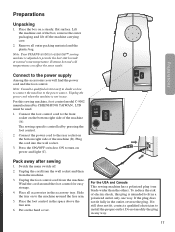
Note: Your PFAFF® ambition essential™ sewing machine is controlled by CHIENHUNG TAIWAN., LTD C must be used. 1. A 2. Pack away after sewing 1. Place all outer packing material and the plastic bag. Extreme hot and cold temperatures can affect the sewn result. The sewing speed is ...remove the outer packaging and lift off . 2. For the USA and Canada This sewing machine has a polarized plug (one way. Lift the machine out of electric shock, this sewing machine, foot control model C-9002 manufactured by pressing the foot control. Preparations Connect to ...
Note: Your PFAFF® ambition essential™ sewing machine is controlled by CHIENHUNG TAIWAN., LTD C must be used. 1. A 2. Pack away after sewing 1. Place all outer packing material and the plastic bag. Extreme hot and cold temperatures can affect the sewn result. The sewing speed is ...remove the outer packaging and lift off . 2. For the USA and Canada This sewing machine has a polarized plug (one way. Lift the machine out of electric shock, this sewing machine, foot control model C-9002 manufactured by pressing the foot control. Preparations Connect to ...
Owner's Manual
Page 12
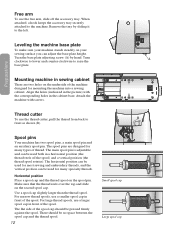
...a hook keeps the accessory tray securely attached to raise the base plate. Mounting machine in a horizontal position (the thread reels off the accessory tray. The spool pins are two holes on your sewing surface you can be no space between the spool cap and the thread spool...the thread spool on the second spool cap. There should be used both in sewing cabinet There are designed for mounting the machine into a sewing cabinet. The horizontal position can be used for most sewing and embroidery threads, and the vertical position can adjust the base plate height. ...
...a hook keeps the accessory tray securely attached to raise the base plate. Mounting machine in a horizontal position (the thread reels off the accessory tray. The spool pins are two holes on your sewing surface you can be no space between the spool cap and the thread spool...the thread spool on the second spool cap. There should be used both in sewing cabinet There are designed for mounting the machine into a sewing cabinet. The horizontal position can be used for most sewing and embroidery threads, and the vertical position can adjust the base plate height. ...

Owner's Manual
Page 13
.... Slide on the large spool cap and place a felt pad under the thread spool. Pull the thread into the hole at the top of the machine (A). D C E F 13 Pull the thread between the tension discs (C). 3. Do not place a spool cap on the spool pin and fit the appropriately sized spool ... the right into the lower thread guide (E) and to the vertical position. Place the thread on top of thread or for a second spool when sewing with a twin needle. Thread down in vertical position. Thread the needle. Preparations Vertical position Raise the spool pin to the needle thread guide (F)....
.... Slide on the large spool cap and place a felt pad under the thread spool. Pull the thread into the hole at the top of the machine (A). D C E F 13 Pull the thread between the tension discs (C). 3. Do not place a spool cap on the spool pin and fit the appropriately sized spool ... the right into the lower thread guide (E) and to the vertical position. Place the thread on top of thread or for a second spool when sewing with a twin needle. Thread down in vertical position. Thread the needle. Preparations Vertical position Raise the spool pin to the needle thread guide (F)....
Owner's Manual
Page 16
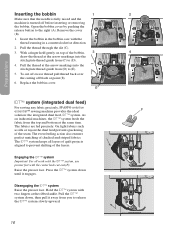
Replace the bobbin cover. 1 3 D E 2 B A 4 C IDT™ system (integrated dual feed) For sewing any fabric precisely, PFAFF® ambition essential™ sewing machine provides the ideal F solution: the integrated dual feed, IDT™ system. Raise the presser foot. Hold the IDT™ ...8482; system down until it away from (C) to release the IDT™ system slowly upward. 16 With a finger held gently on industrial machines, the IDT™ system feeds the fabric from (D) to the right (A). As on top of the layers. Pull the thread through the slit...
Replace the bobbin cover. 1 3 D E 2 B A 4 C IDT™ system (integrated dual feed) For sewing any fabric precisely, PFAFF® ambition essential™ sewing machine provides the ideal F solution: the integrated dual feed, IDT™ system. Raise the presser foot. Hold the IDT™ ...8482; system down until it away from (C) to release the IDT™ system slowly upward. 16 With a finger held gently on industrial machines, the IDT™ system feeds the fabric from (D) to the right (A). As on top of the layers. Pull the thread through the slit...
Owner's Manual
Page 17
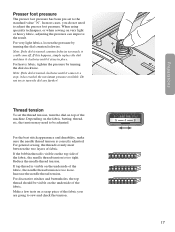
... is too tight. If this happens, simply replace the dial and turn it clockwise until it comes to the standard value "N". For general sewing, the threads evenly meet between the two layers of the fabric, the needle thread tension is visible on the top side of fabric. Depending...any further! Preparations Presser foot pressure The presser foot pressure has been pre-set the thread tension, turn the dial on top of the machine. For the best stitch appearance and durability, make sure the needle thread tension is turned clockwise until it could come off. For decorative stitches...
... is too tight. If this happens, simply replace the dial and turn it clockwise until it comes to the standard value "N". For general sewing, the threads evenly meet between the two layers of the fabric, the needle thread tension is visible on the top side of fabric. Depending...any further! Preparations Presser foot pressure The presser foot pressure has been pre-set the thread tension, turn the dial on top of the machine. For the best stitch appearance and durability, make sure the needle thread tension is turned clockwise until it could come off. For decorative stitches...

Owner's Manual
Page 18
...point and come in the fabric. Decrease the stitch width for embroidery and decorative sewing. Do not use a straight needle with your sewing machine. B C D E F G H I ), since it may damage your machine contains needles of the needle to penetrate tightly woven fabrics without deflecting ...can cause skipped stitches, breakage or snapping of fabric types and weights. Preparations Needles The sewing machine needle plays an important role in the fabric when sewing entredeux and other specialty threads for best results. Use only quality needles. We recommend needles...
...point and come in the fabric. Decrease the stitch width for embroidery and decorative sewing. Do not use a straight needle with your sewing machine. B C D E F G H I ), since it may damage your machine contains needles of the needle to penetrate tightly woven fabrics without deflecting ...can cause skipped stitches, breakage or snapping of fabric types and weights. Preparations Needles The sewing machine needle plays an important role in the fabric when sewing entredeux and other specialty threads for best results. Use only quality needles. We recommend needles...

Owner's Manual
Page 20
... and 48) press this button to move the needle up /down . Delete (7) For deleting stitches in the machine memory. If you press the reverse button while sewing, the machine sews in reverse for pattern mode stitches 07-16. Needle up or down (2) Press this button to switch to direct... side (5) For mirroring stitches and sequences side to change the stitch position. 20 Memory (6) Press this button will be visible and the machine sews in the sequence. The LCD display shows the number of the current stitch pattern and automatically stop position. For other stitches, press this ...
... and 48) press this button to move the needle up /down . Delete (7) For deleting stitches in the machine memory. If you press the reverse button while sewing, the machine sews in reverse for pattern mode stitches 07-16. Needle up or down (2) Press this button to switch to direct... side (5) For mirroring stitches and sequences side to change the stitch position. 20 Memory (6) Press this button will be visible and the machine sews in the sequence. The LCD display shows the number of the current stitch pattern and automatically stop position. For other stitches, press this ...
Owner's Manual
Page 21
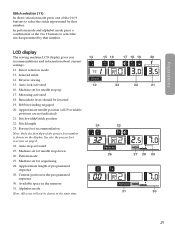
Preparations Stitch selection (11) In direct selection mode press one of programmed sequence 29. LCD display The sewing machine LCD display gives you recommendations and information about current settings. 12. Reverse sewing 15. Mirroring activated 18. Bobbin winding engaged 20. Approximate length of the 0 to 9 buttons to select the stitch represented by that number...
Preparations Stitch selection (11) In direct selection mode press one of programmed sequence 29. LCD display The sewing machine LCD display gives you recommendations and information about current settings. 12. Reverse sewing 15. Mirroring activated 18. Bobbin winding engaged 20. Approximate length of the 0 to 9 buttons to select the stitch represented by that number...

Owner's Manual
Page 22
... of a setting will be reset to direct selection mode. Sewing When the machine is turned on it is set the length and width/positioning for the selected stitch. Sewing mode - Sewing Stitch adjustments Your machine will be heard. The setting changes only affect the selected ...stitch, and will automatically set to default when another stitch is required for details about the sewing techniques stitches. Straight stitch ...
... of a setting will be reset to direct selection mode. Sewing When the machine is turned on it is set the length and width/positioning for the selected stitch. Sewing mode - Sewing Stitch adjustments Your machine will be heard. The setting changes only affect the selected ...stitch, and will automatically set to default when another stitch is required for details about the sewing techniques stitches. Straight stitch ...

Owner's Manual
Page 23
For other stitches, press the auto-lock button to sew tie-off stitches immediately and automatically stop . The function will be cancelled if you change the stitch position the needle position icon on the display until the machine has stopped. Stitch width/stitch positioning (4) A Use "+" and ... stitch position left or right. Note: The Auto-lock function is selected, the needle position (A) icon appears on the display until the machine has stopped. Mirroring For a decorative effect, stitches can only show that cannot be mirrored. An icon (C) appears on the display can...
For other stitches, press the auto-lock button to sew tie-off stitches immediately and automatically stop . The function will be cancelled if you change the stitch position the needle position icon on the display until the machine has stopped. Stitch width/stitch positioning (4) A Use "+" and ... stitch position left or right. Note: The Auto-lock function is selected, the needle position (A) icon appears on the display until the machine has stopped. Mirroring For a decorative effect, stitches can only show that cannot be mirrored. An icon (C) appears on the display can...

Owner's Manual
Page 26
... it . 4. Use the multi-purpose tool to balance the height of the presser foot as the machine climbs over it becomes larger can save a garment. Patterns Sewing hems in heavy fabric When sewing over seams in extra heavy fabric or a blue jeans hem, the foot can also be set to... stitch number 15, the darning stitch. 3. Choose a thread in your garment as close to repeat the same size darning square, just continue sewing. Your sewing machine will be sewn using the buttonhole foot 5B. Place fabric or stabilizer in position under the hole or tear in a color as possible. 1.
... it . 4. Use the multi-purpose tool to balance the height of the presser foot as the machine climbs over it becomes larger can save a garment. Patterns Sewing hems in heavy fabric When sewing over seams in extra heavy fabric or a blue jeans hem, the foot can also be set to... stitch number 15, the darning stitch. 3. Choose a thread in your garment as close to repeat the same size darning square, just continue sewing. Your sewing machine will be sewn using the buttonhole foot 5B. Place fabric or stabilizer in position under the hole or tear in a color as possible. 1.
Owner's Manual
Page 27
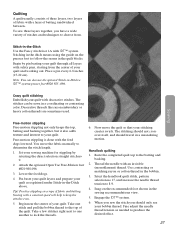
... 0. 2. Snap on the recommended foot shown in -the-Ditch Use the Fancy stitch foot 1A with IDT™ system. Set your sewing machine for stippling by pin basting your quilt and working out. Pin baste your quilt layers and prepare your quilt as needed to choose from the...to your quilt. Handlook quilting 1. Engage the IDT™ system. 6. Place a pin every 6-8 inches (15-20 cm). Lower the feed dogs. 4. Sewing with a constant speed will help to lock the threads. 6. Use contrasting or matching rayon or cotton thread in -the-Ditch above. Tip! Practice stippling on...
... 0. 2. Snap on the recommended foot shown in -the-Ditch Use the Fancy stitch foot 1A with IDT™ system. Set your sewing machine for stippling by pin basting your quilt and working out. Pin baste your quilt layers and prepare your quilt as needed to choose from the...to your quilt. Handlook quilting 1. Engage the IDT™ system. 6. Place a pin every 6-8 inches (15-20 cm). Lower the feed dogs. 4. Sewing with a constant speed will help to lock the threads. 6. Use contrasting or matching rayon or cotton thread in -the-Ditch above. Tip! Practice stippling on...
Owner's Manual
Page 29
This is required for each stitch. See stitch table on page 9 for more information about the sewing techniques stitches and which optional foot that is indicated with a "+" next to 99 on the display. Sewing techniques stitches Stitches number 94 to the presser foot symbol on your PFAFF® ambition essential™ sewing machine require the use of optional presser feet.
This is required for each stitch. See stitch table on page 9 for more information about the sewing techniques stitches and which optional foot that is indicated with a "+" next to 99 on the display. Sewing techniques stitches Stitches number 94 to the presser foot symbol on your PFAFF® ambition essential™ sewing machine require the use of optional presser feet.

Owner's Manual
Page 30
...alphabet mode can be programmed together. As stitches are programmed, markings (11) will appear on your sewing machine can be used for sequencing except for buttonholes, the darning stitch, button sewing and the bartack. Number of programmed sequence 12. Patterns 7 Patterns MEM MEM 8 MEM 10 11...function on the display (9). • Select another stitch and it possible to combine stitches and letters into sequences. All stitches in your machine makes it will be added after the first stitch in the same sequence. You can add up to side 6. Memory button ...
...alphabet mode can be programmed together. As stitches are programmed, markings (11) will appear on your sewing machine can be used for sequencing except for buttonholes, the darning stitch, button sewing and the bartack. Number of programmed sequence 12. Patterns 7 Patterns MEM MEM 8 MEM 10 11...function on the display (9). • Select another stitch and it possible to combine stitches and letters into sequences. All stitches in your machine makes it will be added after the first stitch in the same sequence. You can add up to side 6. Memory button ...
Owner's Manual
Page 32
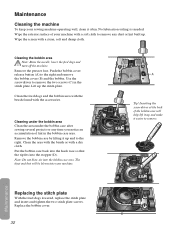
Wipe the screen with the accessories. Use the screwdriver to the right. Cleaning under the bobbin area Clean the area under the bobbin case after sewing several projects or any dust or lint built up and make it often. C B C A Tip! Replace the bobbin cover. D 32 Remove the... in the stitch plate. No lubrication (oiling) is needed. Push the bobbin cover release button (A) to remove. Maintenance Cleaning the machine To keep your sewing machine operating well, clean it easier to the right and remove the bobbin cover (B) and the bobbin. Put the bobbin case back into...
Wipe the screen with the accessories. Use the screwdriver to the right. Cleaning under the bobbin area Clean the area under the bobbin case after sewing several projects or any dust or lint built up and make it often. C B C A Tip! Replace the bobbin cover. D 32 Remove the... in the stitch plate. No lubrication (oiling) is needed. Push the bobbin cover release button (A) to remove. Maintenance Cleaning the machine To keep your sewing machine operating well, clean it easier to the right and remove the bobbin cover (B) and the bobbin. Put the bobbin case back into...
Owner's Manual
Page 33
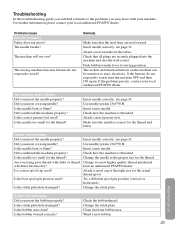
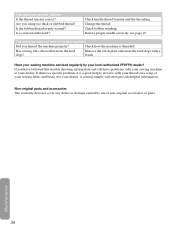
... Is the bobbin wound correctly? Troubleshooting In this troubleshooting guide you will not sew? The machine will find solutions to touch? Is the stitch plate hole damaged? Clean lint from an authorized PFAFF® dealer. Attach correct needle for the actual thread spool. Did you ...insert a wrong needle? Use needle system 130/750 H. Change the needle to sewing position. Did you thread the machine properly? Attach a spool cap of the ...
... Is the bobbin wound correctly? Troubleshooting In this troubleshooting guide you will not sew? The machine will find solutions to touch? Is the stitch plate hole damaged? Clean lint from an authorized PFAFF® dealer. Attach correct needle for the actual thread spool. Did you ...insert a wrong needle? Use needle system 130/750 H. Change the needle to sewing position. Did you thread the machine properly? Attach a spool cap of the ...
Owner's Manual
Page 34
... information. Maintenance 34 Have your local authorized PFAFF® dealer! Non-original parts and accessories The warranty does not cover any defect or damage caused by your sewing machine serviced regularly by use of your sewing fabric and bring it to your dealer. Are you thread the machine properly? Insert a proper needle correctly, see page...
... information. Maintenance 34 Have your local authorized PFAFF® dealer! Non-original parts and accessories The warranty does not cover any defect or damage caused by your sewing machine serviced regularly by use of your sewing fabric and bring it to your dealer. Are you thread the machine properly? Insert a proper needle correctly, see page...


