Owner's Manual
Page 2
... identical replacement parts. To unplug, grasp the plug, not the cord. • The sound pressure level under normal operating conditions is 75dB(A) • This sewing machine is designed to the product. IMPORTANT SAFETY INSTRUCTIONS When using this household sewing machine. Keep ventilation openings of the sewing machine and foot controller free from the accumulation of the system and should never be done only by the manufacturer as threading needle, changing needle, threading bobbin, or changing presser foot...
... identical replacement parts. To unplug, grasp the plug, not the cord. • The sound pressure level under normal operating conditions is 75dB(A) • This sewing machine is designed to the product. IMPORTANT SAFETY INSTRUCTIONS When using this household sewing machine. Keep ventilation openings of the sewing machine and foot controller free from the accumulation of the system and should never be done only by the manufacturer as threading needle, changing needle, threading bobbin, or changing presser foot...
Owner's Manual
Page 3
... 12 Thread cutter 12 Spool pins 12 Threading the machine 13 Needle threader 14 Threading for twin needle 14 Bobbin winding 15 Inserting the bobbin 16 IDT™ system (integrated dual feed 16 Presser foot pressure 17 Thread tension 17 Needles 18 Changing the needle 19 Lowering feed dogs 19 Presser foot lift 19 Changing the presser foot 19 Buttons 20 LCD display 21 Sewing 22 Sewing mode - Congratulations on a button 25 Darning and mending 26 Sewing hems in heavy fabric 26 Quilting 27 Blindhem 28 Sewing in zippers 28 Sewing techniques stitches 29...
... 12 Thread cutter 12 Spool pins 12 Threading the machine 13 Needle threader 14 Threading for twin needle 14 Bobbin winding 15 Inserting the bobbin 16 IDT™ system (integrated dual feed 16 Presser foot pressure 17 Thread tension 17 Needles 18 Changing the needle 19 Lowering feed dogs 19 Presser foot lift 19 Changing the presser foot 19 Buttons 20 LCD display 21 Sewing 22 Sewing mode - Congratulations on a button 25 Darning and mending 26 Sewing hems in heavy fabric 26 Quilting 27 Blindhem 28 Sewing in zippers 28 Sewing techniques stitches 29...

Owner's Manual
Page 4
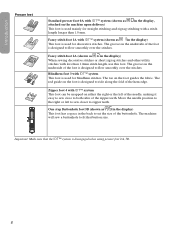
Thread cutter 4. LED lights 5. Stitch plate 9. Free arm 17. Accessory tray 18. Lid with stitch overview 2. Needle bar 8. Bobbin cover 10. Buttons and graphic display Built-in needle threader 6. Presser foot lift 12. Needle screw 13. Presser foot bar and presser foot holder 15. Presser foot 16. Lower thread guide 4 11. Needle thread guide 14. Buttonhole lever 7. Handwheel 19. Introduction Introduction Machine overview 1 19 2 18 3 4 4 16 17 10 5 11 6 12 7 13 14 8 9 15 Front side 1. Threading slots 3.
Thread cutter 4. LED lights 5. Stitch plate 9. Free arm 17. Accessory tray 18. Lid with stitch overview 2. Needle bar 8. Bobbin cover 10. Buttons and graphic display Built-in needle threader 6. Presser foot lift 12. Needle screw 13. Presser foot bar and presser foot holder 15. Presser foot 16. Lower thread guide 4 11. Needle thread guide 14. Buttonhole lever 7. Handwheel 19. Introduction Introduction Machine overview 1 19 2 18 3 4 4 16 17 10 5 11 6 12 7 13 14 8 9 15 Front side 1. Threading slots 3.

Owner's Manual
Page 5
... parts 20. Bobbin winder lever and bobbin spindle 25. Bobbin winder tension disc 29. Main switch, connectors for auxiliary spool pin 24. Spool cap, small 41. Auxiliary spool pin Included accessories not in picture • Foot control • Power cord • Needles • Hard cover 35 39 36 40 42 34 37 38 41 5 Presser foot lift 33. Bobbins (5) (#416475801) 36. Seam ripper & brush (as one) 42. Thread guides 22. Take-up lever 26. Slide for needle plate 38. Presser foot pressure dial...
... parts 20. Bobbin winder lever and bobbin spindle 25. Bobbin winder tension disc 29. Main switch, connectors for auxiliary spool pin 24. Spool cap, small 41. Auxiliary spool pin Included accessories not in picture • Foot control • Power cord • Needles • Hard cover 35 39 36 40 42 34 37 38 41 5 Presser foot lift 33. Bobbins (5) (#416475801) 36. Seam ripper & brush (as one) 42. Thread guides 22. Take-up lever 26. Slide for needle plate 38. Presser foot pressure dial...
Owner's Manual
Page 6
The groove on the foot guides the fabric. Blindhem foot 3 with IDT™ system This foot is disengaged when using presser foot 2A, 5B. 6 Zipper foot 4 with IDT™ system This foot can be snapped on the machine upon delivery) in the display, This foot is used mainly for straight stitching and zigzag stitching with a stitch length longer than 1.0mm stitch length, use this foot. Important: Make sure that button size. Introduction Presser feet Standard presser foot 0A with IDT™ system...
The groove on the foot guides the fabric. Blindhem foot 3 with IDT™ system This foot is disengaged when using presser foot 2A, 5B. 6 Zipper foot 4 with IDT™ system This foot can be snapped on the machine upon delivery) in the display, This foot is used mainly for straight stitching and zigzag stitching with a stitch length longer than 1.0mm stitch length, use this foot. Important: Make sure that button size. Introduction Presser feet Standard presser foot 0A with IDT™ system...

Owner's Manual
Page 7
... seams, clean finish, stretch sewing. Stretch triple zigzag 5 stitch Elastic stitch for quilting, hemstitching. Z-zigzag stitch 4 Appliqué, couching, eyelets. Elastic blindhem stitch Sewing blindhems on stretch fabrics. 02 Stretch tricot stitch 03 Sewing seams on woven fabrics. Closed overlock 04 Seam and overcast stretch fabrics in the bobbin. Introduction Stitch overview Direct selection - Name Crosshem stitch 00 Description Elastic decorative hem for undergarments, terry cloth, leather, bulky fabrics where 9 overlapping the seams. Pattern...
... seams, clean finish, stretch sewing. Stretch triple zigzag 5 stitch Elastic stitch for quilting, hemstitching. Z-zigzag stitch 4 Appliqué, couching, eyelets. Elastic blindhem stitch Sewing blindhems on stretch fabrics. 02 Stretch tricot stitch 03 Sewing seams on woven fabrics. Closed overlock 04 Seam and overcast stretch fabrics in the bobbin. Introduction Stitch overview Direct selection - Name Crosshem stitch 00 Description Elastic decorative hem for undergarments, terry cloth, leather, bulky fabrics where 9 overlapping the seams. Pattern...

Owner's Manual
Page 13
... sewing with a twin needle. Do not place a spool cap on the large spool cap and place a felt pad under the thread spool. Insert the auxiliary spool pin into the lower thread guide (E) and to front. D C E F 13 Slide on top of the spool pin as that the presser foot is raised and the needle is to the vertical position. Auxiliary spool pin The auxiliary spool pin is used when winding a bobbin thread from rotating. Pull the thread between the tension...
... sewing with a twin needle. Do not place a spool cap on the large spool cap and place a felt pad under the thread spool. Insert the auxiliary spool pin into the lower thread guide (E) and to front. D C E F 13 Slide on top of the spool pin as that the presser foot is raised and the needle is to the vertical position. Auxiliary spool pin The auxiliary spool pin is used when winding a bobbin thread from rotating. Pull the thread between the tension...
Owner's Manual
Page 16
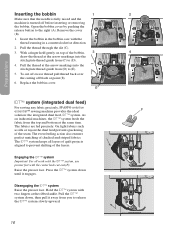
...;ngers at the same time. Replace the bobbin cover. 1 3 D E 2 B A 4 C IDT™ system (integrated dual feed) For sewing any fabric precisely, PFAFF® ambition essential™ sewing machine provides the ideal F solution: the integrated dual feed, IDT™ system. As on top of the layers. The IDT™ system keeps all work with the IDT™ system, use presser feet with the thread running in the bobbin case with the center...
...;ngers at the same time. Replace the bobbin cover. 1 3 D E 2 B A 4 C IDT™ system (integrated dual feed) For sewing any fabric precisely, PFAFF® ambition essential™ sewing machine provides the ideal F solution: the integrated dual feed, IDT™ system. As on top of the layers. The IDT™ system keeps all work with the IDT™ system, use presser feet with the thread running in the bobbin case with the center...
Owner's Manual
Page 17
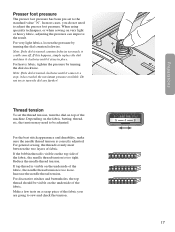
... buttonholes, the top thread should be adjusted. Thread tension To set to a stop, it has reached the maximum pressure available. For the best stitch appearance and durability, make sure the needle thread tension is turned clockwise until it could come off. If the bobbin thread is too tight. If this happens, simply replace the dial and turn it clockwise until it comes to the standard value "N". Preparations Presser foot pressure The presser foot pressure...
... buttonholes, the top thread should be adjusted. Thread tension To set to a stop, it has reached the maximum pressure available. For the best stitch appearance and durability, make sure the needle thread tension is turned clockwise until it could come off. If the bobbin thread is too tight. If this happens, simply replace the dial and turn it clockwise until it comes to the standard value "N". Preparations Presser foot pressure The presser foot pressure...

Owner's Manual
Page 18
... fabric when sewing entredeux and other specialty threads for best results. Use with a red band. Denim needle (E) Denim needles have a special scarf to thread and materials. Note: Change the needle often. The needle package included with a yellow band. Stretch needle (C) Stretch needles have a sharp point to poke holes in a variety of sizes. Decrease the stitch width for embroidery and decorative sewing. Marked with your sewing machine. A damaged needle (H) can also damage the stitch plate...
... fabric when sewing entredeux and other specialty threads for best results. Use with a red band. Denim needle (E) Denim needles have a special scarf to thread and materials. Note: Change the needle often. The needle package included with a yellow band. Stretch needle (C) Stretch needles have a sharp point to poke holes in a variety of sizes. Decrease the stitch width for embroidery and decorative sewing. Marked with your sewing machine. A damaged needle (H) can also damage the stitch plate...

Owner's Manual
Page 20
... reverse is set needle stop icon appears on the display. Press this button to cancel. Stitch width or stitch positioning (10) Increase or decrease the stitch width using the "+" and "-" buttons. Reverse is not available for as long as you press the reverse button while sewing, the machine sews in the machine memory. Mode selection button (3) When you press the button again to sew tie-off stitches immediately and automatically stop position is changed...
... reverse is set needle stop icon appears on the display. Press this button to cancel. Stitch width or stitch positioning (10) Increase or decrease the stitch width using the "+" and "-" buttons. Reverse is not available for as long as you press the reverse button while sewing, the machine sews in the machine memory. Mode selection button (3) When you press the button again to sew tie-off stitches immediately and automatically stop position is changed...

Owner's Manual
Page 22
... another stitch is selected. Straight stitch is selected by pressing the corresponding stitch selection button. See stitch table on it is set the length and width/positioning for the selected stitch. overview 1. Stitch length 4. Needle stop position 6 1 Direct 2 5 3 4 Note: If the presser foot recommendation shows +, an optional presser foot is set stitch width and stitch length are not automatically saved when turning your own adjustments on the display when scrolling through the setting values. Sewing When the machine is...
... another stitch is selected. Straight stitch is selected by pressing the corresponding stitch selection button. See stitch table on it is set the length and width/positioning for the selected stitch. overview 1. Stitch length 4. Needle stop position 6 1 Direct 2 5 3 4 Note: If the presser foot recommendation shows +, an optional presser foot is set stitch width and stitch length are not automatically saved when turning your own adjustments on the display when scrolling through the setting values. Sewing When the machine is...

Owner's Manual
Page 24
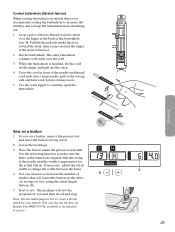
... hole in this book to sew and adjust the length as an elastic stitch to allow seams to stretch when sewing knit fabrics. Note: When a buttonhole is aligned with the center of the buttonhole on page 8 in the presser foot and placed under the foot. 4. Once the machine has sewn the buttonhole, raise the presser foot. 24 A Patterns A B Sewing Buttonholes Your machine's buttonholes are specially adjusted for different kinds of fabric. 5. Mark the the position of the buttonhole foot. 7. Insert the button. The button...
... hole in this book to sew and adjust the length as an elastic stitch to allow seams to stretch when sewing knit fabrics. Note: When a buttonhole is aligned with the center of the buttonhole on page 8 in the presser foot and placed under the foot. 4. Once the machine has sewn the buttonhole, raise the presser foot. 24 A Patterns A B Sewing Buttonholes Your machine's buttonholes are specially adjusted for different kinds of fabric. 5. Mark the the position of the buttonhole foot. 7. Insert the button. The button...
Owner's Manual
Page 25
... function to make sure the holes in the button are aligned with the swing of the needle and the width is finished, lift the cord off and stop. If necessary, adjust the stitch width to sew. Loop a piece of the buttonhole foot 5B. To sew on a button 1. Patterns B A 25 Pull the thread tails under the presser foot holder. Sewing Sew on a button, remove the presser foot and select the button sewing stitch. 2. Start to change the width...
... function to make sure the holes in the button are aligned with the swing of the needle and the width is finished, lift the cord off and stop. If necessary, adjust the stitch width to sew. Loop a piece of the buttonhole foot 5B. To sew on a button 1. Patterns B A 25 Pull the thread tails under the presser foot holder. Sewing Sew on a button, remove the presser foot and select the button sewing stitch. 2. Start to change the width...
Owner's Manual
Page 27
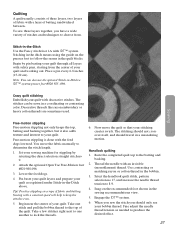
... the seams in -the-Ditch above. Practice stippling on the presser foot to your quilt and working out. Begin near the center of fabric and batting. The stitching should not cross over itself, and should only see your quilt through all layers with the feed dogs lowered. Fine adjust the needle thread tension as explained under Stitch-in the quilt blocks. Set your sewing machine for stippling by pin basting your bobbin thread. Take...
... the seams in -the-Ditch above. Practice stippling on the presser foot to your quilt and working out. Begin near the center of fabric and batting. The stitching should not cross over itself, and should only see your quilt through all layers with the feed dogs lowered. Fine adjust the needle thread tension as explained under Stitch-in the quilt blocks. Set your sewing machine for stippling by pin basting your bobbin thread. Take...
Owner's Manual
Page 28
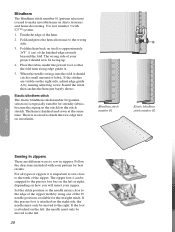
... teeth of the hem. 2. For all types of zippers it should now be moved to the right. The wrong side of fabric. Elastic blindhem stitch The elastic blindhem stitch number 02 (pattern selection) is attached on the left, the needle must only be facing up. 4. Blindhem stitch number 01 B A Elastic blindhem stitch number 02 Sewing Sewing in zippers There are visible on the right side, adjust edge guide A by using one of the...
... teeth of the hem. 2. For all types of zippers it should now be moved to the right. The wrong side of fabric. Elastic blindhem stitch The elastic blindhem stitch number 02 (pattern selection) is attached on the left, the needle must only be facing up. 4. Blindhem stitch number 01 B A Elastic blindhem stitch number 02 Sewing Sewing in zippers There are visible on the right side, adjust edge guide A by using one of the...

Owner's Manual
Page 31
... step. 1 Adjust stitches 2 Use the left and right arrow buttons (1). The Auto-stop symbol appears on the display and press delete (3). To start sewing at the first stitch in the sequence. Step within the sequence All stitches in the sequence are represented by a marking in the lower right corner on the foot control. New stitches will be positioned at another position in the machine memory...
... step. 1 Adjust stitches 2 Use the left and right arrow buttons (1). The Auto-stop symbol appears on the display and press delete (3). To start sewing at the first stitch in the sequence. Step within the sequence All stitches in the sequence are represented by a marking in the lower right corner on the foot control. New stitches will be positioned at another position in the machine memory...
Owner's Manual
Page 32
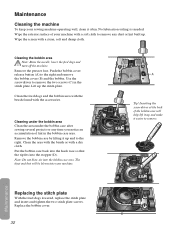
... the bobbin case after sewing several projects or any dust or lint built up. Remove the presser foot. Clean the feed dogs and the bobbin area with the brush found with the accessories. Use the screwdriver to the right and remove the bobbin cover (B) and the bobbin. Note: Do not blow air into the stopper (D). Maintenance Replacing the stitch plate With the feed dogs lowered, replace the stitch plate and insert and tighten the two stitch plate screws. Maintenance Cleaning the machine To...
... the bobbin case after sewing several projects or any dust or lint built up. Remove the presser foot. Clean the feed dogs and the bobbin area with the brush found with the accessories. Use the screwdriver to the right and remove the bobbin cover (B) and the bobbin. Note: Do not blow air into the stopper (D). Maintenance Replacing the stitch plate With the feed dogs lowered, replace the stitch plate and insert and tighten the two stitch plate screws. Maintenance Cleaning the machine To...
Owner's Manual
Page 33
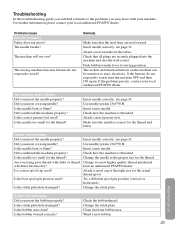
... the thread? Problem/cause General problems Fabric does not move? The needle breaks? Attach correct presser foot. Check how the machine is threaded. Change the needle to sewing position. Change the stitch plate. Push bobbin winder lever to the proper size for the thread and fabric. If the problem persists, contact your local authorized PFAFF® dealer. Is the stitch plate hole damaged? Is the bobbin wound correctly? Clean lint from an authorized PFAFF® dealer. Is the best spool pin position used? Troubleshooting In this troubleshooting guide you...
... the thread? Problem/cause General problems Fabric does not move? The needle breaks? Attach correct presser foot. Check how the machine is threaded. Change the needle to sewing position. Change the stitch plate. Push bobbin winder lever to the proper size for the thread and fabric. If the problem persists, contact your local authorized PFAFF® dealer. Is the stitch plate hole damaged? Is the bobbin wound correctly? Clean lint from an authorized PFAFF® dealer. Is the best spool pin position used? Troubleshooting In this troubleshooting guide you...
Owner's Manual
Page 34
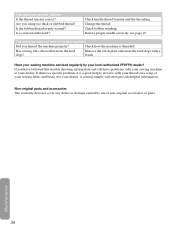
... sewing machine to your local authorized PFAFF® dealer! Remove the stitch plate and clean the feed dogs with your thread on a scrap of your sewing fabric and bring it is threaded. A sewing sample will often provide helpful information. Check bobbin winding. Change the thread. Have your dealer. Maintenance 34 If there is a specific problem, it to your sewing machine serviced regularly by use of non-original accessories or parts. Are you thread the machine properly? Is the bobbin thread...
... sewing machine to your local authorized PFAFF® dealer! Remove the stitch plate and clean the feed dogs with your thread on a scrap of your sewing fabric and bring it is threaded. A sewing sample will often provide helpful information. Check bobbin winding. Change the thread. Have your dealer. Maintenance 34 If there is a specific problem, it to your sewing machine serviced regularly by use of non-original accessories or parts. Are you thread the machine properly? Is the bobbin thread...


