
Owner's Manual
Page 4
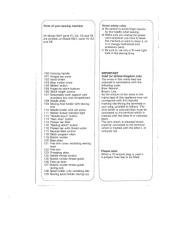
...sure you unplug the power cord whenever you have to leave the machine or want to use only a 15-watt light bulb in the sewing lamp. 100 Carrying handle 101 Hinged top cover 102 Hand wheel...guide (swing-out) 128 Spool holder with the letter L or coloured red. Parts of your sewing machine On Model 1047 parts 111, 112, 113 and 115 are coloured in accordance with the following code: Blue: ...a 3-ampere fuse has to be connected to the terminal which is marked with unreeling disc 1 29 Sewing spool holder (swing-up) ) IMPORTANT Valid for United Kingdom only The wires in this appliance may not...
...sure you unplug the power cord whenever you have to leave the machine or want to use only a 15-watt light bulb in the sewing lamp. 100 Carrying handle 101 Hinged top cover 102 Hand wheel...guide (swing-out) 128 Spool holder with the letter L or coloured red. Parts of your sewing machine On Model 1047 parts 111, 112, 113 and 115 are coloured in accordance with the following code: Blue: ...a 3-ampere fuse has to be connected to the terminal which is marked with unreeling disc 1 29 Sewing spool holder (swing-up) ) IMPORTANT Valid for United Kingdom only The wires in this appliance may not...
Owner's Manual
Page 6
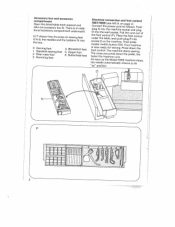
strYhteaesorsutpsrdemosdewaawlnc,ihnttihhgne.ee As the soon as needle the Model 1069 machine stops, automatically returns to its "up" position. 7- Accessory box and accessory compartment ttOiaokpneeanlotauhctecaecdscesetoasrcsyohracybolmbeopwxaorNtrm.kTeshnuetprpeuonisrdteaarnnneadadtdh.i t0Ihll.etoPb6so,hxto.hwesnheoewdleths eansdnatph-eonbosbebwininsgfifteientto 0 Darning foot Standard sewing foot 2 Clear-view foot 3 Hemming foot 4 Blindstitch foot 5 Zipper foot 6 Buttonhole foot Electrical connection and foot control...
strYhteaesorsutpsrdemosdewaawlnc,ihnttihhgne.ee As the soon as needle the Model 1069 machine stops, automatically returns to its "up" position. 7- Accessory box and accessory compartment ttOiaokpneeanlotauhctecaecdscesetoasrcsyohracybolmbeopwxaorNtrm.kTeshnuetprpeuonisrdteaarnnneadadtdh.i t0Ihll.etoPb6so,hxto.hwesnheoewdleths eansdnatph-eonbosbebwininsgfifteientto 0 Darning foot Standard sewing foot 2 Clear-view foot 3 Hemming foot 4 Blindstitch foot 5 Zipper foot 6 Buttonhole foot Electrical connection and foot control...
Owner's Manual
Page 7
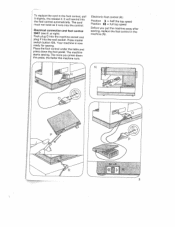
... control (R): Position = half the top speed Position (4 = full top speed Before you press down the foot pedal. Electrical connection and foot control 1047 (see ill. Your machine is now ready for sewing. N UL 1 I E CTfl1 ci .1• I 3 The cord must not twist as it . Press master switch button 104. Place press the foot control...
... control (R): Position = half the top speed Position (4 = full top speed Before you press down the foot pedal. Electrical connection and foot control 1047 (see ill. Your machine is now ready for sewing. N UL 1 I E CTfl1 ci .1• I 3 The cord must not twist as it . Press master switch button 104. Place press the foot control...
Owner's Manual
Page 13
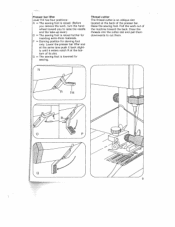
...cutter slot and pull them downwards to raise the needle and the take-up lever.) o = The sewing foot is lowered for inserting extra-thick materials. Q = The sewing foot is raised further for sewing. Lower the presser bar lifter and at the same tane push it back slight ly until it enters... notch R at the back of the machine toward you remove the work out of the presser bar. Raise the sewing foot. P = Darning position ...
...cutter slot and pull them downwards to raise the needle and the take-up lever.) o = The sewing foot is lowered for inserting extra-thick materials. Q = The sewing foot is raised further for sewing. Lower the presser bar lifter and at the same tane push it back slight ly until it enters... notch R at the back of the machine toward you remove the work out of the presser bar. Raise the sewing foot. P = Darning position ...
Owner's Manual
Page 15
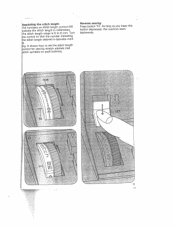
As long as you keep this button depressed, the machine sews backwards. 11 I0 Regulating the stitch length ttirhhnhedeeiccnsaotutinetmtcrthbohleelressnsotgoitttnhchhasrttailttenchnghegetlnheiusnimgn0tbhmteoircl6oliinnmmdtreiomctela.rt1siTn.0ug6rn e stitch length desired is opposite mark 0 shows how to set the stitch length trol for sewing stretch stitches (red th symbols on push buttons). Reverse sewing Press button 117.
As long as you keep this button depressed, the machine sews backwards. 11 I0 Regulating the stitch length ttirhhnhedeeiccnsaotutinetmtcrthbohleelressnsotgoitttnhchhasrttailttenchnghegetlnheiusnimgn0tbhmteoircl6oliinnmmdtreiomctela.rt1siTn.0ug6rn e stitch length desired is opposite mark 0 shows how to set the stitch length trol for sewing stretch stitches (red th symbols on push buttons). Reverse sewing Press button 117.
Owner's Manual
Page 21
..."hgpehveoeepdeewpatdos.hfonlnsaieeW sdniu"bitdtipfriiothbsaiiowhccnebuneaa.nartl(titrwW fcowondyo)rneasrohhe,ywluesediasingennhlnphewededrtvynieienogicessrgusoaveesr the machine stops. Electronic top speed selection (tBh0taTro1hygaehp0elmalev6piigsen7marfphde,iunaet.saltslcssehnAihdpuednttihpigneoti.1eehnrft0cWdehsyi6sinaepoc9hsmgauea)e"termensopdemroewaywctloatiauicgesamnlhrhnoptiyewobnrgfeee"sionsptvchsbedeaasueietrncthdioatneio.tfbsdeofneer,baadutntllhietdgwteohintll. wbTinbhhsieenenrlttaehthmdreepaabndgdoobes sewing continues. Important: Free arm cover 121 must be pressed during...
..."hgpehveoeepdeewpatdos.hfonlnsaieeW sdniu"bitdtipfriiothbsaiiowhccnebuneaa.nartl(titrwW fcowondyo)rneasrohhe,ywluesediasingennhlnphewededrtvynieienogicessrgusoaveesr the machine stops. Electronic top speed selection (tBh0taTro1hygaehp0elmalev6piigsen7marfphde,iunaet.saltslcssehnAihdpuednttihpigneoti.1eehnrft0cWdehsyi6sinaepoc9hsmgauea)e"termensopdemroewaywctloatiauicgesamnlhrhnoptiyewobnrgfeee"sionsptvchsbedeaasueietrncthdioatneio.tfbsdeofneer,baadutntllhietdgwteohintll. wbTinbhhsieenenrlttaehthmdreepaabndgdoobes sewing continues. Important: Free arm cover 121 must be pressed during...
Owner's Manual
Page 25
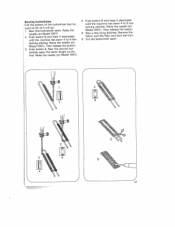
...Then release the button. 5 Sew a few tying stitches. Then release the button. 3 Push button A. Sew the second but tonhole seam the same length as it will go. 1 Sew first buttonhole seam. Raise the needle (on Model 1067> 2 Push button B and keep it depressed until the machine has sewn 4 to 6 ...bar tacking stitches. Raise the needle (on Model 1067). 4 Push button B and keep it depressed until the machine has sewn 4 to 6 bartacking...
...Then release the button. 5 Sew a few tying stitches. Then release the button. 3 Push button A. Sew the second but tonhole seam the same length as it will go. 1 Sew first buttonhole seam. Raise the needle (on Model 1067> 2 Push button B and keep it depressed until the machine has sewn 4 to 6 ...bar tacking stitches. Raise the needle (on Model 1067). 4 Push button B and keep it depressed until the machine has sewn 4 to 6 bartacking...
Owner's Manual
Page 26
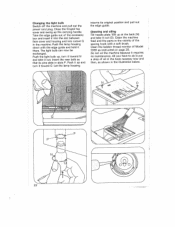
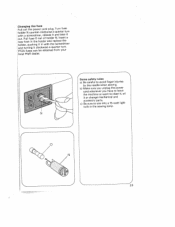
.... Push it up at the back (N> and take it out (0). Take the edge guide out of the sewing hook with the edge guide and hold it toward 0. The light bulb can now be exchanged. Insert the ...so that its original position and pull out the edge guide. Changing the light bulb Switch off the machine and pull out the power cord plug. Cleaning and oiling Tilt needle plate 108 up and turn it... 1069 as shown in the hook raceway now and then, as instructed on page 25. Clean the machine feed and the parts in the vicinity of the accessory box and insert it requires no maintenance. Let...
.... Push it up at the back (N> and take it out (0). Take the edge guide out of the sewing hook with the edge guide and hold it toward 0. The light bulb can now be exchanged. Insert the ...so that its original position and pull out the edge guide. Changing the light bulb Switch off the machine and pull out the power cord plug. Cleaning and oiling Tilt needle plate 108 up and turn it... 1069 as shown in the hook raceway now and then, as instructed on page 25. Clean the machine feed and the parts in the vicinity of the accessory box and insert it requires no maintenance. Let...
Owner's Manual
Page 27
....aslledetduehqdgeierautr.efaarpTqsNroncluut.amderarceIrnrnewttyatsefudotkeurhrrruesnttiereuv.iaretnr local Pfaff dealer. Some safety rules a) Be careful to use only a 15-watt light bulb in the sewing lamp. 4 N 23 c) Be sure to avoid finger injuries by the needle when sewing. b) Make sure you unplug the power cord whenever you have to leave the machine or want to clean it...
....aslledetduehqdgeierautr.efaarpTqsNroncluut.amderarceIrnrnewttyatsefudotkeurhrrruesnttiereuv.iaretnr local Pfaff dealer. Some safety rules a) Be careful to use only a 15-watt light bulb in the sewing lamp. 4 N 23 c) Be sure to avoid finger injuries by the needle when sewing. b) Make sure you unplug the power cord whenever you have to leave the machine or want to clean it...
Owner's Manual
Page 29
.... Remedy: Cause: 5. Roiel minotovehtohorkeardaceenwdasy.and put a drop of accumulated feed dog. between Feed dog dropped. (Drop-feed or not at right.) 6. The sewing lamp lights up, but the machine is at tooth control all Remove needle Flick drop-feed plate and control to clean out the left (to and dis the right...
.... Remedy: Cause: 5. Roiel minotovehtohorkeardaceenwdasy.and put a drop of accumulated feed dog. between Feed dog dropped. (Drop-feed or not at right.) 6. The sewing lamp lights up, but the machine is at tooth control all Remove needle Flick drop-feed plate and control to clean out the left (to and dis the right...


