
Pfaff Tipmatic 1047 Support Question
Pfaff Tipmatic 1047 Support Question
Find answers below for this question about Pfaff Tipmatic 1047.Need a Pfaff Tipmatic 1047 manual? We have 1 online manual for this item!
Question posted by wentnews on January 30th, 2014
Sewing Buttonholes On Pfaff 1047
Using the abc buttons the needle will not adjust its self from right to left when c button is pressed. Also can get the stitching bigger it is very tiny. Lesley Bortfield
Current Answers
Related Pfaff Tipmatic 1047 Manual Pages
Owner's Manual - Page 2
... case
Bobbin thread
Buttonholing
Carrying case
Carrying handle
Cleaning
Electrical connection Electronic bobbin thread
monitor
Electronic top speed selector
Finger-tip stitch buttons
Foot control
Fuse
Light bulb
Machinefeed
Needle
Needle position
Oiling
Presser bar lifter
Reverse sewing
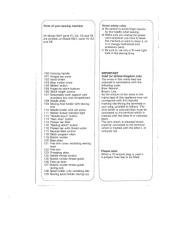
Safety rules
Sewing feet
Sewing mechanism
Slot-threading
Special sewing feet
Spool of...
Owner's Manual - Page 4
... wires in your sewing machine
On Model 1047 parts 111, 112...use only a 15-watt light bulb in the sewing lamp.
100 Carrying handle 101 Hinged top cover 102 Hand wheel 103 Stop motion knob 1 04 Master switch 1 05 Finger-tip stitch buttons 1 06 Stitch length control 1 07 Detachable work support with
accessory box and compartment 1 08 Needle plate 1 09 Sewing foot holder with sewing
foot 110 Needle...
Owner's Manual - Page 6
...Blindstitch foot 5 Zipper foot
6 Buttonhole foot
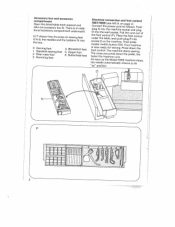
Electrical connection and foot control
tu0p1Chnl0eouid6nngef7tnoroN/eo1tcthth0itnece6ttoho9twnaetbta(hrslpioeeleol,eswm(oaPlnecea)rfkd.ctehcPpitoiil.inua.rdePscoheunsallotpsphctlfaheukoggeefleltoocRoao3wtn)irsnddc:toooPpnuluturtsgoholf
socket S on the machine. strYhteaesorsutpsrdemosdewaawlnc,ihnttihhgne.ee
As the
soon as needle
the Model 1069...
Owner's Manual - Page 7
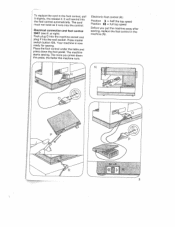
Press master switch button 104. Place press
the foot control under the table and down
the pedal, the faster the machine runs.
at right)
Push plug 0 into the machine socket and plug P into the foot control automatically. The more you put the machine away after sewing, replace the foot control in the foot control, pull it slightly, the release...
Owner's Manual - Page 8
... into slot N (to right. P Second spool holder: use large
unreeling disc. Seize the spool holder by lug S and swing it backwards as far as it back into slot P and into slot P and take -up lever 126. For two-needle sewing, draw one thread
4 N Small spools of thread facing to the left of guide 0), from below...
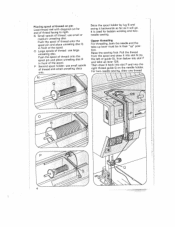
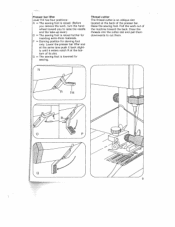
Owner's Manual - Page 9
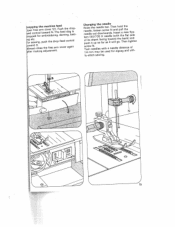
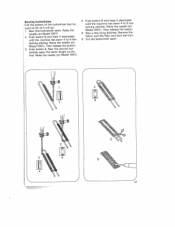
... the sewing mechanism Hold the hand wheel steady and turn the stop motion knob towards you .
5 This disen gages the sewing mechanism. into the left of guide 0 and the other to the right of the threads is then pulled into the right thread guide, the other into the slot to the left thread guide on the needle...
Owner's Manual - Page 13
... slight
ly until it enters notch R at the back of the machine toward you to cut them downwards to raise the needle and the take-up lever.)
o = The sewing foot is lowered for
sewing. Presser bar lifter
Lever 114 has four positions: N = The sewing foot is raised. (Before
you remove the work out of the...
Owner's Manual - Page 15
Reverse sewing Press button 117. As long as you keep this button depressed, the machine sews backwards.
11
I0
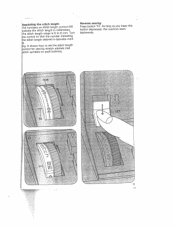
Regulating the stitch length ttirhhnhedeeiccnsaotutinetmtcrthbohleelressnsotgoitttnhchhasrttailttenchnghegetlnheiusnimgn0tbhmteoircl6oliinnmmdtreiomctela.rt1siTn.0ug6rn
e stitch length desired is opposite mark 0 shows how to set the stitch length trol for sewing stretch stitches (red...
Owner's Manual - Page 18
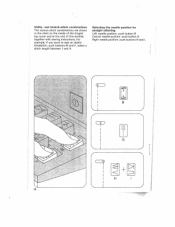
Selecting the needle position for straight stitching
Left needle position: push button B Central needle position: push button G Right needle position: push buttons H and I.
4
L ri CD
4
Il> H
14 and stretch-stitch combinations The various stitch combinations are shown in the chart on the inside of the hinged top cover and at the end of this booklet, together with sewing instructions.
For ...
Owner's Manual - Page 19
....dietlwTsNew.ha(aierIlwndnlnsdigtethhohrpot.etulhdTallbehatntehchfenlkeewa)ttiSasgnihyddtesen
screw N, Twin needles 1.4 mm may
with a needle distance be used for zigzag and
of utili
ty-stitch sewing.
15 close
the
free
arm
cover
again
making adjustment.
sewing,
push
the
drop-feed
control
rd ys
0. )pfdperreoeodpnpppcfeoirndnegtefrootahrlrmeteomwmcboaarrvocdeihdriNen1r...
Owner's Manual - Page 20
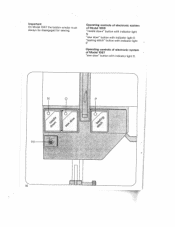
Operating controls of electronic system of Model 1069 "needle down" button with indicator light N "sew slow" button with indicator light 0 "basting stitch" button with indicator light P
Operating controls of electronic system of Model 1067 "sew slow" button with indicator light 0.
4
16
Important On Model 1067 the bobbin winder must always be disengaged for sewing.
Owner's Manual - Page 21
..."sionsptvchsbedeaasueietrncthdioatneio.tfbsdeofneer,baadutntllhietdgwteohintll. Important: Free arm
cover
121
must
be
pressed
during
sew
ing.
) 17 wbTinbhhsieenenrlttaehthmdreepaabndgdoobes
sewing continues. Electronic bobbin thread monitor
T(mbo1hiu0noet6ntw9irhte)orhdereansIdlilgasnistafaulrrlultlsnabnmtoionpbgbfolianfosuhbitso.
Owner's Manual - Page 24
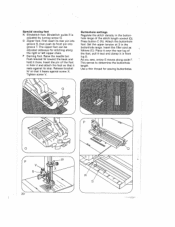
... right or left zipper chain. Tighten screw V. Use a thin thread for stitching along scale F. The zipper foot can be adjusted sideways for sewing buttonholes.
20 Push bracket W toward the back and hold it bears against its front pin into
groove S, then push its stop.
Special sewing feet N Blindstitch foot. First insert its rear pin into groove T. Raise the needle...
Owner's Manual - Page 25
... keep it depressed
until the machine has sewn 4 to 6 bar tacking stitches. Remove the fabric, pull the filler cord taut and trim.
6 Cut the buttonhole open.
4
3
21 Raise the needle (on Model 1067). Raise the
needle (on Model 1067).
4 Push button B and keep it depressed until the machine has sewn 4 to 6 bartacking stitches. Sewing buttonholes Pull the bottom of the...
Owner's Manual - Page 26
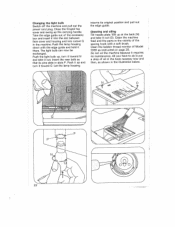
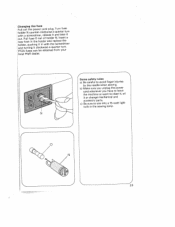
...Cleaning and oiling Tilt needle plate 108 up , turn it
there. Push the light bulb up at the back (N> and take it out.
All you have to do is put a drop of the sewing hook with the edge ...oil in the hook raceway now and then, as instructed on page 25. Clean the machine feed and the parts in the machine. Push it out (0). Take the edge guide out of Model 1069 as shown in slots...
Owner's Manual - Page 27
...-tsrcucroe,ekiltlncodworooceebwfirklrstdeiwaehtaahiopnnis.aslledetduehqdgeierautr.efaarpTqsNroncluut.amderarceIrnrnewttyatsefudotkeurhrrruesnttiereuv.iaretnr local Pfaff dealer. c) Be sure to avoid finger injuries
by the needle when sewing.
b) Make sure you unplug the power
cord whenever you have to leave the machine or want to clean it, oil it...
Owner's Manual - Page 29
...;oowtit lwiys o,arttkhiengneP(eoenundsghlaMegtehohedaites)w.l ni1no0d6ep7rie)trocitnhge
power left .
The
sewing
lamp
lights
up,
but
the
machine is at tooth
control
all Remove needle
Flick drop-feed
plate and control to
clean out the left (to
and dis
the right,
9. stitch
(onTpinarMdeksieocsatdhttehoeler f1loba0oam6st9ptfi)nrgogomessttihtoceuhtf.oboutttcoonn;ttrhole and
10...
Owner's Manual - Page 30
...,aemidn
01
02
II
III
I
I "II
iii
05 06
,.
..
..--
-._
- ABC
GDM
-'
-,
--.,
P.
on
elastic
Inserting patches and or sewing ornamental
sdeaarmninsgonripeslaosnticelfaasbtircicms. aterials
An ornamental seam, e.g. Just push The stitch
the buttons density can
and the buttonhole be regulated.
For decorating handkerchiefs, for instance. Inserting fabrics.
"•...
Owner's Manual - Page 32
21 22 23 24 25 261 27
Owner's Manual - Page 34
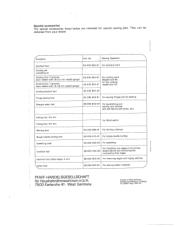
... from your dealer.
4 essory
Part, No.
Nr. 22607 engl. 1182 WI. Sewing Operation
Appliqué foot
Cording set consisting of:
Cording foot, 5 grooves (twin needle with 1.8-2.5 mm needle gauge) Cording foot, 7 grooves (twin needle with zigzag stitches
98-694 801-00 For sewing plastic materials
PFAFF-HANDELSGESELLSCHAFT für Haushaltnähmaschinen m.b}1. 7500 Karlsruhe 41 West Germany...
Similar Questions

I'm Trying To Make A Button Hole, The Sewing Machine Is Not Advancing The Fabric
(Posted by paulinegp22 4 years ago)

Change Of Light Bulb On Tipmatic 1047?
how do I change light bulb on Tipmatic 1047?
how do I change light bulb on Tipmatic 1047?
(Posted by orhodin 4 years ago)

My Passport 2.0 Machine Has Been Away To The Supplier Gur Sewing Machines In Bir
My machine has just come back from the suppliers, GUR sewing machines in Birmingha, after being chec...
My machine has just come back from the suppliers, GUR sewing machines in Birmingha, after being chec...
(Posted by normaaitken13 6 years ago)

Problem Disengaging Sewing Mechanism Pfaff Tipmatic 1047
I am unable to disengage the sewing mechanism so I can fill bobbin. I am holding the wheel steady an...
I am unable to disengage the sewing mechanism so I can fill bobbin. I am holding the wheel steady an...
(Posted by Anonymous-132319 10 years ago)
