
Owner's Manual
Page 2
I Fold this page out Index Bobbin Bobbin case Bobbin thread Buttonholing Carrying case Carrying handle Cleaning Electrical connection Finger-tip stitch Finger-tip stitch Finger-tip stitch Finger-tip stitch Foot control buttons, buttons, buttons, buttons, Models 1014 Model 1019 Model 1035 Model 1037 and 1015 Light bulb Machine feed Needle Needle position Oiling Presser...
I Fold this page out Index Bobbin Bobbin case Bobbin thread Buttonholing Carrying case Carrying handle Cleaning Electrical connection Finger-tip stitch Finger-tip stitch Finger-tip stitch Finger-tip stitch Foot control buttons, buttons, buttons, buttons, Models 1014 Model 1019 Model 1035 Model 1037 and 1015 Light bulb Machine feed Needle Needle position Oiling Presser...
Owner's Manual
Page 4
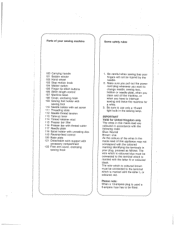
Make sure you pull out the power cord plug whenever you want to change needle, sewing foot, bobbin or needle plate, when you clean and oil the machine, or when you have to use only a 15-watt light bulb in the sewing lamp. ... which is marked with the coloured marking identifying the terminals in the mains lead of your sewing machine 4 Some safety rules 100 Carrying handle 101 Bobbin winder 102 Hand wheel 103 Stop motion knob 104 Master switch 105 Finger tip stitch buttons 106 Stitch length control 107 Machine base 108 Cover...
Make sure you pull out the power cord plug whenever you want to change needle, sewing foot, bobbin or needle plate, when you clean and oil the machine, or when you have to use only a 15-watt light bulb in the sewing lamp. ... which is marked with the coloured marking identifying the terminals in the mains lead of your sewing machine 4 Some safety rules 100 Carrying handle 101 Bobbin winder 102 Hand wheel 103 Stop motion knob 104 Master switch 105 Finger tip stitch buttons 106 Stitch length control 107 Machine base 108 Cover...

Owner's Manual
Page 9
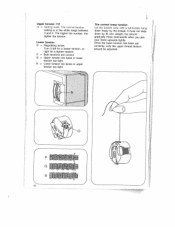
One of the threads is then pulled into the left thread guide on the needle holder. Disengaging the sewing mechanism Before you . Threading the needle Thread the needle from you. 5 Hold the hand wheel steady and turn the stop motion knob toward you start winding the bobbin, disen gage the sewing mechanism. I other into the right thread guide, the other to back. After bobbin winding, tighten the knob again by turning it away from front to the righE of the guide.
One of the threads is then pulled into the left thread guide on the needle holder. Disengaging the sewing mechanism Before you . Threading the needle Thread the needle from you. 5 Hold the hand wheel steady and turn the stop motion knob toward you start winding the bobbin, disen gage the sewing mechanism. I other into the right thread guide, the other to back. After bobbin winding, tighten the knob again by turning it away from front to the righE of the guide.
Owner's Manual
Page 10
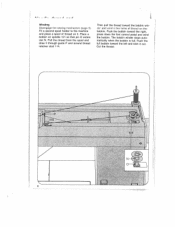
...LI_.._1 __.J Winding Disengage the sewing mechanism (page 5). Fit a second spool holder to the machine and place a spool of thread on the bobbin. Push the bobbin toward the bobbin win der and wind a few turns of thread on spindle 101 so that pin 0 enters slot N. Then pull the thread toward the right..., press down the foot control pedal and wind the bobbin. RI__II... Push the full bobbin toward the left and take it through guide P and around thread retainer stud 114. Cut the thread. 4 N 6 The...
...LI_.._1 __.J Winding Disengage the sewing mechanism (page 5). Fit a second spool holder to the machine and place a spool of thread on the bobbin. Push the bobbin toward the bobbin win der and wind a few turns of thread on spindle 101 so that pin 0 enters slot N. Then pull the thread toward the right..., press down the foot control pedal and wind the bobbin. RI__II... Push the full bobbin toward the left and take it through guide P and around thread retainer stud 114. Cut the thread. 4 N 6 The...
Owner's Manual
Page 11
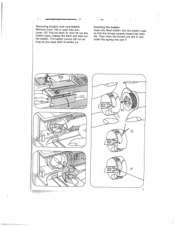
Then draw the thread into slot 0 and under the spring into the bobbin case so that the thread unreels toward the back (N). The bobbin cannot fall out as long as you keep latch N pulled out. Inserting the bobbin Insert the filled bobbin into eye P. 7 Removing bobbin case and bobbin Remove cover 108 or open free arm cover 122. Pull out latch N, then lift out the bobbin case, release the latch and take out the bobbin.
Then draw the thread into slot 0 and under the spring into the bobbin case so that the thread unreels toward the back (N). The bobbin cannot fall out as long as you keep latch N pulled out. Inserting the bobbin Insert the filled bobbin into eye P. 7 Removing bobbin case and bobbin Remove cover 108 or open free arm cover 122. Pull out latch N, then lift out the bobbin case, release the latch and take out the bobbin.

Owner's Manual
Page 12
Turn hand wheel 102 toward the left and back under the sewing foot. 8 Release the latch. Replace cover 108 or close free arm cover 122. Pull the bobbin thread out of the needle hole and lay both threads toward you until the needle moves down and up again and the take-up lever is up. Stud 0 and latch P must point upwards. Inserting the bobbin case Pull up the bobbin thread Hold the needle thread a little taut. Drawing up latch P and push the bobbin case onto stud 0 as far as it will go. Cutout N must be flush.
Turn hand wheel 102 toward the left and back under the sewing foot. 8 Release the latch. Replace cover 108 or close free arm cover 122. Pull the bobbin thread out of the needle hole and lay both threads toward you until the needle moves down and up again and the take-up lever is up. Stud 0 and latch P must point upwards. Inserting the bobbin case Pull up the bobbin thread Hold the needle thread a little taut. Drawing up latch P and push the bobbin case onto stud 0 as far as it will go. Cutout N must be flush.
Owner's Manual
Page 14
... in the white range between 3 and 5. The higher the number, the tighter the tension. P = Both tensions are correct. The correct lower tension Let the bobbin case with a full bobbin hang down by the thread. Q-' -'I . Lower tension O = Regulating screw. It must not slide down freely by its own weight, but should be adjusted...
... in the white range between 3 and 5. The higher the number, the tighter the tension. P = Both tensions are correct. The correct lower tension Let the bobbin case with a full bobbin hang down by the thread. Q-' -'I . Lower tension O = Regulating screw. It must not slide down freely by its own weight, but should be adjusted...
Owner's Manual
Page 29
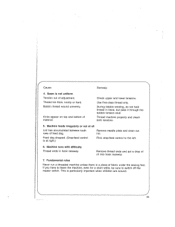
... in hook raceway. Remove needle plate and clean out lint. Machine runs with difficulty Thread ends in hand, but pass it through the bobbin tension stud. This is not uniform Tension out of adjustment. Kinks appear on top and bottom of oil into hook raceway. 7. Thread ...Remove thread ends and put a drop of material, Check upper and lower tensions. Seam is particularly important when children are around. 4 Cause: Remedy: 4. Bobbin thread wound unevenly. Feed dog dropped. (Drop-feed control is a piece of feed dog. If you have to leave the machine, even for a short...
... in hook raceway. Remove needle plate and clean out lint. Machine runs with difficulty Thread ends in hand, but pass it through the bobbin tension stud. This is not uniform Tension out of adjustment. Kinks appear on top and bottom of oil into hook raceway. 7. Thread ...Remove thread ends and put a drop of material, Check upper and lower tensions. Seam is particularly important when children are around. 4 Cause: Remedy: 4. Bobbin thread wound unevenly. Feed dog dropped. (Drop-feed control is a piece of feed dog. If you have to leave the machine, even for a short...


