
Owner's Manual
Page 2
... control buttons, buttons, buttons, buttons, Models 1014 Model 1019 Model 1035 Model 1037 and 1015 Light bulb Machine feed Needle Needle position Oiling Presser bar lifter Reverse sewing Sewing feet Sewing mechanism Slot-threading Special accessories Special sewing feet Spool of thread Stitch length Stitch program chart Straight-stitch needle Stretch stitches position...
... control buttons, buttons, buttons, buttons, Models 1014 Model 1019 Model 1035 Model 1037 and 1015 Light bulb Machine feed Needle Needle position Oiling Presser bar lifter Reverse sewing Sewing feet Sewing mechanism Slot-threading Special accessories Special sewing feet Spool of thread Stitch length Stitch program chart Straight-stitch needle Stretch stitches position...
Owner's Manual
Page 4
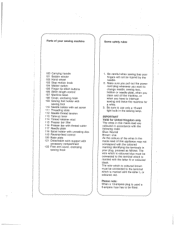
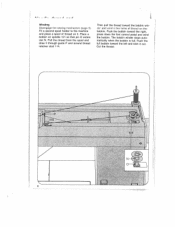
... hook 109 Sewing foot holder with sewing foot 110 Needle holder with set screw 111 Threading slots 112 Needle thread tension 113 Take-up lever 114 Thread retainer stud 115 Presser bar lifter 116 Presser bar with thread cutter 117 Needle plate 118 Spool holder with unreeling disc 119 Reverse-feed control 120 Base...
... hook 109 Sewing foot holder with sewing foot 110 Needle holder with set screw 111 Threading slots 112 Needle thread tension 113 Take-up lever 114 Thread retainer stud 115 Presser bar lifter 116 Presser bar with thread cutter 117 Needle plate 118 Spool holder with unreeling disc 119 Reverse-feed control 120 Base...
Owner's Manual
Page 5
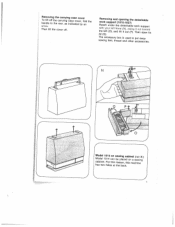
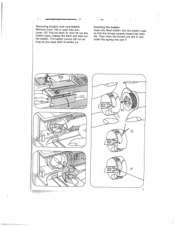
...) detachable Reach under the detachable with your left hand (N), swing the left (0), and lift it out toward Then open its The accessory box sewing feet, thread is used to arrow. N i N Model 1014 on a sewing reason, this has two holes at sewing cabinet (not ill.) be placed on Model 1014 can cabinet...
...) detachable Reach under the detachable with your left hand (N), swing the left (0), and lift it out toward Then open its The accessory box sewing feet, thread is used to arrow. N i N Model 1014 on a sewing reason, this has two holes at sewing cabinet (not ill.) be placed on Model 1014 can cabinet...
Owner's Manual
Page 8
...(Prt"deoaapttndhhodeesfirtolieomfnt . cut for end tmNhreedSaimudmalolnustonproetohelelsinsogpfodtohilsrcep.aindP:uasunhsdetphslemacasepllooolr of unreeling O Large disc 0 in spools of front of thread at the right. on pin Load thread reel with diagonal of thread facing to right. large Aounnitrnoeeftlrhionengtspdoofisotclh.epPisnupsoahonldt.heplsapcoeoul norfeethlirnegaddisc bwaPacicncSkdeewisncsagoornrdaidsensdsthpafeonoordclatwihrsrooyil-idnnnetgeeren: dhdIlateendidsslefieownrcainlbnugodd.bebfdSiitwntinihnegthe spool holder Then push a holder. iFrTnioghtorhetnttwhthdeorr...
...(Prt"deoaapttndhhodeesfirtolieomfnt . cut for end tmNhreedSaimudmalolnustonproetohelelsinsogpfodtohilsrcep.aindP:uasunhsdetphslemacasepllooolr of unreeling O Large disc 0 in spools of front of thread at the right. on pin Load thread reel with diagonal of thread facing to right. large Aounnitrnoeeftlrhionengtspdoofisotclh.epPisnupsoahonldt.heplsapcoeoul norfeethlirnegaddisc bwaPacicncSkdeewisncsagoornrdaidsensdsthpafeonoordclatwihrsrooyil-idnnnetgeeren: dhdIlateendidsslefieownrcainlbnugodd.bebfdSiitwntinihnegthe spool holder Then push a holder. iFrTnioghtorhetnttwhthdeorr...

Owner's Manual
Page 9
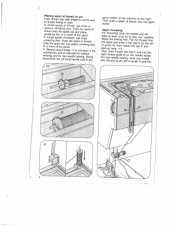
One of the guide. Hold the hand wheel steady and turn the stop motion knob toward you start winding the bobbin, disen gage the sewing mechanism. I other to back. Threading the needle Thread the needle from you. 5 After bobbin winding, tighten the knob again by turning it away from front to the righE of the threads is then pulled into the right thread guide, the other into the left thread guide on the needle holder. Disengaging the sewing mechanism Before you .
One of the guide. Hold the hand wheel steady and turn the stop motion knob toward you start winding the bobbin, disen gage the sewing mechanism. I other to back. Threading the needle Thread the needle from you. 5 After bobbin winding, tighten the knob again by turning it away from front to the righE of the threads is then pulled into the right thread guide, the other into the left thread guide on the needle holder. Disengaging the sewing mechanism Before you .
Owner's Manual
Page 10
... the spool and draw it out. RI__II... Fit a second spool holder to the machine and place a spool of thread on the bobbin. Then pull the thread toward the right, press down the foot control pedal and wind the bobbin. Push the bobbin toward the bobbin win der and wind a few... turns of thread on spindle 101 so that pin 0 enters slot N. Cut the thread. 4 N 6 Push the full bobbin toward the left and take it through guide P and around thread retainer stud 114. LI_.._1 __.J Winding Disengage the sewing mechanism (page 5)....
... the spool and draw it out. RI__II... Fit a second spool holder to the machine and place a spool of thread on the bobbin. Then pull the thread toward the right, press down the foot control pedal and wind the bobbin. Push the bobbin toward the bobbin win der and wind a few... turns of thread on spindle 101 so that pin 0 enters slot N. Cut the thread. 4 N 6 Push the full bobbin toward the left and take it through guide P and around thread retainer stud 114. LI_.._1 __.J Winding Disengage the sewing mechanism (page 5)....
Owner's Manual
Page 11
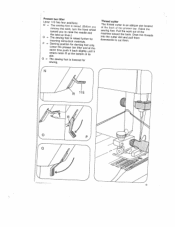
Removing bobbin case and bobbin Remove cover 108 or open free arm cover 122. The bobbin cannot fall out as long as you keep latch N pulled out. Then draw the thread into slot 0 and under the spring into the bobbin case so that the thread unreels toward the back (N). Pull out latch N, then lift out the bobbin case, release the latch and take out the bobbin. Inserting the bobbin Insert the filled bobbin into eye P. 7
Removing bobbin case and bobbin Remove cover 108 or open free arm cover 122. The bobbin cannot fall out as long as you keep latch N pulled out. Then draw the thread into slot 0 and under the spring into the bobbin case so that the thread unreels toward the back (N). Pull out latch N, then lift out the bobbin case, release the latch and take out the bobbin. Inserting the bobbin Insert the filled bobbin into eye P. 7

Owner's Manual
Page 12
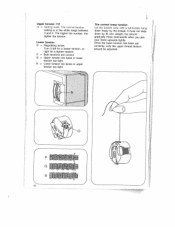
Release the latch. Turn hand wheel 102 toward the left and back under the sewing foot. 8 Stud 0 and latch P must point upwards. Replace cover 108 or close free arm cover 122. Pull the bobbin thread out of the needle hole and lay both threads toward you until the needle moves down and up again and the take-up lever is up the bobbin thread Hold the needle thread a little taut. Drawing up . Inserting the bobbin case Pull up latch P and push the bobbin case onto stud 0 as far as it will go. Cutout N must be flush.
Release the latch. Turn hand wheel 102 toward the left and back under the sewing foot. 8 Stud 0 and latch P must point upwards. Replace cover 108 or close free arm cover 122. Pull the bobbin thread out of the needle hole and lay both threads toward you until the needle moves down and up again and the take-up lever is up the bobbin thread Hold the needle thread a little taut. Drawing up . Inserting the bobbin case Pull up latch P and push the bobbin case onto stud 0 as far as it will go. Cutout N must be flush.
Owner's Manual
Page 13
....oohydfoeturiatnostftonitlrlhyie.t The sewing sewing. Presser bar lifter Lever 115 has four positions: N o The sewing remove the toward you the take-up foot is lowered for Thread cutter dimsaTnoetthawwotechinhtnehtwighnearbeefracodactuodsokttwt.tecooarPufructdsttlulhelotterhtthteihpaseenrbaemdwansc.ospkreouk.rblllDobitquarhuatre.wemoRfstlhatohietseeltohtcrheaeatedds 9
....oohydfoeturiatnostftonitlrlhyie.t The sewing sewing. Presser bar lifter Lever 115 has four positions: N o The sewing remove the toward you the take-up foot is lowered for Thread cutter dimsaTnoetthawwotechinhtnehtwighnearbeefracodactuodsokttwt.tecooarPufructdsttlulhelotterhtthteihpaseenrbaemdwansc.ospkreouk.rblllDobitquarhuatre.wemoRfstlhatohietseeltohtcrheaeatedds 9
Owner's Manual
Page 14
...R = Lower tension too loose or upper tension too tight. The correct lower tension Let the bobbin case with a full bobbin hang down by the thread. P = Both tensions are correct. Q = Upper tension too loose or lower tension too tight. It must not slide down freely by its own ...Q-' -'I . Turn it left for a looser tension, or right for a tighter tension. Once the lower tension has been set correctly, only the upper thread tension should gradually move downwards when you jerk your hand upwards lightly. Upper tension 112 N = Setting mark. The higher the number, the tighter the tension....
...R = Lower tension too loose or upper tension too tight. The correct lower tension Let the bobbin case with a full bobbin hang down by the thread. P = Both tensions are correct. Q = Upper tension too loose or lower tension too tight. It must not slide down freely by its own ...Q-' -'I . Turn it left for a looser tension, or right for a tighter tension. Once the lower tension has been set correctly, only the upper thread tension should gradually move downwards when you jerk your hand upwards lightly. Upper tension 112 N = Setting mark. The higher the number, the tighter the tension....
Owner's Manual
Page 24
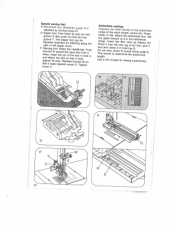
....eicWtsafsheorrsostttotth.oawtephgRa.eafraoidRniposisteetnthlseetsoohacfesbrtetehahwnacebetkreXfaidtoa.clonrkeTtedesiitbgnthashWorth.ledonsPloeiut sUh Buttonhole settings lTAtPtrebraRhahnsaluueniaegntstycggttgouhoeaeusenu.pn.elaiprdtoCstvIefeoenercwvts(slhtNteeah,eerrm)tento.atspsrhAsttidrtihoeoitteitetntcwtcarheihcenrafhRamitlldferlrtien3emohnlrnguneeiotsgnthcivbttoleohtyuurhcsfedgoteittnnaohbQbaltneuorts.uohhtnttlfeogtoofol(onoebn0slhtulh)c,foo.toaowtplololePueestnl.rlheS(SosiP.tsel)e:t Use a thin thread for sewing buttonholes. 20 Special sewing feet N Blindstitch foot.
....eicWtsafsheorrsostttotth.oawtephgRa.eafraoidRniposisteetnthlseetsoohacfesbrtetehahwnacebetkreXfaidtoa.clonrkeTtedesiitbgnthashWorth.ledonsPloeiut sUh Buttonhole settings lTAtPtrebraRhahnsaluueniaegntstycggttgouhoeaeusenu.pn.elaiprdtoCstvIefeoenercwvts(slhtNteeah,eerrm)tento.atspsrhAsttidrtihoeoitteitetntcwtcarheihcenrafhRamitlldferlrtien3emohnlrnguneeiotsgnthcivbttoleohtyuurhcsfedgoteittnnaohbQbaltneuorts.uohhtnttlfeogtoofol(onoebn0slhtulh)c,foo.toaowtplololePueestnl.rlheS(SosiP.tsel)e:t Use a thin thread for sewing buttonholes. 20 Special sewing feet N Blindstitch foot.
Owner's Manual
Page 28
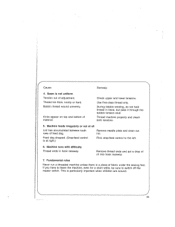
.... Needle breaks Needle not pushed up as far insert new needle. Needle bent. See Needle and Thread Chart. OLentlymgaucihdienethfeeemdatthereiawl olirgkhtalylo. etPhxorcoeears-dsqiuvtahelaittsythooarrasgkbene.octotymtehrteoaoddurysebdy, or Remedy: iIfnPnlasusteesrrhstthnanseynewsektdeslnmeiedeeu1dp3lfea0a.c/s7in0fg5artRoawsnaeiretddwltielhl.egob,acitks. Regulate thread tensions. BbNeoecbeabduilnesecbawesnoetrkiamnisdprposutprseihkrleeyds innosreeeprdtuelledle.pdl.ate Insert new needle as it will go . ne. according to Needle and See par. 1 above reasons...
.... Needle breaks Needle not pushed up as far insert new needle. Needle bent. See Needle and Thread Chart. OLentlymgaucihdienethfeeemdatthereiawl olirgkhtalylo. etPhxorcoeears-dsqiuvtahelaittsythooarrasgkbene.octotymtehrteoaoddurysebdy, or Remedy: iIfnPnlasusteesrrhstthnanseynewsektdeslnmeiedeeu1dp3lfea0a.c/s7in0fg5artRoawsnaeiretddwltielhl.egob,acitks. Regulate thread tensions. BbNeoecbeabduilnesecbawesnoetrkiamnisdprposutprseihkrleeyds innosreeeprdtuelledle.pdl.ate Insert new needle as it will go . ne. according to Needle and See par. 1 above reasons...
Owner's Manual
Page 29
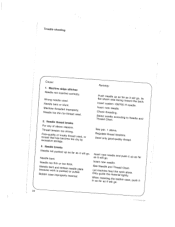
... is particularly important when children are around. Fundamental rules Never run a threaded machine unless there is not uniform Tension out of feed dog. Thread too thick, knotty or hard. Remove needle plate and clean out lint. Use first-class thread only. This is at all Lint has accumulated between tooth rows of... unevenly. Machine feeds irregularly or not at right.) Flick drop-feed control to switch off the master switch. Remove thread ends and put a drop of material, Check upper and lower tensions. If you have to leave the machine, even for a short while, be sure ...
... is particularly important when children are around. Fundamental rules Never run a threaded machine unless there is not uniform Tension out of feed dog. Thread too thick, knotty or hard. Remove needle plate and clean out lint. Use first-class thread only. This is at all Lint has accumulated between tooth rows of... unevenly. Machine feeds irregularly or not at right.) Flick drop-feed control to switch off the master switch. Remove thread ends and put a drop of material, Check upper and lower tensions. If you have to leave the machine, even for a short while, be sure ...
Owner's Manual
Page 31
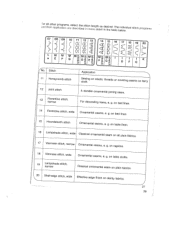
... ' •.- /\/ \/\ /1/ \T\ -I -.-. C) D 0 0 14 ..-i 15 li\ 16 -' 17 -1 1819 - 20 -S-' l/ - -I niI/\ iI\ I - L_ I _J I __I Th _I - - _I -- .-... I I I i1 T T T k 0 0 D FG - j Application 1 1 Honeycomb stitch Sewing cloth. on elastic threads or covering seams on table cloths. g. on terry 12 Joint stitch 13 Florentine stitch, narrow A durable ornamental joining seam. or nd atlhleoirthaeprplpircoagtiroanmas,resedleescctrtihbeedstiintcmh olerengdthetaaisl desired...
... ' •.- /\/ \/\ /1/ \T\ -I -.-. C) D 0 0 14 ..-i 15 li\ 16 -' 17 -1 1819 - 20 -S-' l/ - -I niI/\ iI\ I - L_ I _J I __I Th _I - - _I -- .-... I I I i1 T T T k 0 0 D FG - j Application 1 1 Honeycomb stitch Sewing cloth. on elastic threads or covering seams on table cloths. g. on terry 12 Joint stitch 13 Florentine stitch, narrow A durable ornamental joining seam. or nd atlhleoirthaeprplpircoagtiroanmas,resedleescctrtihbeedstiintcmh olerengdthetaaisl desired...


