
Owner's Manual
Page 2
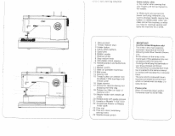
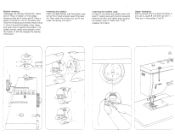
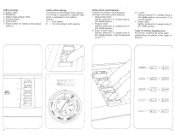
... out the power cord plug whenever you want to change needle, sewing foot, bobbin or needle plate, when you clean and oil the machine, or when you have to interrupt sewing and leave the machine for a while. 1 Take-up lever 2 Thread retainer stud 3 Eraser button 4 Utility-stitch buttons 5 Spool pins 6 Bobbin winder 7 Balance wheel 8 Stop motion knob 9 Ultra-Matic stitch selector 1 0 Needle position and buttonhole control 11 Master switch 1 2 Base (of portable machines) 1 3 Bed cover 14 Sewing foot 1 5 Thread cutter (on presser bar) On Model 1 209 dual feed with thread cutter 1 6 Upper tension...
... out the power cord plug whenever you want to change needle, sewing foot, bobbin or needle plate, when you clean and oil the machine, or when you have to interrupt sewing and leave the machine for a while. 1 Take-up lever 2 Thread retainer stud 3 Eraser button 4 Utility-stitch buttons 5 Spool pins 6 Bobbin winder 7 Balance wheel 8 Stop motion knob 9 Ultra-Matic stitch selector 1 0 Needle position and buttonhole control 11 Master switch 1 2 Base (of portable machines) 1 3 Bed cover 14 Sewing foot 1 5 Thread cutter (on presser bar) On Model 1 209 dual feed with thread cutter 1 6 Upper tension...
Owner's Manual
Page 3
...Foot control Removing bobbin case and bobbin Disengaging the sewing mechanism Bobbin winding Inserting the bobbin Inserting the bobbin case Upper threading Threading the needle 1196-1199 Drawing up the bobbin thread Attaching the work support Thread cutter Ultra-Matic stitch selector (9) Straight stitch Zigzag stitch Needle position Reverse sewing and dropping the feed dog Presser bar lifter Dual feed. 1209 Thread tensions Changing the needle Changing the sewing foot Utility stitches Utility-stitch combinations Sewing buttonholes Sewing feet Special accessories Changing the light bulb Cleaning...
...Foot control Removing bobbin case and bobbin Disengaging the sewing mechanism Bobbin winding Inserting the bobbin Inserting the bobbin case Upper threading Threading the needle 1196-1199 Drawing up the bobbin thread Attaching the work support Thread cutter Ultra-Matic stitch selector (9) Straight stitch Zigzag stitch Needle position Reverse sewing and dropping the feed dog Presser bar lifter Dual feed. 1209 Thread tensions Changing the needle Changing the sewing foot Utility stitches Utility-stitch combinations Sewing buttonholes Sewing feet Special accessories Changing the light bulb Cleaning...
Owner's Manual
Page 4
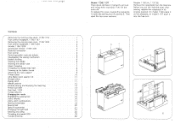
Jll.C shows how the accessories are kept in a drawer. Removing the carrying case cover, Model 1199/1209 On the Compact models the carrying case cover is not locked in position by the arrow in ill. Accessories drawer, Model 1199/1209 On the Compact models the accessories are to be easily lifted off. Foot control receptacle Models 11 99/1209 Remove the receptacle from the machine. Handle, Model 1199/1209 The handle can be folded down...
Jll.C shows how the accessories are kept in a drawer. Removing the carrying case cover, Model 1199/1209 On the Compact models the carrying case cover is not locked in position by the arrow in ill. Accessories drawer, Model 1199/1209 On the Compact models the accessories are to be easily lifted off. Foot control receptacle Models 11 99/1209 Remove the receptacle from the machine. Handle, Model 1199/1209 The handle can be folded down...
Owner's Manual
Page 5
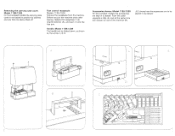
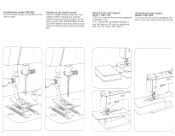
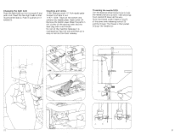
... . The machine starts sewing. Press down its pedal. Electrical connection Push plug A into the machine socket and plug B into the wall socket. Lift latch K, pull Out the bobbin case, release the latch and take out the bobbin. Foot control Place the foot control under the table. Remove bed cover 1 3 or open free arm cap 24. Disengaging the sewing mechanism Before you keep latch K raised. After bobbin winding, turn the stop motion knob...
... . The machine starts sewing. Press down its pedal. Electrical connection Push plug A into the machine socket and plug B into the wall socket. Lift latch K, pull Out the bobbin case, release the latch and take out the bobbin. Foot control Place the foot control under the table. Remove bed cover 1 3 or open free arm cap 24. Disengaging the sewing mechanism Before you keep latch K raised. After bobbin winding, turn the stop motion knob...
Owner's Manual
Page 6
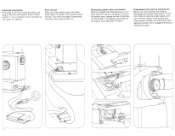
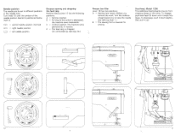
... times, and push lever 6 against the bobbin. Re-engage the sewing mechanism. Inserting the bobbin Insert the filled bobbin into the bobbin case so that pin A enters slot B. Upper threading Pull the thread from the spool and draw it into slot A, guide B and take-up lever 1. Raise pins 5. Release the latch and lightly press against the bobbin case to make sure it around thread retainer stud 2, wind it has snapped into eye C. Bobbin winding Disengage the sewing...
... times, and push lever 6 against the bobbin. Re-engage the sewing mechanism. Inserting the bobbin Insert the filled bobbin into the bobbin case so that pin A enters slot B. Upper threading Pull the thread from the spool and draw it into slot A, guide B and take-up lever 1. Raise pins 5. Release the latch and lightly press against the bobbin case to make sure it around thread retainer stud 2, wind it has snapped into eye C. Bobbin winding Disengage the sewing...
Owner's Manual
Page 7
... 7 toward the left and back under the sewing foot. Pull the bobbin thread out of the needle hole and lay both threads toward you until its guide pins enter the two holes, then lower it, Attaching the work support, Model 1199/1209 Turn over the foot control receptacle and push it over the free arm as far as it over the foot control receptacle and attach it (A). 11 97: Incline the workplate and...
... 7 toward the left and back under the sewing foot. Pull the bobbin thread out of the needle hole and lay both threads toward you until its guide pins enter the two holes, then lower it, Attaching the work support, Model 1199/1209 Turn over the foot control receptacle and push it over the free arm as far as it over the foot control receptacle and attach it (A). 11 97: Incline the workplate and...

Owner's Manual
Page 8
... the sewing foot. Zigzag stitch Setting mark = A Zigzag stitches are sewn in the range from 0 to 4. Thread cutter, Model 1209 The thread cutter is located at the back of the straight or zigzag stitch desired is positioned above mark A. Ultra-Matic stitch selector (9) Turn the outer ring until the symbol of dual feed 1 5. toward the left, the zigzag stitches become increasingly longer. N 11 At the right of the presser bar which serves as a thread cutter. Thread cutter, Models...
... the sewing foot. Zigzag stitch Setting mark = A Zigzag stitches are sewn in the range from 0 to 4. Thread cutter, Model 1209 The thread cutter is located at the back of the straight or zigzag stitch desired is positioned above mark A. Ultra-Matic stitch selector (9) Turn the outer ring until the symbol of dual feed 1 5. toward the left, the zigzag stitches become increasingly longer. N 11 At the right of the presser bar which serves as a thread cutter. Thread cutter, Models...
Owner's Manual
Page 9
...Presser bar lifter Lever 1 8 has two positions: A = Sewing foot raised, (Before you remove the work, turn the balance wheel toward you to different positions in reverse. Needle position The needle can be set to raise the needle and take-up lever 1.) B = The sewing foot is lowered for embroidering, darning, etc.). Dual feed, Model 1209 This additional feed prevents one ply from creeping ahead of the needle position desired is positioned below mark A. = central needle position (normal) = right needle position = left needle position Reverse sewing and dropping the feed dog Reverse...
...Presser bar lifter Lever 1 8 has two positions: A = Sewing foot raised, (Before you remove the work, turn the balance wheel toward you to different positions in reverse. Needle position The needle can be set to raise the needle and take-up lever 1.) B = The sewing foot is lowered for embroidering, darning, etc.). Dual feed, Model 1209 This additional feed prevents one ply from creeping ahead of the needle position desired is positioned below mark A. = central needle position (normal) = right needle position = left needle position Reverse sewing and dropping the feed dog Reverse...
Owner's Manual
Page 10
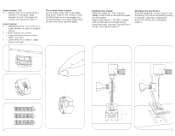
Changing the needle Raise the needle bar. Changing the sewing foot Raise the needle bar. The correct lower tension Let the bobbin case with the flat side of its own weight, but should gradually move downwards when you jerk your hand upwards lightly. Attach the sewing foot and tighten screw A. - Loosen screw A until the sewing foot can be removed by pulling it left for a looser tension, or right for a tighter tension. Lower tension B = Regulating screw. Insert a new System 1 30/705...
Changing the needle Raise the needle bar. Changing the sewing foot Raise the needle bar. The correct lower tension Let the bobbin case with the flat side of its own weight, but should gradually move downwards when you jerk your hand upwards lightly. Attach the sewing foot and tighten screw A. - Loosen screw A until the sewing foot can be removed by pulling it left for a looser tension, or right for a tighter tension. Lower tension B = Regulating screw. Insert a new System 1 30/705...
Owner's Manual
Page 11
Ill Super stretch stitch Setting: buttons C+D, straight stitch 4, left needle position, raise reverse-feed control 17, IV E stitch Setting: buttons B+C, straight stitch 0, left needle position. ____ Utility stitches A Elastic stitch B Blindstitch C Elastic triple straight stitch D Overlock stitch E Cross stitch 3 Eraser button for a specific utility stitch is required for releasing the pushed buttons. I * II 17 II Pullover stitch Setting: buttons B+C, straight stitch 4, left needle position, turn control 1 7 to vertical position. Table of stitches (Supplement) All ...
Ill Super stretch stitch Setting: buttons C+D, straight stitch 4, left needle position, raise reverse-feed control 17, IV E stitch Setting: buttons B+C, straight stitch 0, left needle position. ____ Utility stitches A Elastic stitch B Blindstitch C Elastic triple straight stitch D Overlock stitch E Cross stitch 3 Eraser button for a specific utility stitch is required for releasing the pushed buttons. I * II 17 II Pullover stitch Setting: buttons B+C, straight stitch 4, left needle position, turn control 1 7 to vertical position. Table of stitches (Supplement) All ...
Owner's Manual
Page 13
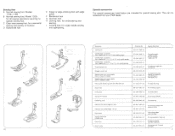
... obtained from your Pfaff dealer. for embroidering and darning. D Buttonhole foot E Zipper or edge-stitching foot with 1 .4-, 1 .6 or 1 .8- for ornamental sewing and sewing on buttons. Sewing feet A Normal sewing foot, Models 1196-1199 O Normal sewing foot, Model 1 209; for special sewing jobs. ccessory Cordvig set Coroing fool, 3 grooves (twin needle with 2.5 or 3.0mm needle gauge) Cording foot. 5 grooves twin needle with round needle hole for free-arm models Needle plate with 1 .8-. 2.0- Needle plate with round needle hole for flatbed models Eoge guide (fastening screw 93-040...
... obtained from your Pfaff dealer. for embroidering and darning. D Buttonhole foot E Zipper or edge-stitching foot with 1 .4-, 1 .6 or 1 .8- for ornamental sewing and sewing on buttons. Sewing feet A Normal sewing foot, Models 1196-1199 O Normal sewing foot, Model 1 209; for special sewing jobs. ccessory Cordvig set Coroing fool, 3 grooves (twin needle with 2.5 or 3.0mm needle gauge) Cording foot. 5 grooves twin needle with round needle hole for free-arm models Needle plate with 1 .8-. 2.0- Needle plate with round needle hole for flatbed models Eoge guide (fastening screw 93-040...
Owner's Manual
Page 14
... maintenance-free, but now and then put a drop of the sewing hook and the feed dog with a soft brush. Clean the parts in the vicinity of oil into the hook raceway. Cleaning and oiling 11 96: Remove cover 1 5. Open cover 24. Remove the bobbin case. Draw the thread under fingers A and B, at the same time releasing control 25 and the thread. Do not oil the machine because it out. 1197-1209: Take out the screws and remove the needle plate. Insert the new light bulb...
... maintenance-free, but now and then put a drop of the sewing hook and the feed dog with a soft brush. Clean the parts in the vicinity of oil into the hook raceway. Cleaning and oiling 11 96: Remove cover 1 5. Open cover 24. Remove the bobbin case. Draw the thread under fingers A and B, at the same time releasing control 25 and the thread. Do not oil the machine because it out. 1197-1209: Take out the screws and remove the needle plate. Insert the new light bulb...
Owner's Manual
Page 15
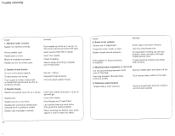
... into hook raceway. Thread tension too strong. Needle bent. Remove thread ends and put a drop of adjustment. Machine threaded improperly. Let machine feed the work is at all Lint has accumulated between tooth Remove needle plate and clean out lint. Needle too thin for thread used . Regulate thread tensions. Insert new needle. Note Needle and Thread Chart. Machine works heavily Thread ends in hand, but pass it will go . Needle too thin or too thick. During bobbin winding, do not hold thread in hook raceway...
... into hook raceway. Thread tension too strong. Needle bent. Remove thread ends and put a drop of adjustment. Machine threaded improperly. Let machine feed the work is at all Lint has accumulated between tooth Remove needle plate and clean out lint. Needle too thin for thread used . Regulate thread tensions. Insert new needle. Note Needle and Thread Chart. Machine works heavily Thread ends in hand, but pass it will go . Needle too thin or too thick. During bobbin winding, do not hold thread in hook raceway...


