Pfaff synchrotronic 1229 Support and Manuals
Get Help and Manuals for this Pfaff item

View All Support Options Below
Free Pfaff synchrotronic 1229 manuals!
Problems with Pfaff synchrotronic 1229?
Ask a Question
Free Pfaff synchrotronic 1229 manuals!
Problems with Pfaff synchrotronic 1229?
Ask a Question
Most Recent Pfaff synchrotronic 1229 Questions

The Needle Position Is Slightly Off By One To Two Thread Widths When Needle Posi
is in center position. I'm trying to achieve an exact 1/4" seam allowance. Can the needle position b...
is in center position. I'm trying to achieve an exact 1/4" seam allowance. Can the needle position b...
(Posted by Pamelaeller 1 year ago)
Pfaff synchrotronic 1229 Videos

Pfaff synchrotronic 1229
Duration: :48
Total Views: 2,491
Duration: :48
Total Views: 2,491
Popular Pfaff synchrotronic 1229 Manual Pages
Owner's Manual - Page 2
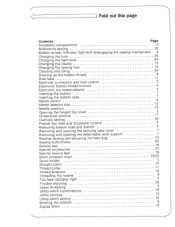
... hinged top cover
2
Ornamental stitches
17
Overlock setting
20
Presser bar lifter and Stopmatic control
5
Removing bobbin case and bobbin
Removing and opening the carrying case cover
Removing and opening the detachable work support Reverse sewing and dropping the feed dog Sewing buttonholes
Sewing feet Special accessories Special sewing feet Stitch program chart Spool holder Straight...
Owner's Manual - Page 4
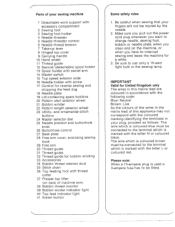
... blue must be injured by the needle.
2. Be careful when sewing that your sewing machine
1 Detachable work support with accessory compartment
2 Sewing foot 3 Sewing foot holder 4 Needle threader 5 Needle threader control 6 Needle thread tension 7 Take-up lever 8 Hinged top cover 9 Carrying handle 10 Hand wheel 11 Thread guide 12 Second (detachable) spool holder 13 Spool holder with swivel arm...
Owner's Manual - Page 5
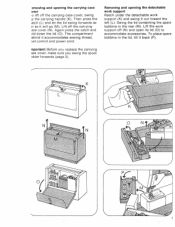
... (0) to the rear (M). nportant: Before you replace the carrying ase cover, make sure you swing the spool older forwards (page 2). To place spare bobbins in the lid, tilt it accommodates sewing thread, ot control and power cord. The compartment ehind it back (P).
4
1 Lift the work support (K) and swing it will go (M). Then press...
Owner's Manual - Page 8
... feed (page 11),
Ii
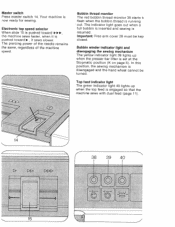
Important: Free arm cover 28 must be turned. Your machine is pushed toward , it sews slower. Bobbin winder indicator light and disengaging the sewing mechanism The yellow indicator light 39 lights up when the top feed is set at the Stopmatic position (K on page 5).
The piercing power of the needle...
Owner's Manual - Page 14
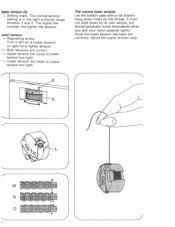
..., but should gradually move downwards when you jerk your hand upwards lightly.
The normal tension setting is in the light-coloured range between 3 and 5. The correct lower tension Let the... 0 The higher the number, the tighter the tension. ower tension = Regulating screw. Jpper tension (6) = Setting mark. Turn it left for a looser tension, or right for a tighter tension.
1 = Both tensions are...
Owner's Manual - Page 16

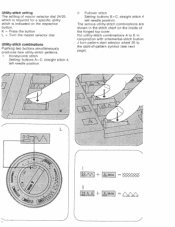
... above mark K. ilaster selector dial (24) Furn the outer ring until the symbol of these ranges are sewn in the range rom 0 to 4
Zigzag stitch Setting mark = K Zigzag stitches are close together. Toward the left, the zigzag stitches become increasingly longer. Hraight stitch traight stitche.
Owner's Manual - Page 17
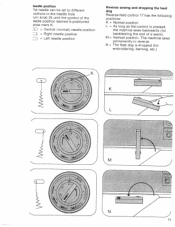
N = The feed dog is pressed,
the machine sews backwards (for embroidering, darning, etc.)
CF
A
13 The machine sews permanently in the needle hole. •urn knob 25 until the symbol of the
eedle position desired is positioned
elow mark K.
= Central (normal) needle position = Right needle position
= Left needle position
Reverse sewing and dropping the feed dog...
Owner's Manual - Page 20
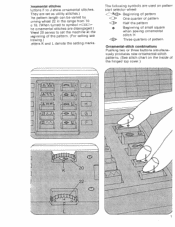
...-stitch combinations Pushing two buttons simultaneously prodi ices new utility-stitch patterns. I Honeycomb stitch
Setting: buttons A+C, straight stitch 4, left needle position. L
4
+ [j 0-2
,\
,". Utility-stitch setting The setting of master selector dial 24/25 which is required for a specific utility stitch is indicated on the inside of -pattern symbol (see next
page). For utility...
Owner's Manual - Page 21
...
•
Beginning of small square
when sewing ornamental
stitch H
4IIIJ1 Three quarters of pattern
Ornamental-stitch combinations Pushing two or three buttons simultane ously produces new ornamental-stitch patterns. (See stitch chart on the inside of the pattern. (For setting see
I
N The following symbols are set the machine at the eginning of the hinged...
Owner's Manual - Page 23
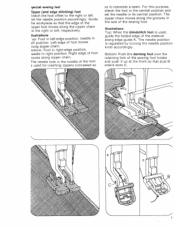
... accordingly. Right edge of the sewing foot. Ihe needle hole in the middle of the foot s used , guide the folded edge of foot moves long zipper chain. 3ottom: Foot in right-edge position, ieedle in.... For this purpose, attach the foot in the central position and set the needle in right position. pecial sewing feet
sipper (and edge stitching) foot \ttach the foot offset to resemble a seam.
Owner's Manual - Page 24
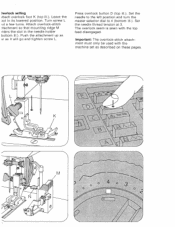
... up as r as described on these pages.
The overlock seam is sewn with the machine set as it will go and tighten screw L. Leave the Dot in the needle holder bottom... that mounting ridge M nters the slot in its lowered position. )verlock setting ttach overlock foot K (top ill.). Press overlock button D (top ill.). Set the needle to the left position and turn the master selector dial to...
Owner's Manual - Page 28
...
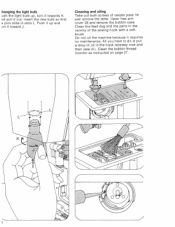
vicinity of the sewing hook with a soft
brush. Cleaning and oiling Take out both screws of oil in the hook raceway now and
then (see ill.). Do not oil the machine because it requires no maintenance. Clean the feed dog and the parts in slots L. Clean the bobbin thread monitor as instructed on page...
Owner's Manual - Page 29

... out the power cord plug whenever you want to change needle, sewing foot, bobbin or needle plate, when you clean and oil the machine, or when you have to use only a 15-watt light ...fuse urn fuse holder K counter-clockwise a uarter turn . Be careful when sewing that your
fingers will not be obtained om your local Pfaff dealer. lachines with 11OV are without fuse.
4
Some safety rules 1. FF2A ...
Owner's Manual - Page 33
... zigzag stitch
1 7 Overlock st.tch
18 Embroidery stitch
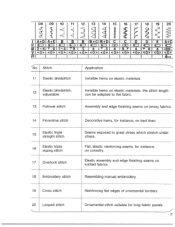
Decorative hems, for instance, on knitted fabrics.
No. Flat, elastic reinforcing seams, for long fabric panels. 2
Resembling manual embroidery.
19 Cross stitch
Reinforcing flat edges of ornamental borders.
20 Looped stitch
Ornamental stitch suitable for instance, on elastic materials; Sti. the stitch length...
Owner's Manual - Page 37
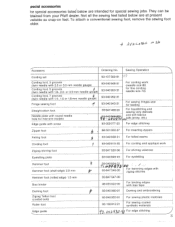
... below are at present ailable as snap-on feet.
or 2.5-mm needle gage)
Cording foot, 7 grooves
4
(twin needle with 1.4-, 1.6 or 1.8-mm needle gauge)
Fringe sewing foot
1
Straight-stitch foot
Needle plate with round needle hole for free-arm models
Edge guide with screw
93-1 07 560-91 93-04094831 93-040950-31 93-040952-31 93...
Pfaff synchrotronic 1229 Reviews
We have not received any reviews for Pfaff yet.