
Owner's Manual
Page 2
... top speed selector 4 Inserting the bobbin 7 Inserting the bobbin case 7 Master switch 4 Master selector dial 12 Needle position 13 Opening the hinged top cover 2 Ornamental stitches 17 Overlock setting 20 Presser bar lifter and Stopmatic control 5 Removing bobbin case and bobbin Removing and opening the carrying case cover Removing and opening the detachable work support Reverse sewing and dropping the feed dog Sewing buttonholes Sewing feet Special accessories Special sewing feet Stitch program chart Spool holder Straight stitch Thread cutter Thread tensions Threading...
... top speed selector 4 Inserting the bobbin 7 Inserting the bobbin case 7 Master switch 4 Master selector dial 12 Needle position 13 Opening the hinged top cover 2 Ornamental stitches 17 Overlock setting 20 Presser bar lifter and Stopmatic control 5 Removing bobbin case and bobbin Removing and opening the carrying case cover Removing and opening the detachable work support Reverse sewing and dropping the feed dog Sewing buttonholes Sewing feet Special accessories Special sewing feet Stitch program chart Spool holder Straight stitch Thread cutter Thread tensions Threading...
Owner's Manual
Page 4
... dropping the feed dog 18 Needle plate 19 Lid containing spare bobbins 20 Pattern start selector wheel 21 Bobbin winder 22 Pattern length selector wheel 23 Utility- 4 Parts of your sewing machine 1 Detachable work support with accessory compartment 2 Sewing foot 3 Sewing foot holder 4 Needle threader 5 Needle threader control 6 Needle thread tension 7 Take-up lever 8 Hinged top cover 9 Carrying handle 10 Hand wheel 11 Thread guide 12 Second (detachable) spool holder 13 Spool holder with swivel arm 14 Master switch 15 Top speed selector slide 16 Needle holder with thread cutter 37 Presser bar...
... dropping the feed dog 18 Needle plate 19 Lid containing spare bobbins 20 Pattern start selector wheel 21 Bobbin winder 22 Pattern length selector wheel 23 Utility- 4 Parts of your sewing machine 1 Detachable work support with accessory compartment 2 Sewing foot 3 Sewing foot holder 4 Needle threader 5 Needle threader control 6 Needle thread tension 7 Take-up lever 8 Hinged top cover 9 Carrying handle 10 Hand wheel 11 Thread guide 12 Second (detachable) spool holder 13 Spool holder with swivel arm 14 Master switch 15 Top speed selector slide 16 Needle holder with thread cutter 37 Presser bar...
Owner's Manual
Page 5
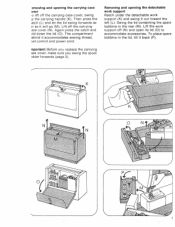
... work support (K) and swing it will go (M). Removing and opening the carrying case over o lift off (N) and open its lid (0) to the rear (M). Again press the catch and ld down the lid (0). nportant: Before you replace the carrying ase cover, make sure you swing the spool older forwards (page 2). To place spare bobbins in the lid, tilt it accommodates sewing thread, ot control and power cord...
... work support (K) and swing it will go (M). Removing and opening the carrying case over o lift off (N) and open its lid (0) to the rear (M). Again press the catch and ld down the lid (0). nportant: Before you replace the carrying ase cover, make sure you swing the spool older forwards (page 2). To place spare bobbins in the lid, tilt it accommodates sewing thread, ot control and power cord...
Owner's Manual
Page 6
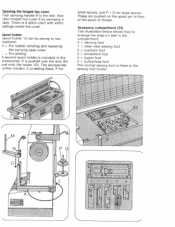
Opening the hinged top cover old carrying handle 9 to two ositions: = For bobbin winding and replacing the carrying case cover. - = For sewing. Spool holder Spool holder 13 can be swung to the rear, then pen hinged top cover 8 by swinging it Dack. These are pushed on feet in the corn partrnent: o = darning foot 1 = clear-view sewing foot 2 = overlock foot 3 = blindstitch foot 4 = zipper foot 5 = buttonhole foot The normal sewing foot is pushed over the wire (N) nd onto the holder (0). It...
Opening the hinged top cover old carrying handle 9 to two ositions: = For bobbin winding and replacing the carrying case cover. - = For sewing. Spool holder Spool holder 13 can be swung to the rear, then pen hinged top cover 8 by swinging it Dack. These are pushed on feet in the corn partrnent: o = darning foot 1 = clear-view sewing foot 2 = overlock foot 3 = blindstitch foot 4 = zipper foot 5 = buttonhole foot The normal sewing foot is pushed over the wire (N) nd onto the holder (0). It...
Owner's Manual
Page 8
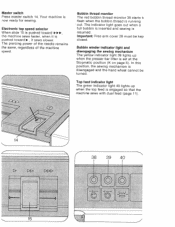
... the bobbin thread is now ready for sewing. Master switch Press master switch 14. Important: Free arm cover 28 must be turned. The piercing power of the needle remains the same, regardless of the machine speed. Top feed indicator light The green indicator light 40 lights up when the presser bar lifter is engaged so that the machine sews with dual feed (page 11), Ii Bobbin winder indicator light and disengaging the sewing...
... the bobbin thread is now ready for sewing. Master switch Press master switch 14. Important: Free arm cover 28 must be turned. The piercing power of the needle remains the same, regardless of the machine speed. Top feed indicator light The green indicator light 40 lights up when the presser bar lifter is engaged so that the machine sews with dual feed (page 11), Ii Bobbin winder indicator light and disengaging the sewing...
Owner's Manual
Page 9
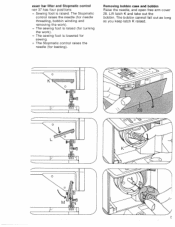
The Stopmatic control raises the needle (for needle threading, bobbin winding and removing the work). = The sewing foot is raised (for basting). Removing bobbin case and bobbin Raise the needle, and open free arm cover 28. Lift latch K and take out the bobbin. esser bar litter and Stopmatic control ver 37 has four positions: = Sewing foot is lowered for sewing. = The Stopmatic control raises the needle (for turning the work). = The sewing foot is raised. The bobbin cannot fall out as long as you keep latch K raised.
The Stopmatic control raises the needle (for needle threading, bobbin winding and removing the work). = The sewing foot is raised (for basting). Removing bobbin case and bobbin Raise the needle, and open free arm cover 28. Lift latch K and take out the bobbin. esser bar litter and Stopmatic control ver 37 has four positions: = Sewing foot is lowered for sewing. = The Stopmatic control raises the needle (for turning the work). = The sewing foot is raised. The bobbin cannot fall out as long as you keep latch K raised.

Owner's Manual
Page 10
... spool pin. Draw the needle thread under the sewing foot, to its horizonta (K) position. Then proceed as described for winding a bobbin from the spool. Pull the thread from the spool, pass it . Winding through guides 11 and 32, counter-clockwise around retainer stud 34, and then to its horizontal (K) position. The bobbin winder stops automatically when the bobbin is fitted) Raise presser bar lifter 37 to the bobbin winder. Remove the bobbin and cut thc thread. Wind...
... spool pin. Draw the needle thread under the sewing foot, to its horizonta (K) position. Then proceed as described for winding a bobbin from the spool. Pull the thread from the spool, pass it . Winding through guides 11 and 32, counter-clockwise around retainer stud 34, and then to its horizontal (K) position. The bobbin winder stops automatically when the bobbin is fitted) Raise presser bar lifter 37 to the bobbin winder. Remove the bobbin and cut thc thread. Wind...

Owner's Manual
Page 12
... K one thread is placed above disc L, the other below it into thread guide 11, slot K, thread guide 31, take-up lever 7, thread guide 30 and the right guide of thread (page 2). Place a spool of thread on the holder and push the unreeling disc on twin needles For two-needle sewing jobs attach the second spool holder for large spools. Swing spool holder 13 back. Note on the spool pin. Upper threading Raise presser bar lifter 37 to its horizontal (K) position.
... K one thread is placed above disc L, the other below it into thread guide 11, slot K, thread guide 31, take-up lever 7, thread guide 30 and the right guide of thread (page 2). Place a spool of thread on the holder and push the unreeling disc on twin needles For two-needle sewing jobs attach the second spool holder for large spools. Swing spool holder 13 back. Note on the spool pin. Upper threading Raise presser bar lifter 37 to its horizontal (K) position.
Owner's Manual
Page 13
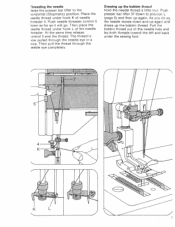
At the same time release ontrol 5 and the thread. The thread is iow pulled through the ieedle eye completely. Threading the needle aise the presser bar lifter to position L (page 5) and then up again. Place the ieedle thread under the sewing foot. Pull the bobbin thread out of the needle hole and lay both threads toward the left and back under hook K of the needle hreader. As you do...
At the same time release ontrol 5 and the thread. The thread is iow pulled through the ieedle eye completely. Threading the needle aise the presser bar lifter to position L (page 5) and then up again. Place the ieedle thread under the sewing foot. Pull the bobbin thread out of the needle hole and lay both threads toward the left and back under hook K of the needle hreader. As you do...
Owner's Manual
Page 17
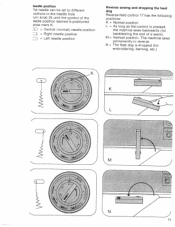
... in reverse. M Vertical position. N = The feed dog is pressed, the machine sews backwards (for backtacking the end of the eedle position desired is positioned elow mark K. = Central (normal) needle position = Right needle position = Left needle position Reverse sewing and dropping the feed dog Reverse-feed control 17 has the following positions: K = Normal position L As long as the control is dropped (for embroidering, darning, etc.) CF A 13 The machine sews permanently in the needle hole. •urn knob 25 until the symbol of a seam).
... in reverse. M Vertical position. N = The feed dog is pressed, the machine sews backwards (for backtacking the end of the eedle position desired is positioned elow mark K. = Central (normal) needle position = Right needle position = Left needle position Reverse sewing and dropping the feed dog Reverse-feed control 17 has the following positions: K = Normal position L As long as the control is dropped (for embroidering, darning, etc.) CF A 13 The machine sews permanently in the needle hole. •urn knob 25 until the symbol of a seam).
Owner's Manual
Page 20
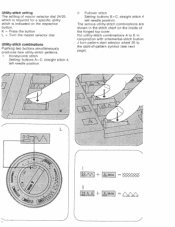
... buttons simultaneously prodi ices new utility-stitch patterns. V ,, = + L] Utility-stitch setting The setting of master selector dial 24/25 which is required for a specific utility stitch is indicated on the inside of -pattern symbol (see next page). II Pullover stitch Setting: buttons B+C, straight stitch 4 left needle position. For utility-stitch combinations A to E in the stitch chart on the respective button. L 4 + [j 0-2 ,\ ,". The various utility-stitch combinations are shown in conjunction with ornamental-stitch button J turn pattern start...
... buttons simultaneously prodi ices new utility-stitch patterns. V ,, = + L] Utility-stitch setting The setting of master selector dial 24/25 which is required for a specific utility stitch is indicated on the inside of -pattern symbol (see next page). II Pullover stitch Setting: buttons B+C, straight stitch 4 left needle position. For utility-stitch combinations A to E in the stitch chart on the respective button. L 4 + [j 0-2 ,\ ,". The various utility-stitch combinations are shown in conjunction with ornamental-stitch button J turn pattern start...
Owner's Manual
Page 23
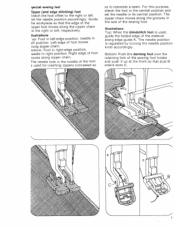
... -edge position, needle in left , respectively. Ihe needle hole in its central position. The zipper chain moves along edge guide K. et the needle position accordingly. For this purpose, attach the foot in the central position and set the needle in the middle of the sewing foot. The needle position is used for inserting zippers concealed so as to the right or left. pecial sewing feet sipper (and edge stitching) foot \ttach the foot offset to resemble a seam.
... -edge position, needle in left , respectively. Ihe needle hole in its central position. The zipper chain moves along edge guide K. et the needle position accordingly. For this purpose, attach the foot in the central position and set the needle in the middle of the sewing foot. The needle position is used for inserting zippers concealed so as to the right or left. pecial sewing feet sipper (and edge stitching) foot \ttach the foot offset to resemble a seam.
Owner's Manual
Page 24
... overlock-stitch attach ment must only be used with the top feed disengaged. Turn screw L ut a few turns. Press overlock button D (top ill.). The overlock seam is sewn with the machine set as it will go and tighten screw L. Set the needle to the left position and turn the master selector dial to 4 (bottom ill.). Set the needle thread tension at 3. )verlock setting ttach overlock foot K (top ill.). Leave the Dot in the needle holder bottom...
... overlock-stitch attach ment must only be used with the top feed disengaged. Turn screw L ut a few turns. Press overlock button D (top ill.). The overlock seam is sewn with the machine set as it will go and tighten screw L. Set the needle to the left position and turn the master selector dial to 4 (bottom ill.). Set the needle thread tension at 3. )verlock setting ttach overlock foot K (top ill.). Leave the Dot in the needle holder bottom...

Owner's Manual
Page 26
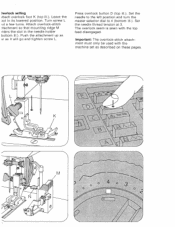
... to (bottom ill.). Restore this setting at the beginning of scrap material. Begin by turning the master selector dial in the buttonhole range from + to the position shown in front lug L. his serves to 2 numbers. The stitches must be - Release the sh buttons. uttonhole setting [tach the buttonhole foot. Turn the knob clockwise only. Reduce the needle thread tension by 1 to determine the...
... to (bottom ill.). Restore this setting at the beginning of scrap material. Begin by turning the master selector dial in the buttonhole range from + to the position shown in front lug L. his serves to 2 numbers. The stitches must be - Release the sh buttons. uttonhole setting [tach the buttonhole foot. Turn the knob clockwise only. Reduce the needle thread tension by 1 to determine the...
Owner's Manual
Page 28
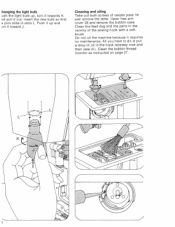
... a drop of oil in slots L. Clean the bobbin thread monitor as instructed on page 27. hanging the light bulb ush the light bulb up and irn it toward J. Insert the new bulb so that s pins slide in the hook raceway now and then (see ill.). Push it up , turn it towards K nd pull it requires no maintenance. Clean the feed dog and the parts in the vicinity of needle plate 18 and remove...
... a drop of oil in slots L. Clean the bobbin thread monitor as instructed on page 27. hanging the light bulb ush the light bulb up and irn it toward J. Insert the new bulb so that s pins slide in the hook raceway now and then (see ill.). Push it up , turn it towards K nd pull it requires no maintenance. Clean the feed dog and the parts in the vicinity of needle plate 18 and remove...

Owner's Manual
Page 29
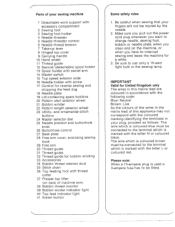
... pull out the power cord plug whenever you want to change needle, sewing foot, bobbin or needle plate, when you clean and oil the machine, or when you have to use only a 15-watt light bulb in with 11OV are without fuse. 4 Some safety rules 1. Be sure to interrupt sewing and leave the machine for a while. 3. Pull fuse L out of holder K. hanging the fuse urn fuse holder K counter-clockwise...
... pull out the power cord plug whenever you want to change needle, sewing foot, bobbin or needle plate, when you clean and oil the machine, or when you have to use only a 15-watt light bulb in with 11OV are without fuse. 4 Some safety rules 1. Be sure to interrupt sewing and leave the machine for a while. 3. Pull fuse L out of holder K. hanging the fuse urn fuse holder K counter-clockwise...
Owner's Manual
Page 30
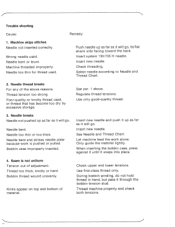
... stitches Needle not inserted correctly. Needle thread breaks For any of material. Use only good-quality thread. 3. Needle bent. Insert new needle. During bobbin winding, do not hold thread in hand, but pass it snaps into place. 4. Insert new needle and push it up as far as it will go. Machine threaded improperly. Needle breaks Needle not pushed up as far as it will go . Let machine feed the work is not uniform Tension out of adjustment. Only guide...
... stitches Needle not inserted correctly. Needle thread breaks For any of material. Use only good-quality thread. 3. Needle bent. Insert new needle. During bobbin winding, do not hold thread in hand, but pass it snaps into place. 4. Insert new needle and push it up as far as it will go. Machine threaded improperly. Needle breaks Needle not pushed up as far as it will go . Let machine feed the work is not uniform Tension out of adjustment. Only guide...

Owner's Manual
Page 31
... tooth rows of oil into hook raceway. 7. Electronic bobbin thread monitor does not work properly Thread ends and lint have to leave the machine, even for a short while, be sure to the right. 6. Machine skips stitches in and around . 2 Flick lever 17 to switch off and on the photo-electronic eye in the free arm cover, in the bobbin case and in overlock seam Overlock-stitch attachment fitted loosely, Seam does not...
... tooth rows of oil into hook raceway. 7. Electronic bobbin thread monitor does not work properly Thread ends and lint have to leave the machine, even for a short while, be sure to the right. 6. Machine skips stitches in and around . 2 Flick lever 17 to switch off and on the photo-electronic eye in the free arm cover, in the bobbin case and in overlock seam Overlock-stitch attachment fitted loosely, Seam does not...

Owner's Manual
Page 32
... 4 Stitch 01 Straight stitch 02 Zigzag stitch 03 Buttonholes 04 Elastic stitch Application For aN sewing operations. for instance. the stitch density can be regulated accordingly. Inserting patches and darning rips on elastic threads or covering terry cloth seams. 08 Cord stitch A loose decorative seam for the various seam patterns. Sewing on elastic fabrics. 05 Scallop stitch Decorating handkerchiefs, for instance. 06 Viennese stitch 07 Honeycomb stitch Decorating napkins, for edge finishing, appliqué work, inserting lace, satin stitching, embroidering, darning etc...
... 4 Stitch 01 Straight stitch 02 Zigzag stitch 03 Buttonholes 04 Elastic stitch Application For aN sewing operations. for instance. the stitch density can be regulated accordingly. Inserting patches and darning rips on elastic threads or covering terry cloth seams. 08 Cord stitch A loose decorative seam for the various seam patterns. Sewing on elastic fabrics. 05 Scallop stitch Decorating handkerchiefs, for instance. 06 Viennese stitch 07 Honeycomb stitch Decorating napkins, for edge finishing, appliqué work, inserting lace, satin stitching, embroidering, darning etc...
Owner's Manual
Page 37
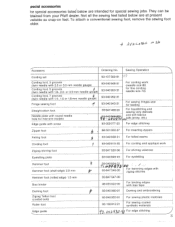
... sewing foot 1 Straight-stitch foot Needle plate with round needle hole for free-arm models Edge guide with 1.8-, 2.0- For edge stitching Zipper foot 98-501 000-27 For inserting zippers Felling foot 93-040938-31 For felled seams Cording foot Zigzag shirring foot 1 93-040915-35 For cording and appliqué work (needle size 80, for fine cording needle size 70) For sewing fringes and for special sewing jobs. For binding edges with zigzag stitches 93-847 547-00 98-055622-00 93-040960-91 - Accessory Ordering...
... sewing foot 1 Straight-stitch foot Needle plate with round needle hole for free-arm models Edge guide with 1.8-, 2.0- For edge stitching Zipper foot 98-501 000-27 For inserting zippers Felling foot 93-040938-31 For felled seams Cording foot Zigzag shirring foot 1 93-040915-35 For cording and appliqué work (needle size 80, for fine cording needle size 70) For sewing fringes and for special sewing jobs. For binding edges with zigzag stitches 93-847 547-00 98-055622-00 93-040960-91 - Accessory Ordering...


