User Manual
Page 1
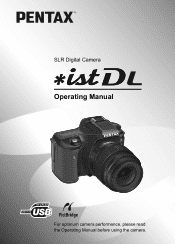
SLR Digital Camera Operating Manual For optimum camera performance, please read the Operating Manual before using the camera.
SLR Digital Camera Operating Manual For optimum camera performance, please read the Operating Manual before using the camera.
User Manual
Page 2
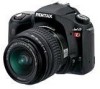
..., you for anything other lens or accessory, see p.37 and p.180. To users of this manual before using the camera in order to their respective owners. However, this manual are for purchasing the PENTAX L Digital Camera. You can use of all the camera's capabilities. Regarding copyrights Images taken using the L that are different from the actual product.
..., you for anything other lens or accessory, see p.37 and p.180. To users of this manual before using the camera in order to their respective owners. However, this manual are for purchasing the PENTAX L Digital Camera. You can use of all the camera's capabilities. Regarding copyrights Images taken using the L that are different from the actual product.
User Manual
Page 6
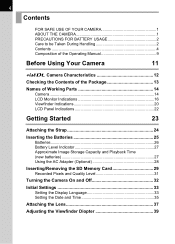
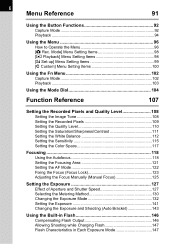
...USAGE 2 Care to be Taken During Handling 2 Contents 4 Composition of the Operating Manual 9 Before Using Your Camera 11 L Camera Characteristics 12 Checking the Contents of the Package 13 Names of Working Parts 14 Camera 14 LCD Monitor Indications 16 Viewfinder Indications 20 LCD Panel Indications 22 Getting Started ...27 Using the AC Adapter (Optional 28 Inserting/Removing the SD Memory Card 29 Recorded Pixels and Quality Level 31 Turning the Camera On and Off 32 Initial Settings 33 Setting the Display Language 33 Setting the Date and Time 35 Attaching the Lens 37 ...
...USAGE 2 Care to be Taken During Handling 2 Contents 4 Composition of the Operating Manual 9 Before Using Your Camera 11 L Camera Characteristics 12 Checking the Contents of the Package 13 Names of Working Parts 14 Camera 14 LCD Monitor Indications 16 Viewfinder Indications 20 LCD Panel Indications 22 Getting Started ...27 Using the AC Adapter (Optional 28 Inserting/Removing the SD Memory Card 29 Recorded Pixels and Quality Level 31 Turning the Camera On and Off 32 Initial Settings 33 Setting the Display Language 33 Setting the Date and Time 35 Attaching the Lens 37 ...
User Manual
Page 8
... Focusing 118 Using the Autofocus 118 Setting the Focusing Area 121 Setting the AF Mode 122 Fixing the Focus (Focus Lock 123 Adjusting the Focus Manually (Manual Focus 125 Setting the Exposure 127 Effect of Aperture and Shutter Speed 127 Selecting the Metering Method 130 Changing the Exposure Mode 132 Setting the...
... Focusing 118 Using the Autofocus 118 Setting the Focusing Area 121 Setting the AF Mode 122 Fixing the Focus (Focus Lock 123 Adjusting the Focus Manually (Manual Focus 125 Setting the Exposure 127 Effect of Aperture and Shutter Speed 127 Selecting the Metering Method 130 Changing the Exposure Mode 132 Setting the...
User Manual
Page 11
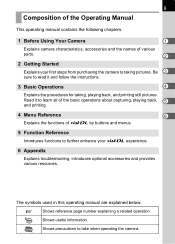
... follow the instructions. 3 Basic Operations 4 Explains the procedures for taking pictures. Be 3 sure to take when operating the camera. 9 Composition of the Operating Manual This operating manual contains the following chapters. 1 Before Using Your Camera 1 Explains camera characteristics, accessories and the names of L by buttons and menus. 5 Function Reference Introduces functions to further enhance your...
... follow the instructions. 3 Basic Operations 4 Explains the procedures for taking pictures. Be 3 sure to take when operating the camera. 9 Composition of the Operating Manual This operating manual contains the following chapters. 1 Before Using Your Camera 1 Explains camera characteristics, accessories and the names of L by buttons and menus. 5 Function Reference Introduces functions to further enhance your...
User Manual
Page 15
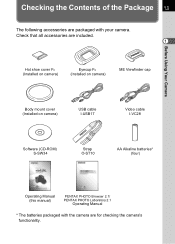
... FN (Installed on camera) ME Viewfinder cap Before Using Your Camera Body mount cover (Installed on camera) USB cable I-USB17 Video cable I-VC28 Software (CD-ROM) S-SW34 Strap O-ST10 AA Alkaline batteries* (four) Operating Manual (this manual) PENTAX PHOTO Browser 2.1/ PENTAX PHOTO Laboratory 2.1 Operating Manual * The batteries packaged with the camera are packaged with your camera. Checking the Contents of...
... FN (Installed on camera) ME Viewfinder cap Before Using Your Camera Body mount cover (Installed on camera) USB cable I-USB17 Video cable I-VC28 Software (CD-ROM) S-SW34 Strap O-ST10 AA Alkaline batteries* (four) Operating Manual (this manual) PENTAX PHOTO Browser 2.1/ PENTAX PHOTO Laboratory 2.1 Operating Manual * The batteries packaged with the camera are packaged with your camera. Checking the Contents of...

User Manual
Page 22
...set to k (Continuous mode). 6 Picture mode icon (p.47) Icon for Picture mode in use appears. . 20 Viewfinder Indications 2 1 1 1 Before Using Your Camera 34 5 6 78 9 10 11 12 13 14 1 Autofocus frame (p.39) 2 Spot metering frame (p.130) 3 Flash status (p.49) Appears when flash is ...available and blinks when flash is recommended but not set. 4 Manual white balance (p.113) Appears when manual white balance is in use and blinks while adjusting. 5 Continuous mode (p.122) Appears when focus mode is focused. When blinking...
...set to k (Continuous mode). 6 Picture mode icon (p.47) Icon for Picture mode in use appears. . 20 Viewfinder Indications 2 1 1 1 Before Using Your Camera 34 5 6 78 9 10 11 12 13 14 1 Autofocus frame (p.39) 2 Spot metering frame (p.130) 3 Flash status (p.49) Appears when flash is ...available and blinks when flash is recommended but not set. 4 Manual white balance (p.113) Appears when manual white balance is in use and blinks while adjusting. 5 Continuous mode (p.122) Appears when focus mode is focused. When blinking...

User Manual
Page 23
...compensation value appears when EV compensation is being adjusted. (p.133) The difference with current quality and recorded pixel setting. Before Using Your Camera 11 Number of recordable images/EV compensation 1 Show the number of recordable images is exceeded. 14 AE lock indicator (p.142) Appears ... output. Adjusted value appears where number of recordable images with the appropriate exposure value appears if exposure mode is a. (p.138) 12 Manual focus (p.125) Appears when focus mode is \. 13 ISO sensitivity warning (p.116) Appears when warning value is shown. 21 10 ...
...compensation value appears when EV compensation is being adjusted. (p.133) The difference with current quality and recorded pixel setting. Before Using Your Camera 11 Number of recordable images/EV compensation 1 Show the number of recordable images is exceeded. 14 AE lock indicator (p.142) Appears ... output. Adjusted value appears where number of recordable images with the appropriate exposure value appears if exposure mode is a. (p.138) 12 Manual focus (p.125) Appears when focus mode is \. 13 ISO sensitivity warning (p.116) Appears when warning value is shown. 21 10 ...

User Manual
Page 30
SD Memory Card and data will be corrupted if disconnected while camera is recording or reading data. • Be sure to read the AC adapter D-AC10 operating manual when using the LCD monitor for a long time or when connecting to your camera will not charge when connected to the AC adapter. 4 Plug ...the AC cord into the power outlet. • Make sure the camera is turned off before opening the terminal cover...
SD Memory Card and data will be corrupted if disconnected while camera is recording or reading data. • Be sure to read the AC adapter D-AC10 operating manual when using the LCD monitor for a long time or when connecting to your camera will not charge when connected to the AC adapter. 4 Plug ...the AC cord into the power outlet. • Make sure the camera is turned off before opening the terminal cover...

User Manual
Page 46
...) 5 Press the shutter release button fully. The focus indicator ] appears in the viewfinder when the subject is taken. The flash pops up automatically when necessary. (Manually lift the flash when Flash mode is not set to [Auto].) 1OPERATING THE SHUTTER RELEASE BUTTON (p.45) 1Hard-to determine the size of the subject...
...) 5 Press the shutter release button fully. The focus indicator ] appears in the viewfinder when the subject is taken. The flash pops up automatically when necessary. (Manually lift the flash when Flash mode is not set to [Auto].) 1OPERATING THE SHUTTER RELEASE BUTTON (p.45) 1Hard-to determine the size of the subject...
User Manual
Page 48
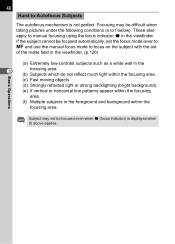
...-Autofocus Subjects The autofocus mechanism is displayed when (f) above applies. Subject may be focused automatically, set the focus mode lever to \ and use the manual focus mode to manual focusing using the focus indicator ] in the foreground and background within the focusing area. (f) Multiple subjects in the viewfinder. These also apply to...
...-Autofocus Subjects The autofocus mechanism is displayed when (f) above applies. Subject may be focused automatically, set the focus mode lever to \ and use the manual focus mode to manual focusing using the focus indicator ] in the foreground and background within the focusing area. (f) Multiple subjects in the viewfinder. These also apply to...
User Manual
Page 51
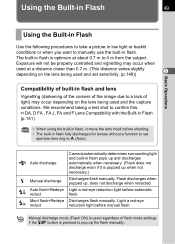
... a lack of flash mode settings if the K button is pressed to 4 m from the subject. B Auto discharge b Manual discharge C Auto flash+Redeye reduct D Manl flash+Redeye reduct Camera automatically determines surrounding light and built-in flash. Manual discharge mode (Flash ON) is optimum at a distance closer than 0.7 m. (This distance varies slightly 3 depending on the...
... a lack of flash mode settings if the K button is pressed to 4 m from the subject. B Auto discharge b Manual discharge C Auto flash+Redeye reduct D Manl flash+Redeye reduct Camera automatically determines surrounding light and built-in flash. Manual discharge mode (Flash ON) is optimum at a distance closer than 0.7 m. (This distance varies slightly 3 depending on the...
User Manual
Page 53
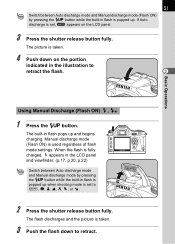
... , E appears on the portion indicated in the illustration to retract. 51 Switch between Auto discharge mode and Manual discharge mode by pressing the K button while the built-in flash pops up . Manual discharge mode (Flash ON) is popped up and begins charging. When the flash is fully charged, b appears... in the LCD panel and viewfinder. (p.17, p.20, p.22) Switch between Auto discharge mode and Manual discharge mode (Flash ON) by pressing the K button while the built-in flash is popped up when shooting mode is taken. 3 Push the flash ...
... , E appears on the portion indicated in the illustration to retract. 51 Switch between Auto discharge mode and Manual discharge mode by pressing the K button while the built-in flash pops up . Manual discharge mode (Flash ON) is popped up and begins charging. When the flash is fully charged, b appears... in the LCD panel and viewfinder. (p.17, p.20, p.22) Switch between Auto discharge mode and Manual discharge mode (Flash ON) by pressing the K button while the built-in flash is popped up when shooting mode is taken. 3 Push the flash ...
User Manual
Page 54
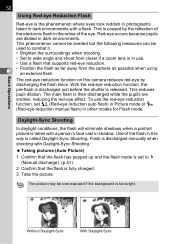
...is caused by the reflection of the electronic flash in the retina of the flash in use the red-eye reduction function, set to b (Manual discharge). (p.51) 2 Confirm that the flash has popped up and the flash mode is called Daylight-Sync Shooting. This reduces pupil dilation.... it. • Brighten the surroundings when shooting. • Set to wide angle and shoot from closer if a zoom lens is in this camera reduces red-eye by discharging the flash twice. Basic Operations Daylight-Sync Shooting In daylight conditions, the flash will eliminate shadows when a portrait picture...
...is caused by the reflection of the electronic flash in the retina of the flash in use the red-eye reduction function, set to b (Manual discharge). (p.51) 2 Confirm that the flash has popped up and the flash mode is called Daylight-Sync Shooting. This reduces pupil dilation.... it. • Brighten the surroundings when shooting. • Set to wide angle and shoot from closer if a zoom lens is in this camera reduces red-eye by discharging the flash twice. Basic Operations Daylight-Sync Shooting In daylight conditions, the flash will eliminate shadows when a portrait picture...
User Manual
Page 60
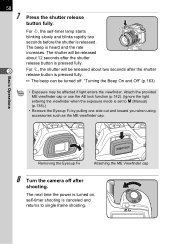
...and blinks rapidly two seconds before the shutter is heard and the rate increases. Removing the Eyecup FN Attaching the ME Viewfinder cap 8 Turn the camera off . "Turning the Beep On and Off" (p.163) Basic Operations • Exposure may be turned off after the shutter release button is pressed...viewfinder cap or use the AE lock function (p.142). (Ignore the light entering the viewfinder when the exposure mode is canceled and returns to a (Manual) (p.138).) • Remove the Eyecup FN by pulling one side out and toward you when using accessories such as the ME viewfinder cap. ...
...and blinks rapidly two seconds before the shutter is heard and the rate increases. Removing the Eyecup FN Attaching the ME Viewfinder cap 8 Turn the camera off . "Turning the Beep On and Off" (p.163) Basic Operations • Exposure may be turned off after the shutter release button is pressed...viewfinder cap or use the AE lock function (p.142). (Ignore the light entering the viewfinder when the exposure mode is canceled and returns to a (Manual) (p.138).) • Remove the Eyecup FN by pulling one side out and toward you when using accessories such as the ME viewfinder cap. ...
User Manual
Page 62
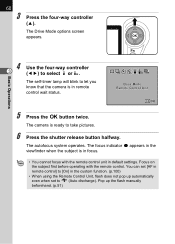
... to select h or i. The Drive Mode options screen appears. Basic Operations 4 3 Use the four-way controller (45) to B (Auto discharge). The camera is ready to let you know that the camera is in focus. • You cannot focus with the remote control. The autofocus system operates. 60 3 Press the four-way controller... [AF in remote control] to [On] in the custom function. (p.100) • When using the Remote Control Unit, flash does not pop up the flash manually beforehand. (p.51)
... to select h or i. The Drive Mode options screen appears. Basic Operations 4 3 Use the four-way controller (45) to B (Auto discharge). The camera is ready to let you know that the camera is in focus. • You cannot focus with the remote control. The autofocus system operates. 60 3 Press the four-way controller... [AF in remote control] to [On] in the custom function. (p.100) • When using the Remote Control Unit, flash does not pop up the flash manually beforehand. (p.51)
User Manual
Page 63
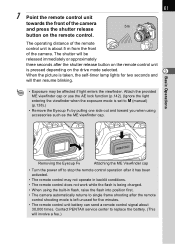
...function (p.142). (Ignore the light entering the viewfinder when the exposure mode is set to a (manual) (p.138).) • Remove the Eyecup FN by pulling one side out and toward you when using ... light enters the viewfinder. 61 7 Point the remote control unit towards the front of the camera 5m and press the shutter release button on the drive mode selected. 3 When the picture is... When using accessories such as the ME viewfinder cap. The shutter will involve a fee.) Contact PENTAX service center to stop the remote control operation after it has been activated. • The remote...
...function (p.142). (Ignore the light entering the viewfinder when the exposure mode is set to a (manual) (p.138).) • Remove the Eyecup FN by pulling one side out and toward you when using ... light enters the viewfinder. 61 7 Point the remote control unit towards the front of the camera 5m and press the shutter release button on the drive mode selected. 3 When the picture is... When using accessories such as the ME viewfinder cap. The shutter will involve a fee.) Contact PENTAX service center to stop the remote control operation after it has been activated. • The remote...
User Manual
Page 65
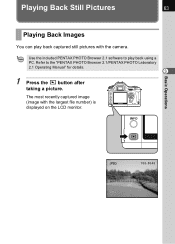
The most recently captured image (image with the camera. Playing Back Still Pictures 63 Playing Back Images You can play back using a PC. Refer to play back captured still pictures with the largest file number) is displayed on the LCD monitor. Basic Operations 100-0046 Use the included PENTAX PHOTO Browser 2.1 software to the "PENTAX PHOTO Browser 2.1/PENTAX PHOTO Laboratory 2.1 Operating Manual" for details. 3 1 Press the Q button after taking a picture.
The most recently captured image (image with the camera. Playing Back Still Pictures 63 Playing Back Images You can play back using a PC. Refer to play back captured still pictures with the largest file number) is displayed on the LCD monitor. Basic Operations 100-0046 Use the included PENTAX PHOTO Browser 2.1 software to the "PENTAX PHOTO Browser 2.1/PENTAX PHOTO Laboratory 2.1 Operating Manual" for details. 3 1 Press the Q button after taking a picture.

User Manual
Page 72
... other end of the AC adapter (optional) is connected. Basic Operations 70 Connecting the Camera to which the camera is recommended. (p.28) • For AV equipment with multiple video IN jacks (such as TVs), check the operating manual of the AV device, and select the video IN jack to AV Equipment By using... the video cable, you intend to use the camera continuously for a long period, use of the video cable to the video IN...
... other end of the AC adapter (optional) is connected. Basic Operations 70 Connecting the Camera to which the camera is recommended. (p.28) • For AV equipment with multiple video IN jacks (such as TVs), check the operating manual of the AV device, and select the video IN jack to AV Equipment By using... the video cable, you intend to use the camera continuously for a long period, use of the video cable to the video IN...

User Manual
Page 85
... printer (p.90) • Use of copies exceeds 500. • You cannot use the camera to select multiple images for your printer. • See the "PENTAX PHOTO Browser 2.1/PENTAX PHOTO Laboratory 2.1 Operating Manual" when connecting to print directly. Make the settings on the camera (such as print settings and DPOF settings) may be valid. • A printing...
... printer (p.90) • Use of copies exceeds 500. • You cannot use the camera to select multiple images for your printer. • See the "PENTAX PHOTO Browser 2.1/PENTAX PHOTO Laboratory 2.1 Operating Manual" when connecting to print directly. Make the settings on the camera (such as print settings and DPOF settings) may be valid. • A printing...


