
User Manual
Page 87
The PictBridge logo is changed. 7 Press the 3 button. 85 Set-up Brightness Level Video Out Transfer Mode Auto Power Off File # Sensor Cleaning Cancel 0 NTSC PC PictBridge PC-F OK OK 3 Basic Operations Connecting the Camera to select [PictBridge]. 6 Press the 4 button. The setting is displayed on PictBridge compatible printers. 5 Use the four-way controller (23) to the Printer 1 Turn the camera off. 2 Connect the camera and PictBridge compatible printer using the USB cable supplied with the camera.
The PictBridge logo is changed. 7 Press the 3 button. 85 Set-up Brightness Level Video Out Transfer Mode Auto Power Off File # Sensor Cleaning Cancel 0 NTSC PC PictBridge PC-F OK OK 3 Basic Operations Connecting the Camera to select [PictBridge]. 6 Press the 4 button. The setting is displayed on PictBridge compatible printers. 5 Use the four-way controller (23) to the Printer 1 Turn the camera off. 2 Connect the camera and PictBridge compatible printer using the USB cable supplied with the camera.
User Manual
Page 101
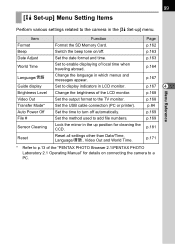
...camera to a PC. p.167 Guide display Set to the TV monitor. p.171 * Refer to p.13 of the "PENTAX PHOTO Browser 2.1/PENTAX PHOTO Laboratory 2.1 Operating Manual" for cleaning the CCD. p.84 Auto Power Off Set the time to turn off . p.163 Date Adjust Set the date format and time. p.169 Sensor... output format to display indicators in LCD monitor. 99 [H Set-up] Menu Setting Items Menu Reference Perform various settings related to the camera in the [H Set-up position for details on /off automatically. Item Function Page Format Format the SD Memory Card. p.167 4...
...camera to a PC. p.167 Guide display Set to the TV monitor. p.171 * Refer to p.13 of the "PENTAX PHOTO Browser 2.1/PENTAX PHOTO Laboratory 2.1 Operating Manual" for cleaning the CCD. p.84 Auto Power Off Set the time to turn off . p.163 Date Adjust Set the date format and time. p.169 Sensor... output format to display indicators in LCD monitor. 99 [H Set-up] Menu Setting Items Menu Reference Perform various settings related to the camera in the [H Set-up position for details on /off automatically. Item Function Page Format Format the SD Memory Card. p.167 4...

User Manual
Page 170
... to see. Set in [Video Out] in the [H Set-up] menu. (p.99) 1Connecting the Camera to AV Equipment (p.70) Set-up Brightness Level Video Out Transfer Mode Auto Power Off File # Sensor Cleaning 0 1 min SerialNo OK OK Function Reference 5 Selecting the Video Output Format When you connect the... camera to AV equipment such as a TV, choose the appropriate video output format (NTSC or PAL)...
... to see. Set in [Video Out] in the [H Set-up] menu. (p.99) 1Connecting the Camera to AV Equipment (p.70) Set-up Brightness Level Video Out Transfer Mode Auto Power Off File # Sensor Cleaning 0 1 min SerialNo OK OK Function Reference 5 Selecting the Video Output Format When you connect the... camera to AV equipment such as a TV, choose the appropriate video output format (NTSC or PAL)...
User Manual
Page 171
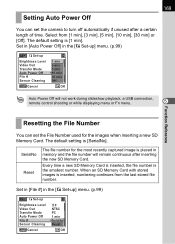
... the most recently captured image is placed in the [H Set-up] menu. (p.99) Set-up Brightness Level Video Out Transfer Mode Auto Power Off File # Sensor Cleaning Cancel 0 NTSC PC 1 min SerialNo Reset OK OK The default setting is inserted, numbering continues from [1 min], [3 min], [5 min], [10 min], [30... Memory Card. Set in [File #] in the [H Set-up] menu. (p.99) Set-up Brightness Level Video Out Transfer Mode Auto Power Off File # Sensor Cleaning Cancel 1 min 3 min 5 min 10 min 30 min Off OK OK Auto Power Off will remain continuous after a certain length of time. 169 Setting...
... the most recently captured image is placed in the [H Set-up] menu. (p.99) Set-up Brightness Level Video Out Transfer Mode Auto Power Off File # Sensor Cleaning Cancel 0 NTSC PC 1 min SerialNo Reset OK OK The default setting is inserted, numbering continues from [1 min], [3 min], [5 min], [10 min], [30... Memory Card. Set in [File #] in the [H Set-up] menu. (p.99) Set-up Brightness Level Video Out Transfer Mode Auto Power Off File # Sensor Cleaning Cancel 1 min 3 min 5 min 10 min 30 min Off OK OK Auto Power Off will remain continuous after a certain length of time. 169 Setting...

User Manual
Page 177
... Power Off File # 0 Yes According to default setting Yes PC Yes 1 min Yes SerialNo Yes Yes p.168 No p.168 Yes p.84 Yes p.169 Yes p.169 Sensor Cleaning Reset - - - p.181 - - - 175 [H Set-up] Menu Item Default Setting Last Memory Setting Reset Setting Page Format Beep - O (On) - - p.171...
... Power Off File # 0 Yes According to default setting Yes PC Yes 1 min Yes SerialNo Yes Yes p.168 No p.168 Yes p.84 Yes p.169 Yes p.169 Sensor Cleaning Reset - - - p.181 - - - 175 [H Set-up] Menu Item Default Setting Last Memory Setting Reset Setting Page Format Beep - O (On) - - p.171...

User Manual
Page 183
...A warning beep will sound if the battery capacity becomes low during cleaning. If the power is turned off and remove the lens. 2 Turn the camera on. 3 Select [Sensor Cleaning] on the [H Set-up] menu. 4 Press the four-way controller (5). Please stop cleaning immediately. • Do not put the tip ...CCD. • When the battery level is low, "Not enough battery remaining to the shutter or the CCD sensor. 6 • Use of the blower inside the lens mount area. Appendix Please contact PENTAX service center for white backgrounds and other shooting conditions if the CCD becomes dirty or dusty.
...A warning beep will sound if the battery capacity becomes low during cleaning. If the power is turned off and remove the lens. 2 Turn the camera on. 3 Select [Sensor Cleaning] on the [H Set-up] menu. 4 Press the four-way controller (5). Please stop cleaning immediately. • Do not put the tip ...CCD. • When the battery level is low, "Not enough battery remaining to the shutter or the CCD sensor. 6 • Use of the blower inside the lens mount area. Appendix Please contact PENTAX service center for white backgrounds and other shooting conditions if the CCD becomes dirty or dusty.

User Manual
Page 184
Using a blower with a cloth. The mirror is locked in the up position. 7 6 Clean the CCD. Do not wipe the CCD with a brush may scratch the CCD. 182 5 Press the four-way controller (2) to its original position. Sensor Cleaning Mirror Up to Clean CCD Turn the power OFF to end Mirror Up Cancel OK OK Appendix 8 Turn the camera off. 9 Attach the lens after the mirror returns to select [Mirror Up]. 6 Press the 4 button. Use a brush-less blower to remove dirt and dust from the CCD.
Using a blower with a cloth. The mirror is locked in the up position. 7 6 Clean the CCD. Do not wipe the CCD with a brush may scratch the CCD. 182 5 Press the four-way controller (2) to its original position. Sensor Cleaning Mirror Up to Clean CCD Turn the power OFF to end Mirror Up Cancel OK OK Appendix 8 Turn the camera off. 9 Attach the lens after the mirror returns to select [Mirror Up]. 6 Press the 4 button. Use a brush-less blower to remove dirt and dust from the CCD.
User Manual
Page 188
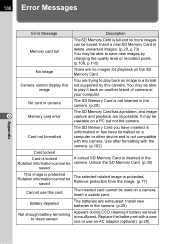
... Memory Card or delete unwanted images. (p.29, p.73) You may be able to play back an image in the camera. (p.25) Not enough battery remaining to clean sensor Appears during CCD cleaning if battery set with this card The inserted card cannot be saved The selected rotated image is protected... Rotation information cannot be used on a PC but not the camera. No card in camera The SD Memory Card is not ...
... Memory Card or delete unwanted images. (p.29, p.73) You may be able to play back an image in the camera. (p.25) Not enough battery remaining to clean sensor Appears during CCD cleaning if battery set with this card The inserted card cannot be saved The selected rotated image is protected... Rotation information cannot be used on a PC but not the camera. No card in camera The SD Memory Card is not ...

User Manual
Page 192
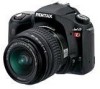
190 Main Specifications Appendix Type TTL autofocus, auto-exposure SLR digital-still camera with builtin retractable P-TTL flash Effective Pixels 6.10 megapixels Sensor Recorded Pixels Total pixels 6.31 megapixels, interline/interlace scan CCD with a primary color filter P .... 106 Approx. 173 Approx. 271 Compression: C (Best) = 1/3, D (Better) = 1/6, E (Good) = 1/12 White Balance LCD Monitor Playback Function Digital Filter Auto, Daylight, Shade, Cloudy, Fluorescent Light (D: Daylight, N: Neutral White, W: White), Tungsten Light, Flash, Manual 2.5 inch low-temperature poly-silicon TFT ...
190 Main Specifications Appendix Type TTL autofocus, auto-exposure SLR digital-still camera with builtin retractable P-TTL flash Effective Pixels 6.10 megapixels Sensor Recorded Pixels Total pixels 6.31 megapixels, interline/interlace scan CCD with a primary color filter P .... 106 Approx. 173 Approx. 271 Compression: C (Best) = 1/3, D (Better) = 1/6, E (Good) = 1/12 White Balance LCD Monitor Playback Function Digital Filter Auto, Daylight, Shade, Cloudy, Fluorescent Light (D: Daylight, N: Neutral White, W: White), Tungsten Light, Flash, Manual 2.5 inch low-temperature poly-silicon TFT ...