

User Manual
Page 4
...use of an AC adapter other irregularity, stop using the camera immediately, remove the battery and contact your neck is of the power and voltage specified for exclusive use of the camera may cause fire or electric shocks. • If the camera emits smoke or a strange smell, or in fire ... dropped, please do not hang the strap around your nearest PENTAX Service Center. Please take the camera apart or remodel the camera. Seek medical attention immediately if a card is accidentally swallowed. • Wrapping the strap of the camera around their necks. • Use an AC adapter that ...
...use of an AC adapter other irregularity, stop using the camera immediately, remove the battery and contact your neck is of the power and voltage specified for exclusive use of the camera may cause fire or electric shocks. • If the camera emits smoke or a strange smell, or in fire ... dropped, please do not hang the strap around your nearest PENTAX Service Center. Please take the camera apart or remodel the camera. Seek medical attention immediately if a card is accidentally swallowed. • Wrapping the strap of the camera around their necks. • Use an AC adapter that ...

User Manual
Page 5
... not discharge the flash while it is touching your clothing as there is a risk of discoloring. • If any abnormality, stop using the camera and get medical attention immediately. DO NOT HEAT ABOVE 140°F / 60°C, OR SHORT CIRCUIT. - Wash the affected areas thoroughly with clean... water and get medical attention immediately. 3 DO NOT CRUSH OR MODIFY. • Remove the battery from the battery should come in contact with your eyes, it may cause a loss of sight. Caution • Do not place your finger on your ...
... not discharge the flash while it is touching your clothing as there is a risk of discoloring. • If any abnormality, stop using the camera and get medical attention immediately. DO NOT HEAT ABOVE 140°F / 60°C, OR SHORT CIRCUIT. - Wash the affected areas thoroughly with clean... water and get medical attention immediately. 3 DO NOT CRUSH OR MODIFY. • Remove the battery from the battery should come in contact with your eyes, it may cause a loss of sight. Caution • Do not place your finger on your ...
User Manual
Page 6
... to use the product can cause a fire or electrical shock. • If a thunder storm should be present during use the battery charger to get inside the product, consult a PENTAX Service Center. Caution • Do not place heavy objects on the AC plug cord, allow the AC plug cord to become covered.... • Do not plug in the AC plug cord with a power source or voltage other than rechargeable lithium-ion battery D-LI92. If the AC plug cord becomes damaged, consult a PENTAX Service Center. • Do not short or touch the output terminals of the power cord if it is 100-240V ...
... to use the product can cause a fire or electrical shock. • If a thunder storm should be present during use the battery charger to get inside the product, consult a PENTAX Service Center. Caution • Do not place heavy objects on the AC plug cord, allow the AC plug cord to become covered.... • Do not plug in the AC plug cord with a power source or voltage other than rechargeable lithium-ion battery D-LI92. If the AC plug cord becomes damaged, consult a PENTAX Service Center. • Do not short or touch the output terminals of the power cord if it is 100-240V ...
User Manual
Page 8
... Card. • Please note that data using a tripod with any other equipment. • Storing the battery fully charged may decrease the battery performance. Avoid storing it with the camera, be possible to maintain high performance. • If the camera is recommended. • Do not hold or force the extended part of the lens. This...
... Card. • Please note that data using a tripod with any other equipment. • Storing the battery fully charged may decrease the battery performance. Avoid storing it with the camera, be possible to maintain high performance. • If the camera is recommended. • Do not hold or force the extended part of the lens. This...

User Manual
Page 9
...Parts 18 Names of Operating Parts 19 Monitor Indications 20 Getting Started 27 Attaching the Lens Cap and Strap 28 Powering the Camera 29 Charging the Battery 29 Installing the Battery 30 Using the AC Adapter 33 Installing the SD Memory Card 34 Number of Images Recordable on an SD Memory Card ...37 Turning the Camera On and Off 38 Starting-up in the Playback Mode 39 Initial Settings 40 Setting the Display Language 40 ...
...Parts 18 Names of Operating Parts 19 Monitor Indications 20 Getting Started 27 Attaching the Lens Cap and Strap 28 Powering the Camera 29 Charging the Battery 29 Installing the Battery 30 Using the AC Adapter 33 Installing the SD Memory Card 34 Number of Images Recordable on an SD Memory Card ...37 Turning the Camera On and Off 38 Starting-up in the Playback Mode 39 Initial Settings 40 Setting the Display Language 40 ...
User Manual
Page 19
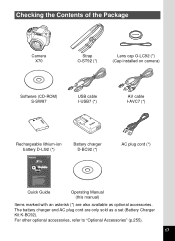
The battery charger and AC plug cord are also available as a set (Battery Charger Kit K-BC92). For other optional accessories, refer to "Optional Accessories" (p.255). 17 Checking the Contents of the Package Camera X70 Strap O-ST92 (*) Lens cap O-LC92 (*) (Cap installed on camera) Software (CD-ROM) S-SW87 USB cable I-USB7 (*) AV cable I-AVC7 (*) Rechargeable lithium-ion battery D-LI92 (*) Battery charger D-BC92 (*) AC plug cord (*) Quick Guide Operating Manual (this manual) Items marked with an asterisk (*) are only sold as optional accessories.
The battery charger and AC plug cord are also available as a set (Battery Charger Kit K-BC92). For other optional accessories, refer to "Optional Accessories" (p.255). 17 Checking the Contents of the Package Camera X70 Strap O-ST92 (*) Lens cap O-LC92 (*) (Cap installed on camera) Software (CD-ROM) S-SW87 USB cable I-USB7 (*) AV cable I-AVC7 (*) Rechargeable lithium-ion battery D-LI92 (*) Battery charger D-BC92 (*) AC plug cord (*) Quick Guide Operating Manual (this manual) Items marked with an asterisk (*) are only sold as optional accessories.

User Manual
Page 21
Bottom Tripod socket Battery/Card cover lock lever Battery/Card cover Names of each button. 19 p.51) for an explanation of the function of Operating Parts EVF/LCD button W button e-dial I button Q button Four-way controller 4 button Green/i button 3 button Refer to "Understanding the Button Functions" (p.48 -
Bottom Tripod socket Battery/Card cover lock lever Battery/Card cover Names of each button. 19 p.51) for an explanation of the function of Operating Parts EVF/LCD button W button e-dial I button Q button Four-way controller 4 button Green/i button 3 button Refer to "Understanding the Button Functions" (p.48 -

User Manual
Page 23
... Reduction icon (p.132) 5 Shutter speed 6 Aperture 7 Flash Mode (p.110) 8 Drive Mode (p.95 - p.101) 9 Focus Mode (p.113) 10 Digital Zoom/Intelligent Zoom icon (p.82) 11 Memory status (p.38) 12 Remaining image storage capacity 13 Battery level indicator (p.32) 14 Focus frame (p.64) 15 Date and time (p.44) 16 EV Compensation (p.108) 17 Date...
... Reduction icon (p.132) 5 Shutter speed 6 Aperture 7 Flash Mode (p.110) 8 Drive Mode (p.95 - p.101) 9 Focus Mode (p.113) 10 Digital Zoom/Intelligent Zoom icon (p.82) 11 Memory status (p.38) 12 Remaining image storage capacity 13 Battery level indicator (p.32) 14 Focus frame (p.64) 15 Date and time (p.44) 16 EV Compensation (p.108) 17 Date...
User Manual
Page 24
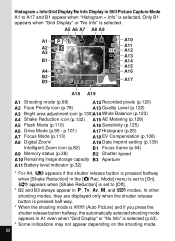
...indications may not appear depending on the shooting mode. 22 p.101) A17 Histogram (p.25) A7 Focus Mode (p.113) A18 EV Compensation (p.108) A8 Digital Zoom/ A19 Date Imprint setting (p.139) Intelligent Zoom icon (p.82) B1 Focus frame (p.64) A9 Memory status (p.38) B2 Shutter speed A10 ...Remaining image storage capacity B3 Aperture A11 Battery level indicator (p.32) * For A4, M appears if the shutter release button is pressed halfway when [Shake Reduction] in A1 even when "Grid...
...indications may not appear depending on the shooting mode. 22 p.101) A17 Histogram (p.25) A7 Focus Mode (p.113) A18 EV Compensation (p.108) A8 Digital Zoom/ A19 Date Imprint setting (p.139) Intelligent Zoom icon (p.82) B1 Focus frame (p.64) A9 Memory status (p.38) B2 Shutter speed A10 ...Remaining image storage capacity B3 Aperture A11 Battery level indicator (p.32) * For A4, M appears if the shutter release button is pressed halfway when [Shake Reduction] in A1 even when "Grid...

User Manual
Page 26
... Face Priority icon (p.78) A3 Memory status (p.38) A4 Folder number (p.207) A5 File number A6 Protect icon (p.170) A7 Voice memo icon (p.195) A8 Battery level indicator (p.32) A9 Volume icon A10 Captured date and time (p.44) A11 Four-way controller guide B1 Recorded pixels (p.120) B2 Quality Level (p.122...
... Face Priority icon (p.78) A3 Memory status (p.38) A4 Folder number (p.207) A5 File number A6 Protect icon (p.170) A7 Voice memo icon (p.195) A8 Battery level indicator (p.32) A9 Volume icon A10 Captured date and time (p.44) A11 Four-way controller guide B1 Recorded pixels (p.120) B2 Quality Level (p.122...
User Manual
Page 31
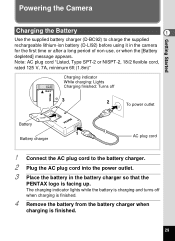
...PENTAX logo is finished. 29 Note: AC plug cord "Listed, Type SPT-2 or NISPT-2, 18/2 flexible cord, rated 125 V, 7A, minimum 6ft (1.8m)" Charging indicator While charging: Lights Charging finished: Turns off when charging is finished. 4 Remove the battery from the battery charger when charging is facing up. Powering the Camera... Getting Started Charging the Battery 1 Use the supplied battery charger (D-BC92) to the battery charger. 2 Plug the AC plug cord into...
...PENTAX logo is finished. 29 Note: AC plug cord "Listed, Type SPT-2 or NISPT-2, 18/2 flexible cord, rated 125 V, 7A, minimum 6ft (1.8m)" Charging indicator While charging: Lights Charging finished: Turns off when charging is finished. 4 Remove the battery from the battery charger when charging is facing up. Powering the Camera... Getting Started Charging the Battery 1 Use the supplied battery charger (D-BC92) to the battery charger. 2 Plug the AC plug cord into...

User Manual
Page 32
... (1). 30 The time required to fully charge the battery is 0°C to 40°C (32°F to light, the battery may overheat or be faulty. Replace with a new battery. • If the battery is provided with a new battery. Replace with the camera. Installing the Battery Use the rechargeable lithium-ion battery D-LI92 that is inserted correctly but the...
... (1). 30 The time required to fully charge the battery is 0°C to 40°C (32°F to light, the battery may overheat or be faulty. Replace with a new battery. • If the battery is provided with a new battery. Replace with the camera. Installing the Battery Use the rechargeable lithium-ion battery D-LI92 that is inserted correctly but the...

User Manual
Page 33
... . • When storing the battery for more than 6 months, charge the battery for 30 minutes using the battery charger and store the battery separately. Make sure that the PENTAX logo is locked in place. Avoid storing it . • This camera uses a rechargeable lithium-ion battery D-LI92. If the battery is ideal. Storing the battery below room temperature is incorrectly...
... . • When storing the battery for more than 6 months, charge the battery for 30 minutes using the battery charger and store the battery separately. Make sure that the PENTAX logo is locked in place. Avoid storing it . • This camera uses a rechargeable lithium-ion battery D-LI92. If the battery is ideal. Storing the battery below room temperature is incorrectly...
User Manual
Page 34
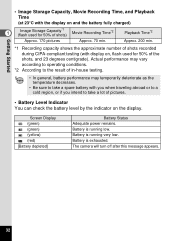
... used for 50% of the shots, and 23 degrees centigrade). Screen Display (green) (green) (yellow) (red) [Battery depleted] Battery Status Adequate power remains. Battery is exhausted. Battery is running very low. Getting Started • Image Storage Capacity, Movie Recording Time, and Playback Time (at 23°C...Be sure to take a spare battery with you when traveling abroad or to a cold region, or if you intend to take a lot of pictures. • Battery Level Indicator You can check the battery level by the indicator on the display. The camera will turn off after this message ...
... used for 50% of the shots, and 23 degrees centigrade). Screen Display (green) (green) (yellow) (red) [Battery depleted] Battery Status Adequate power remains. Battery is exhausted. Battery is running very low. Getting Started • Image Storage Capacity, Movie Recording Time, and Playback Time (at 23°C...Be sure to take a spare battery with you when traveling abroad or to a cold region, or if you intend to take a lot of pictures. • Battery Level Indicator You can check the battery level by the indicator on the display. The camera will turn off after this message ...
User Manual
Page 35
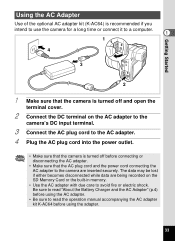
... if you intend to use the camera for a long time or connect it to a computer. 1 1 4 3 2 1 Make sure that the camera is turned off and open the ...terminal cover. 2 Connect the DC terminal on the AC adapter to the camera's DC input terminal. 3 Connect the AC...the AC plug cord into the power outlet. • Make sure that the camera is turned off before using the AC adapter. • Be sure to read ...AC plug cord and the power cord connecting the AC adapter to the camera are being recorded on the SD Memory Card or the built-in memory....
... if you intend to use the camera for a long time or connect it to a computer. 1 1 4 3 2 1 Make sure that the camera is turned off and open the ...terminal cover. 2 Connect the DC terminal on the AC adapter to the camera's DC input terminal. 3 Connect the AC...the AC plug cord into the power outlet. • Make sure that the camera is turned off before using the AC adapter. • Be sure to read ...AC plug cord and the power cord connecting the AC adapter to the camera are being recorded on the SD Memory Card or the built-in memory....

User Manual
Page 37
... card is facing toward the front of (1). After closing the battery/card cover, slide the battery/card cover lock lever in all the way. 3 Close the battery/card cover. Pull the card out. 35 Push the card in the opposite direction of the camera (the side with the lens). To Remove the SD Memory... Card 1 Open the battery/card cover. 2 Push the card into the SD Memory Card socket so...
... card is facing toward the front of (1). After closing the battery/card cover, slide the battery/card cover lock lever in all the way. 3 Close the battery/card cover. Pull the card out. 35 Push the card in the opposite direction of the camera (the side with the lens). To Remove the SD Memory... Card 1 Open the battery/card cover. 2 Push the card into the SD Memory Card socket so...
User Manual
Page 38
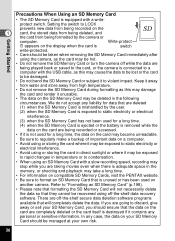
... may take a long time. • For information on compatible SD Memory Cards, visit the PENTAX website. • Be sure to static electricity or electrical interference. (3) when the SD Memory Card... has not been used for data that the data on another camera. Setting the switch to violent impact. Be sure to regularly make a backup of important data on ... In any liability for a long time. (4) when the SD Memory Card is ejected or the battery is removed while the data on the card are being formatted by the user. (2) when the...
... may take a long time. • For information on compatible SD Memory Cards, visit the PENTAX website. • Be sure to static electricity or electrical interference. (3) when the SD Memory Card... has not been used for data that the data on another camera. Setting the switch to violent impact. Be sure to regularly make a backup of important data on ... In any liability for a long time. (4) when the SD Memory Card is ejected or the battery is removed while the data on the card are being formatted by the user. (2) when the...

User Manual
Page 212
... to a computer - A pull-down menu appears. Brightness Level 30sec. while the camera is connected to select [Power Saving]. When you press the 3 button in the ...- when switching to the ordinary brightness by setting the display to select the time until the camera enters power saving mode. After the power saving function has been activated, the display returns to...adapter - Use the four-way controller (23) to dim automatically when no operation is performed after the camera is turned on, Power Saving is activated only after 15 seconds elapse even if [5sec.] is being...
... to a computer - A pull-down menu appears. Brightness Level 30sec. while the camera is connected to select [Power Saving]. When you press the 3 button in the ...- when switching to the ordinary brightness by setting the display to select the time until the camera enters power saving mode. After the power saving function has been activated, the display returns to...adapter - Use the four-way controller (23) to dim automatically when no operation is performed after the camera is turned on, Power Saving is activated only after 15 seconds elapse even if [5sec.] is being...

User Manual
Page 220
If the battery runs out of 8 power while images are being transmitted to the...French, German, Spanish, Italian, Japanese) It is recommended to use the optional AC adapter kit K-AC64 when the camera is included in the provided CD-ROM (S-SW87). Provided Software The following software is connected to a Computer 218 Setting... installing the software included on the provided CD-ROM on your camera to the computer, the image data may be lost or damaged. Windows • Image viewing/managing/editing software "ACDSee for PENTAX 3.0" (Nine languages: English, French, German, Spanish, Italian...
If the battery runs out of 8 power while images are being transmitted to the...French, German, Spanish, Italian, Japanese) It is recommended to use the optional AC adapter kit K-AC64 when the camera is included in the provided CD-ROM (S-SW87). Provided Software The following software is connected to a Computer 218 Setting... installing the software included on the provided CD-ROM on your camera to the computer, the image data may be lost or damaged. Windows • Image viewing/managing/editing software "ACDSee for PENTAX 3.0" (Nine languages: English, French, German, Spanish, Italian...

User Manual
Page 228
...the steps in "When the "Device Detector" screen does not appear" (p.228). The "Device Detector" screen appears. The power lamp is lit while the camera is connected to a PC, whereas it blinks while the card is connected to the Windows PC using the provided USB cable (I-USB7). 1 Turn your Windows... PC on. 2 Turn your camera off. 3 Connect your camera on the side of power while images are being accessed. If the battery runs out of the camera. Connect the terminal of the USB cable with pointing toward the 4 on the PC/AV ...
...the steps in "When the "Device Detector" screen does not appear" (p.228). The "Device Detector" screen appears. The power lamp is lit while the camera is connected to a PC, whereas it blinks while the card is connected to the Windows PC using the provided USB cable (I-USB7). 1 Turn your Windows... PC on. 2 Turn your camera off. 3 Connect your camera on the side of power while images are being accessed. If the battery runs out of the camera. Connect the terminal of the USB cable with pointing toward the 4 on the PC/AV ...
