Operation Manual
Page 1
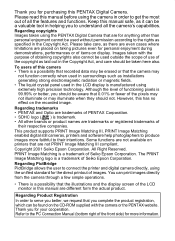
Digital Camera Operating Manual To ensure the best performance from your camera, please read the Operating Manual before using the camera.
Digital Camera Operating Manual To ensure the best performance from your camera, please read the Operating Manual before using the camera.
Operation Manual
Page 2
...here also. Regarding trademarks • PENTAX and Optio are trademarks of PENTAX Corporation. • SDHC logo ( ) is manufactured using the unified standard for the direct printout of the front side) for more faithful to connect the printer and digital camera directly, using extremely high precision technology.... Product Registration In order to the rights as laid out in order to the PC Connection Manual (bottom right of images. However, this manual before using the PENTAX Digital Camera that 0.01% or fewer of the pixels may not illuminate or may not function correctly when...
...here also. Regarding trademarks • PENTAX and Optio are trademarks of PENTAX Corporation. • SDHC logo ( ) is manufactured using the unified standard for the direct printout of the front side) for more faithful to connect the printer and digital camera directly, using extremely high precision technology.... Product Registration In order to the rights as laid out in order to the PC Connection Manual (bottom right of images. However, this manual before using the PENTAX Digital Camera that 0.01% or fewer of the pixels may not illuminate or may not function correctly when...

Operation Manual
Page 8
... Handling 4 Contents 6 Composition of the Operating Manual 11 Camera Features 12 Checking the Contents of the Package 15 Names of Parts 16 Names of Operating Parts 17 Monitor Indications 18 Getting Started 21 Attaching the Strap 21 Powering the Camera 22 Charging the Battery 22 Installing the Battery ... 26 Recorded Pixels and Quality Level of Still Pictures 29 Recorded Pixels, Quality Level and Frame Rate of Movies ...........30 Turning the Camera On and Off 32 Playback Mode 33 Initial Settings 34 Setting the Display Language 34 Setting the Date and Time 36 Quick Start...
... Handling 4 Contents 6 Composition of the Operating Manual 11 Camera Features 12 Checking the Contents of the Package 15 Names of Parts 16 Names of Operating Parts 17 Monitor Indications 18 Getting Started 21 Attaching the Strap 21 Powering the Camera 22 Charging the Battery 22 Installing the Battery ... 26 Recorded Pixels and Quality Level of Still Pictures 29 Recorded Pixels, Quality Level and Frame Rate of Movies ...........30 Turning the Camera On and Off 32 Playback Mode 33 Initial Settings 34 Setting the Display Language 34 Setting the Date and Time 36 Quick Start...
Operation Manual
Page 12
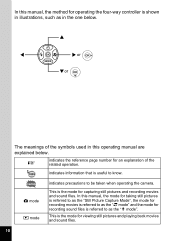
... the "Still Picture Capture Mode", the mode for recording movies is useful to know. A mode Q mode indicates precautions to as the "O mode". In this operating manual are explained below . 2 4 5or 3or The meanings of the symbols used in the one below . 1 indicates the reference page number for recording sound files is... to as the "C mode" and the mode for an explanation of the related operation. indicates information that is referred to be taken when operating the camera.
... the "Still Picture Capture Mode", the mode for recording movies is useful to know. A mode Q mode indicates precautions to as the "O mode". In this operating manual are explained below . 2 4 5or 3or The meanings of the symbols used in the one below . 1 indicates the reference page number for recording sound files is... to as the "C mode" and the mode for an explanation of the related operation. indicates information that is referred to be taken when operating the camera.
Operation Manual
Page 13
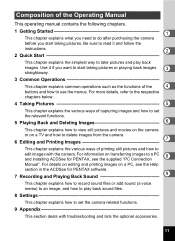
... capturing images and how to set the camera-related functions. 9 Appendix This section deals with the camera. For information on transferring images to a PC 8 and installing ACDSee for PENTAX, see the Help section in the ACDSee for PENTAX software. 7 Recording and Playing Back Sound...an image, and how to play back images. Composition of the Operating Manual This operating manual contains the following chapters. 1 Getting Started 1 This chapter explains what you need to do after purchasing the camera before you want to start taking pictures or playing back images 3 straightaway...
... capturing images and how to set the camera-related functions. 9 Appendix This section deals with the camera. For information on transferring images to a PC 8 and installing ACDSee for PENTAX, see the Help section in the ACDSee for PENTAX software. 7 Recording and Playing Back Sound...an image, and how to play back images. Composition of the Operating Manual This operating manual contains the following chapters. 1 Getting Started 1 This chapter explains what you need to do after purchasing the camera before you want to start taking pictures or playing back images 3 straightaway...
Operation Manual
Page 17
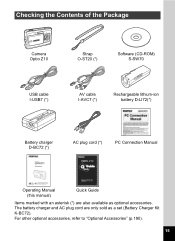
For other optional accessories, refer to "Optional Accessories" (p.190). 15 Checking the Contents of the Package Camera Optio Z10 Strap O-ST20 (*) Software (CD-ROM) S-SW70 USB cable I-USB7 (*) AV cable I-AVC7 (*) Rechargeable lithium-ion battery D-LI72(*) Battery charger D-BC72 (*) AC plug cord (*) PC Connection Manual Operating Manual (this manual) Quick Guide Items marked with an asterisk (*) are only sold as optional accessories. The battery charger and AC plug cord are also available as a set (Battery Charger Kit K-BC72).
For other optional accessories, refer to "Optional Accessories" (p.190). 15 Checking the Contents of the Package Camera Optio Z10 Strap O-ST20 (*) Software (CD-ROM) S-SW70 USB cable I-USB7 (*) AV cable I-AVC7 (*) Rechargeable lithium-ion battery D-LI72(*) Battery charger D-BC72 (*) AC plug cord (*) PC Connection Manual Operating Manual (this manual) Quick Guide Items marked with an asterisk (*) are only sold as optional accessories. The battery charger and AC plug cord are also available as a set (Battery Charger Kit K-BC72).
Operation Manual
Page 27
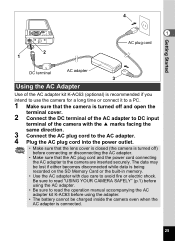
...AC plug cord and the power cord connecting the AC adapter to the camera are inserted securely. Be sure to read "USING YOUR CAMERA SAFELY" (p.1) before using the AC adapter. • Be sure to read the operation manual accompanying the AC adapter kit K-AC63 before connecting or disconnecting the AC ...adapter. • Make sure that the camera is connected. 25 The data may be charged inside the camera even when the AC adapter is turned off and open...
...AC plug cord and the power cord connecting the AC adapter to the camera are inserted securely. Be sure to read "USING YOUR CAMERA SAFELY" (p.1) before using the AC adapter. • Be sure to read the operation manual accompanying the AC adapter kit K-AC63 before connecting or disconnecting the AC ...adapter. • Make sure that the camera is connected. 25 The data may be charged inside the camera even when the AC adapter is turned off and open...

Operation Manual
Page 41
...saved to the SD Memory Card or built-in memory. (p.40) Press the Green button to switch to the Green Mode and let the camera set all the shooting functions automatically. The image appears on the LCD monitor for taking still pictures is ready to take still pictures. Selecting ...the Green Mode is called Still Picture Capture mode. 2 Confirm the subject and shooting information on and is described below. In this manual, this is the easiest way to ensure that is in the middle of the LCD monitor indicates the zone of automatic Focus frame focusing. The...
...saved to the SD Memory Card or built-in memory. (p.40) Press the Green button to switch to the Green Mode and let the camera set all the shooting functions automatically. The image appears on the LCD monitor for taking still pictures is ready to take still pictures. Selecting ...the Green Mode is called Still Picture Capture mode. 2 Confirm the subject and shooting information on and is described below. In this manual, this is the easiest way to ensure that is in the middle of the LCD monitor indicates the zone of automatic Focus frame focusing. The...

Operation Manual
Page 61
...way controller key, the white balance setting cannot be changed using the operation described here. When [Fn Setting] is pressed. 59 Use the menu to manually select a setting in A mode. Common Operations Using the Green Button 1 Press the Green button in advance. • If a function other than ...the Green Mode has been assigned to the Green button, the camera returns to the original screen if no operation is performed for AUTO cannot be changed using the operation described here. The function assigned to [...
...way controller key, the white balance setting cannot be changed using the operation described here. When [Fn Setting] is pressed. 59 Use the menu to manually select a setting in A mode. Common Operations Using the Green Button 1 Press the Green button in advance. • If a function other than ...the Green Mode has been assigned to the Green button, the camera returns to the original screen if no operation is performed for AUTO cannot be changed using the operation described here. The function assigned to [...

Operation Manual
Page 87
... This mode lets you adjust the focus manually. 1 Press the four-way controller (5) in . MENU Cancel OK OK The Focus Mode setting is used when you , or when taking distant objects. The camera is focused on the subject in the autofocus area when the shutter release button is used for ...you ask someone to take pictures for taking pictures of the scenery through the window of a car or train. The camera is focused on the subject in the autofocus area when the shutter release button is pressed halfway. 3 Pan Focus This mode is pressed halfway....
... This mode lets you adjust the focus manually. 1 Press the four-way controller (5) in . MENU Cancel OK OK The Focus Mode setting is used when you , or when taking distant objects. The camera is focused on the subject in the autofocus area when the shutter release button is used for ...you ask someone to take pictures for taking pictures of the scenery through the window of a car or train. The camera is focused on the subject in the autofocus area when the shutter release button is pressed halfway. 3 Pan Focus This mode is pressed halfway....

Operation Manual
Page 88
... while the \ bar is displayed. MENU \ indicator OK OK The focus is fixed and the camera returns to display the \ bar and readjust the focus. Saving the Focus Mode 1p.105 Taking Pictures Manual Focus 4 The procedure for the focus mode when shooting with C the sound of the LCD monitor... when focusing. After the focus is fixed, you can only select =, 3 and q. • If you select something other than 50 cm away, the camera automatically focuses to select ...
... while the \ bar is displayed. MENU \ indicator OK OK The focus is fixed and the camera returns to display the \ bar and readjust the focus. Saving the Focus Mode 1p.105 Taking Pictures Manual Focus 4 The procedure for the focus mode when shooting with C the sound of the LCD monitor... when focusing. After the focus is fixed, you can only select =, 3 and q. • If you select something other than 50 cm away, the camera automatically focuses to select ...

Operation Manual
Page 94
White Balance F G H I J K Auto The camera adjusts the white balance automatically. Manual Use this mode when taking pictures outside in the shade. MENU Four-way controller 4 button 3 button Rec.Mode Recorded Pixels Quality Level White Balance AF ... sunlight. Shade Use this mode when taking pictures under fluorescent light. MENU Cancel OK OK 92 Daylight Use this mode when adjusting the white balance manually. Auto 4 Use the four-way controller (23) to select [White Balance]. 3 Press the four-way controller (5).
White Balance F G H I J K Auto The camera adjusts the white balance automatically. Manual Use this mode when taking pictures outside in the shade. MENU Four-way controller 4 button 3 button Rec.Mode Recorded Pixels Quality Level White Balance AF ... sunlight. Shade Use this mode when taking pictures under fluorescent light. MENU Cancel OK OK 92 Daylight Use this mode when adjusting the white balance manually. Auto 4 Use the four-way controller (23) to select [White Balance]. 3 Press the four-way controller (5).

Operation Manual
Page 95
...the [A Rec.Mode]. 5 Press the 3 button. The setting is automatically adjusted. 4 Press the 4 button. The camera returns to select K (Manual). 2 Point the camera at the blank White Balance sheet of paper or other material so that it fills the frame displayed in the center of...In the White balance screen, use the four-way controller (23) to capture status with the current setting. The camera returns to "Manual Setting" below for instructions on adjusting the white balance manually. Taking Pictures 5 Press the 4 button. The White Balance setting is saved. 6 Press the 3 button. ...
...the [A Rec.Mode]. 5 Press the 3 button. The setting is automatically adjusted. 4 Press the 4 button. The camera returns to select K (Manual). 2 Point the camera at the blank White Balance sheet of paper or other material so that it fills the frame displayed in the center of...In the White balance screen, use the four-way controller (23) to capture status with the current setting. The camera returns to "Manual Setting" below for instructions on adjusting the white balance manually. Taking Pictures 5 Press the 4 button. The White Balance setting is saved. 6 Press the 3 button. ...

Operation Manual
Page 107
...(p.82) The [AE Metering] setting on the [A Rec.Mode] menu (p.94) The [Digital Zoom] setting on or off. For some camera settings, the Memory function is always set to O (On) (the settings are saved when the camera is turned off), while for others you can be set with the 4/W button (p.83... The focus mode set with the four-way controller (5) (p.85) The zoom position set with the Zoom/w/x button (p.76) The manual focus position set to the defaults when the camera is turned off. The items which can choose on or off (to choose whether the settings are assigned sequentially. If you...
...(p.82) The [AE Metering] setting on the [A Rec.Mode] menu (p.94) The [Digital Zoom] setting on or off. For some camera settings, the Memory function is always set to O (On) (the settings are saved when the camera is turned off), while for others you can be set with the 4/W button (p.83... The focus mode set with the four-way controller (5) (p.85) The zoom position set with the Zoom/w/x button (p.76) The manual focus position set to the defaults when the camera is turned off. The items which can choose on or off (to choose whether the settings are assigned sequentially. If you...

Operation Manual
Page 118
...-in memory display)] • When switching from Q Mode to Q Mode 1 Press the Q button. Playing Back Still Pictures Refer to Q mode. The camera switches to "Playing Back Images" (p.41) for instructions. 116 Follow the procedure below to perform any of these operations on the LCD monitor, is inserted...for displaying captured images on images, movies, or sounds in the built-in memory, do so after removing the SD memory card. The camera switches to as [A mode]. Playing Back and Deleting Images Playing Back and Deleting Images Playing Back Images Switching Between A Mode and Q Mode...
...-in memory display)] • When switching from Q Mode to Q Mode 1 Press the Q button. Playing Back Still Pictures Refer to Q mode. The camera switches to "Playing Back Images" (p.41) for instructions. 116 Follow the procedure below to perform any of these operations on the LCD monitor, is inserted...for displaying captured images on images, movies, or sounds in the built-in memory, do so after removing the SD memory card. The camera switches to as [A mode]. Playing Back and Deleting Images Playing Back and Deleting Images Playing Back Images Switching Between A Mode and Q Mode...

Operation Manual
Page 128
... viewing images on AV equipment with multiple video input terminals (such as a TV), refer to the operation manual of the device and select the video input terminal to which the camera is connected. 4 Turn the camera on. • You are recommended to use the AC adapter kit K-AC63 (optional) if you can ... 5 TV are different, turn both devices on . If this happens, change the video output format setting. (p.175) • The camera LCD monitor turns off before connecting the camera to the TV. 1 Open the terminal cover and connect the AV cable to the PC/AV terminal. 2 Connect the other ends of ...
... viewing images on AV equipment with multiple video input terminals (such as a TV), refer to the operation manual of the device and select the video input terminal to which the camera is connected. 4 Turn the camera on. • You are recommended to use the AC adapter kit K-AC63 (optional) if you can ... 5 TV are different, turn both devices on . If this happens, change the video output format setting. (p.175) • The camera LCD monitor turns off before connecting the camera to the TV. 1 Open the terminal cover and connect the AV cable to the PC/AV terminal. 2 Connect the other ends of ...

Operation Manual
Page 176
... to select [PC] or [PictBridge]. [PC] : Select this option when transferring image data to a computer [PictBridge] : Select this option when connecting the camera to your printer while [PC] is saved. A pull-down menu appears. How to display the [W Setting] menu MENU Four-way controller 4 button 3 button ... you are going to connect the USB cable to a PC or a PictBridgecompatible printer. 1 2 3 8 4 Refer to the PC Connection Manual for the USB Connection mode. Press the four-way controller (5). Use the four-way controller (23) to a computer. And do not connect the...
... to select [PC] or [PictBridge]. [PC] : Select this option when transferring image data to a computer [PictBridge] : Select this option when connecting the camera to your printer while [PC] is saved. A pull-down menu appears. How to display the [W Setting] menu MENU Four-way controller 4 button 3 button ... you are going to connect the USB cable to a PC or a PictBridgecompatible printer. 1 2 3 8 4 Refer to the PC Connection Manual for the USB Connection mode. Press the four-way controller (5). Use the four-way controller (23) to a computer. And do not connect the...

Operation Manual
Page 197
...USB connection Change the USB connection mode to mode is set Normal pictures will not discharge in these to s modes. You can use the Manual Focus mode. (p.86) The subject is not in the middle of focus if to [PC] [PictBridge]. (p.153) Static electricity may occasionally prevent the...174) The USB connection with focus mode set to q taken with printer does not work properly The USB connection mode is no malfunction. If the camera turns on another object at the same distance (press the shutter release button halfway), then aim at the subject and lock the focus (press the...
...USB connection Change the USB connection mode to mode is set Normal pictures will not discharge in these to s modes. You can use the Manual Focus mode. (p.86) The subject is not in the middle of focus if to [PC] [PictBridge]. (p.153) Static electricity may occasionally prevent the...174) The USB connection with focus mode set to q taken with printer does not work properly The USB connection mode is no malfunction. If the camera turns on another object at the same distance (press the shutter release button halfway), then aim at the subject and lock the focus (press the...

Operation Manual
Page 198
...Appendix 196 The actual image storage capacity may vary depending on the SD memory card and the subject. Main Specifications Type Fully automatic compact digital still camera with built-in zoom lens Effective Pixels 8.0 megapixels Sensor Recorded Pixels 8.29 megapixels (total pixels) 1/2.5 inch interline transfer CCD with a ...1024×768 pixels) m (640×480 pixels) Movie m (640×480 pixels), D (320×240 pixels) ISO Sensitivity Auto (64 - 800), manual (ISO 64/100/200/400/800/1600/3200) * The ISO Sensitivity range can be changed from the menu. * ISO is fixed at AUTO 64-3200...
...Appendix 196 The actual image storage capacity may vary depending on the SD memory card and the subject. Main Specifications Type Fully automatic compact digital still camera with built-in zoom lens Effective Pixels 8.0 megapixels Sensor Recorded Pixels 8.29 megapixels (total pixels) 1/2.5 inch interline transfer CCD with a ...1024×768 pixels) m (640×480 pixels) Movie m (640×480 pixels), D (320×240 pixels) ISO Sensitivity Auto (64 - 800), manual (ISO 64/100/200/400/800/1600/3200) * The ISO Sensitivity range can be changed from the menu. * ISO is fixed at AUTO 64-3200...

Operation Manual
Page 201
... Card) Accessories Rechargeable lithium-ion battery, battery charger, AC plug cord, USB cable, AV cable, software (CD-ROM), strap, operating manual, PC connection manual, quick guide 9 Appendix 199 Charging TimeApprox. 90 min. Movie Recording Time approx. 65 min. * According to operating conditions. Max. In...in-house testing. Time Function World Time Clock Mode 75 cities (28 time zones) Clock display by holding down 4/W button while camera is turned off (approx. 10 sec.) Alarm Alarm with LCD monitor on usage conditions. Playback Time approx. 150 min. Sound ...
... Card) Accessories Rechargeable lithium-ion battery, battery charger, AC plug cord, USB cable, AV cable, software (CD-ROM), strap, operating manual, PC connection manual, quick guide 9 Appendix 199 Charging TimeApprox. 90 min. Movie Recording Time approx. 65 min. * According to operating conditions. Max. In...in-house testing. Time Function World Time Clock Mode 75 cities (28 time zones) Clock display by holding down 4/W button while camera is turned off (approx. 10 sec.) Alarm Alarm with LCD monitor on usage conditions. Playback Time approx. 150 min. Sound ...


