
Operation Manual
Page 1
... to change without notice. 57343 Copyright © PENTAX Corporation 2004 01-200402 Printed in Japan Digital Camera Operating Manual To ensure the best performance from your camera, please read the Operating Manual before using the camera. Limited PENTAX House, Heron Drive, Langley, Slough, Berks SL3 8PN, U.K. (http://www.pentax.co.uk) PENTAX France S.A.S. 12/14, rue Jean Poulmarch...
... to change without notice. 57343 Copyright © PENTAX Corporation 2004 01-200402 Printed in Japan Digital Camera Operating Manual To ensure the best performance from your camera, please read the Operating Manual before using the camera. Limited PENTAX House, Heron Drive, Langley, Slough, Berks SL3 8PN, U.K. (http://www.pentax.co.uk) PENTAX France S.A.S. 12/14, rue Jean Poulmarch...

Operation Manual
Page 2
... cannot be used in helping you to get the most out of all the camera's capabilities. Although the level of functioning pixels is 99.99% or better, you for buying the PENTAX Optio S4i Digital Camera. When used outside the scope of use of the copyright as specified in the... Copyright Act. Keep this camera • There is manufactured using the camera in the Copyright Act, and care should not. To users...
... cannot be used in helping you to get the most out of all the camera's capabilities. Although the level of functioning pixels is 99.99% or better, you for buying the PENTAX Optio S4i Digital Camera. When used outside the scope of use of the copyright as specified in the... Copyright Act. Keep this camera • There is manufactured using the camera in the Copyright Act, and care should not. To users...
Operation Manual
Page 3
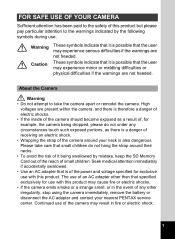
... medical attention immediately if accidentally swallowed. • Use an AC adapter that small children do not under any other irregularity, stop using the camera immediately, remove the battery or disconnect the AC adapter and contact your neck is of it being dropped, please do not hang the strap around... your nearest PENTAX service center. About the Camera Warning • Do not attempt to the warnings indicated by mistake, keep the SD Memory Card out of the reach of...
... medical attention immediately if accidentally swallowed. • Use an AC adapter that small children do not under any other irregularity, stop using the camera immediately, remove the battery or disconnect the AC adapter and contact your neck is of it being dropped, please do not hang the strap around... your nearest PENTAX service center. About the Camera Warning • Do not attempt to the warnings indicated by mistake, keep the SD Memory Card out of the reach of...
Operation Manual
Page 4
...shock. • If water should happen to burn yourself during removal. • Some portions of the camera heat up during using, unplug the power cord and discontinue using and consult a PENTAX Service Center. Continuing to use the product can cause damage to use , so please take care, as...contact with water. Continuing to the equipment, fire or electrical shock. • Wipe off the plug of smoke or strange odor from the camera immediately if it may explode. • Remove the battery from the product or other abnormality occurs, immediately discontinue using . Flush your clothing ...
...shock. • If water should happen to burn yourself during removal. • Some portions of the camera heat up during using, unplug the power cord and discontinue using and consult a PENTAX Service Center. Continuing to use the product can cause damage to use , so please take care, as...contact with water. Continuing to the equipment, fire or electrical shock. • Wipe off the plug of smoke or strange odor from the camera immediately if it may explode. • Remove the battery from the product or other abnormality occurs, immediately discontinue using . Flush your clothing ...

Operation Manual
Page 6
... to substantial vibrations, shocks or pressure. PENTAX is not responsible for consequential damages (costs incurred as a result of taking pictures, loss of benefits that were to be obtained through taking pictures) arising from failure of this camera is still working properly, particularly prior to prevent the camera from becoming moldy during travelling). Remove...
... to substantial vibrations, shocks or pressure. PENTAX is not responsible for consequential damages (costs incurred as a result of taking pictures, loss of benefits that were to be obtained through taking pictures) arising from failure of this camera is still working properly, particularly prior to prevent the camera from becoming moldy during travelling). Remove...

Operation Manual
Page 7
... overtighten the screw in the tripod socket on the inside and outside of water get onto the camera, please wipe dry. • Refer to rapid temperature changes, condensation may damage the exterior of the camera or the LCD monitor. • When using an SD Memory Card" (p.21) regarding the ...Memory Card. • Please do not press forcefully on the LCD monitor. If rain or drops of the camera. This could cause breakage or malfunction. • Be careful not to sit down with the camera in temperature has subsided. • Avoid contact with garbage, dirt, sand, dust, water, toxic gases, ...
... overtighten the screw in the tripod socket on the inside and outside of water get onto the camera, please wipe dry. • Refer to rapid temperature changes, condensation may damage the exterior of the camera or the LCD monitor. • When using an SD Memory Card" (p.21) regarding the ...Memory Card. • Please do not press forcefully on the LCD monitor. If rain or drops of the camera. This could cause breakage or malfunction. • Be careful not to sit down with the camera in temperature has subsided. • Avoid contact with garbage, dirt, sand, dust, water, toxic gases, ...
Operation Manual
Page 8
... Checking the Contents of the Package 10 Names of Parts 11 Names of Operating Parts 12 Getting Started 13 Attaching the Strap 13 Powering the Camera 14 Installing the Battery 14 Removing the Battery 14 Charging the Battery 15 Using the AC Adapter (optional 18 Installing the SD Memory Card 20... 28 Playing Back an Image 28 Playing Back the Previous or Next Image 28 Rotating the Displayed Image 29 Common Operations 30 Turning the Camera On and Off 30 Lens Closed Playback Mode 31 Voice Recording Mode 31 Using the Button Functions 32 Capture Mode 32 Playback Mode 34 ...
... Checking the Contents of the Package 10 Names of Parts 11 Names of Operating Parts 12 Getting Started 13 Attaching the Strap 13 Powering the Camera 14 Installing the Battery 14 Removing the Battery 14 Charging the Battery 15 Using the AC Adapter (optional 18 Installing the SD Memory Card 20... 28 Playing Back an Image 28 Playing Back the Previous or Next Image 28 Rotating the Displayed Image 29 Common Operations 30 Turning the Camera On and Off 30 Lens Closed Playback Mode 31 Voice Recording Mode 31 Using the Button Functions 32 Capture Mode 32 Playback Mode 34 ...

Operation Manual
Page 10
... Images on a TV 99 Setting the Printing Service (DPOF 100 Printing Single Images 100 Printing All Images 102 Direct Printing Using PictBridge 103 Connecting the Camera to the Printer 103 Printing Single Images 104 Printing All Images 105 Printing Using the DPOF Settings 105 Disconnecting the... the Printer 106 Editing Images 107 Changing the Image Size and Quality 107 Trimming Images 109 Copying Files 110 Settings 112 Camera Settings 112 Formatting an SD Memory Card or the Built-in Memory 112 Changing the Start-up Screen 113 Changing the Sound Settings 114 Changing ...
... Images on a TV 99 Setting the Printing Service (DPOF 100 Printing Single Images 100 Printing All Images 102 Direct Printing Using PictBridge 103 Connecting the Camera to the Printer 103 Printing Single Images 104 Printing All Images 105 Printing Using the DPOF Settings 105 Disconnecting the... the Printer 106 Editing Images 107 Changing the Image Size and Quality 107 Trimming Images 109 Copying Files 110 Settings 112 Camera Settings 112 Formatting an SD Memory Card or the Built-in Memory 112 Changing the Start-up Screen 113 Changing the Sound Settings 114 Changing ...

Operation Manual
Page 11
... Contents of the Operating Manual This operating manual contains the following chapters. 1 Getting Started 1 This chapter explains what to do after purchasing the camera before you want to start taking pictures straightaway. 3 Common Operations This chapter explains common operations such as the functions of the buttons and how ...to take pictures and play back images on the camera or on a TV, how to 6 delete, resize and trim images, and how to print images directly to the printer. ...
... Contents of the Operating Manual This operating manual contains the following chapters. 1 Getting Started 1 This chapter explains what to do after purchasing the camera before you want to start taking pictures straightaway. 3 Common Operations This chapter explains common operations such as the functions of the buttons and how ...to take pictures and play back images on the camera or on a TV, how to 6 delete, resize and trim images, and how to print images directly to the printer. ...

Operation Manual
Page 12
Checking the Contents of the Package Camera Optio S4i Strap O-ST20 (∗) Software (CD-ROM) S-SW20 AV cable I-AVC7 (∗) USB cable I-USB7 (∗) Rechargeable lithium-ion battery D-LI8 (∗) Battery charger D-BC20 (∗) AC plug cord D-CO2J Operating Manual (this manual) Operating Manual (PC Connection Manual) Items marked with an asterisk (∗) are also available as optional accessories. For other optional accessories, refer to "Optional Accessories" (p.127). 10
Checking the Contents of the Package Camera Optio S4i Strap O-ST20 (∗) Software (CD-ROM) S-SW20 AV cable I-AVC7 (∗) USB cable I-USB7 (∗) Rechargeable lithium-ion battery D-LI8 (∗) Battery charger D-BC20 (∗) AC plug cord D-CO2J Operating Manual (this manual) Operating Manual (PC Connection Manual) Items marked with an asterisk (∗) are also available as optional accessories. For other optional accessories, refer to "Optional Accessories" (p.127). 10
Operation Manual
Page 16
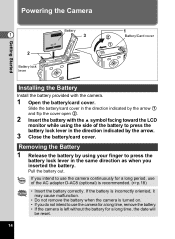
...D-AC8 (optional) is left without the battery for a long time, remove the battery. • If the camera is recommended. (1p.18) • Insert the battery correctly. Pull the battery out. Powering the Camera Getting Started 1 2 Battery lock lever Battery 3 1 2 Battery/Card cover 1 Installing the Battery Install the battery...date will be reset. 14 If the battery is incorrectly oriented, it may cause malfunction. • Do not remove the battery when the camera is turned on. • If you intend to use of the battery to press the battery lock lever in the same direction as when...
...D-AC8 (optional) is left without the battery for a long time, remove the battery. • If the camera is recommended. (1p.18) • Insert the battery correctly. Pull the battery out. Powering the Camera Getting Started 1 2 Battery lock lever Battery 3 1 2 Battery/Card cover 1 Installing the Battery Install the battery...date will be reset. 14 If the battery is incorrectly oriented, it may cause malfunction. • Do not remove the battery when the camera is turned on. • If you intend to use of the battery to press the battery lock lever in the same direction as when...
Operation Manual
Page 17
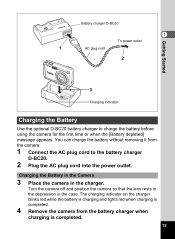
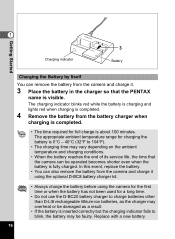
... can charge the battery without removing it from the battery charger when charging is completed. 4 Remove the camera from the camera. 1 Connect the AC plug cord to charge the battery before using the camera for the first time or when the [Battery depleted] message appears. Getting Started Battery charger D-BC20 1...D-BC20 battery charger to the battery charger D-BC20. 2 Plug the AC plug cord into the power outlet. Charging the Battery in the Camera 3 Place the camera in the case. Turn the camera off and position the camera so that the lens rests in the depression in the charger.
... can charge the battery without removing it from the battery charger when charging is completed. 4 Remove the camera from the camera. 1 Connect the AC plug cord to charge the battery before using the camera for the first time or when the [Battery depleted] message appears. Getting Started Battery charger D-BC20 1...D-BC20 battery charger to the battery charger D-BC20. 2 Plug the AC plug cord into the power outlet. Charging the Battery in the Camera 3 Place the camera in the case. Turn the camera off and position the camera so that the lens rests in the depression in the charger.
Operation Manual
Page 18
...depending on the ambient temperature and charging conditions. • When the battery reaches the end of its service life, the time that the PENTAX name is inserted correctly but the charging indicator fails to blink, the battery may be faulty. The appropriate ambient temperature range for full ... Charging indicator 3 Battery Charging the Battery by Itself You can remove the battery from the camera and charge it using the optional D-BC8 battery charger kit. • Always charge the battery before using the camera for the first time or when the battery has not been used for a long time...
...depending on the ambient temperature and charging conditions. • When the battery reaches the end of its service life, the time that the PENTAX name is inserted correctly but the charging indicator fails to blink, the battery may be faulty. The appropriate ambient temperature range for full ... Charging indicator 3 Battery Charging the Battery by Itself You can remove the battery from the camera and charge it using the optional D-BC8 battery charger kit. • Always charge the battery before using the camera for the first time or when the battery has not been used for a long time...
Operation Manual
Page 19
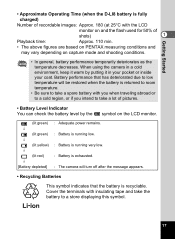
... with insulating tape and take a lot of shots) 1 Playback time: Approx. 110 min. • The above figures are based on PENTAX measuring conditions and may vary depending on and the flash used for 50% of pictures. • Battery Level Indicator You can check the ...; (lit red) ↓ [Battery depleted] : Adequate power remains. : Battery is running low. : Battery is running very low. : Battery is exhausted. : The camera will turn off after the message appears. • Recycling Batteries This symbol indicates that has deteriorated due to low temperature will be restored when the...
... with insulating tape and take a lot of shots) 1 Playback time: Approx. 110 min. • The above figures are based on PENTAX measuring conditions and may vary depending on and the flash used for 50% of pictures. • Battery Level Indicator You can check the ...; (lit red) ↓ [Battery depleted] : Adequate power remains. : Battery is running low. : Battery is running very low. : Battery is exhausted. : The camera will turn off after the message appears. • Recycling Batteries This symbol indicates that has deteriorated due to low temperature will be restored when the...

Operation Manual
Page 20
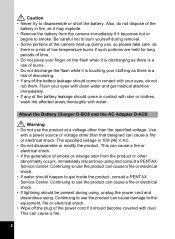
... turned off and open the terminal cover. 2 Connect the DC terminal on the AC adapter to the DC input terminal on the camera, being sure to match the 4 symbols. 3 Connect the AC plug cord to the AC adapter. 4 Plug the AC plug cord into the power outlet. • ...Make sure that the camera is turned off when connecting or disconnecting the AC adapter. • Make sure that the AC plug cord and connecting cable are taking pictures. •...
... turned off and open the terminal cover. 2 Connect the DC terminal on the AC adapter to the DC input terminal on the camera, being sure to match the 4 symbols. 3 Connect the AC plug cord to the AC adapter. 4 Plug the AC plug cord into the power outlet. • ...Make sure that the camera is turned off when connecting or disconnecting the AC adapter. • Make sure that the AC plug cord and connecting cable are taking pictures. •...
Operation Manual
Page 21
Refer to read the section on "FOR SAFE USE OF YOUR CAMERA" on page 1. Getting Started Precautions When Using the Battery Charger or AC Adapter To avoid the risk of fire or electric shock when using the battery charger or AC adapter, be sure to page 132 for the specifications of 1 the battery charger and AC adapter. 19
Refer to read the section on "FOR SAFE USE OF YOUR CAMERA" on page 1. Getting Started Precautions When Using the Battery Charger or AC Adapter To avoid the risk of fire or electric shock when using the battery charger or AC adapter, be sure to page 132 for the specifications of 1 the battery charger and AC adapter. 19
Operation Manual
Page 22
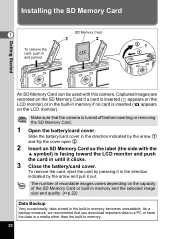
... built-in the direction indicated by the arrow 1 and flip the cover open 2 . 2 Insert an SD Memory Card so the label (the side with this camera. The number of the SD Memory Card or built-in memory and the selected image size and quality. (1p.22) Data Backup Very occasionally, data... the 2 symbol) is turned off before inserting or removing the SD Memory Card. 1 Open the battery/card cover. As a backup measure, we recommend that the camera is facing toward the LCD monitor and push the card in memory. 20 Slide the battery/card cover in the direction indicated by the arrow...
... built-in the direction indicated by the arrow 1 and flip the cover open 2 . 2 Insert an SD Memory Card so the label (the side with this camera. The number of the SD Memory Card or built-in memory and the selected image size and quality. (1p.22) Data Backup Very occasionally, data... the 2 symbol) is turned off before inserting or removing the SD Memory Card. 1 Open the battery/card cover. As a backup measure, we recommend that the camera is facing toward the LCD monitor and push the card in memory. 20 Slide the battery/card cover in the direction indicated by the arrow...

Operation Manual
Page 23
...the card compatibility can also be answered by prohibiting recording of new data, deletion of existing data or 1 formatting of important data on another camera. Be sure to make a backup of the card. • Care should be taken if you remove the SD Memory Card immediately after using...PC with a write-protect switch. Getting Started Precautions When Using an SD Memory Card • Make sure that have compatibilty with your nearest PENTAX service center. 21 If it to [LOCK] protects the existing data by your camera. Write-protect switch Setting the switch to violent impact.
...the card compatibility can also be answered by prohibiting recording of new data, deletion of existing data or 1 formatting of important data on another camera. Be sure to make a backup of the card. • Care should be taken if you remove the SD Memory Card immediately after using...PC with a write-protect switch. Getting Started Precautions When Using an SD Memory Card • Make sure that have compatibilty with your nearest PENTAX service center. 21 If it to [LOCK] protects the existing data by your camera. Write-protect switch Setting the switch to violent impact.

Operation Manual
Page 25
... menus, error messages, etc. are displayed from the following: English, French, German, Spanish, Italian, Russian, Chinese (traditional and simplified) and Japanese. 1 Turn the camera on , follow the procedure below to choose the display language. The default setting is not required. Initial setting Language/ English City NYC DST MENU Exit... button Four-way controller DISPLAY button OK button MENU button If the Initial Settings screen or Date Adjust screen appears when you turn the camera on . 2 Use the four-way controller (45) to set the display language and/or current date and time.
... menus, error messages, etc. are displayed from the following: English, French, German, Spanish, Italian, Russian, Chinese (traditional and simplified) and Japanese. 1 Turn the camera on , follow the procedure below to choose the display language. The default setting is not required. Initial setting Language/ English City NYC DST MENU Exit... button Four-way controller DISPLAY button OK button MENU button If the Initial Settings screen or Date Adjust screen appears when you turn the camera on . 2 Use the four-way controller (45) to set the display language and/or current date and time.

Operation Manual
Page 27
... to "Changing the Date and Time" (p.115). 25 Press the OK button again. • When you finish the settings and press the OK button, the camera clock is displayed, you can change the [year], [hour] and [minutes]. Refer to take pictures. If you set the date and time using the MENU... settings after they have finished the 1 settings. Choose AM or PM if you selected [12h] in Step 3. 9 Press the OK button when you turn the camera on the TV, radio, etc.) reaches 00 seconds. • When the Initial Settings screen is reset to 00 seconds. • To set the exact time...
... to "Changing the Date and Time" (p.115). 25 Press the OK button again. • When you finish the settings and press the OK button, the camera clock is displayed, you can change the [year], [hour] and [minutes]. Refer to take pictures. If you set the date and time using the MENU... settings after they have finished the 1 settings. Choose AM or PM if you selected [12h] in Step 3. 9 Press the OK button when you turn the camera on the TV, radio, etc.) reaches 00 seconds. • When the Initial Settings screen is reset to 00 seconds. • To set the exact time...


