

User Manual
Page 2
...copyrights Images taken using extremely high precision technology. Images taken with this PENTAX x Digital Camera. The DNG logo is either a registered trademark or trademark of Adobe Systems Incorporated in the United States and/or other lens or accessory, see p.45 and p.230. Although the level of ... can print images directly from the actual product. Regarding PictBridge PictBridge allows the user to connect the printer and digital camera directly, using the camera in order to their respective companies. To use any other countries. All other brands or product names are trademarks...
...copyrights Images taken using extremely high precision technology. Images taken with this PENTAX x Digital Camera. The DNG logo is either a registered trademark or trademark of Adobe Systems Incorporated in the United States and/or other lens or accessory, see p.45 and p.230. Although the level of ... can print images directly from the actual product. Regarding PictBridge PictBridge allows the user to connect the printer and digital camera directly, using the camera in order to their respective companies. To use any other countries. All other brands or product names are trademarks...

User Manual
Page 3
... power or voltage can cause a fire, electric shock, or camera breakdown. • If any irregularities occur during use the AC adapter exclusively developed for this product, with a telephoto lens may damage your nearest PENTAX Service Center. Using an AC adapter not exclusive to this product...directly at the sun through the camera with the risk of electric shock. • If the camera interior is exposed due to dropping or otherwise damaging the camera, never touch the exposed portion. High voltage areas are present inside the camera, with a telephoto lens attached, as smoke or a...
... power or voltage can cause a fire, electric shock, or camera breakdown. • If any irregularities occur during use the AC adapter exclusively developed for this product, with a telephoto lens may damage your nearest PENTAX Service Center. Using an AC adapter not exclusive to this product...directly at the sun through the camera with the risk of electric shock. • If the camera interior is exposed due to dropping or otherwise damaging the camera, never touch the exposed portion. High voltage areas are present inside the camera, with a telephoto lens attached, as smoke or a...
User Manual
Page 5
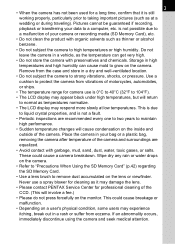
...suffer from eczema. 3 • When the camera has not been used for a long time, confirm that it may damage the lens. • Please contact PENTAX Service Center for cleaning as the temperature can cause mold to grow on the lens or viewfinder. Remove from vibrations of motorcycles,... automobiles, or ships. • The temperature range for camera use a spray blower for professional...
...suffer from eczema. 3 • When the camera has not been used for a long time, confirm that it may damage the lens. • Please contact PENTAX Service Center for cleaning as the temperature can cause mold to grow on the lens or viewfinder. Remove from vibrations of motorcycles,... automobiles, or ships. • The temperature range for camera use a spray blower for professional...

User Manual
Page 7
...Taken During Handling 2 Contents 5 Composition of the Operating Manual 11 Before Using Your Camera 13 x Camera Characteristics 14 Checking the Contents of the Package 16 Names and Functions of Working Parts 17 Camera 17 Capture Mode 18 Playback Mode 20 Display Indicators 22 Monitor 22 Viewfinder 27 LCD...AC Adapter (Optional 40 Inserting/Removing the SD Memory Card 41 Recorded Pixels and Quality Level 43 Attaching the Lens 45 Adjusting the Viewfinder Diopter 47 Turning the Camera On and Off 48 Initial Settings 49 Setting the Display Language 49 Setting the Date and Time 52
...Taken During Handling 2 Contents 5 Composition of the Operating Manual 11 Before Using Your Camera 13 x Camera Characteristics 14 Checking the Contents of the Package 16 Names and Functions of Working Parts 17 Camera 17 Capture Mode 18 Playback Mode 20 Display Indicators 22 Monitor 22 Viewfinder 27 LCD...AC Adapter (Optional 40 Inserting/Removing the SD Memory Card 41 Recorded Pixels and Quality Level 43 Attaching the Lens 45 Adjusting the Viewfinder Diopter 47 Turning the Camera On and Off 48 Initial Settings 49 Setting the Display Language 49 Setting the Date and Time 52

User Manual
Page 8
... 72 Deleting a Single Image 72 Shooting Functions 73 How to Operate the Shooting Menus 74 [A Rec. 6 Basic Operations 55 Basic Shooting Operation 56 Holding the Camera 56 Letting the Camera Choose the Optimal Settings 57 Using a Zoom Lens 61 Using the Built-in Focus Mode 111
... 72 Deleting a Single Image 72 Shooting Functions 73 How to Operate the Shooting Menus 74 [A Rec. 6 Basic Operations 55 Basic Shooting Operation 56 Holding the Camera 56 Letting the Camera Choose the Optimal Settings 57 Using a Zoom Lens 61 Using the Built-in Focus Mode 111

User Manual
Page 9
...113 Continuous Shooting 115 Self-Timer Shooting 117 Remote Control Shooting (Remote Control F: Sold Separately 120 Using Mirror Up Function to Prevent Camera Shake 123 Changing the Shooting Conditions Automatically when Shooting (Auto Bracket 124 Using the Flash 127 Compensating Flash Output 128 Allowing Shooting ... in Each Exposure Mode 130 Distance and Aperture when Using the Built-in Flash 132 DA, D FA, FA J, FA and F Lens Compatibility with the Built-in Flash 133 Using an External Flash (Optional 134 Shooting Settings 143 Setting the Image Processing Method in Capture Mode...
...113 Continuous Shooting 115 Self-Timer Shooting 117 Remote Control Shooting (Remote Control F: Sold Separately 120 Using Mirror Up Function to Prevent Camera Shake 123 Changing the Shooting Conditions Automatically when Shooting (Auto Bracket 124 Using the Flash 127 Compensating Flash Output 128 Allowing Shooting ... in Each Exposure Mode 130 Distance and Aperture when Using the Built-in Flash 132 DA, D FA, FA J, FA and F Lens Compatibility with the Built-in Flash 133 Using an External Flash (Optional 134 Shooting Settings 143 Setting the Image Processing Method in Capture Mode...

User Manual
Page 12
10 Appendix 223 Default Settings 224 Functions Available with Various Lens Combinations .......... 228 Notes on the CCD (Dust Alert 231 Removing Dust with a Blower 233 Optional Accessories 235 Error Messages 240 Troubleshooting 243 Main Specifications 246 Glossary 250 Index 255 WARRANTY POLICY 260 Using Aperture Ring 230 Cleaning the CCD 231 Removing Dust by Shaking the CCD 231 Detecting Dust on [23.
10 Appendix 223 Default Settings 224 Functions Available with Various Lens Combinations .......... 228 Notes on the CCD (Dust Alert 231 Removing Dust with a Blower 233 Optional Accessories 235 Error Messages 240 Troubleshooting 243 Main Specifications 246 Glossary 250 Index 255 WARRANTY POLICY 260 Using Aperture Ring 230 Cleaning the CCD 231 Removing Dust by Shaking the CCD 231 Detecting Dust on [23.

User Manual
Page 16
... image, enabling a wider range of expression. • Records in both the camera and grip, the battery set and use menus make the camera easier to capture sharp pictures with minimal camera shake regardless of the camera. Pictures taken in various parts of the lens type. • Features an AF sensor with more power is prioritized...
... image, enabling a wider range of expression. • Records in both the camera and grip, the battery set and use menus make the camera easier to capture sharp pictures with minimal camera shake regardless of the camera. Pictures taken in various parts of the lens type. • Features an AF sensor with more power is prioritized...

User Manual
Page 17
.... Inversely, multiply the focal length of the lens used with x 300×1.5=450 Focal length is equivalent to a 450 mm lens on the x features a PENTAX original system which uses magnetic force to move the image sensor at high speeds, compensating camera shake. The camera may generate some operating noise when it is... times longer than that of x. It is used with x by 1.5. 15 Before Using Your Camera The captured area (view angle) will differ between the x and 35 mm SLR cameras even if the same lens is used because the format size for 35 mm film and CCD 35 mm film : 36×...
.... Inversely, multiply the focal length of the lens used with x 300×1.5=450 Focal length is equivalent to a 450 mm lens on the x features a PENTAX original system which uses magnetic force to move the image sensor at high speeds, compensating camera shake. The camera may generate some operating noise when it is... times longer than that of x. It is used with x by 1.5. 15 Before Using Your Camera The captured area (view angle) will differ between the x and 35 mm SLR cameras even if the same lens is used because the format size for 35 mm film and CCD 35 mm film : 36×...

User Manual
Page 19
Names and Functions of Working 17 Parts Before Using Your Camera Camera Self-Timer lamp/ Remote control receiver Card cover Lens mount index (red dot) Lens unlock button Diopter adjustment lever Built-in Flash Cable switch terminal USB/Video terminal DC input terminal Terminal cover 1 Hot shoe Mirror Strap lug AF coupler Lens information contacts LCD panel Viewfinder Card access lamp Monitor Tripod socket Battery grip connector terminal Battery cover unlock lever Battery cover * In the illustrations above, the back and bottom sides of the camera are shown with the Eyecup FP removed.
Names and Functions of Working 17 Parts Before Using Your Camera Camera Self-Timer lamp/ Remote control receiver Card cover Lens mount index (red dot) Lens unlock button Diopter adjustment lever Built-in Flash Cable switch terminal USB/Video terminal DC input terminal Terminal cover 1 Hot shoe Mirror Strap lug AF coupler Lens information contacts LCD panel Viewfinder Card access lamp Monitor Tripod socket Battery grip connector terminal Battery cover unlock lever Battery cover * In the illustrations above, the back and bottom sides of the camera are shown with the Eyecup FP removed.

User Manual
Page 20
Before Using Your Camera 1 5 2 3 6 7 4 8 c d 9 e 0 f a g b h 1 Green button Sets the Exposure mode to Automatic Exposure (p.88, p.96) and resets the settings (p.100, p.128, p.154). 2 Shutter release button Press to capture images. (p.59) 3 Main switch Move to detach lens. (p.46) 18 Capture Mode Functions of buttons, dials and... are noted. 1 The factory default settings are explained here. Depending on /off (p.48) or to preview (p.113). 4 Lens unlock button Press to turn the power on the button or dial, these settings can be changed in the [A Custom Settings] menu (p....
Before Using Your Camera 1 5 2 3 6 7 4 8 c d 9 e 0 f a g b h 1 Green button Sets the Exposure mode to Automatic Exposure (p.88, p.96) and resets the settings (p.100, p.128, p.154). 2 Shutter release button Press to capture images. (p.59) 3 Main switch Move to detach lens. (p.46) 18 Capture Mode Functions of buttons, dials and... are noted. 1 The factory default settings are explained here. Depending on /off (p.48) or to preview (p.113). 4 Lens unlock button Press to turn the power on the button or dial, these settings can be changed in the [A Custom Settings] menu (p....

User Manual
Page 25
... to explanation of the information may not be displayed. Depending on the Capture mode, some of set Shooting mode. 1 Detailed information display Before Using Your Camera SCN 1/2000 F2.8 +1.3 AF.C - 1.0 400 mm ISO AUTO 200-1600 ±0 G2 A1 AdobeRGB ± 0 RAW+ 10 +1 +1 02...AE metering (p.98) 4 Flash mode (p.63) 5 Drive mode (p.77) 6 Exposure bracket (p.124) 7 Focus mode (p.102) 8 AF point position (p.105) 9 Lens focal length (p.69) 10 Shutter speed (p.81) 11 Aperture (p.82) 12 EV compensation (p.100) 13 Flash exposure compensation (p.128) 14 Sensitivity (p.83) 15 ISO correction...
... to explanation of the information may not be displayed. Depending on the Capture mode, some of set Shooting mode. 1 Detailed information display Before Using Your Camera SCN 1/2000 F2.8 +1.3 AF.C - 1.0 400 mm ISO AUTO 200-1600 ±0 G2 A1 AdobeRGB ± 0 RAW+ 10 +1 +1 02...AE metering (p.98) 4 Flash mode (p.63) 5 Drive mode (p.77) 6 Exposure bracket (p.124) 7 Focus mode (p.102) 8 AF point position (p.105) 9 Lens focal length (p.69) 10 Shutter speed (p.81) 11 Aperture (p.82) 12 EV compensation (p.100) 13 Flash exposure compensation (p.128) 14 Sensitivity (p.83) 15 ISO correction...

User Manual
Page 27
25 Playback Mode Every time you press the M button during playback, the camera switches screen displays in which the flash was discharged. Before Using Your Camera Detailed information display P 100-0001 AF.S 24 mm 1/2000 F2.8 +1.5 -0.5 ±0 ISO 200 G2 A1 ±0 JPEG 10 AdobeRGB ± 0 02 / 02 / ...bracket 11 Aperture 12 EV compensation 13 Flash exposure compensation 14 Folder No./File No. 15 Focus mode 16 AF point position 17 Lens focal length 18 Image Tone 19 Saturation/Filter Effect 20 Hue/Toning 21 Contrast 22 Sharpness/Fine Sharpness 23 Sensitivity 24 White balance 25...
25 Playback Mode Every time you press the M button during playback, the camera switches screen displays in which the flash was discharged. Before Using Your Camera Detailed information display P 100-0001 AF.S 24 mm 1/2000 F2.8 +1.5 -0.5 ±0 ISO 200 G2 A1 ±0 JPEG 10 AdobeRGB ± 0 02 / 02 / ...bracket 11 Aperture 12 EV compensation 13 Flash exposure compensation 14 Folder No./File No. 15 Focus mode 16 AF point position 17 Lens focal length 18 Image Tone 19 Saturation/Filter Effect 20 Hue/Toning 21 Contrast 22 Sharpness/Fine Sharpness 23 Sensitivity 24 White balance 25...

User Manual
Page 37
2 Getting Started This chapter explains your first steps from purchasing the camera to read it and follow the instructions. Attaching the Strap 36 Inserting the Batteries 37 Inserting/Removing the SD Memory Card .........41 Attaching the Lens 45 Adjusting the Viewfinder Diopter 47 Turning the Camera On and Off 48 Initial Settings 49 Be sure to taking pictures.
2 Getting Started This chapter explains your first steps from purchasing the camera to read it and follow the instructions. Attaching the Strap 36 Inserting the Batteries 37 Inserting/Removing the SD Memory Card .........41 Attaching the Lens 45 Adjusting the Viewfinder Diopter 47 Turning the Camera On and Off 48 Initial Settings 49 Be sure to taking pictures.

User Manual
Page 39
...; Insert batteries correctly. A commercially available battery charger that can be used in the illustration (1), and slide 1 the battery cover toward the lens (2), and then flip open the battery cover or remove the batteries while the power is on. • Remove the batteries when you insert... These are rechargeable and are not rechargeable. • Do not open . 2 Inserting the Batteries 37 Getting Started Insert batteries into the camera. Use four AA lithium batteries, AA Ni-MH batteries, or AA alkaline batteries. Otherwise, malfunctions, such as the battery level not being...
...; Insert batteries correctly. A commercially available battery charger that can be used in the illustration (1), and slide 1 the battery cover toward the lens (2), and then flip open the battery cover or remove the batteries while the power is on. • Remove the batteries when you insert... These are rechargeable and are not rechargeable. • Do not open . 2 Inserting the Batteries 37 Getting Started Insert batteries into the camera. Use four AA lithium batteries, AA Ni-MH batteries, or AA alkaline batteries. Otherwise, malfunctions, such as the battery level not being...
User Manual
Page 47
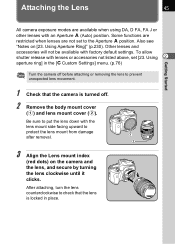
...Aperture Ring]" (p.230). Other lenses and accessories will not be available with the lens mount side facing upward to prevent unexpected lens movement. 1 Check that the camera is turned off. 2 Remove the body mount cover (1) and lens mount cover (2). Using 2 aperture ring] in place. Be sure to the... Aperture s position. Also see "Notes on the camera and the lens, and secure by turning the lens clockwise until it clicks. To allow shutter release with an Aperture s (Auto) position. Attaching the Lens 45 Getting Started All camera exposure modes are not set [23. Some functions ...
...Aperture Ring]" (p.230). Other lenses and accessories will not be available with the lens mount side facing upward to prevent unexpected lens movement. 1 Check that the camera is turned off. 2 Remove the body mount cover (1) and lens mount cover (2). Using 2 aperture ring] in place. Be sure to the... Aperture s position. Also see "Notes on the camera and the lens, and secure by turning the lens clockwise until it clicks. To allow shutter release with an Aperture s (Auto) position. Attaching the Lens 45 Getting Started All camera exposure modes are not set [23. Some functions ...

User Manual
Page 48
When necessary, clean the contacts with a soft dry cloth. Getting Started 2 To detach the lens, hold down the lens unlock button (3) and turn the lens counterclockwise. 3 • The body mount cover (1) is sold separately and has a lock function. • We assume no responsibility nor liability for accidents,... corrosion may damage the electrical system. Body Mount Cap K is a cover to prevent scratches and block dust when shipped. 46 4 Remove the front lens cap by other manufacturers. • The camera body and lens mount incorporate lens information contacts and an AF coupler.
When necessary, clean the contacts with a soft dry cloth. Getting Started 2 To detach the lens, hold down the lens unlock button (3) and turn the lens counterclockwise. 3 • The body mount cover (1) is sold separately and has a lock function. • We assume no responsibility nor liability for accidents,... corrosion may damage the electrical system. Body Mount Cap K is a cover to prevent scratches and block dust when shipped. 46 4 Remove the front lens cap by other manufacturers. • The camera body and lens mount incorporate lens information contacts and an AF coupler.

User Manual
Page 49
...it with the groove on the viewfinder eyepiece and push it into position. • If it is difficult to the viewfinder portion when the camera leaves the factory. You can adjust the diopter from approximately -2.5 to suit your eyesight. Adjust the lever until the AF frame in the direction... adjustment is available with the eyecup removed. • To remove the FP Eyecup, pull it is difficult to use the optional diopter correction lens adapter M. Slide the diopter adjustment lever left or right. If it out in the viewfinder is attached to see the viewfinder image clearly even ...
...it with the groove on the viewfinder eyepiece and push it into position. • If it is difficult to the viewfinder portion when the camera leaves the factory. You can adjust the diopter from approximately -2.5 to suit your eyesight. Adjust the lever until the AF frame in the direction... adjustment is available with the eyecup removed. • To remove the FP Eyecup, pull it is difficult to use the optional diopter correction lens adapter M. Slide the diopter adjustment lever left or right. If it out in the viewfinder is attached to see the viewfinder image clearly even ...

User Manual
Page 57
For information about advanced functions and settings for shooting by setting mode dial to I (Auto Picture) to chapter 4 and onward. 3 Basic Operations This chapter explains basic operations for taking pictures, refer to ensure successful capturing. Basic Shooting Operation 56 Using a Zoom Lens 61 Using the Built-in Flash 62 Taking Pictures Using the Shake Reduction Function 67 Playing Back Still Pictures 70 Deleting Images 72
For information about advanced functions and settings for shooting by setting mode dial to I (Auto Picture) to chapter 4 and onward. 3 Basic Operations This chapter explains basic operations for taking pictures, refer to ensure successful capturing. Basic Shooting Operation 56 Using a Zoom Lens 61 Using the Built-in Flash 62 Taking Pictures Using the Shake Reduction Function 67 Playing Back Still Pictures 70 Deleting Images 72

User Manual
Page 58
... is 1/75 of a second for a focal length of 50 mm and 1/150 of the camera and lens is recommended to avoid camera shake. • Do not use the Shake Reduction function when using the camera on a solid object such as a table, tree, or wall. • Although there are...picture. 3 Basic Operations Horizontal position Vertical position • To reduce camera shake, support your body or the camera on a tripod. Use a tripod or the Shake Reduction function (p.67) when using a lower shutter speed. • When using a telephoto lens, a tripod that is heavier than the total weight of a second...
... is 1/75 of a second for a focal length of 50 mm and 1/150 of the camera and lens is recommended to avoid camera shake. • Do not use the Shake Reduction function when using the camera on a solid object such as a table, tree, or wall. • Although there are...picture. 3 Basic Operations Horizontal position Vertical position • To reduce camera shake, support your body or the camera on a tripod. Use a tripod or the Shake Reduction function (p.67) when using a lower shutter speed. • When using a telephoto lens, a tripod that is heavier than the total weight of a second...


