

K2 Manual
Page 2
or 29 actual damage to these precise 27 specifications and, therefore, 28 may cause difficulties with 36 an Asahi Pentax camera. a Pentax 30 camera. INDEX Nomenclature Specifications • Lens mounting Battery Basic operating instructions Film loading and winding Setting ASA film speed Exposure...Automatic shutter and light metering Manual shutter and light metering • Compose and focus Camera holding Film unloading Depth-of-field preview button and guide Depth-of-field table: SMC PENTAX 50mm lens Mirror lock-up Self-timer Flash synchronization Infra-red photography Multiple exposure ...
or 29 actual damage to these precise 27 specifications and, therefore, 28 may cause difficulties with 36 an Asahi Pentax camera. a Pentax 30 camera. INDEX Nomenclature Specifications • Lens mounting Battery Basic operating instructions Film loading and winding Setting ASA film speed Exposure...Automatic shutter and light metering Manual shutter and light metering • Compose and focus Camera holding Film unloading Depth-of-field preview button and guide Depth-of-field table: SMC PENTAX 50mm lens Mirror lock-up Self-timer Flash synchronization Infra-red photography Multiple exposure ...
K2 Manual
Page 8
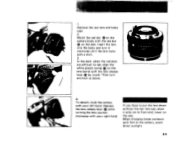
..., place it clockwise until the lens locks with your right hand. Depress the lens release lever Q while turning the lens counterclockwise with film in the camera, avoid direct sunlight. 6* Then turn it only on its front end, never on the rear. When changing lenses outdoors with your left hand. To ...detach, hold the camera with a click. 3. Match the red dot (;) on the camera body with the red dot on the lens barrel with the lens release lever Co by touch. Insert the lens into...
..., place it clockwise until the lens locks with your right hand. Depress the lens release lever Q while turning the lens counterclockwise with film in the camera, avoid direct sunlight. 6* Then turn it only on its front end, never on the rear. When changing lenses outdoors with your left hand. To ...detach, hold the camera with a click. 3. Match the red dot (;) on the camera body with the red dot on the lens barrel with the lens release lever Co by touch. Insert the lens into...
K2 Manual
Page 9
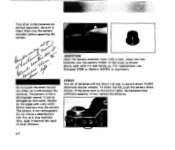
... the cover as shown above, each with a coin. It can be damaged by the edges with a dry cloth before operating the camera. Do not throw a dead battery into the camera. Also, keep it beyond the reach of batteries will exhaust the batteries. To check the life, push the battery check button. For...
... the cover as shown above, each with a coin. It can be damaged by the edges with a dry cloth before operating the camera. Do not throw a dead battery into the camera. Also, keep it beyond the reach of batteries will exhaust the batteries. To check the life, push the battery check button. For...
K2 Manual
Page 10
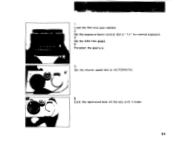
Set the ASA film speed. 4. Set the shutter speed dial at "lx" for normal exposure. 3. Set the exposure factor control dial at AUTOMATIC. 6. Pre-select the aperture. 5. Cock the rapid-wind lever all the way until it stops. 8• 1. Load the film into your camera. 2.
Set the ASA film speed. 4. Set the shutter speed dial at "lx" for normal exposure. 3. Set the exposure factor control dial at AUTOMATIC. 6. Pre-select the aperture. 5. Cock the rapid-wind lever all the way until it stops. 8• 1. Load the film into your camera. 2.
K2 Manual
Page 12
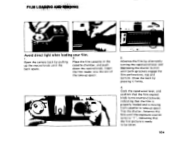
... knob until both sprockets engage the film perforations, top and bottom. FILM LOWNG ANDWOHOING KVA' - 416 Avoid direct light when loading your film. 1 2. Open the camera back by pressing it firmly. .suteot" 4. Cock the rapid-wind lever, and confirm that the film rewind knob turns counter-clockwise, indicating that the first...
... knob until both sprockets engage the film perforations, top and bottom. FILM LOWNG ANDWOHOING KVA' - 416 Avoid direct light when loading your film. 1 2. Open the camera back by pressing it firmly. .suteot" 4. Cock the rapid-wind lever, and confirm that the film rewind knob turns counter-clockwise, indicating that the first...

K2 Manual
Page 13
...:1,,J1,01 a. 04 COLOR MN, - IP EXPOSURES As a reminder of what type of film is in the data sheet packed with each roll of the camera. • 11 The higher the ASA number, the more sensitive the film is set the index, first make sure that the exposure factor dial is... to light. While depressing the ASA ring lever turn the ring until the ASA number of your camera, tear off the top of film box and insert it into the Memo Holder on the back cover of film. To set at "1x...
...:1,,J1,01 a. 04 COLOR MN, - IP EXPOSURES As a reminder of what type of film is in the data sheet packed with each roll of the camera. • 11 The higher the ASA number, the more sensitive the film is set the index, first make sure that the exposure factor dial is... to light. While depressing the ASA ring lever turn the ring until the ASA number of your camera, tear off the top of film box and insert it into the Memo Holder on the back cover of film. To set at "1x...

K2 Manual
Page 14
You get "normal" exposure at lx, while 1/2x and 1/4x automatically program the camera to deliver one half and one fourth the amount aur of light to achieve more specific exposure control. 12• The 2x and 4x settings ...
You get "normal" exposure at lx, while 1/2x and 1/4x automatically program the camera to deliver one half and one fourth the amount aur of light to achieve more specific exposure control. 12• The 2x and 4x settings ...
K2 Manual
Page 16
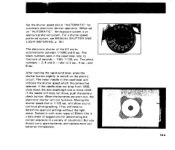
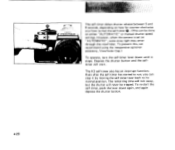
...AND LIGHT METERING, p. 16.) The electronic shutter of seconds - 1/60, 1/125, etc. The black numbers seen in the viewfinder will have to fractions of the K2 works automatically between 1/1000 and 8 sec. If the needle still does not move, push the battery check button. Packed in a variety of situations.) But you... numbers - 2, 4 and 8 - After cocking the rapid-wind lever, press the shutter button slightly to continue photographing. (You will indicate the shutter speed which the camera has selected. When the batteries are worn out, the electronic shutter will not function.
...AND LIGHT METERING, p. 16.) The electronic shutter of seconds - 1/60, 1/125, etc. The black numbers seen in the viewfinder will have to fractions of the K2 works automatically between 1/1000 and 8 sec. If the needle still does not move, push the battery check button. Packed in a variety of situations.) But you... numbers - 2, 4 and 8 - After cocking the rapid-wind lever, press the shutter button slightly to continue photographing. (You will indicate the shutter speed which the camera has selected. When the batteries are worn out, the electronic shutter will not function.
K2 Manual
Page 18
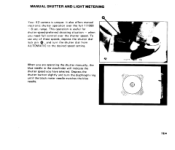
.... This operation is unique: it also offers manual electronic shutter operation over the shutter speed. when you have selected. MANUAL SHUTTER AND LIGHT METERING A Your K2 camera is useful for shutter-speed-preferred shooting situation - To o , use any of these speeds, depress the shutter dial lock pin and turn the diaphragm ring...
.... This operation is unique: it also offers manual electronic shutter operation over the shutter speed. when you have selected. MANUAL SHUTTER AND LIGHT METERING A Your K2 camera is useful for shutter-speed-preferred shooting situation - To o , use any of these speeds, depress the shutter dial lock pin and turn the diaphragm ring...
K2 Manual
Page 19
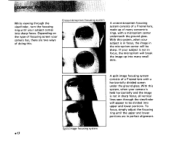
... your subject comes into many concentric rings, with a horizontally divided screen under the ground glass. With this . Depending on the type of focusing screen your camera has, there are in the microprism center will be divided into upper and lower portions. With this system, when your... camera is held horizontally and the image is not in sharp focus, all vertical lines seen through the viewfinder, turn the focusing ring until the upper ...
... your subject comes into many concentric rings, with a horizontally divided screen under the ground glass. With this . Depending on the type of focusing screen your camera has, there are in the microprism center will be divided into upper and lower portions. With this system, when your... camera is held horizontally and the image is not in sharp focus, all vertical lines seen through the viewfinder, turn the focusing ring until the upper ...
K2 Manual
Page 20
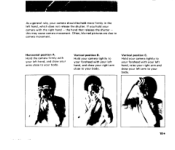
... hand, raise your right arm and draw your left arm to your body. 18• Hold your camera tightly to your forehead with your left hand, and draw your arms close to your camera should be held more firmly in the left hand, and draw your right arm close to your body.... Hold your camera tightly to camera movement. As a general rule, your body. the hand that releases the shutter - Horizontal position...
... hand, raise your right arm and draw your left arm to your body. 18• Hold your camera tightly to your forehead with your left hand, and draw your arms close to your camera should be held more firmly in the left hand, and draw your right arm close to your body.... Hold your camera tightly to camera movement. As a general rule, your body. the hand that releases the shutter - Horizontal position...
K2 Manual
Page 25
...lever back to run, you have turned the self-timer Q. (This can stop it A stops. Depress the shutter button and the self- The K2 self-timer also has an interrupt function. To re-start . timer will never be done N TAX on "AUTOMATIC", some stray light may enter... through the viewfinder. Even after the self-timer has started to its normal position. However, when the camera is set on either "AUTOMATIC" or manual shutter speed IC settings. To prevent this, we recommend using the inexpensive optional accessory, Viewfinder Cap.)...
...lever back to run, you have turned the self-timer Q. (This can stop it A stops. Depress the shutter button and the self- The K2 self-timer also has an interrupt function. To re-start . timer will never be done N TAX on "AUTOMATIC", some stray light may enter... through the viewfinder. Even after the self-timer has started to its normal position. However, when the camera is set on either "AUTOMATIC" or manual shutter speed IC settings. To prevent this, we recommend using the inexpensive optional accessory, Viewfinder Cap.)...

K2 Manual
Page 27
... not using the terminals, keep the plugs inserted. Use one of these three bulb types: M, MF or FP. Before attaching the flash unit to the camera, you must remove the protective plug from the proper terminal. Either can be used with your...
... not using the terminals, keep the plugs inserted. Use one of these three bulb types: M, MF or FP. Before attaching the flash unit to the camera, you must remove the protective plug from the proper terminal. Either can be used with your...

K2 Manual
Page 30
Due to a Mount Adaptor K. Full-aperture metering lenses will not function. 2. Use of the Mount Adaptor K does not affect any aspect of normal lens function except as stop-down metering lenses. 28 • Conventional screw-mount Takumar lenses (both Super-Takumar and SMC Takumar) can be easily mounted onto your camera by attaching them first to the difference in coupling systems, the automatic diaphragm will function as regards the following two points: 1.
Due to a Mount Adaptor K. Full-aperture metering lenses will not function. 2. Use of the Mount Adaptor K does not affect any aspect of normal lens function except as stop-down metering lenses. 28 • Conventional screw-mount Takumar lenses (both Super-Takumar and SMC Takumar) can be easily mounted onto your camera by attaching them first to the difference in coupling systems, the automatic diaphragm will function as regards the following two points: 1.

K2 Manual
Page 31
...Mount Adaptor K from that which locks in the normal way. Since the mechanism for locking in the Mount Adapter K is totally different from the camera body, first remove the screw-mount lens. Screw the conventional Takumar lens into the Mount Adaptor K. 2. tf: B. Other screw- To remove...• 3. mount Takumar lenses can then be attached in an SMC Pentax bayonet-mount lens, the e lens release lever on the camera body plays no part at all. • 29 Attach the Adapter/lens unit to the camera body, simply unscrew the lens counter-clockwise. Then press, with a click...
...Mount Adaptor K from that which locks in the normal way. Since the mechanism for locking in the Mount Adapter K is totally different from the camera body, first remove the screw-mount lens. Screw the conventional Takumar lens into the Mount Adaptor K. 2. tf: B. Other screw- To remove...• 3. mount Takumar lenses can then be attached in an SMC Pentax bayonet-mount lens, the e lens release lever on the camera body plays no part at all. • 29 Attach the Adapter/lens unit to the camera body, simply unscrew the lens counter-clockwise. Then press, with a click...
K2 Manual
Page 32
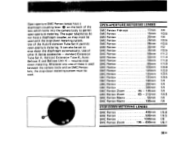
A - 4 OPEN-APERTURE METERING LENSES SMC Pentax Fish-eye SMC Pentax SMC Pentax SMC Pentax SMC Pentax SMC Pentax SMC Pentax SMC Pentax SMC Pentax SMC Pentax SMC Pentax SMC Pentax SMC Pentax SMC Pentax SMC Pentax SMC Pentax SMC Pentax SMC Pentax SMC Pentax Zoom SMC Pentax Zoom SMC Pentax Macro SMC Pentax Macro 17mm 15mm 20mm 24mm 28mm 35mm 35mm 50mm ... so they must be set to permit open -aperture metering. Whenever any one of the lens which locks into the camera body to stop -down the diaphragm automatically. It can also be used with the stop down metering system. The super ...
A - 4 OPEN-APERTURE METERING LENSES SMC Pentax Fish-eye SMC Pentax SMC Pentax SMC Pentax SMC Pentax SMC Pentax SMC Pentax SMC Pentax SMC Pentax SMC Pentax SMC Pentax SMC Pentax SMC Pentax SMC Pentax SMC Pentax SMC Pentax SMC Pentax SMC Pentax SMC Pentax Zoom SMC Pentax Zoom SMC Pentax Macro SMC Pentax Macro 17mm 15mm 20mm 24mm 28mm 35mm 35mm 50mm ... so they must be set to permit open -aperture metering. Whenever any one of the lens which locks into the camera body to stop -down the diaphragm automatically. It can also be used with the stop down metering system. The super ...
K2 Manual
Page 33
...rapid temperature change of 10°C should be allowed to a sub-freezing one, and if tiny drops of the battery. Furthermore, if the camera goes from 50°C to cold could be avoided as much as possible. For extremely low temperature, use new batteries. •31 Thus... expansion. However, resistance to -20° C. If this is to the mechanism. Put the batteries into the camera right before shooting. Therefore, the camera should be protected against low temperature. SISTANCE TO TEMPERATURE EXTREMES AND CHANGES The temperature range at full efficiency in very cold...
...rapid temperature change of 10°C should be allowed to a sub-freezing one, and if tiny drops of the battery. Furthermore, if the camera goes from 50°C to cold could be avoided as much as possible. For extremely low temperature, use new batteries. •31 Thus... expansion. However, resistance to -20° C. If this is to the mechanism. Put the batteries into the camera right before shooting. Therefore, the camera should be protected against low temperature. SISTANCE TO TEMPERATURE EXTREMES AND CHANGES The temperature range at full efficiency in very cold...
K2 Manual
Page 34
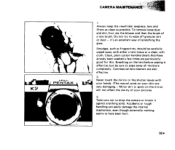
...clean as fingerprints, should be carefully wiped away with your hands. (The natural acids on your pictures. 3. but be sure to drop the camera or knock it 's an excellent way of scratching the Smudges, such as possible. Take care not to wipe away all moisture completely. it... brush. Accidents or rough handling can easily damage the internal mechanism, even though externally nothing seems to wipe off granular dirt golrasdsust - K2 PEN TAX t9_ CAMERA MAINTENANCE 1. Do not try to have already been washed a few times are very damaging.- Minor dirt or spots on the lens before...
...clean as fingerprints, should be carefully wiped away with your hands. (The natural acids on your pictures. 3. but be sure to drop the camera or knock it 's an excellent way of scratching the Smudges, such as possible. Take care not to wipe away all moisture completely. it... brush. Accidents or rough handling can easily damage the internal mechanism, even though externally nothing seems to wipe off granular dirt golrasdsust - K2 PEN TAX t9_ CAMERA MAINTENANCE 1. Do not try to have already been washed a few times are very damaging.- Minor dirt or spots on the lens before...
K2 Manual
Page 35
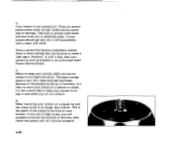
...it . 6. If your camera as soon as possible to keep your camera in such a case, take your camera should get inside and do a great deal of the hole, after which the camera will probably puncture the bottom of damage. Where to an authorized Asahi Pentax Service Center. 5. The beest... storage place is no longer than 5.5mm. When mounting your camera on your camera while you will not function properly. • 33...
...it . 6. If your camera as soon as possible to keep your camera in such a case, take your camera should get inside and do a great deal of the hole, after which the camera will probably puncture the bottom of damage. Where to an authorized Asahi Pentax Service Center. 5. The beest... storage place is no longer than 5.5mm. When mounting your camera on your camera while you will not function properly. • 33...
K2 Manual
Page 36
... free of charge, and the lenses other indirect or consequential damages of twelve postage prepaid. Any Asahi Pentax which proves defective during from other than Pentax lenses are guaranteed against defects of purchase. The covered by use or country where you wish to have... our equipment will be returned to you owing to the complicated without cost to you within that country. WARR' All Asahi Pentax cameras purchased through equipment or to instruction. Service will be considerable length of time before the equipment rendered and defective parts will be...
... free of charge, and the lenses other indirect or consequential damages of twelve postage prepaid. Any Asahi Pentax which proves defective during from other than Pentax lenses are guaranteed against defects of purchase. The covered by use or country where you wish to have... our equipment will be returned to you owing to the complicated without cost to you within that country. WARR' All Asahi Pentax cameras purchased through equipment or to instruction. Service will be considerable length of time before the equipment rendered and defective parts will be...


