Operation Manual
Page 1
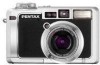
Digital Camera Operating Manual To ensure the best performance from your camera, please read the Operating Manual before using the camera.
Digital Camera Operating Manual To ensure the best performance from your camera, please read the Operating Manual before using the camera.
Operation Manual
Page 2
... the illustrations and the display screen of the LCD monitor in this manual before using the camera in the Copyright Act. To users of all the camera's capabilities. However, this camera • There is manufactured using the unified standard for buying the PENTAX Optio 750Z Digital Camera. Copyright 2001 Seiko Epson Corporation. Please take care, as installations generating strong electromagnetic...
... the illustrations and the display screen of the LCD monitor in this manual before using the camera in the Copyright Act. To users of all the camera's capabilities. However, this camera • There is manufactured using the unified standard for buying the PENTAX Optio 750Z Digital Camera. Copyright 2001 Seiko Epson Corporation. Please take care, as installations generating strong electromagnetic...

Operation Manual
Page 3
... symbols indicate that it being dropped, please do not hang the strap around your nearest PENTAX service center. Continued use of an AC adapter other than that small children do not under any other irregularity, stop using the camera immediately, remove the battery and disconnect the AC adapter and contact your neck is possible...
... symbols indicate that it being dropped, please do not hang the strap around your nearest PENTAX service center. Continued use of an AC adapter other than that small children do not under any other irregularity, stop using the camera immediately, remove the battery and disconnect the AC adapter and contact your neck is possible...

Operation Manual
Page 4
...are held for long periods of the battery leakage should happen to get inside the product, consult a PENTAX Service Center. This can cause a fire or electrical shock. Use with water. • Remove the battery from the product or other than rechargeable lithium-ion battery D-... areas thoroughly with a power source or voltage other than the specified voltage. Also, be careful of the camera heat up during use the product at a voltage other abnormality occurs, immediately discontinue using and consult a PENTAX Service Center. Continuing to disassemble or short the battery.
...are held for long periods of the battery leakage should happen to get inside the product, consult a PENTAX Service Center. This can cause a fire or electrical shock. Use with water. • Remove the battery from the product or other than rechargeable lithium-ion battery D-... areas thoroughly with a power source or voltage other than the specified voltage. Also, be careful of the camera heat up during use the product at a voltage other abnormality occurs, immediately discontinue using and consult a PENTAX Service Center. Continuing to disassemble or short the battery.
Operation Manual
Page 5
...becomes damaged, consult a PENTAX Service Center. • Do not short or touch the output terminals of high temperature and humidity should be avoided. This can cause a fire. is still plugged in. • Remove the battery and unplug the AC plug cord when not using . Particular care should ..., fire or electrical shock. • Wipe off the plug of the recording cannot be useful if you experience problems abroad. • When the camera has not been used for if recording, playback or transferring your camera or recording media (SD Memory Card), etc. • The lens on the AC plug...
...becomes damaged, consult a PENTAX Service Center. • Do not short or touch the output terminals of high temperature and humidity should be avoided. This can cause a fire. is still plugged in. • Remove the battery and unplug the AC plug cord when not using . Particular care should ..., fire or electrical shock. • Wipe off the plug of the recording cannot be useful if you experience problems abroad. • When the camera has not been used for if recording, playback or transferring your camera or recording media (SD Memory Card), etc. • The lens on the AC plug...
Operation Manual
Page 6
..., water or any other liquid, wipe it may come in which the camera can be used is not weather, water, or liquid resistant. LED Safety Standard This device is a digital still camera that the camera is subjected to rapid temperature changes, condensation may cause damage to the... camera. This could cause breakage or malfunction. • When using a tripod with garbage, dirt, sand, dust, water, toxic gases,...
..., water or any other liquid, wipe it may come in which the camera can be used is not weather, water, or liquid resistant. LED Safety Standard This device is a digital still camera that the camera is subjected to rapid temperature changes, condensation may cause damage to the... camera. This could cause breakage or malfunction. • When using a tripod with garbage, dirt, sand, dust, water, toxic gases,...
Operation Manual
Page 7
... 10 Names of Parts 11 Names of Operating Parts 12 Getting Started 13 Attaching the Strap 13 Powering the Camera 14 Charging the Battery 14 Installing the Battery 15 Using the AC Adapter (optional 17 Installing the SD Memory Card 18 Recorded Pixels and Quality Level for Still Pictures... 20 Recorded Pixels and Quality Level for Movies 22 Adjusting the LCD Monitor 23 Adjusting the Viewfinder 24 Turning the Camera On and Off 25...
... 10 Names of Parts 11 Names of Operating Parts 12 Getting Started 13 Attaching the Strap 13 Powering the Camera 14 Charging the Battery 14 Installing the Battery 15 Using the AC Adapter (optional 17 Installing the SD Memory Card 18 Recorded Pixels and Quality Level for Still Pictures... 20 Recorded Pixels and Quality Level for Movies 22 Adjusting the LCD Monitor 23 Adjusting the Viewfinder 24 Turning the Camera On and Off 25...
Operation Manual
Page 8
...Camera Set the Exposure (Program Mode 49 Aperture Priority Shooting 50 Shutter Priority Shooting 51 Manual Shooting 52 Using Preset Function Settings (User Mode 53 Selecting the Picture Mode According to the Shooting Scene (Picture Mode 55 Using the Zoom 57 Setting the Exposure (EV Compensation 59 Continuous Shooting (Continuous Shooting Mode 60 Using...Superimposing One Picture on Top of Another (Multiple Exposure Mode 69 Using the Remote Control Unit (optional 72 Taking Pictures with Digital Filters (Digital Filter Mode 74 Taking Panorama Pictures (Panorama Assist 75 Taking ...
...Camera Set the Exposure (Program Mode 49 Aperture Priority Shooting 50 Shutter Priority Shooting 51 Manual Shooting 52 Using Preset Function Settings (User Mode 53 Selecting the Picture Mode According to the Shooting Scene (Picture Mode 55 Using the Zoom 57 Setting the Exposure (EV Compensation 59 Continuous Shooting (Continuous Shooting Mode 60 Using...Superimposing One Picture on Top of Another (Multiple Exposure Mode 69 Using the Remote Control Unit (optional 72 Taking Pictures with Digital Filters (Digital Filter Mode 74 Taking Panorama Pictures (Panorama Assist 75 Taking ...

Operation Manual
Page 9
...Quality (Resize 133 Trimming Images 135 Editing Pictures with Digital Filters 137 Setting the Printing Service (DPOF 139 Printing Single Images 139 Printing All Images 141 Direct Printing Using PictBridge 142 Connecting the Camera to the Printer 142 Printing Single Images 143 Printing ...All Images 144 Printing Images Using the DPOF Settings 145 Disconnecting the Camera from the Printer 145 Recording and Playing Back ...
...Quality (Resize 133 Trimming Images 135 Editing Pictures with Digital Filters 137 Setting the Printing Service (DPOF 139 Printing Single Images 139 Printing All Images 141 Direct Printing Using PictBridge 142 Connecting the Camera to the Printer 142 Printing Single Images 143 Printing ...All Images 144 Printing Images Using the DPOF Settings 145 Disconnecting the Camera from the Printer 145 Recording and Playing Back ...
Operation Manual
Page 10
...the camera. R, d, F, G, D, C, O, 7 Ex. E a b c R F G D C Setting the Image Sharpness (Sharpness) 8 Mode Menus for Each Operation Mode 178 Default Settings 179 Optional Accessories 184 Messages 185 Troubleshooting 187 Main Specifications 190 WARRANTY POLICY 194 The meanings of the symbols used ...Alarm 167 Stopping the Alarm 168 Digital Exposure Metering Function 169 Digital Exposure Metering Function 169 Digital Exposure Metering Mode 169 Setting Up the Digital Exposure Metering Mode 169 Metering the Exposure 171 Using the Reflected Light Exposure Meter 174...
...the camera. R, d, F, G, D, C, O, 7 Ex. E a b c R F G D C Setting the Image Sharpness (Sharpness) 8 Mode Menus for Each Operation Mode 178 Default Settings 179 Optional Accessories 184 Messages 185 Troubleshooting 187 Main Specifications 190 WARRANTY POLICY 194 The meanings of the symbols used ...Alarm 167 Stopping the Alarm 168 Digital Exposure Metering Function 169 Digital Exposure Metering Function 169 Digital Exposure Metering Mode 169 Setting Up the Digital Exposure Metering Mode 169 Metering the Exposure 171 Using the Reflected Light Exposure Meter 174...
Operation Manual
Page 11
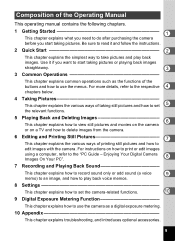
... explains common operations such as the functions of the buttons and how to use the camera as a digital exposure metering. 10 Appendix This chapter explains troubleshooting, and introduces optional accessories. 9 Enjoying Your Digital Camera 8 Images On Your PC". 7 Recording and Playing Back Sound This chapter... Getting Started 1 This chapter explains what you need to do after purchasing the camera before you want to start taking still pictures and how to set the camera-related functions. 10 9 Digital Exposure Metering Function This chapter explains how to use the menus.
... explains common operations such as the functions of the buttons and how to use the camera as a digital exposure metering. 10 Appendix This chapter explains troubleshooting, and introduces optional accessories. 9 Enjoying Your Digital Camera 8 Images On Your PC". 7 Recording and Playing Back Sound This chapter... Getting Started 1 This chapter explains what you need to do after purchasing the camera before you want to start taking still pictures and how to set the camera-related functions. 10 9 Digital Exposure Metering Function This chapter explains how to use the menus.
Operation Manual
Page 16
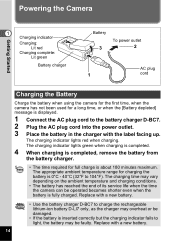
...complete: Lit green Battery charger Battery 3 To power outlet 2 AC plug 1 cord Charging the Battery Charge the battery when using the camera for the first time, when the camera has not been used for a long time, or when the [Battery depleted] message is displayed. 1 Connect the AC plug cord to the...depending on the ambient temperature and charging conditions. • The battery has reached the end of its service life when the time the camera can be faulty. The charging time may be operated becomes shorter even when the battery is about 180 minutes maximum. The appropriate ambient ...
...complete: Lit green Battery charger Battery 3 To power outlet 2 AC plug 1 cord Charging the Battery Charge the battery when using the camera for the first time, when the camera has not been used for a long time, or when the [Battery depleted] message is displayed. 1 Connect the AC plug cord to the...depending on the ambient temperature and charging conditions. • The battery has reached the end of its service life when the time the camera can be faulty. The charging time may be operated becomes shorter even when the battery is about 180 minutes maximum. The appropriate ambient ...

Operation Manual
Page 17
.... Removing the Battery 1 Open the battery/card cover. 2 Press the battery lock lever in the same direction as when you intend to use the camera continuously for the first time. 1 Open the battery/card cover. Pull the battery out. If you inserted the battery. Slide the battery.../card cover in the direction indicated by the arrow 1 and flip the cover open 2 . 2 Insert the battery with the camera. Charge the battery before installing it locks. 3 Close the battery/card cover. Getting Started 1 2 2 1 1 Battery lock lever Installing the Battery Install...
.... Removing the Battery 1 Open the battery/card cover. 2 Press the battery lock lever in the same direction as when you intend to use the camera continuously for the first time. 1 Open the battery/card cover. Pull the battery out. If you inserted the battery. Slide the battery.../card cover in the direction indicated by the arrow 1 and flip the cover open 2 . 2 Insert the battery with the camera. Charge the battery before installing it locks. 3 Close the battery/card cover. Getting Started 1 2 2 1 1 Battery lock lever Installing the Battery Install...

Operation Manual
Page 18
...8226; Image Storage Capacity, Recording Time and Playback Time (at 23°C, LCD monitor on with fully charged battery D-LI7) Image Storage Capacity (using the camera in a cold region, or if you intend to take a lot of pictures. • Battery Level Indicator You can check the battery level... symbol on the LCD monitor. Use of shots) Approx. 245 pictures Playback Time Approx. 4 hr. 30 min. • The still picture storage capacity is based on measuring conditions in accordance with CIPA standards and the playback time is based on PENTAX measuring conditions. Battery is running ...
...8226; Image Storage Capacity, Recording Time and Playback Time (at 23°C, LCD monitor on with fully charged battery D-LI7) Image Storage Capacity (using the camera in a cold region, or if you intend to take a lot of pictures. • Battery Level Indicator You can check the battery level... symbol on the LCD monitor. Use of shots) Approx. 245 pictures Playback Time Approx. 4 hr. 30 min. • The still picture storage capacity is based on measuring conditions in accordance with CIPA standards and the playback time is based on PENTAX measuring conditions. Battery is running ...

Operation Manual
Page 19
.... • Make sure that the camera is connected. 17 DC terminal 1 AC adapter To power 3 outlet 1 4 Getting Started 2 AC plug cord Using the AC Adapter (optional) If you intend to use the camera for a long time or connect the camera to a computer, use of the AC adapter D-AC7 is ...recommended. 1 Make sure that the camera is turned off when connecting and disconnecting the AC adapter....
.... • Make sure that the camera is connected. 17 DC terminal 1 AC adapter To power 3 outlet 1 4 Getting Started 2 AC plug cord Using the AC Adapter (optional) If you intend to use the camera for a long time or connect the camera to a computer, use of the AC adapter D-AC7 is ...recommended. 1 Make sure that the camera is turned off when connecting and disconnecting the AC adapter....
Operation Manual
Page 20
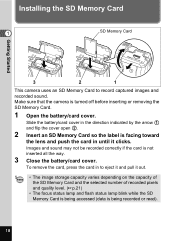
... the SD Memory Card is being accessed (data is being recorded or read). 18 Getting Started Installing the SD Memory Card 1 SD Memory Card 2 1 3 2 1 This camera uses an SD Memory Card to eject it and pull it clicks. Images and sound may not be recorded correctly if the card is turned off... before inserting or removing the SD Memory Card. 1 Open the battery/card cover. Make sure that the camera is not inserted all the way. 3 Close the battery/card cover.
... the SD Memory Card is being accessed (data is being recorded or read). 18 Getting Started Installing the SD Memory Card 1 SD Memory Card 2 1 3 2 1 This camera uses an SD Memory Card to eject it and pull it clicks. Images and sound may not be recorded correctly if the card is turned off... before inserting or removing the SD Memory Card. 1 Open the battery/card cover. Make sure that the camera is not inserted all the way. 3 Close the battery/card cover.
Operation Manual
Page 21
... long time. • For information on compatible memory cards, visit the PENTAX website or contact your nearest PENTAX customer service center. 19 Be sure to make a backup of the card. 1 r appears on a computer. • Avoid using or storing the card where it may be exposed to static electricity or ...protected. • Care should be deleted in temperature or to condensation. • When using the camera, as the card may be hot. • Do not remove the SD Memory Card or turn the camera off while data is being recorded on the card may be taken when removing the ...
... long time. • For information on compatible memory cards, visit the PENTAX website or contact your nearest PENTAX customer service center. 19 Be sure to make a backup of the card. 1 r appears on a computer. • Avoid using or storing the card where it may be exposed to static electricity or ...protected. • Care should be deleted in temperature or to condensation. • When using the camera, as the card may be hot. • Do not remove the SD Memory Card or turn the camera off while data is being recorded on the card may be taken when removing the ...

Operation Manual
Page 22
...is a normal aspect ratio of the printer and other factors; Suitable for attaching to Use Aspect Ratio of pictures that can only be taken. This can be specified with the camera. Suitable for editing images with the ACDSee software provided with the recorded pixels 3056×... of 4:3, part of recorded pixels and quality level best suited to Use TIFF Captures the image as uncompressed TIFF data. therefore, you do not need select more of the original image. When printing an image with a digital camera. C Best Lowest compression rate. E Good Highest compression rate.
...is a normal aspect ratio of the printer and other factors; Suitable for attaching to Use Aspect Ratio of pictures that can only be taken. This can be specified with the camera. Suitable for editing images with the ACDSee software provided with the recorded pixels 3056×... of 4:3, part of recorded pixels and quality level best suited to Use TIFF Captures the image as uncompressed TIFF data. therefore, you do not need select more of the original image. When printing an image with a digital camera. C Best Lowest compression rate. E Good Highest compression rate.

Operation Manual
Page 23
...;1944 2048×1536 1600×1200 1024×768 640×480 TIFF 2 pictures 4 pictures - - - - Getting Started Choose the appropriate number of images when using a 64MB SD Memory Card. • The above figures are based on measuring conditions in accordance with CIPA standards.
...;1944 2048×1536 1600×1200 1024×768 640×480 TIFF 2 pictures 4 pictures - - - - Getting Started Choose the appropriate number of images when using a 64MB SD Memory Card. • The above figures are based on measuring conditions in accordance with CIPA standards.

Operation Manual
Page 24
Records using a 64MB SD Memory Card. • The above table is based on standard shooting conditions specified by PENTAX and may vary depending on the [A Rec. Recorded Pixels, Frame Rate and Approximate Recording Time Frame Rate Recorded Pixels 640×...frames, but with a shorter recording time. Larger numbers produce clearer movie images, but also result in larger filesizes. Appropriate Frame Rate According to Use (frames/sec.) 30fps 15fps Produces movies with smoother movement, but with a longer recording time. Choose the appropriate number of recorded pixels and ...
Records using a 64MB SD Memory Card. • The above table is based on standard shooting conditions specified by PENTAX and may vary depending on the [A Rec. Recorded Pixels, Frame Rate and Approximate Recording Time Frame Rate Recorded Pixels 640×...frames, but with a shorter recording time. Larger numbers produce clearer movie images, but also result in larger filesizes. Appropriate Frame Rate According to Use (frames/sec.) 30fps 15fps Produces movies with smoother movement, but with a longer recording time. Choose the appropriate number of recorded pixels and ...
