
Operation Manual
Page 8
Letting the Camera Set the Exposure (Program Mode 49 Aperture Priority Shooting 50 ... Top of Another (Multiple Exposure Mode 69 Using the Remote Control Unit (optional 72 Taking Pictures with Digital Filters (Digital Filter Mode 74 Taking Panorama Pictures (Panorama Assist 75 Taking 3D Pictures (3D Image Mode 77 Displaying ...Light Metering Range to Determine the Exposure (AE Metering 100 Setting the Sensitivity 101 Setting the Instant Review Time (Instant Review 102 Selecting the Image Tone 103 Setting the Image Sharpness (Sharpness 104 Setting the Color Saturation (Saturation...
Letting the Camera Set the Exposure (Program Mode 49 Aperture Priority Shooting 50 ... Top of Another (Multiple Exposure Mode 69 Using the Remote Control Unit (optional 72 Taking Pictures with Digital Filters (Digital Filter Mode 74 Taking Panorama Pictures (Panorama Assist 75 Taking 3D Pictures (3D Image Mode 77 Displaying ...Light Metering Range to Determine the Exposure (AE Metering 100 Setting the Sensitivity 101 Setting the Instant Review Time (Instant Review 102 Selecting the Image Tone 103 Setting the Image Sharpness (Sharpness 104 Setting the Color Saturation (Saturation...

Operation Manual
Page 35
The image appears on the LCD monitor for two seconds (Instant Review) and is in a two-step action as follows. Using the Shutter Release Button The shutter release button works in focus. Press halfway The focus, exposure ...
The image appears on the LCD monitor for two seconds (Instant Review) and is in a two-step action as follows. Using the Shutter Release Button The shutter release button works in focus. Press halfway The focus, exposure ...

Operation Manual
Page 36
...case, lock the focus on the LCD monitor for a Class 1 LED product. In this camera conforms to the safety standard (IEC60825-1) for two seconds (Instant Review) immediately after it is captured. Instant Review The image appears on an object the same distance away as the subject (by pressing the... the Auxiliary AF Light may illuminate the subject. You can change the Instant Review time. (1p.102) You can delete the image from Instant Review by pressing the shutter release button halfway), then aim 2 the camera at your subject and press the shutter release button fully. • Objects that...
...case, lock the focus on the LCD monitor for a Class 1 LED product. In this camera conforms to the safety standard (IEC60825-1) for two seconds (Instant Review) immediately after it is captured. Instant Review The image appears on an object the same distance away as the subject (by pressing the... the Auxiliary AF Light may illuminate the subject. You can change the Instant Review time. (1p.102) You can delete the image from Instant Review by pressing the shutter release button halfway), then aim 2 the camera at your subject and press the shutter release button fully. • Objects that...
Operation Manual
Page 48
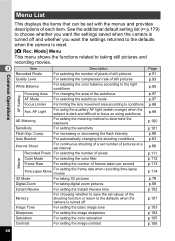
... This menu shows the functions related to taking digital zoom pictures p.58 Instant Review For setting the Instant Review time p.102 Memory For choosing whether to save the set with the menus and provides descriptions of the shooting function or return to the defaults when the camera is turned off and whether you want...
... This menu shows the functions related to taking digital zoom pictures p.58 Instant Review For setting the Instant Review time p.102 Memory For choosing whether to save the set with the menus and provides descriptions of the shooting function or return to the defaults when the camera is turned off and whether you want...

Operation Manual
Page 72
... is given to the brighter image. The focus frame turns green if the subject is in transparent form on the LCD monitor. 4 Aim the camera at your subject 38 and choose the exposure method with a name separate from that of the original image. If you select [Continue] and press...will be played back enabling you want to add another image. Taking Pictures 70 3' Press the shutter release button to the darker image. The Instant Review screen will be displayed and you will be asked whether you to continue shooting. The superimposed image is given to take the base image. Q :...
... is given to the brighter image. The focus frame turns green if the subject is in transparent form on the LCD monitor. 4 Aim the camera at your subject 38 and choose the exposure method with a name separate from that of the original image. If you select [Continue] and press...will be played back enabling you want to add another image. Taking Pictures 70 3' Press the shutter release button to the darker image. The Instant Review screen will be displayed and you will be asked whether you to continue shooting. The superimposed image is given to take the base image. Q :...
Operation Manual
Page 104
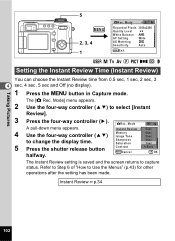
...Mode Recorded Pixels 3056x2296 Quality Level White Balance AF Setting Wide AE Metering Sensitivity Auto MENU Exit E a b c R d F G D Setting the Instant Review Time (Instant Review) You can choose the Instant Review time from 0.5 sec, 1 sec, 2 sec, 3 4 sec, 4 sec, 5 sec and Off (no display). 1 Press the 3 button in Capture..."How to change the display time. Sharpness Saturation 2sec 1sec 5 Press the shutter release button halfway. Instant Review 1p.34 102 Instant Review 5sec 4 Use the four-way controller (23) Memory Image Tone 4sec 3sec to Use the Menus" (p.43...
...Mode Recorded Pixels 3056x2296 Quality Level White Balance AF Setting Wide AE Metering Sensitivity Auto MENU Exit E a b c R d F G D Setting the Instant Review Time (Instant Review) You can choose the Instant Review time from 0.5 sec, 1 sec, 2 sec, 3 4 sec, 4 sec, 5 sec and Off (no display). 1 Press the 3 button in Capture..."How to change the display time. Sharpness Saturation 2sec 1sec 5 Press the shutter release button halfway. Instant Review 1p.34 102 Instant Review 5sec 4 Use the four-way controller (23) Memory Image Tone 4sec 3sec to Use the Menus" (p.43...
Operation Manual
Page 105
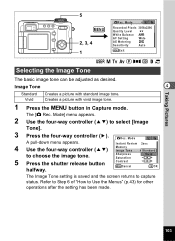
... the screen returns to select [Image Tone]. 3 Press the four-way controller (5). Refer to Step 6 of "How to choose the image tone. The [A Rec. Instant Review 2sec 4 Use the four-way controller (23) Memory Image Tone Standard to Use the Menus" (p.43) for other operations after the setting has been made...
... the screen returns to select [Image Tone]. 3 Press the four-way controller (5). Refer to Step 6 of "How to choose the image tone. The [A Rec. Instant Review 2sec 4 Use the four-way controller (23) Memory Image Tone Standard to Use the Menus" (p.43) for other operations after the setting has been made...
Operation Manual
Page 106
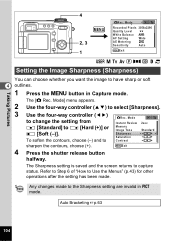
... To soften the contours, choose (-) and to the Sharpness setting are invalid in Capture mode. Any changes made . Mode to change the setting from Instant Review 2sec x [Standard] to select [Sharpness]. 3 Use the four-way controller (45) Rec. MENU Exit 4 Press the shutter release button halfway. The [A Rec. Taking Pictures 4 MENU...
... To soften the contours, choose (-) and to the Sharpness setting are invalid in Capture mode. Any changes made . Mode to change the setting from Instant Review 2sec x [Standard] to select [Sharpness]. 3 Use the four-way controller (45) Rec. MENU Exit 4 Press the shutter release button halfway. The [A Rec. Taking Pictures 4 MENU...

Operation Manual
Page 107
Mode to change the setting from Instant Review 2sec x [Standard] to Use the Menus" (p.43) for other operations after the setting has been made to select [Saturation]. 3 Use the four-way controller (45) ...
Mode to change the setting from Instant Review 2sec x [Standard] to Use the Menus" (p.43) for other operations after the setting has been made to select [Saturation]. 3 Use the four-way controller (45) ...

Operation Manual
Page 108
... the Contrast setting are invalid in Capture mode. Auto Bracketing 1p.63 106 The [A Rec. Any changes made . Mode to change the setting from Instant Review 2sec x [Standard] to select [Contrast]. 3 Use the four-way controller (45) Rec. Mode] menu appears. 2 Use the four-way controller (23) to z [High (+)] or Memory...
... the Contrast setting are invalid in Capture mode. Auto Bracketing 1p.63 106 The [A Rec. Any changes made . Mode to change the setting from Instant Review 2sec x [Standard] to select [Contrast]. 3 Use the four-way controller (45) Rec. Mode] menu appears. 2 Use the four-way controller (23) to z [High (+)] or Memory...

Operation Manual
Page 180
...p.97 9 9 9 9 9 9 9 9 - - - p.111 9 - - p.112 9 - - p.104 9 9 9 9 - 9 9 9 9 - - p.106 Appendix 10 178 Auto Bracket Interval Shoot Recorded Pixels Color Mode Frame Rate Time-lapse Movie 3D Mode Digital Zoom Instant Review Memory Image Tone Sharpness Saturation Contrast a b c R d F G D C 7 O Page 9 9 9 9 9 9 9 9 - - - p.91 9 9 9 9 9 9 9 9 - - - p.93 9 9 9 9 - 9 9 9 9 - - p.66 9 - - p.103 9 9 9 9 - 9 9 9 9 - - p.63 9 9 9 9 9 - - 9 - - - p.114 9 - - - - p.78 9 9 9 9 9 9 9 9 9 - - Comp. p.102 9 9 9 9 9 9 9 9 9 - - Mode Menus for Each Operation Mode 9 : Adjustable...
...p.97 9 9 9 9 9 9 9 9 - - - p.111 9 - - p.112 9 - - p.104 9 9 9 9 - 9 9 9 9 - - p.106 Appendix 10 178 Auto Bracket Interval Shoot Recorded Pixels Color Mode Frame Rate Time-lapse Movie 3D Mode Digital Zoom Instant Review Memory Image Tone Sharpness Saturation Contrast a b c R d F G D C 7 O Page 9 9 9 9 9 9 9 9 - - - p.91 9 9 9 9 9 9 9 9 - - - p.93 9 9 9 9 - 9 9 9 9 - - p.66 9 - - p.103 9 9 9 9 - 9 9 9 9 - - p.63 9 9 9 9 9 - - 9 - - - p.114 9 - - - - p.78 9 9 9 9 9 9 9 9 9 - - Comp. p.102 9 9 9 9 9 9 9 9 9 - - Mode Menus for Each Operation Mode 9 : Adjustable...

Operation Manual
Page 182
... [Q Playback] Menu items ×2 2 sec On Off Off Off On Off Off Off Off Off Off On Normal Normal Normal Normal Item Slideshow Resize Trimming Digital Filter Appendix Quick Zoom Quick Delete Alarm selection Alarm 10 (1, 2, 3) Alarm setting Time Snooze function Image selection Default Setting 3sec - - Comp. B&W Off Off Off Off... p.167 p.167 p.167 180 Yes Yes Yes Yes Yes Yes Yes p.58 p.102 p.87 p.89 p.95 p.59 p.58 p.100 p.101 p.84 p.57 p.85 p.81 p.121 - Digital Zoom Instant Review Flash Flash Exp.
... [Q Playback] Menu items ×2 2 sec On Off Off Off On Off Off Off Off Off Off On Normal Normal Normal Normal Item Slideshow Resize Trimming Digital Filter Appendix Quick Zoom Quick Delete Alarm selection Alarm 10 (1, 2, 3) Alarm setting Time Snooze function Image selection Default Setting 3sec - - Comp. B&W Off Off Off Off... p.167 p.167 p.167 180 Yes Yes Yes Yes Yes Yes Yes p.58 p.102 p.87 p.89 p.95 p.59 p.58 p.100 p.101 p.84 p.57 p.85 p.81 p.121 - Digital Zoom Instant Review Flash Flash Exp.

Operation Manual
Page 197
Therefore, we recommend that you review the warranty card supplied with your product at the time of purchase, or contact the PENTAX distributor in some countries can supersede this warranty policy. • This warranty policy does not affect the customer's statutory rights. • The local warranty policies available from PENTAX distributors in your country for more information and to receive a copy of the warranty policy. 10 The CE Mark is a Directive conformity mark of the European Community. 195 Appendix
Therefore, we recommend that you review the warranty card supplied with your product at the time of purchase, or contact the PENTAX distributor in some countries can supersede this warranty policy. • This warranty policy does not affect the customer's statutory rights. • The local warranty policies available from PENTAX distributors in your country for more information and to receive a copy of the warranty policy. 10 The CE Mark is a Directive conformity mark of the European Community. 195 Appendix