Operation Manual
Page 1
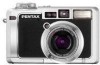
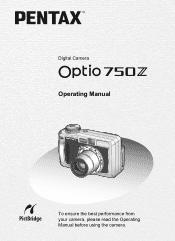
Digital Camera Operating Manual To ensure the best performance from your camera, please read the Operating Manual before using the camera.
Digital Camera Operating Manual To ensure the best performance from your camera, please read the Operating Manual before using the camera.
Operation Manual
Page 2
... the user to the rights as specified in the Copyright Act. Please read this manual before using extremely high precision technology. To users of this manual safe, as laid out in surroundings such as items for buying the PENTAX Optio 750Z Digital Camera. Copyright 2001 Seiko Epson Corporation. Combination of use of the LCD monitor in this...
... the user to the rights as specified in the Copyright Act. Please read this manual before using extremely high precision technology. To users of this manual safe, as laid out in surroundings such as items for buying the PENTAX Optio 750Z Digital Camera. Copyright 2001 Seiko Epson Corporation. Combination of use of the LCD monitor in this...
Operation Manual
Page 7
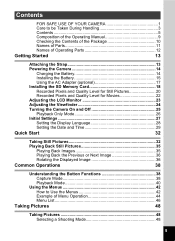
... to be Taken During Handling 3 Contents 5 Composition of the Operating Manual 9 Checking the Contents of the Package 10 Names of Parts 11 Names of Operating Parts 12 Getting Started 13 Attaching the Strap 13 Powering the Camera 14 Charging the Battery 14 Installing the Battery 15 Using the AC ... for Still Pictures 20 Recorded Pixels and Quality Level for Movies 22 Adjusting the LCD Monitor 23 Adjusting the Viewfinder 24 Turning the Camera On and Off 25 Playback Only Mode 26 Initial Settings 27 Setting the Display Language 28 Setting the Date and Time 29 Quick ...
... to be Taken During Handling 3 Contents 5 Composition of the Operating Manual 9 Checking the Contents of the Package 10 Names of Parts 11 Names of Operating Parts 12 Getting Started 13 Attaching the Strap 13 Powering the Camera 14 Charging the Battery 14 Installing the Battery 15 Using the AC ... for Still Pictures 20 Recorded Pixels and Quality Level for Movies 22 Adjusting the LCD Monitor 23 Adjusting the Viewfinder 24 Turning the Camera On and Off 25 Playback Only Mode 26 Initial Settings 27 Setting the Display Language 28 Setting the Date and Time 29 Quick ...
Operation Manual
Page 8
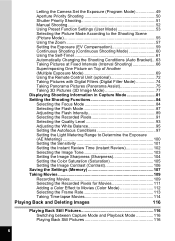
Letting the Camera Set the Exposure (Program Mode 49 Aperture Priority Shooting 50 Shutter Priority Shooting 51 Manual Shooting 52 Using Preset Function Settings (User Mode 53 Selecting the Picture Mode According to the Shooting Scene (Picture Mode 55 Using ... Shooting 66 Superimposing One Picture on Top of Another (Multiple Exposure Mode 69 Using the Remote Control Unit (optional 72 Taking Pictures with Digital Filters (Digital Filter Mode 74 Taking Panorama Pictures (Panorama Assist 75 Taking 3D Pictures (3D Image Mode 77 Displaying Shooting Information in Capture Mode 81 ...
Letting the Camera Set the Exposure (Program Mode 49 Aperture Priority Shooting 50 Shutter Priority Shooting 51 Manual Shooting 52 Using Preset Function Settings (User Mode 53 Selecting the Picture Mode According to the Shooting Scene (Picture Mode 55 Using ... Shooting 66 Superimposing One Picture on Top of Another (Multiple Exposure Mode 69 Using the Remote Control Unit (optional 72 Taking Pictures with Digital Filters (Digital Filter Mode 74 Taking Panorama Pictures (Panorama Assist 75 Taking 3D Pictures (3D Image Mode 77 Displaying Shooting Information in Capture Mode 81 ...
Operation Manual
Page 10
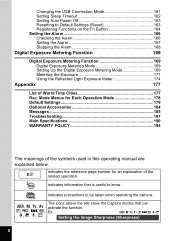
... 7 Ex. The icons above the title show the Capture modes that is useful to be taken when operating the camera. Mode Menus for Each Operation Mode 178 Default Settings 179 Optional Accessories 184 Messages 185 Troubleshooting 187 Main Specifications 190 ...WARRANTY POLICY 194 The meanings of the symbols used in this operating manual are explained below. 1 indicates the reference page number for an ... the Alarm 168 Digital Exposure Metering Function 169 Digital Exposure Metering Function 169 Digital Exposure Metering Mode 169 Setting Up the Digital Exposure Metering Mode...
... 7 Ex. The icons above the title show the Capture modes that is useful to be taken when operating the camera. Mode Menus for Each Operation Mode 178 Default Settings 179 Optional Accessories 184 Messages 185 Troubleshooting 187 Main Specifications 190 ...WARRANTY POLICY 194 The meanings of the symbols used in this operating manual are explained below. 1 indicates the reference page number for an ... the Alarm 168 Digital Exposure Metering Function 169 Digital Exposure Metering Function 169 Digital Exposure Metering Mode 169 Setting Up the Digital Exposure Metering Mode...
Operation Manual
Page 11
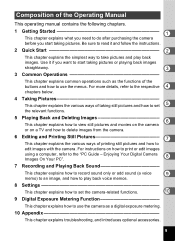
... This chapter explains the various ways of taking still pictures and how to set the camera-related functions. 10 9 Digital Exposure Metering Function This chapter explains how to use the menus. Composition of the Operating Manual This operating manual contains the following chapters. 1 Getting Started 1 This chapter explains what you need to do after...
... This chapter explains the various ways of taking still pictures and how to set the camera-related functions. 10 9 Digital Exposure Metering Function This chapter explains how to use the menus. Composition of the Operating Manual This operating manual contains the following chapters. 1 Getting Started 1 This chapter explains what you need to do after...
Operation Manual
Page 12
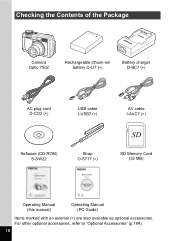
Checking the Contents of the Package Camera Optio 750Z Rechargeable lithium-ion battery D-LI7 (∗) Battery charger D-BC7 (∗) AC plug cord D-CO2 (∗) USB cable I-USB7 (∗) AV cable I-AVC7 (∗) Software (CD-ROM) S-SW22 Strap O-ST17 (∗) SD Memory Card (32 MB) Operating Manual (this manual) Operating Manual (PC Guide) Items marked with an asterisk (∗) are also available as optional accessories. For other optional accessories, refer to "Optional Accessories" (p.184). 10
Checking the Contents of the Package Camera Optio 750Z Rechargeable lithium-ion battery D-LI7 (∗) Battery charger D-BC7 (∗) AC plug cord D-CO2 (∗) USB cable I-USB7 (∗) AV cable I-AVC7 (∗) Software (CD-ROM) S-SW22 Strap O-ST17 (∗) SD Memory Card (32 MB) Operating Manual (this manual) Operating Manual (PC Guide) Items marked with an asterisk (∗) are also available as optional accessories. For other optional accessories, refer to "Optional Accessories" (p.184). 10

Operation Manual
Page 19
... are taking pictures. • To avoid the risk of the AC adapter to the DC input terminal on "FOR SAFE USE OF YOUR CAMERA" (p.1). • Be sure to read the operation manual accompanying the AC adapter before using the battery charger or AC adapter, be sure to read the section on the... camera. 3 Connect the AC plug cord to the AC adapter. 4 Plug the AC plug cord into the power outlet. • Make sure that the AC...
... are taking pictures. • To avoid the risk of the AC adapter to the DC input terminal on "FOR SAFE USE OF YOUR CAMERA" (p.1). • Be sure to read the operation manual accompanying the AC adapter before using the battery charger or AC adapter, be sure to read the section on the... camera. 3 Connect the AC plug cord to the AC adapter. 4 Plug the AC plug cord into the power outlet. • Make sure that the AC...

Operation Manual
Page 40
Cannot be used in Manual Exposure mode. (1p.52) Select E mode on the subject (when Focus mode is set to s or z). (1p.33) Press down halfway to focus on the ... recording in C mode. (1p.109) Starts and stops voice recording in O mode. (1p.146) Zoom/w/x button Changes the shooting area. (1p.57) Adjust the focus manually when the Focus mode is not set to z.
Cannot be used in Manual Exposure mode. (1p.52) Select E mode on the subject (when Focus mode is set to s or z). (1p.33) Press down halfway to focus on the ... recording in C mode. (1p.109) Starts and stops voice recording in O mode. (1p.146) Zoom/w/x button Changes the shooting area. (1p.57) Adjust the focus manually when the Focus mode is not set to z.
Operation Manual
Page 41
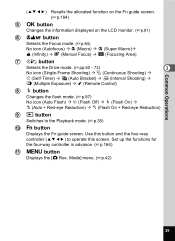
... displayed on the LCD monitor. (1p.81) 6 ) button Selects the Focus mode. (1p.84) No icon (Autofocus) ´ q (Macro) ´ r (Super Macro)´ s (Infinity) ´ z (Manual Focus) ´ 1 (Focusing Area) 7 ( button Selects the Drive mode. (1pp.60 - 73) 3 No icon (Single-Frame Shooting) ´ j (Continuous Shooting) ´ g (Self-Timer) ´ a (Auto...
... displayed on the LCD monitor. (1p.81) 6 ) button Selects the Focus mode. (1p.84) No icon (Autofocus) ´ q (Macro) ´ r (Super Macro)´ s (Infinity) ´ z (Manual Focus) ´ 1 (Focusing Area) 7 ( button Selects the Drive mode. (1pp.60 - 73) 3 No icon (Single-Frame Shooting) ´ j (Continuous Shooting) ´ g (Self-Timer) ´ a (Auto...
Operation Manual
Page 50
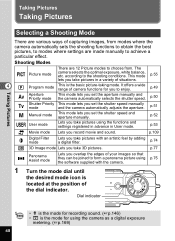
...dial indicator. p.77 F Panorama Assist mode Lets you take 3D pictures. p.52 E User mode Lets you overlap the edges of camera functions for using the camera as a digital exposure metering. (1p.169) 48 It offers a wide range of your images so that they can be joined to form a... p.50 b Shutter Priority This mode lets you take pictures using p.75 the software supplied with an artistic feel by adding a digital filter. p.51 a Manual mode This mode lets you record movie and sound. Taking Pictures Taking Pictures Taking Pictures Selecting a Shooting Mode There are made...
...dial indicator. p.77 F Panorama Assist mode Lets you take 3D pictures. p.52 E User mode Lets you overlap the edges of camera functions for using the camera as a digital exposure metering. (1p.169) 48 It offers a wide range of your images so that they can be joined to form a... p.50 b Shutter Priority This mode lets you take pictures using p.75 the software supplied with an artistic feel by adding a digital filter. p.51 a Manual mode This mode lets you record movie and sound. Taking Pictures Taking Pictures Taking Pictures Selecting a Shooting Mode There are made...

Operation Manual
Page 52
... the shutter release button F5.6 09/25/2004 14:25 halfway. The camera adjusts the shutter speed accordingly. The picture is taken at the aperture you have chosen. Use this mode, you can set the aperture manually. 1 3, 4 2 Taking Pictures c Aperture Priority Shooting In this function...will produce a picture in which both the foreground and the background are in focus. 4 Press the shutter release button fully. The camera 4 automatically sets the shutter speed to obtain the optimal exposure at a slower shutter speed, because the noise reduction function activates to ...
... the shutter release button F5.6 09/25/2004 14:25 halfway. The camera adjusts the shutter speed accordingly. The picture is taken at the aperture you have chosen. Use this mode, you can set the aperture manually. 1 3, 4 2 Taking Pictures c Aperture Priority Shooting In this function...will produce a picture in which both the foreground and the background are in focus. 4 Press the shutter release button fully. The camera 4 automatically sets the shutter speed to obtain the optimal exposure at a slower shutter speed, because the noise reduction function activates to ...
Operation Manual
Page 53
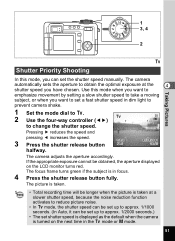
...Pressing 5 reduces the speed and pressing 4 increases the speed. 1/250 3 Press the shutter release button F5.6 halfway. 09/25/2004 14:25 The camera adjusts the aperture accordingly. The picture is taken. • Total recording time will be set up to approx. 1/1000 seconds. (In Auto, it ...can set the shutter speed manually. 1 3, 4 2 b Shutter Priority Shooting Taking Pictures In this mode when you want to set a fast shutter speed in dim light to prevent camera shake. 1 Set the mode dial to b. 38 2 Use the four-way controller ...
...Pressing 5 reduces the speed and pressing 4 increases the speed. 1/250 3 Press the shutter release button F5.6 halfway. 09/25/2004 14:25 The camera adjusts the aperture accordingly. The picture is taken. • Total recording time will be set up to approx. 1/1000 seconds. (In Auto, it ...can set the shutter speed manually. 1 3, 4 2 b Shutter Priority Shooting Taking Pictures In this mode when you want to set a fast shutter speed in dim light to prevent camera shake. 1 Set the mode dial to b. 38 2 Use the four-way controller ...
Operation Manual
Page 54
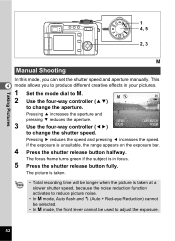
..., the range appears on the exposure bar. 4 Press the shutter release button halfway. This 4 mode allows you can set the shutter speed and aperture manually. Taking Pictures 1 4, 5 2, 3 a Manual Shooting In this mode, you to produce different creative effects in focus. 5 Press the shutter release button fully. Pressing 5 reduces the speed and pressing...
..., the range appears on the exposure bar. 4 Press the shutter release button halfway. This 4 mode allows you can set the shutter speed and aperture manually. Taking Pictures 1 4, 5 2, 3 a Manual Shooting In this mode, you to produce different creative effects in focus. 5 Press the shutter release button fully. Pressing 5 reduces the speed and pressing...

Operation Manual
Page 58
... reduction function activates to the optimal settings for each mode and cannot be changed manually. • Total recording time will be longer when the picture is slower when taking pictures of dark scenes. To prevent camera shake, secure the camera on a tripod or other surface. • In Picture mode, the saturation, contrast, sharpness...
... reduction function activates to the optimal settings for each mode and cannot be changed manually. • Total recording time will be longer when the picture is slower when taking pictures of dark scenes. To prevent camera shake, secure the camera on a tripod or other surface. • In Picture mode, the saturation, contrast, sharpness...
Operation Manual
Page 86
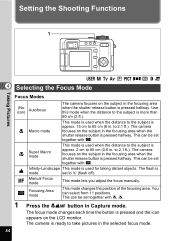
... mode This mode lets you adjust the focus manually. 1 Focusing Area mode This mode changes the position of the focusing area. Setting the Shooting Functions 1 E a b c R d F G D C 4 Selecting the Focus Mode Taking Pictures Focus Modes (No icon) Autofocus The camera focuses on the subject in the focusing area when the...when the distance to the subject is used when the distance to take pictures in Capture mode. This can select from 11 positions. The camera is more than 60 cm (2 ft.). Use this mode when the distance to the subject is ready to the subject is pressed halfway....
... mode This mode lets you adjust the focus manually. 1 Focusing Area mode This mode changes the position of the focusing area. Setting the Shooting Functions 1 E a b c R d F G D C 4 Selecting the Focus Mode Taking Pictures Focus Modes (No icon) Autofocus The camera focuses on the subject in the focusing area when the...when the distance to the subject is used when the distance to take pictures in Capture mode. This can select from 11 positions. The camera is more than 60 cm (2 ft.). Use this mode when the distance to the subject is ready to the subject is pressed halfway....

Operation Manual
Page 87
... check the image on the LCD monitor. • The default setting is Autofocus mode. • Only the digital zoom can also press 0.02 0.3 1 the shutter release button halfway or fully, or OK OK wait for... at least five seconds. Saving the Focus Mode 1p.107 Taking Pictures Manual Focus 1 Press the ) button in r mode. • Make sure that the surface of the lens is ...clean as any dirt on the lens in r mode may cause the camera to focus on the dirt rather than on the subject. • If you can be used in Capture mode...
... check the image on the LCD monitor. • The default setting is Autofocus mode. • Only the digital zoom can also press 0.02 0.3 1 the shutter release button halfway or fully, or OK OK wait for... at least five seconds. Saving the Focus Mode 1p.107 Taking Pictures Manual Focus 1 Press the ) button in r mode. • Make sure that the surface of the lens is ...clean as any dirt on the lens in r mode may cause the camera to focus on the dirt rather than on the subject. • If you can be used in Capture mode...

Operation Manual
Page 97
... 4, 5 1 Rec. Choose the type of shooting. 4 White Balance Settings F Auto The camera adjusts the white balance automatically. H Shade Use this mode when taking pictures under fluorescent light. K Manual Use this mode when taking pictures outside in the shade. Mode] menu appears. 2 Use the... four-way controller (23) to change the setting. G Daylight Use this mode when adjusting the white balance manually. 1 Press the 3 button in natural colors by adjusting the white balance according to the light conditions at the time of fluorescent light...
... 4, 5 1 Rec. Choose the type of shooting. 4 White Balance Settings F Auto The camera adjusts the white balance automatically. H Shade Use this mode when taking pictures under fluorescent light. K Manual Use this mode when taking pictures outside in the shade. Mode] menu appears. 2 Use the... four-way controller (23) to change the setting. G Daylight Use this mode when adjusting the white balance manually. 1 Press the 3 button in natural colors by adjusting the white balance according to the light conditions at the time of fluorescent light...

Operation Manual
Page 98
Saving the White Balance 1p.107 Auto Bracketing 1p.63 Manual Setting Have a blank sheet of white paper ready. 1 Select K (manual) on the White Balance screen. 2 Point the camera at the blank sheet of paper so that it fills the screen of "How to the [A Rec. Taking Pictures 5 6 4 ... controller (45) to take pictures. The white balance is saved and the screen returns to the White Balance setting are invalid in d mode. 96 The camera is saved and the screen returns to Use the Menus" (p.43) for other operations after the setting has been made to capture status. W SHUTTER A ...
Saving the White Balance 1p.107 Auto Bracketing 1p.63 Manual Setting Have a blank sheet of white paper ready. 1 Select K (manual) on the White Balance screen. 2 Point the camera at the blank sheet of paper so that it fills the screen of "How to the [A Rec. Taking Pictures 5 6 4 ... controller (45) to take pictures. The white balance is saved and the screen returns to the White Balance setting are invalid in d mode. 96 The camera is saved and the screen returns to Use the Menus" (p.43) for other operations after the setting has been made to capture status. W SHUTTER A ...
Operation Manual
Page 109
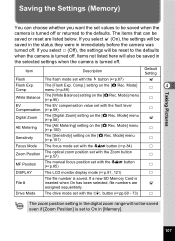
...1p.84) P Zoom Position The optical zoom position set with the Zoom button (1p.57) P MF Position The manual focus position set with the front lever Compensation (1p.59) P Digital Zoom The [Digital Zoom] setting on the [A Rec. If you want the set with the ) button (1p.85) P DISPLAY ...[A Rec. Item Flash Description The flash mode set with the ( button (1pp.60 - 73) P The zoom position setting in the selected settings when the camera is saved. Comp.] setting on the [A Rec. Mode] menu (1p.58) O AE Metering The [AE Metering] setting on the [A Rec. If a...
...1p.84) P Zoom Position The optical zoom position set with the Zoom button (1p.57) P MF Position The manual focus position set with the front lever Compensation (1p.59) P Digital Zoom The [Digital Zoom] setting on the [A Rec. If you want the set with the ) button (1p.85) P DISPLAY ...[A Rec. Item Flash Description The flash mode set with the ( button (1pp.60 - 73) P The zoom position setting in the selected settings when the camera is saved. Comp.] setting on the [A Rec. Mode] menu (1p.58) O AE Metering The [AE Metering] setting on the [A Rec. If a...


