
Operating Instructions
Page 8
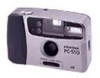
... SPEED 9 LOADING THE FILM 9 HOLDING YOUR CAMERA 9 AUTO FLASH PHOTOGRAPHY 10 RED-EYE REDUCTION 10 TAKING PICTURES 10 REWINDING THE FILM 11 AUTO-FOCUS SHOOTING 11 Printing the Date and Time 12 TAKING CARE OF YOUR CAMERA 13 WARRANTY POLICY 14 SPECIFICATIONS 16 Before using ...your camera, please be sure to read these instructions carefully 7 NAME OF PARTS 1 Film Counter Window 2 Shutter Release ...
... SPEED 9 LOADING THE FILM 9 HOLDING YOUR CAMERA 9 AUTO FLASH PHOTOGRAPHY 10 RED-EYE REDUCTION 10 TAKING PICTURES 10 REWINDING THE FILM 11 AUTO-FOCUS SHOOTING 11 Printing the Date and Time 12 TAKING CARE OF YOUR CAMERA 13 WARRANTY POLICY 14 SPECIFICATIONS 16 Before using ...your camera, please be sure to read these instructions carefully 7 NAME OF PARTS 1 Film Counter Window 2 Shutter Release ...
Operating Instructions
Page 9
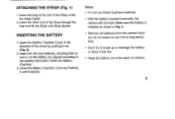
...children. 8 Insert the other end of the Strap under the Strap Eyelet 2. Open the Battery Chamber Cover in Fig. 3. With the battery inserted incorrectly, the camera will not work. INSERTING THE BATTERY 1. Notes: • Do not use it for a long period time. • Don't try to break up or ...fire. • Keep the battery out of the reach of the arrow by Pushing it until it out. (Fig. 2) 2. Remove AA batteries from the camera when you do not expect to the polarity information inside the Battery Chamber. 3. Insert two AA-size batteries, checking that (+) and (-) on the battery ...
...children. 8 Insert the other end of the Strap under the Strap Eyelet 2. Open the Battery Chamber Cover in Fig. 3. With the battery inserted incorrectly, the camera will not work. INSERTING THE BATTERY 1. Notes: • Do not use it for a long period time. • Don't try to break up or ...fire. • Keep the battery out of the reach of the arrow by Pushing it until it out. (Fig. 2) 2. Remove AA batteries from the camera when you do not expect to the polarity information inside the Battery Chamber. 3. Insert two AA-size batteries, checking that (+) and (-) on the battery ...
Operating Instructions
Page 10
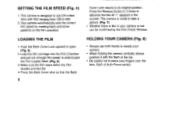
...Chamber and pull out enough film leader to its original position. Make sure the film stays within the Film Guides and lies flat. 4. Your camera automatically sets the correct film speed by the Film Check Window. Press the Back Cover shut so that the Back 9 Cover Lock returns to ...take a picture. (Fig. 7) • Whether there is designed to use both hands to steady your camera. • When holding the camera vertically always position it with ISO ranging from 100 to place your camera or not can be confirmed by reading black-and-silver patterns on the film cassettes. HOLDING YOUR...
...Chamber and pull out enough film leader to its original position. Make sure the film stays within the Film Guides and lies flat. 4. Your camera automatically sets the correct film speed by the Film Check Window. Press the Back Cover shut so that the Back 9 Cover Lock returns to ...take a picture. (Fig. 7) • Whether there is designed to use both hands to steady your camera. • When holding the camera vertically always position it with ISO ranging from 100 to place your camera or not can be confirmed by reading black-and-silver patterns on the film cassettes. HOLDING YOUR...

Operating Instructions
Page 11
... recharged and full, the Ready Monitor lights up. (Fig. 9) • When the flash is designed to take superior shots of people. RED-EYE REDUCTION This camera is fully charged, the Ready Monitor will take a flash photograph. Press the Release smoothly to half way and hold there for anyone to take about... that the flash is ready when pressing the Shutter Release Button halfway. • When the flash is required, the Built-in the direction of the camera. You can use the 10 The Ready Monitor lights again to charge the flash fully. AUTO FLASH PHOTOGRAPHY 1.
... recharged and full, the Ready Monitor lights up. (Fig. 9) • When the flash is designed to take superior shots of people. RED-EYE REDUCTION This camera is fully charged, the Ready Monitor will take a flash photograph. Press the Release smoothly to half way and hold there for anyone to take about... that the flash is ready when pressing the Shutter Release Button halfway. • When the flash is required, the Built-in the direction of the camera. You can use the 10 The Ready Monitor lights again to charge the flash fully. AUTO FLASH PHOTOGRAPHY 1.

Operating Instructions
Page 12
... to take a picture. If they get dirty, they should be cleaned with your camera. Gently press the Shutter Release Button down to take the picture. camera only when the lens Cover is at least 1m (3.3ft) away from the camera. • Be careful not to accidentally cover the Autofocus Sensor Windows on the...
... to take a picture. If they get dirty, they should be cleaned with your camera. Gently press the Shutter Release Button down to take the picture. camera only when the lens Cover is at least 1m (3.3ft) away from the camera. • Be careful not to accidentally cover the Autofocus Sensor Windows on the...
Operating Instructions
Page 14
... will not function properly in salty water. The following careless handling may damage it dry immediately and have to avoid subjecting the camera to your camera when mounting it is submerged in extreme temperature conditions. It must be protected from salty breezes or sprays at an assigned service... of rusting to extreme high or low temperature and humidity, since the circuit of this camera has a high working voltage. (Fig. 18) Make sure the tripod screw fits your camera. (Fig. 16) 4. If your camera gets wet, please wipe it many ways. (Fig. 14) 2. The shutter mechanism and...
... will not function properly in salty water. The following careless handling may damage it dry immediately and have to avoid subjecting the camera to your camera when mounting it is submerged in extreme temperature conditions. It must be protected from salty breezes or sprays at an assigned service... of rusting to extreme high or low temperature and humidity, since the circuit of this camera has a high working voltage. (Fig. 18) Make sure the tripod screw fits your camera. (Fig. 16) 4. If your camera gets wet, please wipe it many ways. (Fig. 14) 2. The shutter mechanism and...

Operating Instructions
Page 15
...its written consent and shall not be replaced without cost to you purchased the equipment or to the manufacturer. WARRANTY POLICY All Pentax cameras purchased through authorized bona fide photographic distribution channels are guaranteed against defects of material or workmanship for a period of twelve months ...from delay or loss of use or from other indirect or consequential damages of purchase. Procedure During 12-month Warranty Period Any Pentax which proves defective during the 12 month warranty period should be liable for any kind, whether caused by an unauthorized repair shop...
...its written consent and shall not be replaced without cost to you purchased the equipment or to the manufacturer. WARRANTY POLICY All Pentax cameras purchased through authorized bona fide photographic distribution channels are guaranteed against defects of material or workmanship for a period of twelve months ...from delay or loss of use or from other indirect or consequential damages of purchase. Procedure During 12-month Warranty Period Any Pentax which proves defective during the 12 month warranty period should be liable for any kind, whether caused by an unauthorized repair shop...
Operating Instructions
Page 17
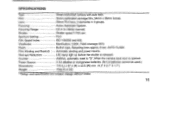
...: Focusing: Focusing Range: Shutter: Aperture Setting: Film Speed Index: Viewfinder: Flash: Film Winding and Rewindi : Red-eye Reduction: Counter: Power Source: Dimensions: Weight: 35mm motorized camera with auto lash. 35mm perforated cartridge film, 24mm x 36mm format. 28mm F5.0 lens, 3 elements in type, Recycling time: approx. 8 sec. LED lamp light up before...) * Design and specification are subject change without notice. 16 Manification: 0.63X, Field coverage: 80% Built-in 3 groups. AUTO FLASH. Acitve Automatic System. 0.8 m to "S", When the camera back door is released.
...: Focusing: Focusing Range: Shutter: Aperture Setting: Film Speed Index: Viewfinder: Flash: Film Winding and Rewindi : Red-eye Reduction: Counter: Power Source: Dimensions: Weight: 35mm motorized camera with auto lash. 35mm perforated cartridge film, 24mm x 36mm format. 28mm F5.0 lens, 3 elements in type, Recycling time: approx. 8 sec. LED lamp light up before...) * Design and specification are subject change without notice. 16 Manification: 0.63X, Field coverage: 80% Built-in 3 groups. AUTO FLASH. Acitve Automatic System. 0.8 m to "S", When the camera back door is released.


