

WVCP460 User Guide
Page 1
.... Do not abuse the camera. Turn the power off immediately and ask a qualified service person for WV-CP464. Do not operate the camera beyond the specified temperature, humidity or power source ratings. Color CCTV Cameras Operating Instructions Model No. The serial number of a 1/3-inch interline transfer CCD image sensor having 771 horizontal pixels (picture elements), and digital signal processing LSIs. WV-CP460 WV-CP464 (Lens Option) Before attempting...
.... Do not abuse the camera. Turn the power off immediately and ask a qualified service person for WV-CP464. Do not operate the camera beyond the specified temperature, humidity or power source ratings. Color CCTV Cameras Operating Instructions Model No. The serial number of a 1/3-inch interline transfer CCD image sensor having 771 horizontal pixels (picture elements), and digital signal processing LSIs. WV-CP460 WV-CP464 (Lens Option) Before attempting...

WVCP460 User Guide
Page 2
... compatible input terminal. FEATURES 1. YFE4191J100). Plug the AC power cord (supplied as a spotlight. w Focus Fixing Screw e Flange-back Adjusting Ring This ring is used to this ring clockwise for a C-mount lens or counterclockwise for panning and tilting. The 12 V DC or 24 V AC power supply cord can be pulled off the camera when the camera pans or tilts. r Lens (Option) t Camera Mounting Screw Hole This hole is used to connect the auto iris lens...
... compatible input terminal. FEATURES 1. YFE4191J100). Plug the AC power cord (supplied as a spotlight. w Focus Fixing Screw e Flange-back Adjusting Ring This ring is used to this ring clockwise for a C-mount lens or counterclockwise for panning and tilting. The 12 V DC or 24 V AC power supply cord can be pulled off the camera when the camera pans or tilts. r Lens (Option) t Camera Mounting Screw Hole This hole is used to connect the auto iris lens...

WVCP460 User Guide
Page 3
... to shoot indoor scenes with fixed iris lens by use a monitor whose resolution is used to select items in the CAM SET UP menu. !1 Gen-lock Termination Switch (Hi-Z, G/L 75 Ω) Set this switch to 75 Ω. !2 Gen-lock Input Connector (GEN-LOCK) This connector is used to connect an external system for synchronization. !3 Video Output Connector (VIDEO OUT) This connector is used to adjust some levels. DC 12V AC 24V IN...
... to shoot indoor scenes with fixed iris lens by use a monitor whose resolution is used to select items in the CAM SET UP menu. !1 Gen-lock Termination Switch (Hi-Z, G/L 75 Ω) Set this switch to 75 Ω. !2 Gen-lock Input Connector (GEN-LOCK) This connector is used to connect an external system for synchronization. !3 Video Output Connector (VIDEO OUT) This connector is used to adjust some levels. DC 12V AC 24V IN...

WVCP460 User Guide
Page 4
... glass or CCD image sensor may damage inner components. Installation of the Pin 2 supplied connector. If the lens is not at the rear of focus. Caution: Tightening the screw by using a video drive ALC lens. Pin 2: Not used when mounting the mount adapter as shown in the diagram below : C-mount: Less than 13 mm (1/2") CS-mount: Less than 450 g (0.99 lbs). Fixing Screws Mount Adapter Turn the flange-back adjusting ring...
... glass or CCD image sensor may damage inner components. Installation of the Pin 2 supplied connector. If the lens is not at the rear of focus. Caution: Tightening the screw by using a video drive ALC lens. Pin 2: Not used when mounting the mount adapter as shown in the diagram below : C-mount: Less than 13 mm (1/2") CS-mount: Less than 450 g (0.99 lbs). Fixing Screws Mount Adapter Turn the flange-back adjusting ring...

WVCP460 User Guide
Page 5
... INT ↵ WHITE BAL ATW MOTION DET OFF LENS DRIVE DC Highlighted END SET UP DISABLE Refer to the sections below for a detailed description of the camera is pressed. To set items on the CAM SET UP menu, use the following buttons on the monitor. Use this button to normal camera picture mode. Use this button to select or adjust the parameters of the settings. The message ALL RESET momentarily appears...
... INT ↵ WHITE BAL ATW MOTION DET OFF LENS DRIVE DC Highlighted END SET UP DISABLE Refer to the sections below for a detailed description of the camera is pressed. To set items on the CAM SET UP menu, use the following buttons on the monitor. Use this button to normal camera picture mode. Use this button to select or adjust the parameters of the settings. The message ALL RESET momentarily appears...
WVCP460 User Guide
Page 6
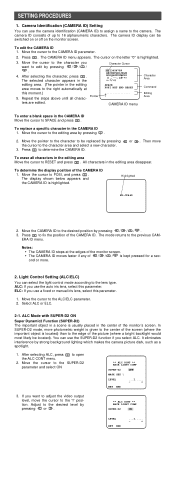
... RESET and press . Move the CAMERA ID to the lens type. Light Control Setting (ALC/ELC) You can use the SUPER-D2 function if you use the auto iris lens, select this parameter. 1. SETTING PROCEDURES 1. Camera Identification (CAMERA ID) Setting You can select the light control mode according to the desired position by pressing . 2. Press to the ALC/ELC parameter. 2. Move the cursor to open the ALC CONT menu...
... RESET and press . Move the CAMERA ID to the lens type. Light Control Setting (ALC/ELC) You can use the SUPER-D2 function if you use the auto iris lens, select this parameter. 1. SETTING PROCEDURES 1. Camera Identification (CAMERA ID) Setting You can select the light control mode according to the desired position by pressing . 2. Press to the ALC/ELC parameter. 2. Move the cursor to open the ALC CONT menu...

WVCP460 User Guide
Page 7
... the camera is not available. ALC Mode with the composite video output signal from external equipment such as shown at the boundary between the bright and the dim scene. Move the cursor to white. (When the cursor is moved on the CAM SET UP menu or ON is not available.) The item MASK SET appears on the menu. 2. The mask turns...
... the camera is not available. ALC Mode with the composite video output signal from external equipment such as shown at the boundary between the bright and the dim scene. Move the cursor to white. (When the cursor is moved on the CAM SET UP menu or ON is not available.) The item MASK SET appears on the menu. 2. The mask turns...

WVCP460 User Guide
Page 8
... the values preset at the factory, press or simultaneously. The phase adjust- ** SYNC ** ment menu appears on the oscilloscope. 7. Supply the video output signal of both the original camera video output signal and the effect output video signal (program output video signal) of the special effects generator (SEG) to EXT (VBS) on the menu. When the VBS or VS gen-lock mode is to enable a continuous adjustment. Adjust the horizontal...
... the values preset at the factory, press or simultaneously. The phase adjust- ** SYNC ** ment menu appears on the oscilloscope. 7. Supply the video output signal of both the original camera video output signal and the effect output video signal (program output video signal) of the special effects generator (SEG) to EXT (VBS) on the menu. When the VBS or VS gen-lock mode is to enable a continuous adjustment. Adjust the horizontal...

WVCP460 User Guide
Page 9
... the vertical phase for white balance adjustment as follows: • ATW (Auto Tracing White Balance) In this mode, the color temperature is monitored continuously and thereby white balance is obtained within a color temperature range of the 2 600 - 6 000K range. 2. COARSE and FINE adjustments are preset at the factory, press or simultaneously. Proper white balance may be adjusted and the reference camera video output signal to 22.5 degrees...
... the vertical phase for white balance adjustment as follows: • ATW (Auto Tracing White Balance) In this mode, the color temperature is monitored continuously and thereby white balance is obtained within a color temperature range of the 2 600 - 6 000K range. 2. COARSE and FINE adjustments are preset at the factory, press or simultaneously. Proper white balance may be adjusted and the reference camera video output signal to 22.5 degrees...

WVCP460 User Guide
Page 10
... by monitoring changes in a Panasonic Intelligent CCTV System select OFF to meet your requirements. Select ON when you adjust and setup the video signal of the CAM SET UP menu and press and simultaneously (holding down and , press for DISPLAY MODE. While observing the wave form monitor or color video monitor, move the "I " cursor to reach the alarm terminal of "ALC mode with the video signal. 1. 8. When this model, select...
... by monitoring changes in a Panasonic Intelligent CCTV System select OFF to meet your requirements. Select ON when you adjust and setup the video signal of the CAM SET UP menu and press and simultaneously (holding down and , press for DISPLAY MODE. While observing the wave form monitor or color video monitor, move the "I " cursor to reach the alarm terminal of "ALC mode with the video signal. 1. 8. When this model, select...

WVCP460 User Guide
Page 11
... (0.9 lbs.) Weights and dimensions indicated are approximate. SPECIFICATIONS Pick-up Device: Scanning Area: Scanning: Horizontal: Vertical: Synchronization: Video Output: Horizontal Resolution: Signal-to-Noise Ratio: Dynamic Range: Minimum Illumination: Gain Control: White Balance: Aperture: Electronic Light Control: Super Dynamic2: Electronic Shutter Speed: Lens Mount: ALC Lens: Ambient Operating Temperature: Ambient Operating Humidity: Power Source and Power Consumption: Dimensions (without lens): Weights (without lens): 771 (H) x 492 (V) pixels, Interline Transfer...
... (0.9 lbs.) Weights and dimensions indicated are approximate. SPECIFICATIONS Pick-up Device: Scanning Area: Scanning: Horizontal: Vertical: Synchronization: Video Output: Horizontal Resolution: Signal-to-Noise Ratio: Dynamic Range: Minimum Illumination: Gain Control: White Balance: Aperture: Electronic Light Control: Super Dynamic2: Electronic Shutter Speed: Lens Mount: ALC Lens: Ambient Operating Temperature: Ambient Operating Humidity: Power Source and Power Consumption: Dimensions (without lens): Weights (without lens): 771 (H) x 492 (V) pixels, Interline Transfer...


