
Operating Instructions
Page 16
Make sure that the Device Option Tab is set properly before printing a document, or printing problems may occur. Configuring the Printer Driver Settings Windows 98/Windows Me Device Options Tab 1. Number of Paper Trays Select the number of optional devices. Device Options Tab specifies device-specific settings and settings of available paper trays if optional Paper Feed Module(s) are installed. 16 NOTE 1.
Make sure that the Device Option Tab is set properly before printing a document, or printing problems may occur. Configuring the Printer Driver Settings Windows 98/Windows Me Device Options Tab 1. Number of Paper Trays Select the number of optional devices. Device Options Tab specifies device-specific settings and settings of available paper trays if optional Paper Feed Module(s) are installed. 16 NOTE 1.

Operating Instructions
Page 24
Make sure that the Device Option Tab is set properly before printing a document, or printing problems may occur. Device Options Tab specifies device-specific settings and settings of available paper trays if optional Paper Feed Module(s) are installed. 24 NOTE 1. Number of Paper Trays Select the number of optional devices. Configuring the Printer Driver Settings Windows NT 4.0 (Administrator) Device Options Tab 1.
Make sure that the Device Option Tab is set properly before printing a document, or printing problems may occur. Device Options Tab specifies device-specific settings and settings of available paper trays if optional Paper Feed Module(s) are installed. 24 NOTE 1. Number of Paper Trays Select the number of optional devices. Configuring the Printer Driver Settings Windows NT 4.0 (Administrator) Device Options Tab 1.

Operating Instructions
Page 31
... printing features. Optional features of printers in the settings. Printing Defaults... The processor and data type define operations of the printer (page ordering, booklet printing, numbering on your machine. Usually no change is shared, the settings here are enabled. button Specify a print processor and data type to incompatibility. Print Processor... button...
... printing features. Optional features of printers in the settings. Printing Defaults... The processor and data type define operations of the printer (page ordering, booklet printing, numbering on your machine. Usually no change is shared, the settings here are enabled. button Specify a print processor and data type to incompatibility. Print Processor... button...

Operating Instructions
Page 33
Number of Paper Trays Select the number of optional devices. NOTE 1. Device Options Tab specifies device-specific settings and settings of available paper trays if optional Paper Feed Module(s) are installed. Make sure that the Device Option Tab is set properly before printing a document, or printing problems may occur. 33 Printer Section Configuring the Printer Driver Settings Windows 2000/Windows XP/Windows Server 2003 (Administrator) Device Options Tab 1.
Number of Paper Trays Select the number of optional devices. NOTE 1. Device Options Tab specifies device-specific settings and settings of available paper trays if optional Paper Feed Module(s) are installed. Make sure that the Device Option Tab is set properly before printing a document, or printing problems may occur. 33 Printer Section Configuring the Printer Driver Settings Windows 2000/Windows XP/Windows Server 2003 (Administrator) Device Options Tab 1.

Operating Instructions
Page 35
Output Size Specifies the paper size to be set within the application, indicate one copy here and specify the number of copies in the Print dialog box of copies to be printed can be used. The various paper sizes listed match those supported by ... indicate 100% here and specify the enlargement/reduction percentage in the Print dialog box of the printer driver files. 9. If the number of the application. 6. Copies (1-99) Specify the number of copies to the default settings. 35 Zoom (50-200) Specify an enlargement or reduction percentage when printing documents. Paper Size ...
Output Size Specifies the paper size to be set within the application, indicate one copy here and specify the number of copies in the Print dialog box of copies to be printed can be used. The various paper sizes listed match those supported by ... indicate 100% here and specify the enlargement/reduction percentage in the Print dialog box of the printer driver files. 9. If the number of the application. 6. Copies (1-99) Specify the number of copies to the default settings. 35 Zoom (50-200) Specify an enlargement or reduction percentage when printing documents. Paper Size ...

Operating Instructions
Page 38
... NT 4.0/Windows 2000/Windows XP/Windows Server 2003 only) 2. Configuring the Printer Driver Settings Windows Common Settings Quality Tab 1. dpi (dots per inch) represents the number of the printer driver files. 5.
... NT 4.0/Windows 2000/Windows XP/Windows Server 2003 only) 2. Configuring the Printer Driver Settings Windows Common Settings Quality Tab 1. dpi (dots per inch) represents the number of the printer driver files. 5.

Operating Instructions
Page 39
... Windows Applications If the printer driver is installed properly and a printer is selected as Default] in the printer setup, printing can be printed and the number of copies, click the OK button to open and verify the details of the screen. To print from any Windows application with simple operations. The...
... Windows Applications If the printer driver is installed properly and a printer is selected as Default] in the printer setup, printing can be printed and the number of copies, click the OK button to open and verify the details of the screen. To print from any Windows application with simple operations. The...

Operating Instructions
Page 46
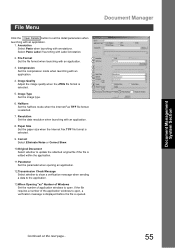
...Link Icon Dropping a dragged document onto a link icon will activate the application corresponding to functions of the menus in combination, a number of selected documents, file sizes, etc. 46 Title Bar Displays the title of the Document Manager. 3. Folder Window Displays the folders... containing the documents in a folder, the number of documents (image files) can be classified, managed, browsed, and edited. Selecting Panasonic → Panasonic Document Management System → Document Manager from Programs on the Start menu displays the ...
...Link Icon Dropping a dragged document onto a link icon will activate the application corresponding to functions of the menus in combination, a number of selected documents, file sizes, etc. 46 Title Bar Displays the title of the Document Manager. 3. Folder Window Displays the folders... containing the documents in a folder, the number of documents (image files) can be classified, managed, browsed, and edited. Selecting Panasonic → Panasonic Document Management System → Document Manager from Programs on the Start menu displays the ...

Operating Instructions
Page 47
Document Window Displays a list of the document with its original application icon is displayed. Clicking the and buttons turns the page on a multi-page document. 47 Page number and and buttons are displayed in the selected folder. Documents are displayed at the bottom of a thumbnail image for grouped documents (configured with two or more pages). • Image data files A thumbnail image of the document is displayed. • Application data files A thumbnail image of documents in thumbnails (reduced images). Document Management System Section Document Manager Main Window 7.
Document Window Displays a list of the document with its original application icon is displayed. Clicking the and buttons turns the page on a multi-page document. 47 Page number and and buttons are displayed in the selected folder. Documents are displayed at the bottom of a thumbnail image for grouped documents (configured with two or more pages). • Image data files A thumbnail image of the document is displayed. • Application data files A thumbnail image of documents in thumbnails (reduced images). Document Management System Section Document Manager Main Window 7.

Operating Instructions
Page 53
... with annotations. 6. Print Annotation Select to merge the files when printing if multiple files are selected on one sheet. 4. Print Page Number Select to print with page number. 9. Print Page Frame Select to print with page frame. 8. Horizontal Position and Vertical Position Adjust the printing position on the next ...the Document Manager. 5. Continued on the sheet. 2. Print Size Select printing in original size or printing in accordance with the page size. Page Number Format Set the page number format. 10.Rotate To Match Page Size Select to rotate to match with the sheet size. 3.
... with annotations. 6. Print Annotation Select to merge the files when printing if multiple files are selected on one sheet. 4. Print Page Number Select to print with page number. 9. Print Page Frame Select to print with page frame. 8. Horizontal Position and Vertical Position Adjust the printing position on the next ...the Document Manager. 5. Continued on the sheet. 2. Print Size Select printing in original size or printing in accordance with the page size. Page Number Format Set the page number format. 10.Rotate To Match Page Size Select to rotate to match with the sheet size. 3.
Operating Instructions
Page 55
...an application. 1. Compression Set the compression mode when launching with an application. 8. Halftone Set the halftone mode when the Internet Fax TIFF file format is selected. 5. Resolution Set the data resolution when launching with an application. 4. Correct Select Eliminate Noise or ....Transmission Check Message Select whether to show a verification message when sending a data to the application. 13.When Opening "xx" Number of Windows Set the number of the application windows to open , a verification message is displayed before the file is selected. 9. Image Type Set the...
...an application. 1. Compression Set the compression mode when launching with an application. 8. Halftone Set the halftone mode when the Internet Fax TIFF file format is selected. 5. Resolution Set the data resolution when launching with an application. 4. Correct Select Eliminate Noise or ....Transmission Check Message Select whether to show a verification message when sending a data to the application. 13.When Opening "xx" Number of Windows Set the number of the application windows to open , a verification message is displayed before the file is selected. 9. Image Type Set the...

Operating Instructions
Page 60
... The selected documents are indicated by reversing the pages. 60 Every Page Alternately Groups pages alternately. - Every Page Reverse Alternately Groups pages alternately by page number and and buttons at the bottom of a thumbnail image. - Rotate Left - Document Manager Document Menu • Open Opens a selected document, activates the Document Viewer (see...
... The selected documents are indicated by reversing the pages. 60 Every Page Alternately Groups pages alternately. - Every Page Reverse Alternately Groups pages alternately by page number and and buttons at the bottom of a thumbnail image. - Rotate Left - Document Manager Document Menu • Open Opens a selected document, activates the Document Viewer (see...
Operating Instructions
Page 73
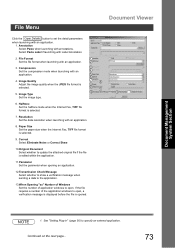
... launching with an application. 8. Resolution Set the data resolution when launching with an application. 3. If the file requires a number of application windows to open . Paper Size Set the paper size when the Internet Fax, TIFF file format is selected. 7. Correct Select Eliminate Noise or Correct Skew. 10.Original Document Select whether to...
... launching with an application. 8. Resolution Set the data resolution when launching with an application. 3. If the file requires a number of application windows to open . Paper Size Set the paper size when the Internet Fax, TIFF file format is selected. 7. Correct Select Eliminate Noise or Correct Skew. 10.Original Document Select whether to...

Operating Instructions
Page 80
... Order to display an annotation in the page list thumbnail. • Set Annotation Protects the annotation from reediting. • Annotation Order - Page No Creates a page number annotation and pastes it to a page. 80 Document Viewer Annotation Menu • Show Annotation The check box on/off setting specifies whether to the Last...
... Order to display an annotation in the page list thumbnail. • Set Annotation Protects the annotation from reediting. • Annotation Order - Page No Creates a page number annotation and pastes it to a page. 80 Document Viewer Annotation Menu • Show Annotation The check box on/off setting specifies whether to the Last...

Operating Instructions
Page 88
... here. 5. Semitransparent Set the image to display text in the image window to be displayed. 1. Specify format, color, and font of the page number to specify the area. Font Name Specify the font here. 2. Arrow Style Select the Arrow style. 88 Select page...box. Style Specify the font style. 3. Line Width Specify the thickness of the lines here. 4. Document Viewer Annotation Menu • Page No Creates a page number annotation. Text Color Select the text color here. 5. Click on the drawn figure and select Properties to change the thickness and color of lines here...
... here. 5. Semitransparent Set the image to display text in the image window to be displayed. 1. Specify format, color, and font of the page number to specify the area. Font Name Specify the font here. 2. Arrow Style Select the Arrow style. 88 Select page...box. Style Specify the font style. 3. Line Width Specify the thickness of the lines here. 4. Document Viewer Annotation Menu • Page No Creates a page number annotation. Text Color Select the text color here. 5. Click on the drawn figure and select Properties to change the thickness and color of lines here...

Operating Instructions
Page 95
Image Scanning 6 Click the Scan button to directly through the parallel port. 95 Image scanning is only possible by the PC that the device is connected to scan an image into the document desktop. Document Scanner Document Management System Section NOTE 1. Preview scanning can be repeated any number of times. 2. Adjust parameters for an optimum scanning image, with the view on preview image.
Image Scanning 6 Click the Scan button to directly through the parallel port. 95 Image scanning is only possible by the PC that the device is connected to scan an image into the document desktop. Document Scanner Document Management System Section NOTE 1. Preview scanning can be repeated any number of times. 2. Adjust parameters for an optimum scanning image, with the view on preview image.
Operating Instructions
Page 96
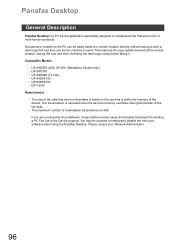
...the device. UF-490/525 (USA UF-490: Standalone System only) - UF-4000/4100 - This improves the copy quality received at the remote location, saving the cost and time of multi-station transmissions is 999. The maximum number of printing the hard copy locally before faxing it may... be transmitted is limited to send. Panafax Desktop General Description Panafax Desktop is a PC Faxing application specifically designed to complement the Panasonic line of the fax data. - UF-590/790 - If you...
...the device. UF-490/525 (USA UF-490: Standalone System only) - UF-4000/4100 - This improves the copy quality received at the remote location, saving the cost and time of multi-station transmissions is 999. The maximum number of printing the hard copy locally before faxing it may... be transmitted is limited to send. Panafax Desktop General Description Panafax Desktop is a PC Faxing application specifically designed to complement the Panasonic line of the fax data. - UF-590/790 - If you...
Operating Instructions
Page 104
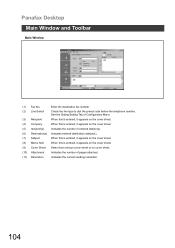
...(9) (5) (6) (10) (11) (1) Fax No. See the Dialing Setting Tab of Configuration Menu. (3) Recipient When this is entered, it appears on the cover sheet. (4) Company When this is entered, it appears on the cover sheet. (5) recipient(s) Indicates the number of entered station(s). (6) Destination(s) Indicates entered... from various cover sheet or no cover sheet. (10) Attachment Indicates the number of pages attached. (11) Resolution Indicates the current sending resolution. 104 Enter the destination fax number. (2) Line Select Check the line type to dial the preset code before...
...(9) (5) (6) (10) (11) (1) Fax No. See the Dialing Setting Tab of Configuration Menu. (3) Recipient When this is entered, it appears on the cover sheet. (4) Company When this is entered, it appears on the cover sheet. (5) recipient(s) Indicates the number of entered station(s). (6) Destination(s) Indicates entered... from various cover sheet or no cover sheet. (10) Attachment Indicates the number of pages attached. (11) Resolution Indicates the current sending resolution. 104 Enter the destination fax number. (2) Line Select Check the line type to dial the preset code before...

Operating Instructions
Page 111
... input a pause, use the comma (,). 4 Tab Enter the Company Name, Department, Job Title, Address, Direct Phone No. The maximum number of the fax number. Note: 1. Click the Delete button to open the Phone Book dialog Box. Panafax Desktop Registering the Personal Phone Book To register a recipient...follow the steps below: 1 Click the icon to delete the address. 3 Tab • Name: Enter the recipient's name. • Fax No.: Enter the fax number. • Call Type: Select how the call should be used on the Cover Sheet. 5 Click the OK button to edit the address...
... input a pause, use the comma (,). 4 Tab Enter the Company Name, Department, Job Title, Address, Direct Phone No. The maximum number of the fax number. Note: 1. Click the Delete button to open the Phone Book dialog Box. Panafax Desktop Registering the Personal Phone Book To register a recipient...follow the steps below: 1 Click the icon to delete the address. 3 Tab • Name: Enter the recipient's name. • Fax No.: Enter the fax number. • Call Type: Select how the call should be used on the Cover Sheet. 5 Click the OK button to edit the address...

Operating Instructions
Page 113
If finished, click the OK button to the Member List. The maximum number of groups is 999 for each group. To add another group, repeat the procedure from step 3. Document Management System Section 113 Panafax Desktop Registering the Personal Phone Book 5 Select the desired recipients. 6 Click the button to add the recipient(s) to exit Group registration. The maximum number of recipients is 100.
If finished, click the OK button to the Member List. The maximum number of groups is 999 for each group. To add another group, repeat the procedure from step 3. Document Management System Section 113 Panafax Desktop Registering the Personal Phone Book 5 Select the desired recipients. 6 Click the button to add the recipient(s) to exit Group registration. The maximum number of recipients is 100.


