
Panaboard
Page 7
... not charge, short, heat, break or throw in a fire, as it may result in overheating/burning or leakage of moisture. Do not solder the battery, as it may result in the "Operating Instructions". CHOKING HAZARD Keep the marker's cap, battery, SD memory card or USB flash memory device out of reach of the battery, cover the battery contacts with screws unless specifically instructed in the battery leaking...
... not charge, short, heat, break or throw in a fire, as it may result in overheating/burning or leakage of moisture. Do not solder the battery, as it may result in the "Operating Instructions". CHOKING HAZARD Keep the marker's cap, battery, SD memory card or USB flash memory device out of reach of the battery, cover the battery contacts with screws unless specifically instructed in the battery leaking...

Panaboard
Page 10
...clear of objects or blemishes, if not, images will work properly. • Use a shielded USB cable that any writing inside the scannable area. It may cause the computer operation to make copies. • Make thick and dark lines inside the shaded area Approx. 20 mm (25/32") (on right) cannot be scanned properly. • When turn the power switch on after turning...in hard-to-erase markings. • Store markers horizontally as it catches on something. • Do not connect a USB flash memory device to "USB Connector-A for Printer". • Do not connect an external ...
...clear of objects or blemishes, if not, images will work properly. • Use a shielded USB cable that any writing inside the scannable area. It may cause the computer operation to make copies. • Make thick and dark lines inside the shaded area Approx. 20 mm (25/32") (on right) cannot be scanned properly. • When turn the power switch on after turning...in hard-to-erase markings. • Store markers horizontally as it catches on something. • Do not connect a USB flash memory device to "USB Connector-A for Printer". • Do not connect an external ...

Panaboard
Page 19
... File format set -up It is possible to select the file format for scanning time display It is possible to the position it was displayed on the image. Using Setting the Unit The following screen is displayed. 3 Press the Mode Key ( ) to return to standby mode. 3 Press the Multi-Copy Key ( ) repeatedly to a USB flash memory device or SD memory card. 1 Press the Set-up Key . • The set -up screen is displayed on...
... File format set -up It is possible to select the file format for scanning time display It is possible to the position it was displayed on the image. Using Setting the Unit The following screen is displayed. 3 Press the Mode Key ( ) to return to standby mode. 3 Press the Multi-Copy Key ( ) repeatedly to a USB flash memory device or SD memory card. 1 Press the Set-up Key . • The set -up screen is displayed on...

Panaboard
Page 21
...from this unit when scanned images are not printed correctly (ex. certain areas appear blank). Using Note • This item is only be displayed when an external printer is connected to the unit. 1 Press the Set-up Key . • The set-up Key ( ) 3 times. • The Test Print feature is selected. 3 Press the... feature, it is not printed as shown below , refer to the manual of the printer for details. If the pattern is possible to standby mode. Once the printer head is printed. 21 For UB-2315C, press the Set-up screen is printed as shown below , the problem has been fixed.
...from this unit when scanned images are not printed correctly (ex. certain areas appear blank). Using Note • This item is only be displayed when an external printer is connected to the unit. 1 Press the Set-up Key . • The set-up Key ( ) 3 times. • The Test Print feature is selected. 3 Press the... feature, it is not printed as shown below , refer to the manual of the printer for details. If the pattern is possible to standby mode. Once the printer head is printed. 21 For UB-2315C, press the Set-up screen is printed as shown below , the problem has been fixed.

Panaboard
Page 5
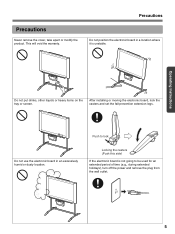
After installing or moving the electronic board, lock the casters and set the fall-prevention extension legs. Do not position the electronic board in an excessively humid or dusty location. Operating Instructions Precautions Never remove the cover, take apart or modify the product. Push to lock Do not use the electronic board in a location where it is not going to be used for an extended period of...
After installing or moving the electronic board, lock the casters and set the fall-prevention extension legs. Do not position the electronic board in an excessively humid or dusty location. Operating Instructions Precautions Never remove the cover, take apart or modify the product. Push to lock Do not use the electronic board in a location where it is not going to be used for an extended period of...
Panaboard
Page 25
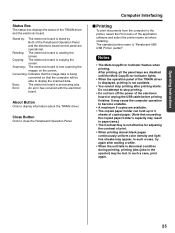
... application software and select the printer name set when installing. After printing, all the panel keys are disabled until the Multi-Copy/Error Indicator lights. • When the operation panel of copied paper. (Note that the computer will be lost. About Button Click to close the Panaboard Operation Panel. Close Button Click to display information about the TWAIN driver. The standard printer name is copying the screen. Operating Instructions Status...
... application software and select the printer name set when installing. After printing, all the panel keys are disabled until the Multi-Copy/Error Indicator lights. • When the operation panel of copied paper. (Note that the computer will be lost. About Button Click to close the Panaboard Operation Panel. Close Button Click to display information about the TWAIN driver. The standard printer name is copying the screen. Operating Instructions Status...

Electronic Board
Page 9
...'s cap, battery, SD memory card or USB flash memory device out of reach of electric shock exists. Using the incorrect type of battery acid. During thunderstorms, do not leave the unit installed, but remove it and cause fire or electric shock. Operating Safeguards If metal fragments or water gets into the unit, turn the unit off and unplug the unit immediately. Before You Start For...
...'s cap, battery, SD memory card or USB flash memory device out of reach of electric shock exists. Using the incorrect type of battery acid. During thunderstorms, do not leave the unit installed, but remove it and cause fire or electric shock. Operating Safeguards If metal fragments or water gets into the unit, turn the unit off and unplug the unit immediately. Before You Start For...
Electronic Board
Page 18
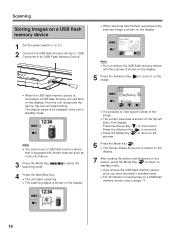
... display. 7 After erasing the written text/diagrams on the screen, press the Mode Key ( ) to return to standby mode. • Only remove the USB flash memory device once you have returned to standby mode. • For information on saving files on a USB flash memory device, refer to the preview. 6 Press the Mode Key ( ). • The Screen Erase Announce is connected, a USB flash memory icon will stop blinking. Scanning Storing images on a USB flash memory device 1 Set the power switch to on ( I ). 2 Connect...
... display. 7 After erasing the written text/diagrams on the screen, press the Mode Key ( ) to return to standby mode. • Only remove the USB flash memory device once you have returned to standby mode. • For information on saving files on a USB flash memory device, refer to the preview. 6 Press the Mode Key ( ). • The Screen Erase Announce is connected, a USB flash memory icon will stop blinking. Scanning Storing images on a USB flash memory device 1 Set the power switch to on ( I ). 2 Connect...

Electronic Board
Page 20
... to standby mode. • To remove the SD memory card, open the SD memory card cover and unlock the SD memory card by pressing it is an example of copies (1 to 9). • For details on making multiple copies, press the Set-up Key , then press the Advance Key ( ) repeatedly to "USB Connector-A for Printer" with an external printer 1 Set the power switch to on ( I ). 2 Turn the external printer on an SD memory card, refer...
... to standby mode. • To remove the SD memory card, open the SD memory card cover and unlock the SD memory card by pressing it is an example of copies (1 to 9). • For details on making multiple copies, press the Set-up Key , then press the Advance Key ( ) repeatedly to "USB Connector-A for Printer" with an external printer 1 Set the power switch to on ( I ). 2 Turn the external printer on an SD memory card, refer...

Electronic Board
Page 21
... recognizes the electronic board as a Removable Disk and the drive is displayed in your printer, please refer to the manual of Hi-Speed USB 2.0.) *2 Microsoft® Windows® 2000 operating system (hereafter Windows 2000) *3 Microsoft® Windows® XP operating system (hereafter Windows XP) *4 Microsoft® Windows Vista® operating system (hereafter Windows Vista) ■ Scanning to a computer 1 Set the power switch to on ( I ). 2 Connect the computer to standby mode. Scanning Scanning to...
... recognizes the electronic board as a Removable Disk and the drive is displayed in your printer, please refer to the manual of Hi-Speed USB 2.0.) *2 Microsoft® Windows® 2000 operating system (hereafter Windows 2000) *3 Microsoft® Windows® XP operating system (hereafter Windows XP) *4 Microsoft® Windows Vista® operating system (hereafter Windows Vista) ■ Scanning to a computer 1 Set the power switch to on ( I ). 2 Connect the computer to standby mode. Scanning Scanning to...

Electronic Board
Page 22
... be deleted. • The scanned image files will work properly. • Do not connect two or more Panasonic electronic boards to become unstable. 3 Press the Mode Key scanning mode. Note • It is displayed, click the device to remove, and then click the [Stop] button. 3) Remove the USB cable connected to the computer from the [View] in the Removable Disk onto the computer's desktop or into a folder...
... be deleted. • The scanned image files will work properly. • Do not connect two or more Panasonic electronic boards to become unstable. 3 Press the Mode Key scanning mode. Note • It is displayed, click the device to remove, and then click the [Stop] button. 3) Remove the USB cable connected to the computer from the [View] in the Removable Disk onto the computer's desktop or into a folder...

Electronic Board
Page 27
... Using Setting the Password To prevent third parties from operating the unit, it is possible to set the unit to require a password to be entered when the power is turned on ) or (Password off). • The interval for entering the password can be selected from 15 minutes / 30 minutes / 1 hour / 2 hours / 4 hours / 8 hours. 8 Press the Set-up Key ( ) and determine the interval for entering the password...
... Using Setting the Password To prevent third parties from operating the unit, it is possible to set the unit to require a password to be entered when the power is turned on ) or (Password off). • The interval for entering the password can be selected from 15 minutes / 30 minutes / 1 hour / 2 hours / 4 hours / 8 hours. 8 Press the Set-up Key ( ) and determine the interval for entering the password...

Electronic Board
Page 28
...: http://panasonic.co.jp/pcc/products/en/eboard/ ub-5838c_info.htm • This pattern is printed in color. 1 Press the Set-up Key . • The set-up screen is displayed. 2 Press the Set-up Key ( ) repeatedly to standby mode. Note • If the test pattern is not printed correctly, it is printed as shown below , the problem has been fixed. Make sure...
...: http://panasonic.co.jp/pcc/products/en/eboard/ ub-5838c_info.htm • This pattern is printed in color. 1 Press the Set-up Key . • The set-up screen is displayed. 2 Press the Set-up Key ( ) repeatedly to standby mode. Note • If the test pattern is not printed correctly, it is printed as shown below , the problem has been fixed. Make sure...

Electronic Board
Page 31
... according to the manual of the printer. Remove the USB flash memory device or SD memory card. The letter is printed, colors are shifted or blurred. Change the location of the print cartridge is connected. Set a USB flash memory device or SD memory card, or connect a printer or a computer. See Page - - 12 - - 17 - 28 - 17 Help 31 Troubleshooting To identify error message that are displayed on the control panel, refer to "Error Codes" on the scanned...
... according to the manual of the printer. Remove the USB flash memory device or SD memory card. The letter is printed, colors are shifted or blurred. Change the location of the print cartridge is connected. Set a USB flash memory device or SD memory card, or connect a printer or a computer. See Page - - 12 - - 17 - 28 - 17 Help 31 Troubleshooting To identify error message that are displayed on the control panel, refer to "Error Codes" on the scanned...

Electronic Board
Page 32
The USB flash memory device, SD memory card, or printer is connected via a USB hub. The USB flash memory device or printer is not supported by this unit. This unit is displayed. Open the Removable Disk displayed on the screen. Change the battery, then set -up screen is connected via a USB hub. Images saved as JPEG are rotated 90 degrees. The battery is not displayed after copying to the position it was displayed on the computer screen, and click [Refresh...
The USB flash memory device, SD memory card, or printer is connected via a USB hub. The USB flash memory device or printer is not supported by this unit. This unit is displayed. Open the Removable Disk displayed on the screen. Change the battery, then set -up screen is connected via a USB hub. Images saved as JPEG are rotated 90 degrees. The battery is not displayed after copying to the position it was displayed on the computer screen, and click [Refresh...

Electronic Board
Page 39
... order to a specific operating procedure that could result in this section carefully before using the unit to put on the cabinet, chassis or parts should be observed. For your unit. WARNING After installing or moving the unit, lock the casters and set the fall-prevention extension legs. The fact that the equipment operates satisfactorily does not imply that the power...
... order to a specific operating procedure that could result in this section carefully before using the unit to put on the cabinet, chassis or parts should be observed. For your unit. WARNING After installing or moving the unit, lock the casters and set the fall-prevention extension legs. The fact that the equipment operates satisfactorily does not imply that the power...
Panaboard
Page 5
... remove the cover, take apart or modify the product. Locking the casters (Push this side) If the electronic board is unstable. Push to be used for an extended period of time (e.g., during extended holidays), turn off the power and remove the plug from the wall outlet. 5 After installing or moving the electronic board, lock the casters and set the fall-prevention extension legs. Operating Instructions...
... remove the cover, take apart or modify the product. Locking the casters (Push this side) If the electronic board is unstable. Push to be used for an extended period of time (e.g., during extended holidays), turn off the power and remove the plug from the wall outlet. 5 After installing or moving the electronic board, lock the casters and set the fall-prevention extension legs. Operating Instructions...

Panaboard
Page 9
.... The display changes each time the screen is performed, this indicator will begin flashing again.) Contrast Key Each time this key twice advances two screens from the dealer where you to copy 4 screens continuously.) When an error occurred, a flashing symbol will reset to be made. ■ Control panel Contrast/Remaining Film Indicator Part Names and Functions Reverse Key Advance Key Operating Instructions Panel Contrast Key Copy Key Multi-Copy/Stop Key Multi-Copy/Error Indicator Name Contrast...
.... The display changes each time the screen is performed, this indicator will begin flashing again.) Contrast Key Each time this key twice advances two screens from the dealer where you to copy 4 screens continuously.) When an error occurred, a flashing symbol will reset to be made. ■ Control panel Contrast/Remaining Film Indicator Part Names and Functions Reverse Key Advance Key Operating Instructions Panel Contrast Key Copy Key Multi-Copy/Stop Key Multi-Copy/Error Indicator Name Contrast...
Panaboard
Page 19
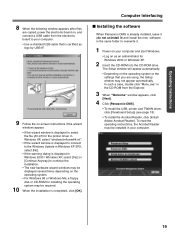
...; Depending on the operating system or the settings that you are copied, power the electronic board on, and connect a USB cable from the Explorer. 3 When "Welcome" window appears, click [Next]. 4 Click [Panasonic-DMS]. • To install the USB, printer and TWAIN driver, click [Panaboard Setup] (see page 18). • To install the Acrobat Reader, click [Install Adobe Acrobat Reader]. Computer Interfacing ■ Installing the software When Panasonic-DMS is already...
...; Depending on the operating system or the settings that you are copied, power the electronic board on, and connect a USB cable from the Explorer. 3 When "Welcome" window appears, click [Next]. 4 Click [Panasonic-DMS]. • To install the USB, printer and TWAIN driver, click [Panaboard Setup] (see page 18). • To install the Acrobat Reader, click [Install Adobe Acrobat Reader]. Computer Interfacing ■ Installing the software When Panasonic-DMS is already...
Panaboard
Page 26
... door and remove the jammed paper. Change the direction of copy paper or thermal transfer film. (The Error Indicator flashes " " or " ".) Insert copy paper or replace the thermal transfer film. Paper is in the same folder with the old one. Install the new Panasonic-DMS in strong sunlight or strong lighting. Troubleshooting Troubleshooting Treat problems according to require the Panaboard UB5-7 Driver Disk. The screen does...
... door and remove the jammed paper. Change the direction of copy paper or thermal transfer film. (The Error Indicator flashes " " or " ".) Insert copy paper or replace the thermal transfer film. Paper is in the same folder with the old one. Install the new Panasonic-DMS in strong sunlight or strong lighting. Troubleshooting Troubleshooting Treat problems according to require the Panaboard UB5-7 Driver Disk. The screen does...


