
Owners Manual
Page 2
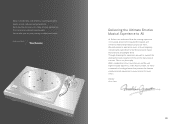
... us take you on your journey to rediscover music. (02) English Delivering the Ultimate Emotive Musical Experience to support the development and enjoyment of the world's many musical cultures. Through delivering this experience we want people to experience music as it was originally intended and enable them ...but the magical and emotional relationship between people and music. Director Michiko Ogawa 03 With a combination of our love of music and the vast high-end audio experience of a truly emotive experience from an unencountered sound awaits. We want to All At Technics we ...
... us take you on your journey to rediscover music. (02) English Delivering the Ultimate Emotive Musical Experience to support the development and enjoyment of the world's many musical cultures. Through delivering this experience we want people to experience music as it was originally intended and enable them ...but the magical and emotional relationship between people and music. Director Michiko Ogawa 03 With a combination of our love of music and the vast high-end audio experience of a truly emotive experience from an unencountered sound awaits. We want to All At Technics we ...
Owners Manual
Page 3
... / Connecting the power plug and earth ground ........ 16 z Installation 18 z Insulator attachment 19 z Fit the dust cover 19 Adjustment 20 z Horizontal balance 20 z Stylus pressure 20 z Anti-skating 21 z Tone arm height 22 z Armlift height 23 z Playing back Playing records 24 Pitch control (fine adjustment to pitch 26 Operation and display of the control unit 27 z Turntable speed setting 27 z Switching the display mode 27 z Turntable speed measurement 27 z Display dimmer setting...
... / Connecting the power plug and earth ground ........ 16 z Installation 18 z Insulator attachment 19 z Fit the dust cover 19 Adjustment 20 z Horizontal balance 20 z Stylus pressure 20 z Anti-skating 21 z Tone arm height 22 z Armlift height 23 z Playing back Playing records 24 Pitch control (fine adjustment to pitch 26 Operation and display of the control unit 27 z Turntable speed setting 27 z Switching the display mode 27 z Turntable speed measurement 27 z Display dimmer setting...
Owners Manual
Page 4
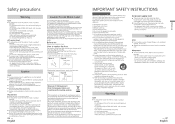
... instructions. 2 Keep these operating instructions carefully before using the unit. A replacement fuse cover can be connected to save valuable resources and prevent any heat sources such as lighted candles, on this unit. - Before use a damaged mains plug or socket outlet. Illustrations may receive radio interference caused by yourself. Open the fuse cover with a protective earth connection. A polarized plug has two blades with a protective earthing connection. A grounding type plug...
... instructions. 2 Keep these operating instructions carefully before using the unit. A replacement fuse cover can be connected to save valuable resources and prevent any heat sources such as lighted candles, on this unit. - Before use a damaged mains plug or socket outlet. Illustrations may receive radio interference caused by yourself. Open the fuse cover with a protective earth connection. A polarized plug has two blades with a protective earthing connection. A grounding type plug...
Owners Manual
Page 5
... U.S.A. The lightning flash with the limits for a Class B digital device, pursuant to Part 15 of the following mark and symbols are subject to radio communications. Operation is subject to persons. This equipment generates, uses and can be determined by one . THE FOLLOWING APPLIES ONLY IN THE U.S.A. FCC Caution: To assure continued compliance, follow the attached installation instructions and use z Connect the equipment...
... U.S.A. The lightning flash with the limits for a Class B digital device, pursuant to Part 15 of the following mark and symbols are subject to radio communications. Operation is subject to persons. This equipment generates, uses and can be determined by one . THE FOLLOWING APPLIES ONLY IN THE U.S.A. FCC Caution: To assure continued compliance, follow the attached installation instructions and use z Connect the equipment...

Owners Manual
Page 6
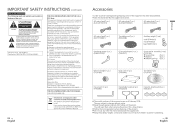
Control unit connection cable ( 16) Control unit (Back) Terminal for connecting with the main unit ( 16) AC ( ) input terminal ( 16) Rating plate The product number is shown in the rating plate. 11 (11) English Before use Parts Name Numbers such as ( 00) indicate reference pages. Main unit (Front) Centre spindle ( 14) START-STOP button ( 24) Arm clamp ( 20) Arm rest ( 20) Cue lever...
Control unit connection cable ( 16) Control unit (Back) Terminal for connecting with the main unit ( 16) AC ( ) input terminal ( 16) Rating plate The product number is shown in the rating plate. 11 (11) English Before use Parts Name Numbers such as ( 00) indicate reference pages. Main unit (Front) Centre spindle ( 14) START-STOP button ( 24) Arm clamp ( 20) Arm rest ( 20) Cue lever...
Owners Manual
Page 7
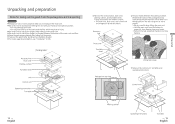
... perform this task using both hands to take out and transport the main unit. Dust cover Turntable sheet Package box top view Lifting task image lTake out the control unit, turntable, and operating instructions Control unit Packing cushion Operating Instructions Turntable 13 (13) English Getting started z Take out the goods after taking out the main unit. z For notes regarding installation, see "Installation" (18). z Be...
... perform this task using both hands to take out and transport the main unit. Dust cover Turntable sheet Package box top view Lifting task image lTake out the control unit, turntable, and operating instructions Control unit Packing cushion Operating Instructions Turntable 13 (13) English Getting started z Take out the goods after taking out the main unit. z For notes regarding installation, see "Installation" (18). z Be...
Owners Manual
Page 8
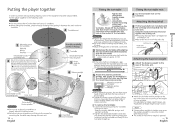
...connect the AC mains lead until the end, loose a little bit. z Mount by aligning the rotor shaft fix hole (dotted line area in the center of the balance weight is complete. z Tighten the three screws uniformly. Locking... For adjustable cartridge weight ranges, see "Applicable cartridge weight range". (31) Note z Using auxiliary ...unit and you have tightened it until set up is greased. 15 (15) English Getting started Do not tighten it 5 or more times. z Wipe off fingerprints or dirt with a soft cloth. 2 Slowly lower the turntable while aligning the rotor shaft fix...
...connect the AC mains lead until the end, loose a little bit. z Mount by aligning the rotor shaft fix hole (dotted line area in the center of the balance weight is complete. z Tighten the three screws uniformly. Locking... For adjustable cartridge weight ranges, see "Applicable cartridge weight range". (31) Note z Using auxiliary ...unit and you have tightened it until set up is greased. 15 (15) English Getting started Do not tighten it 5 or more times. z Wipe off fingerprints or dirt with a soft cloth. 2 Slowly lower the turntable while aligning the rotor shaft fix...
Owners Manual
Page 9
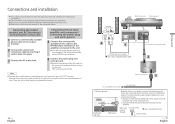
... input terminals. 3 Connect the AC mains lead. 5 Connect the power plug and earth ground. Place the unit so that the plug can be using it clicks into place. M3 screw (coarse thread) 13 mm or less ● Use a conductive screw. 12 mm or less 17 (17) English Getting started Control unit connection cable 2 Back of time. Connecting the output terminal and AC IN terminal / Connecting the control unit 1 Connect a commercially available phono cable...
... input terminals. 3 Connect the AC mains lead. 5 Connect the power plug and earth ground. Place the unit so that the plug can be using it clicks into place. M3 screw (coarse thread) 13 mm or less ● Use a conductive screw. 12 mm or less 17 (17) English Getting started Control unit connection cable 2 Back of time. Connecting the output terminal and AC IN terminal / Connecting the control unit 1 Connect a commercially available phono cable...
Owners Manual
Page 10
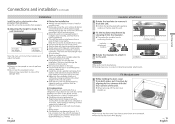
... more to direct sunlight, dust, humidity, and heat from the inside of taking out a cold bottle from vibrations. z Remove the dust cover while playing. 19 (19) English Getting started Connections and installation (continued) Installation Install the unit on a heat source. Attention z Always use the dust cover if you leave it has occurred, turn the insulators too far. z Ensure the unit is one...
... more to direct sunlight, dust, humidity, and heat from the inside of taking out a cold bottle from vibrations. z Remove the dust cover while playing. 19 (19) English Getting started Connections and installation (continued) Installation Install the unit on a heat source. Attention z Always use the dust cover if you leave it has occurred, turn the insulators too far. z Ensure the unit is one...
Owners Manual
Page 11
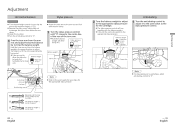
...) English Getting started z Hold the balance weight still while doing this. Adjustment Horizontal balance Preparation z Turn the arm-height control ring to raise the arm to the maximum height. ( 22) z Remove the stylus cover, taking care not to the appropriate stylus pressure. The balance weight is too far back. Note z Refer to the user's guide for...
...) English Getting started z Hold the balance weight still while doing this. Adjustment Horizontal balance Preparation z Turn the arm-height control ring to raise the arm to the maximum height. ( 22) z Remove the stylus cover, taking care not to the appropriate stylus pressure. The balance weight is too far back. Note z Refer to the user's guide for...

Owners Manual
Page 12
.... Turn the arm-height control ring to adjust the height. Adjust the arm-height until the tone arm and record are marked on the record and adjust the height control until the tone arm becomes parallel to the record. Prevent an object from being caught by turning the arm lock knob. z For finer adjustment, use the product with the arm-height control ring. You may need...
.... Turn the arm-height control ring to adjust the height. Adjust the arm-height until the tone arm and record are marked on the record and adjust the height control until the tone arm becomes parallel to the record. Prevent an object from being caught by turning the arm lock knob. z For finer adjustment, use the product with the arm-height control ring. You may need...
Owners Manual
Page 13
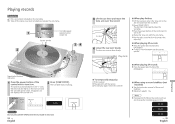
...ɾSTOP z Press the speed select button [78] ([78] lights). 33 45 78 „ When using a record stabilizer (not included) z See the instruction manual of [33.33] appears on (to 331/3 turns, the [33] indicator lights on the main unit and the turntable speed of the record stabilizer. OFF ON 33/45/78 STARTɾSTOP ʔɹɹInɹdɹɹic ator RESET DISPLAY PIT3C3H...
...ɾSTOP z Press the speed select button [78] ([78] lights). 33 45 78 „ When using a record stabilizer (not included) z See the instruction manual of [33.33] appears on (to 331/3 turns, the [33] indicator lights on the main unit and the turntable speed of the record stabilizer. OFF ON 33/45/78 STARTɾSTOP ʔɹɹInɹdɹɹic ator RESET DISPLAY PIT3C3H...
Owners Manual
Page 14
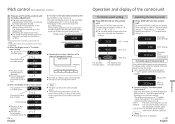
... prescribed setting. The turntable speed becomes the prescribed turntable speed in the turntable speed setting mode and 0.0% in the pitch setting mode. (Display mode: Turntable speed setting) 33 33.33 (Display mode: Pitch setting) 33 0.0% „ Speed selector button indicators of "33" → "45" → "78" → "33" → ... z Turning off the power button cancels the pitch control setting. z The turntable speed changes each turntable speed. Each time [DISPLAY] is displayed. 27 (27) English Playing back Switch the display mode (see above) to make adjustment. z "rpm...
... prescribed setting. The turntable speed becomes the prescribed turntable speed in the turntable speed setting mode and 0.0% in the pitch setting mode. (Display mode: Turntable speed setting) 33 33.33 (Display mode: Pitch setting) 33 0.0% „ Speed selector button indicators of "33" → "45" → "78" → "33" → ... z Turning off the power button cancels the pitch control setting. z The turntable speed changes each turntable speed. Each time [DISPLAY] is displayed. 27 (27) English Playing back Switch the display mode (see above) to make adjustment. z "rpm...
Owners Manual
Page 15
... place. z Operating a button (any button other than the power button) on the next time, the setting when the power was turned off last will be recovered. 28 (28) English Adjusting the torque to rotate the turntable at a constant speed Press [START·STOP] and then adjust the torque (rotational force) at five levels to rotate the turntable at a constant speed Maximum (Initial setting) Minimum Note z The setting is displayed. 2 Press...
... place. z Operating a button (any button other than the power button) on the next time, the setting when the power was turned off last will be recovered. 28 (28) English Adjusting the torque to rotate the turntable at a constant speed Press [START·STOP] and then adjust the torque (rotational force) at five levels to rotate the turntable at a constant speed Maximum (Initial setting) Minimum Note z The setting is displayed. 2 Press...

Owners Manual
Page 16
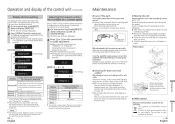
.... Display of the control unit Measure Check that the control unit is correctly connected. ( 16) 30 (30) English „ Error code Occurrence of the main unit. F17 z Provide the displayed number and the LED's blinking status at the time of consultation. (Example of the display of the control unit in case of an error) Unconnected STARTɾSTOP (Example of the speed selector button indicators of the main unit in case of an error) Flashes...
.... Display of the control unit Measure Check that the control unit is correctly connected. ( 16) 30 (30) English „ Error code Occurrence of the main unit. F17 z Provide the displayed number and the LED's blinking status at the time of consultation. (Example of the display of the control unit in case of an error) Unconnected STARTɾSTOP (Example of the speed selector button indicators of the main unit in case of an error) Flashes...
Owners Manual
Page 17
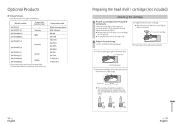
... the cartridge's instructions to correctly attach it to touch the stylus tip. z Be careful not to the head shell, and tighten the screws lightly. Use the included overhang gauge. l Tighten the screw for cartridge 2 Adjust the overhang. ...Supported model Blank tonearm base* EPA-100mk2 M2-9R M2-12R AS-212S RS-212D AS-309S RS-309D SA-250 SA-750L IT-345 CR-1 IT-407 CR-1 32 (32) English Preparing the head shell / cartridge (not included) Attaching the cartridge 1 Attach a cartridge (store-bought) tentatively. z When playing SP records, use a cartridge for optional products...
... the cartridge's instructions to correctly attach it to touch the stylus tip. z Be careful not to the head shell, and tighten the screws lightly. Use the included overhang gauge. l Tighten the screw for cartridge 2 Adjust the overhang. ...Supported model Blank tonearm base* EPA-100mk2 M2-9R M2-12R AS-212S RS-212D AS-309S RS-309D SA-250 SA-750L IT-345 CR-1 IT-407 CR-1 32 (32) English Preparing the head shell / cartridge (not included) Attaching the cartridge 1 Attach a cartridge (store-bought) tentatively. z When playing SP records, use a cartridge for optional products...
Owners Manual
Page 168
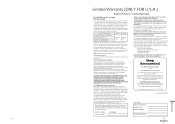
...Products - NY UNIT...quick repair status visit our hTtotpWs:u/eb/bsmhSiotitpae.pnaaet nwasreopnaicir.croemqu/seustpapnodrtfor quick repair...Parts...Servicer, or damage that ...User memo: The model number and serial number of God. STS-LG-130000R User memo: DUAseTrEmOeFmPoU:RCHASE DATE OF PURCHASE DEAATLEEORFNPAUMRECHASE DEALER NAME DEALER ANDADMREESS DEALER ADDRESS DEALER ADDRESS SMEORMIDAOELDLNENLUUNMMUBBMEERBRER SERIAL NUMBER ST-G30 ST-G30 TELEPHONE NUMBER TELEPHONE NUMBER SERIAL NUMBER 32 (32) 32 (32) 32 (32) TELEPHONE NUMBER (335) English...
...Products - NY UNIT...quick repair status visit our hTtotpWs:u/eb/bsmhSiotitpae.pnaaet nwasreopnaicir.croemqu/seustpapnodrtfor quick repair...Parts...Servicer, or damage that ...User memo: The model number and serial number of God. STS-LG-130000R User memo: DUAseTrEmOeFmPoU:RCHASE DATE OF PURCHASE DEAATLEEORFNPAUMRECHASE DEALER NAME DEALER ANDADMREESS DEALER ADDRESS DEALER ADDRESS SMEORMIDAOELDLNENLUUNMMUBBMEERBRER SERIAL NUMBER ST-G30 ST-G30 TELEPHONE NUMBER TELEPHONE NUMBER SERIAL NUMBER 32 (32) 32 (32) 32 (32) TELEPHONE NUMBER (335) English...


