

Sd/hdd Video Camcorder
Page 1
...;ol está incluida. Operating Instructions SD Card/Hard Disk Video Camera Model No. SDR-H200 SDR-H20 SDR-H18 ≥ The illustration shows SDR-H200. ≥ SDR-H20/SDR-H18 do not have a video light. For USA assistance, please call: 1-800-211-PANA(7262) or, contact us via the web at: http://www.panasonic.com/contactinfo For Canadian assistance, please call...
...;ol está incluida. Operating Instructions SD Card/Hard Disk Video Camera Model No. SDR-H200 SDR-H20 SDR-H18 ≥ The illustration shows SDR-H200. ≥ SDR-H20/SDR-H18 do not have a video light. For USA assistance, please call: 1-800-211-PANA(7262) or, contact us via the web at: http://www.panasonic.com/contactinfo For Canadian assistance, please call...

Sd/hdd Video Camcorder
Page 3
...interference, and (2) this equipment. Declaration of Conformity Trade Name: Panasonic Model No.: SDR-H200/SDR-H20/SDR-H18 Responsible party: Panasonic Corporation of North America One Panasonic Way, Secaucus, NJ 07094 Support Contact: Panasonic Consumer Electronics Company 1-800-211-PANA (7262) This device complies...technician for a Class B digital device, pursuant to radio communications. WARNING ≥ AS WITH ANY SMALL OBJECT, SD CARDS CAN BE SWALLOWED BY YOUNG CHILDREN. Operation is subject to provide reasonable protection against harmful interference in accordance with...
...interference, and (2) this equipment. Declaration of Conformity Trade Name: Panasonic Model No.: SDR-H200/SDR-H20/SDR-H18 Responsible party: Panasonic Corporation of North America One Panasonic Way, Secaucus, NJ 07094 Support Contact: Panasonic Consumer Electronics Company 1-800-211-PANA (7262) This device complies...technician for a Class B digital device, pursuant to radio communications. WARNING ≥ AS WITH ANY SMALL OBJECT, SD CARDS CAN BE SWALLOWED BY YOUNG CHILDREN. Operation is subject to provide reasonable protection against harmful interference in accordance with...

Sd/hdd Video Camcorder
Page 7
...Union This symbol is only valid in the United States and other countries. ≥ Microsoft product screen shot(s) reprinted with models SDR-H200, SDR-H20 and SDR-H18. Patent Nos. 4,631,603, 4,577,216, and 4,819,098, licensed for use with permission from Microsoft Corporation. ...≥ Other names of systems and products mentioned in these operating instructions show model SDR-H200, however, parts of the explanation refer to discard this symbolInformation on the model, some functions are designed for limited viewing. Pictures...
...Union This symbol is only valid in the United States and other countries. ≥ Microsoft product screen shot(s) reprinted with models SDR-H200, SDR-H20 and SDR-H18. Patent Nos. 4,631,603, 4,577,216, and 4,819,098, licensed for use with permission from Microsoft Corporation. ...≥ Other names of systems and products mentioned in these operating instructions show model SDR-H200, however, parts of the explanation refer to discard this symbolInformation on the model, some functions are designed for limited viewing. Pictures...

Sd/hdd Video Camcorder
Page 8
...handling ....... 16 Using the LCD monitor 19 Using the remote control (SDR-H200) .....19 HDD and SD card 21 Concerning the internal HDD and cards that can be used on this unit 21 Concerning SD cards 21 HDD handling precautions 23 Access lamp 23 Setup Power supply 25 Charging the battery...48 Zoom in/out function 48 Recording yourself 49 Recording with the video light (SDR-H200 49 Backlight compensation function 50 Fade in/fade out function 50 Soft skin mode 51 8 LSQT1190 Tele macro function (SDR-H200 52 MagicPix function 52 Self-timer recording 53 Recording guideline function 53...
...handling ....... 16 Using the LCD monitor 19 Using the remote control (SDR-H200) .....19 HDD and SD card 21 Concerning the internal HDD and cards that can be used on this unit 21 Concerning SD cards 21 HDD handling precautions 23 Access lamp 23 Setup Power supply 25 Charging the battery...48 Zoom in/out function 48 Recording yourself 49 Recording with the video light (SDR-H200 49 Backlight compensation function 50 Fade in/fade out function 50 Soft skin mode 51 8 LSQT1190 Tele macro function (SDR-H200 52 MagicPix function 52 Self-timer recording 53 Recording guideline function 53...

Sd/hdd Video Camcorder
Page 12
... cover closed, the automatic white balance adjustment may not function properly. ∫ Inserting/removing an SD card 1 Open the LCD monitor and then slide the card slot open lever A to remove it. ≥ (SDR-H200) Open the lens cover before turning the unit on. If the unit is turned on with ...the lens cap attached, the automatic white balance adjustment may not function properly. ≥ (SDR-H20/SDR-H18) Remove the lens cap before turning the unit on...
... cover closed, the automatic white balance adjustment may not function properly. ∫ Inserting/removing an SD card 1 Open the LCD monitor and then slide the card slot open lever A to remove it. ≥ (SDR-H200) Open the lens cover before turning the unit on. If the unit is turned on with ...the lens cap attached, the automatic white balance adjustment may not function properly. ≥ (SDR-H20/SDR-H18) Remove the lens cap before turning the unit on...

Sd/hdd Video Camcorder
Page 13
SDR-H200: 2 Press the Photoshot button [ ] halfway in order to select the recording destination and press the joystick. Before using 2 Press the recording start/stop button to ...; Rotate the mode dial to select . ∫ Recording still pictures ≥ Rotate the mode dial to select . 1 Press the MENU button, then select [MEDIA SELECT] # [HDD] or [SD CARD] to select the recording destination and press the joystick. 1 Press the MENU button, then select [MEDIA SELECT...
SDR-H200: 2 Press the Photoshot button [ ] halfway in order to select the recording destination and press the joystick. Before using 2 Press the recording start/stop button to ...; Rotate the mode dial to select . ∫ Recording still pictures ≥ Rotate the mode dial to select . 1 Press the MENU button, then select [MEDIA SELECT] # [HDD] or [SD CARD] to select the recording destination and press the joystick. 1 Press the MENU button, then select [MEDIA SELECT...

Sd/hdd Video Camcorder
Page 15
...Plays back the next picture. ∫: Stops the playback and shows the thumbnails. SD Memory Card (512 MB) (SDR-H200/SDR-H20) RP-SDR512 Battery pack (SDR-H200) CGA-DU12 Battery pack (SDR-H20/SDR-H18) CGR-DU06 AC adaptor PV-DAC14D AC cable K2CA2CA00029 or K2CA2CA00025 DC cable ...K2GJ2DC00011 or K2GJ2DC00015 AV/S cable K2KZ9CB00001 Remote control (SDR-H200) N2QAEC000023 Button-type battery (SDR-H200) CR2025 Lens cap (SDR-H20/SDR-H18) LSYK2113 USB cable K1HA05CD0014 CD-ROM LSFT0724 15 LSQT1190 Before using Accessories Check the accessories...
...Plays back the next picture. ∫: Stops the playback and shows the thumbnails. SD Memory Card (512 MB) (SDR-H200/SDR-H20) RP-SDR512 Battery pack (SDR-H200) CGA-DU12 Battery pack (SDR-H20/SDR-H18) CGR-DU06 AC adaptor PV-DAC14D AC cable K2CA2CA00029 or K2CA2CA00025 DC cable ...K2GJ2DC00011 or K2GJ2DC00015 AV/S cable K2KZ9CB00001 Remote control (SDR-H200) N2QAEC000023 Button-type battery (SDR-H200) CR2025 Lens cap (SDR-H20/SDR-H18) LSYK2113 USB cable K1HA05CD0014 CD-ROM LSFT0724 15 LSQT1190 Before using Accessories Check the accessories...

Sd/hdd Video Camcorder
Page 16
...5 1 Lens ≥ Do not attach a conversion lens or a filter to this unit as it will cause vignetting. 2 Lens cover (SDR-H200) 3 Video light (SDR-H200) (l 49) 4 White balance sensor (l 57) Remote control sensor (SDR-H200) (l 20) 5 Microphone (built-in, stereo) 11 12 6 13 14 7 15 16 8 9 10 17 18 19 6 Terminal cover...DC/C.C. IN] (l 28) 9 LCD monitor open part (l 19) 10 Battery holder (l 25) 11 Audio-video output terminal [A/V] (l 77, 78) 12 Status indicator (l 28) 13 Power switch [OFF/ON] (l 28) 14 HDD/computer access lamp [ACCESS/ PC] (l 23, 87, 97) 15 Mode dial (l 30) 16 Joystick (l ...
...5 1 Lens ≥ Do not attach a conversion lens or a filter to this unit as it will cause vignetting. 2 Lens cover (SDR-H200) 3 Video light (SDR-H200) (l 49) 4 White balance sensor (l 57) Remote control sensor (SDR-H200) (l 20) 5 Microphone (built-in, stereo) 11 12 6 13 14 7 15 16 8 9 10 17 18 19 6 Terminal cover...DC/C.C. IN] (l 28) 9 LCD monitor open part (l 19) 10 Battery holder (l 25) 11 Audio-video output terminal [A/V] (l 77, 78) 12 Status indicator (l 28) 13 Power switch [OFF/ON] (l 28) 14 HDD/computer access lamp [ACCESS/ PC] (l 23, 87, 97) 15 Mode dial (l 30) 16 Joystick (l ...

Sd/hdd Video Camcorder
Page 17
.... 28 Card slot open lever (l 29) 29 DVD COPY button [DVD COPY] (l 88) 30 Speaker 31 Power LCD plus button [POWER LCD PLUS] (l 37) 32 Video light button [LIGHT] (SDR-H200) (l 49) 33 Reset button [RESET] (l 116) 34 Mode select switch [AUTO/MANUAL/ FOCUS] (l 40, 55, 56) 35 Card slot cover... [SD CARD] (l 29) 36 Card access lamp [ACCESS] (l 24, 87, 97) 37 37 Grip belt (l 17) Using grip belt Adjust the belt length so it fits ...
.... 28 Card slot open lever (l 29) 29 DVD COPY button [DVD COPY] (l 88) 30 Speaker 31 Power LCD plus button [POWER LCD PLUS] (l 37) 32 Video light button [LIGHT] (SDR-H200) (l 49) 33 Reset button [RESET] (l 116) 34 Mode select switch [AUTO/MANUAL/ FOCUS] (l 40, 55, 56) 35 Card slot cover... [SD CARD] (l 29) 36 Card access lamp [ACCESS] (l 24, 87, 97) 37 37 Grip belt (l 17) Using grip belt Adjust the belt length so it fits ...

Sd/hdd Video Camcorder
Page 18
Insert an SD card before attaching this unit to the lens cap fixture. with the tips of the lens cap cord through the loop. 3 To attach or remove ... the surface of the lens. 1 Pass the end of your finger and thumb. Before using Using the lens cover (SDR-H200) For the lens protection, be opened. Attaching the lens cap (SDR-H20/ SDR-H18) Attach the lens cap to close ring. Tripod receptacle This is a hole for attaching the unit to the optional...
Insert an SD card before attaching this unit to the lens cap fixture. with the tips of the lens cap cord through the loop. 3 To attach or remove ... the surface of the lens. 1 Pass the end of your finger and thumb. Before using Using the lens cover (SDR-H200) For the lens protection, be opened. Attaching the lens cap (SDR-H20/ SDR-H18) Attach the lens cap to close ring. Tripod receptacle This is a hole for attaching the unit to the optional...
Sd/hdd Video Camcorder
Page 19
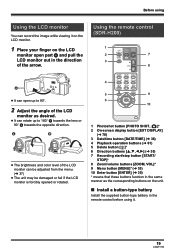
... on the LCD monitor. 1 Place your finger on the LCD monitor open up to 90o. 2 Adjust the angle of the arrow. Using the remote control (SDR-H200) 1 START/ EXT PHOTO STOP DISPLAY SHOT 2 7 3 DATE/ TIME ZOOM VOL 8 SEARCH PLAY SEARCH 4 STILL ADV PAUSE STILL ADV SKIP STOP SKIP 5 MENU 9 ENTER 6 10 1 Photoshot...
... on the LCD monitor. 1 Place your finger on the LCD monitor open up to 90o. 2 Adjust the angle of the arrow. Using the remote control (SDR-H200) 1 START/ EXT PHOTO STOP DISPLAY SHOT 2 7 3 DATE/ TIME ZOOM VOL 8 SEARCH PLAY SEARCH 4 STILL ADV PAUSE STILL ADV SKIP STOP SKIP 5 MENU 9 ENTER 6 10 1 Photoshot...

Sd/hdd Video Camcorder
Page 26
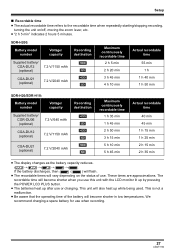
SDR-H200: Battery model number Voltage/capacity Supplied battery/ CGA-DU12 (optional) 7.2 V/1150 mAh CGA-DU21 (optional) 7.2 V/2040 mAh Charging time 2 h 25 min 3 h 55 min SDR-H20/SDR-H18: Battery model number Supplied battery/ CGR-DU06 (optional) CGA-DU12 (optional) CGA-DU21 (optional) Voltage/capacity 7.2 V/640 mAh 7.2 V/1150 mAh 7.2 V/2040 mAh Charging time 1 h ...
SDR-H200: Battery model number Voltage/capacity Supplied battery/ CGA-DU12 (optional) 7.2 V/1150 mAh CGA-DU21 (optional) 7.2 V/2040 mAh Charging time 2 h 25 min 3 h 55 min SDR-H20/SDR-H18: Battery model number Supplied battery/ CGR-DU06 (optional) CGA-DU12 (optional) CGA-DU21 (optional) Voltage/capacity 7.2 V/640 mAh 7.2 V/1150 mAh 7.2 V/2040 mAh Charging time 1 h ...
Sd/hdd Video Camcorder
Page 27
... temperatures. These times are approximations. We recommend charging a spare battery for use when recording. 27 LSQT1190 SDR-H200: Battery model number Voltage/ capacity Recording destination Supplied battery/ CGA-DU12 (optional) 7.2 V/1150 mAh CGA-DU21 (optional) 7.2 V/2040 mAh [HDD] [SD] [HDD] [SD] Maximum continuously recordable time 2 h 5 min 2 h 20 min 3 h 45 min 4 h 10 min Actual recordable time 55...
... temperatures. These times are approximations. We recommend charging a spare battery for use when recording. 27 LSQT1190 SDR-H200: Battery model number Voltage/ capacity Recording destination Supplied battery/ CGA-DU12 (optional) 7.2 V/1150 mAh CGA-DU21 (optional) 7.2 V/2040 mAh [HDD] [SD] [HDD] [SD] Maximum continuously recordable time 2 h 5 min 2 h 20 min 3 h 45 min 4 h 10 min Actual recordable time 55...

Sd/hdd Video Camcorder
Page 28
...the unit is in video recording mode or picture recording mode. 28 LSQT1190 The status indicator A goes off when the power turns off ≥ (SDR-H200) When recording, open the lens cover before turning the unit on for the first time, a selection screen will appear. Select [HDD] or [SD CARD] for the ...monitor when the unit is turned on with the lens cap attached, the automatic white balance adjustment (l 121) may not function properly. ≥ (SDR-H20/SDR-H18) When recording, remove the lens cap before turning the unit on. (l 18) If the unit is turned on with this unit. A ...
...the unit is in video recording mode or picture recording mode. 28 LSQT1190 The status indicator A goes off when the power turns off ≥ (SDR-H200) When recording, open the lens cover before turning the unit on for the first time, a selection screen will appear. Select [HDD] or [SD CARD] for the ...monitor when the unit is turned on with the lens cap attached, the automatic white balance adjustment (l 121) may not function properly. ≥ (SDR-H20/SDR-H18) When recording, remove the lens cap before turning the unit on. (l 18) If the unit is turned on with this unit. A ...

Sd/hdd Video Camcorder
Page 32
Setup About the operation icons displayed in each mode About auto mode and manual mode (l 40) Video recording mode 1/2 NEXT 2/2 NEXT 3/3 NEXT 4/4 NEXT Icon Direction Function 3 Backlight compensation (1/2) 2 Fade 1 Help mode 3 MagicPix (2/2) 2 Soft skin mode 1 Tele macro (SDR-H200) In manual mode (3/3) 3 White balance 2 Iris or gain value 1 Shutter speed In manual focus mode...
Setup About the operation icons displayed in each mode About auto mode and manual mode (l 40) Video recording mode 1/2 NEXT 2/2 NEXT 3/3 NEXT 4/4 NEXT Icon Direction Function 3 Backlight compensation (1/2) 2 Fade 1 Help mode 3 MagicPix (2/2) 2 Soft skin mode 1 Tele macro (SDR-H200) In manual mode (3/3) 3 White balance 2 Iris or gain value 1 Shutter speed In manual focus mode...

Sd/hdd Video Camcorder
Page 33
Picture recording mode 1/2 NEXT 2/2 NEXT 3/3 NEXT 4/4 NEXT Icon (1/2) Direction Function 3 Backlight compensation Ø 2 Self timer 1 Help mode (2/2) 2 Soft skin mode 1 Tele macro (SDR-H200) In manual mode (3/3) 3 White balance 2 Iris or gain value 1 Shutter speed In manual focus mode (4/4) 21 Manual focus adjustment Picture playback mode Icon 1/; ∫ E D Direction 3 4 2 1 ...
Picture recording mode 1/2 NEXT 2/2 NEXT 3/3 NEXT 4/4 NEXT Icon (1/2) Direction Function 3 Backlight compensation Ø 2 Self timer 1 Help mode (2/2) 2 Soft skin mode 1 Tele macro (SDR-H200) In manual mode (3/3) 3 White balance 2 Iris or gain value 1 Shutter speed In manual focus mode (4/4) 21 Manual focus adjustment Picture playback mode Icon 1/; ∫ E D Direction 3 4 2 1 ...

Sd/hdd Video Camcorder
Page 35
... back to the previous screen Move the joystick left. 4 Move the joystick up or down in order to enter the selection. Operating with remote control (SDR-H200) The menu screen transition is displayed. 2 Move the joystick up or down in order to select the desired item. 3 Move the joystick right or press...
... back to the previous screen Move the joystick left. 4 Move the joystick up or down in order to enter the selection. Operating with remote control (SDR-H200) The menu screen transition is displayed. 2 Move the joystick up or down in order to select the desired item. 3 Move the joystick right or press...

Sd/hdd Video Camcorder
Page 36
... the mode dial to set the desired value. ≥ Use the direction buttons (3,4,2,1) and ENTER button in place of the joystick on the remote control. (SDR-H200) [DATE] [D/T] DEC.15.2007 [OFF] DEC.15.2007 3:30 PM MENU ∫ Changing the display style Press the MENU button, then select [SETUP] # [DATE FORMAT...
... the mode dial to set the desired value. ≥ Use the direction buttons (3,4,2,1) and ENTER button in place of the joystick on the remote control. (SDR-H200) [DATE] [D/T] DEC.15.2007 [OFF] DEC.15.2007 3:30 PM MENU ∫ Changing the display style Press the MENU button, then select [SETUP] # [DATE FORMAT...
Sd/hdd Video Camcorder
Page 38
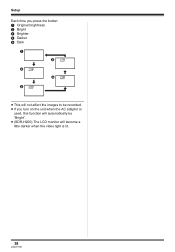
Setup Each time you press the button: 1 Original brightness 2 Bright 3 Brighter 4 Darker 5 Dark 1 5 -1 2 +1 4 -2 3 +2 ≥ This will not affect the images to be recorded. ≥ If you turn on the unit when the AC adaptor is used, this function will automatically be "Bright". ≥ (SDR-H200) The LCD monitor will become a little darker when the video light is lit. 38 LSQT1190
Setup Each time you press the button: 1 Original brightness 2 Bright 3 Brighter 4 Darker 5 Dark 1 5 -1 2 +1 4 -2 3 +2 ≥ This will not affect the images to be recorded. ≥ If you turn on the unit when the AC adaptor is used, this function will automatically be "Bright". ≥ (SDR-H200) The LCD monitor will become a little darker when the video light is lit. 38 LSQT1190

Sd/hdd Video Camcorder
Page 40
...55) jWhite balance (l 56) jShutter speed (l 58) jIris/gain value (l 58) jFocus (l 56) ∫ Auto Ground-directional Standby (AGS) (SDR-H200) This function prevents unnecessary recording when you . Recording ∫ About auto mode Set the AUTO/MANUAL/FOCUS switch to select . Press the MENU button...≥ The AGS function may not be adjusted automatically. The AGS function is only a backup function for optimum brightness. (When set to the video recording mode: The shutter speed is automatically set [AGS] to [OFF] then continue the recording. ≥ Use the recording start/stop button to...
...55) jWhite balance (l 56) jShutter speed (l 58) jIris/gain value (l 58) jFocus (l 56) ∫ Auto Ground-directional Standby (AGS) (SDR-H200) This function prevents unnecessary recording when you . Recording ∫ About auto mode Set the AUTO/MANUAL/FOCUS switch to select . Press the MENU button...≥ The AGS function may not be adjusted automatically. The AGS function is only a backup function for optimum brightness. (When set to the video recording mode: The shutter speed is automatically set [AGS] to [OFF] then continue the recording. ≥ Use the recording start/stop button to...


