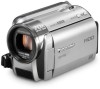
Sd/hdd Camcorder
Page 4
... to an AC supply outside of fire, explosion and burns. Please call 1-800-8-BATTERY for assistance in selecting a suitable AC plug adaptor or AC cord set. Do not disassemble, heat above 60 oC (140 oF) or incinerate. U.S.A./CANADA CONSUMERS: ATTENTION: A lithium ion/polymer battery that is recyclable powers the product you...
... to an AC supply outside of fire, explosion and burns. Please call 1-800-8-BATTERY for assistance in selecting a suitable AC plug adaptor or AC cord set. Do not disassemble, heat above 60 oC (140 oF) or incinerate. U.S.A./CANADA CONSUMERS: ATTENTION: A lithium ion/polymer battery that is recyclable powers the product you...

Sd/hdd Camcorder
Page 8
... the battery 17 Charging time and recordable time ..... 18 Connecting to the AC outlet 19 [3] About HDD and SD cards 20 About SD cards 21 HDD handling 23 Access lamp 23 [4] Inserting/removing an SD card ........ 24 Setup [1] Turning the unit on/off Selecting a mode 25 [2] Using the menu ...screen 26 Language selection 27 Menu list 27 [3] Setting date and time 29 World time setting (Displaying the time of the ...
... the battery 17 Charging time and recordable time ..... 18 Connecting to the AC outlet 19 [3] About HDD and SD cards 20 About SD cards 21 HDD handling 23 Access lamp 23 [4] Inserting/removing an SD card ........ 24 Setup [1] Turning the unit on/off Selecting a mode 25 [2] Using the menu ...screen 26 Language selection 27 Menu list 27 [3] Setting date and time 29 World time setting (Displaying the time of the ...

Sd/hdd Camcorder
Page 11
... the battery against the battery holder and slide it until it clicks. ∫ How to turn on the power While pressing the lock release button A, set the mode dial to , , or . ≥ Align with the status indicator B. ≥ To turn off the power..., set the mode dial to OFF. ∫ Inserting an SD card 1 Open the LCD monitor. 2 Open the SD card slot cover then insert the SD card into the card slot. 3 Securely close the...
... the battery against the battery holder and slide it until it clicks. ∫ How to turn on the power While pressing the lock release button A, set the mode dial to , , or . ≥ Align with the status indicator B. ≥ To turn off the power..., set the mode dial to OFF. ∫ Inserting an SD card 1 Open the LCD monitor. 2 Open the SD card slot cover then insert the SD card into the card slot. 3 Securely close the...

Sd/hdd Camcorder
Page 14
Move the joystick up, down, left, or right to select a setting or scene and then press the joystick to set it. Lens cover For the lens protection, be used. 18 Grip belt 19 Microphone (built-in use. optional) in front of the lens. &#... joystick to select the recording functions and playback operations, and to close switch for the lens cover. 1 Select by moving up, down, left or right. 2 Set by pressing the center. ≥ Menu screen operations (l 26) ≥ To select the recording functions (l 42) ≥ To adjust manually (l 50) ≥ Playback operations (l 54...
Move the joystick up, down, left, or right to select a setting or scene and then press the joystick to set it. Lens cover For the lens protection, be used. 18 Grip belt 19 Microphone (built-in use. optional) in front of the lens. &#... joystick to select the recording functions and playback operations, and to close switch for the lens cover. 1 Select by moving up, down, left or right. 2 Set by pressing the center. ≥ Menu screen operations (l 26) ≥ To select the recording functions (l 42) ≥ To adjust manually (l 50) ≥ Playback operations (l 54...

Sd/hdd Camcorder
Page 17
... LSQT1449 Inserting the battery Removing the battery While sliding the BATTERY lever, slide the battery to remove it does not fall. ≥ Be sure to set the mode dial to OFF and check that the status indicator is incorrectly replaced. Push the battery against the battery holder and slide it until...
... LSQT1449 Inserting the battery Removing the battery While sliding the BATTERY lever, slide the battery to remove it does not fall. ≥ Be sure to set the mode dial to OFF and check that the status indicator is incorrectly replaced. Push the battery against the battery holder and slide it until...

Sd/hdd Camcorder
Page 25
... recording mode (l 37) Picture playback mode (l 57) OFF How to turn the power on and off with the LCD monitor When the mode dial is set the date and time will appear. Preparation Setup 1 Turning the unit on/off with the status indicator B. The status indicator lights. ∫ To turn ...off Close the LCD monitor. To turn off the power immediately after closing the LCD monitor, set to or , the power can be turned on and off Selecting a mode Rotate the mode dial to switch to recording, playback or power OFF. ...
... recording mode (l 37) Picture playback mode (l 57) OFF How to turn the power on and off with the LCD monitor When the mode dial is set the date and time will appear. Preparation Setup 1 Turning the unit on/off with the status indicator B. The status indicator lights. ∫ To turn ...off Close the LCD monitor. To turn off the power immediately after closing the LCD monitor, set to or , the power can be turned on and off Selecting a mode Rotate the mode dial to switch to recording, playback or power OFF. ...

Sd/hdd Camcorder
Page 26
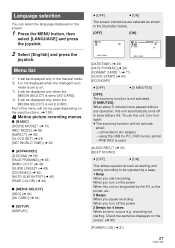
... depending on the position of the mode dial. 2 Select the desired top menu, then move the joystick right or press the joystick. 4 Select the desired setting, then press the joystick to the previous screen Move the joystick left. Preparation Setup 2 Using the menu screen ENTER MENU 1 Press the MENU button.
... depending on the position of the mode dial. 2 Select the desired top menu, then move the joystick right or press the joystick. 4 Select the desired setting, then press the joystick to the previous screen Move the joystick left. Preparation Setup 2 Using the menu screen ENTER MENU 1 Press the MENU button.
Sd/hdd Camcorder
Page 27
...) [SET WORLD TIME] (l 30) ∫ [ADVANCED] [D.ZOOM] (l 39) [FACE FRAMING] (l 45) [WIND CUT]*2 (l 48) [GUIDE LINES]*2 (l 48) [ZOOM MIC] (l 40) [AUTO SLW SHTR]*2 (l 48) [FADE COLOR] (l 44) ∫ [MEDIA SELECT] [HDD] (l 34) [SD CARD] (l 34) ∫ [SETUP] [DISPLAY] ≥ [OFF] ≥ [ON] The screen ...indications are selected as starting . Menu list *1 It will be displayed only in the manual mode. *2 It is not displayed when the Intelligent auto mode is set to on. *3 It...
...) [SET WORLD TIME] (l 30) ∫ [ADVANCED] [D.ZOOM] (l 39) [FACE FRAMING] (l 45) [WIND CUT]*2 (l 48) [GUIDE LINES]*2 (l 48) [ZOOM MIC] (l 40) [AUTO SLW SHTR]*2 (l 48) [FADE COLOR] (l 44) ∫ [MEDIA SELECT] [HDD] (l 34) [SD CARD] (l 34) ∫ [SETUP] [DISPLAY] ≥ [OFF] ≥ [ON] The screen ...indications are selected as starting . Menu list *1 It will be displayed only in the manual mode. *2 It is not displayed when the Intelligent auto mode is set to on. *3 It...

Sd/hdd Camcorder
Page 28
...) Still picture recording menus ∫ [BASIC] [SCENE MODE]*1 (l 51) [PICTURE SIZE] (l 38) [CLOCK SET] (l 29) [SET WORLD TIME] (l 30) ∫ [ADVANCED] [FACE FRAMING] (l 45) [SHTR EFFECT] (l 38) [AUTO SLW SHTR]*2 (l 48) [GUIDE LINES]*2 (l 48) ∫ [MEDIA SELECT] [HDD] (l 37) [SD CARD] (l 37) ∫ [SETUP] Refer to the motion picture recording menus. ∫ [LANGUAGE] (l 27...
...) Still picture recording menus ∫ [BASIC] [SCENE MODE]*1 (l 51) [PICTURE SIZE] (l 38) [CLOCK SET] (l 29) [SET WORLD TIME] (l 30) ∫ [ADVANCED] [FACE FRAMING] (l 45) [SHTR EFFECT] (l 38) [AUTO SLW SHTR]*2 (l 48) [GUIDE LINES]*2 (l 48) ∫ [MEDIA SELECT] [HDD] (l 37) [SD CARD] (l 37) ∫ [SETUP] Refer to the motion picture recording menus. ∫ [LANGUAGE] (l 27...

Sd/hdd Camcorder
Page 29
...# desired display style Display style Screen display [Y/M/D] 2009.NOV.15 [M/D/Y] NOV.15.2009 [D/M/Y] 15.NOV.2009 ≥ The year will change as it is set to [DESTINATION]. 3 Press the joystick to enter the selection. ≥ The clock function starts at [00] seconds when the joystick is pressed. 4 Press ... the built-in lithium battery needs to be recharged. Select [YES] and press the joystick. Use the following steps to charge the battery, and then set the date and time. Leave the unit as follows: 2000, 2001, ..., 2099, 2000, ... ≥ The 12-hour system is used to display...
...# desired display style Display style Screen display [Y/M/D] 2009.NOV.15 [M/D/Y] NOV.15.2009 [D/M/Y] 15.NOV.2009 ≥ The year will change as it is set to [DESTINATION]. 3 Press the joystick to enter the selection. ≥ The clock function starts at [00] seconds when the joystick is pressed. 4 Press ... the built-in lithium battery needs to be recharged. Select [YES] and press the joystick. Use the following steps to charge the battery, and then set the date and time. Leave the unit as follows: 2000, 2001, ..., 2099, 2000, ... ≥ The 12-hour system is used to display...

Sd/hdd Camcorder
Page 30
... from GMT (Greenwich Mean Time) appears on the right top of the screen. If the home region has already been set once, execute the menu ≥ If the clock is not set, adjust the clock to the current time. (l 29) ≥ When the [HOME] (your home region) is not operation for Step... 1. 5 (Only when setting the region of your travel set, such as the time for selecting home/travel ≥ When the destination is in summer time period, move the joystick up . [ ] appears and the...
... from GMT (Greenwich Mean Time) appears on the right top of the screen. If the home region has already been set once, execute the menu ≥ If the clock is not set, adjust the clock to the current time. (l 29) ≥ When the [HOME] (your home region) is not operation for Step... 1. 5 (Only when setting the region of your travel set, such as the time for selecting home/travel ≥ When the destination is in summer time period, move the joystick up . [ ] appears and the...
Sd/hdd Camcorder
Page 31
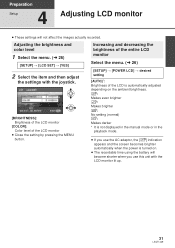
...monitor Select the menu. (l 26) [SETUP] # [POWER LCD] # desired setting [AUTO]*: Brightness of the LCD monitor ≥ Close the setting by pressing the MENU button. Preparation Setup 4 Adjusting LCD monitor ≥ These settings will become shorter when you use the AC adaptor, the [ +1 ] indication appears...of the LCD is automatically adjusted depending on the ambient brightness. +2 : Makes even brighter +1 : Makes brighter ±0 : No setting (normal) -1 : Makes darker * It is turned on. ≥ The recordable time using the battery will not affect the images actually recorded.
...monitor Select the menu. (l 26) [SETUP] # [POWER LCD] # desired setting [AUTO]*: Brightness of the LCD monitor ≥ Close the setting by pressing the MENU button. Preparation Setup 4 Adjusting LCD monitor ≥ These settings will become shorter when you use the AC adaptor, the [ +1 ] indication appears...of the LCD is automatically adjusted depending on the ambient brightness. +2 : Makes even brighter +1 : Makes brighter ±0 : No setting (normal) -1 : Makes darker * It is turned on. ≥ The recordable time using the battery will not affect the images actually recorded.

Sd/hdd Camcorder
Page 32
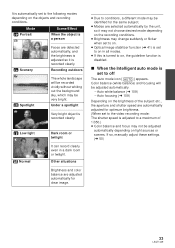
... will make sure your hand through the grip belt. Intelligent auto mode It will become dark in the recording. ≥ When recording, make an optimal setting automatically depending on /off the Intelligent auto mode. 32 LSQT1449 Intelligent auto button Press this button to switch on the objects and recording conditions. ¬...
... will make sure your hand through the grip belt. Intelligent auto mode It will become dark in the recording. ≥ When recording, make an optimal setting automatically depending on /off the Intelligent auto mode. 32 LSQT1449 Intelligent auto button Press this button to switch on the objects and recording conditions. ¬...
Sd/hdd Camcorder
Page 33
...even in all modes. ≥ If this is turned to off The auto mode icon [ AUTO ] appears. If so, manually adjust these settings. (l 50) 33 LSQT1449 Recording outdoors Spotlight The whole landscape will be adjusted automatically depending on , the guideline function is disabled. ∫ When... the Intelligent auto mode is set to on light sources or scenes. Mode Portrait Scene/Effect When the object is a person Scenery Faces are selected automatically by the unit...
...even in all modes. ≥ If this is turned to off The auto mode icon [ AUTO ] appears. If so, manually adjust these settings. (l 50) 33 LSQT1449 Recording outdoors Spotlight The whole landscape will be adjusted automatically depending on , the guideline function is disabled. ∫ When... the Intelligent auto mode is set to on light sources or scenes. Mode Portrait Scene/Effect When the object is a person Scenery Faces are selected automatically by the unit...
Sd/hdd Camcorder
Page 34
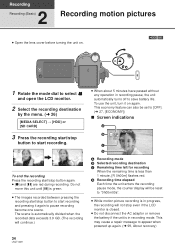
... until [;] is green. ≥ The images recorded between pressing the recording start/stop button to start recording and pressing it on . [HDD] [SD] 1 Rotate the mode dial to select and open the LCD monitor. 2 Select the recording destination by the menu. (l 26) [MEDIA SELECT... passed without any operation in recording mode. D Recording time elapsed Each time the unit enters the recording pause mode, the counter display will be set to "0h00m00s". ≥ While motion picture recording is in recording pause, the unit automatically turns off to save battery life. Recording 2 Recording ...
... until [;] is green. ≥ The images recorded between pressing the recording start/stop button to start recording and pressing it on . [HDD] [SD] 1 Rotate the mode dial to select and open the LCD monitor. 2 Select the recording destination by the menu. (l 26) [MEDIA SELECT... passed without any operation in recording mode. D Recording time elapsed Each time the unit enters the recording pause mode, the counter display will be set to "0h00m00s". ≥ While motion picture recording is in recording pause, the unit automatically turns off to save battery life. Recording 2 Recording ...

Sd/hdd Camcorder
Page 35
By using a device conforming to be recorded in [DOLBY] mode on an SD card. ≥ This function's default setting is canceled if you turn the unit off. 35 LSQT1449 The web mode icon [ ] appears. 2 Press the recording start/stop button to YouTube (l 93) ≥...; Web mode is [DOLBY]. Select the menu. (l 26) [SETUP] # [AUDIO REC] # [DOLBY] or [MPEG] Record motion picture to the SD-Video standard. ≥...
By using a device conforming to be recorded in [DOLBY] mode on an SD card. ≥ This function's default setting is canceled if you turn the unit off. 35 LSQT1449 The web mode icon [ ] appears. 2 Press the recording start/stop button to YouTube (l 93) ≥...; Web mode is [DOLBY]. Select the menu. (l 26) [SETUP] # [AUDIO REC] # [DOLBY] or [MPEG] Record motion picture to the SD-Video standard. ≥...

Sd/hdd Camcorder
Page 36
...modes and recordable time To change the picture quality of the motion picture Select the menu. (l 26) [BASIC] # [REC MODE] # desired setting ∫ HDD Capacity 80 GB (SDR-H90) 60 GB (SDR-H80) XP (High quality) 18 h 14 h Favours image quality Recording mode SP (Normal) 36 h 27 h LP (Long play) 72 h 54...amount of data in a fixed time) depending on a playback image in [LP] mode.) ≥ If you record still pictures on the HDD or an SD card, the recordable time available for the motion picture will become shorter. 36 LSQT1449 jWhen there is a complicated pattern in VBR (Variable Bit Rate...
...modes and recordable time To change the picture quality of the motion picture Select the menu. (l 26) [BASIC] # [REC MODE] # desired setting ∫ HDD Capacity 80 GB (SDR-H90) 60 GB (SDR-H80) XP (High quality) 18 h 14 h Favours image quality Recording mode SP (Normal) 36 h 27 h LP (Long play) 72 h 54...amount of data in a fixed time) depending on a playback image in [LP] mode.) ≥ If you record still pictures on the HDD or an SD card, the recordable time available for the motion picture will become shorter. 36 LSQT1449 jWhen there is a complicated pattern in VBR (Variable Bit Rate...

Sd/hdd Camcorder
Page 38
Check before printing. 38 LSQT1449 The sides of pixels 640k480 640k360 ≥ Default [PICTURE SIZE] is [ON]. Number of pixels Select the menu. (l 26) [BASIC] # [PICTURE SIZE] # desired setting Icon 0.3M 0.2 Aspect 4:3 16:9 Number of pictures recorded in a 16:9 aspect ratio may be cut when printed. Recording with a shutter sound effect Select the menu. (l 26) [ADVANCED] # [SHTR EFFECT] # [ON] ≥ This function's default setting is set to [ 0.2 ].
Check before printing. 38 LSQT1449 The sides of pixels 640k480 640k360 ≥ Default [PICTURE SIZE] is [ON]. Number of pixels Select the menu. (l 26) [BASIC] # [PICTURE SIZE] # desired setting Icon 0.3M 0.2 Aspect 4:3 16:9 Number of pictures recorded in a 16:9 aspect ratio may be cut when printed. Recording with a shutter sound effect Select the menu. (l 26) [ADVANCED] # [SHTR EFFECT] # [ON] ≥ This function's default setting is set to [ 0.2 ].
Sd/hdd Camcorder
Page 39
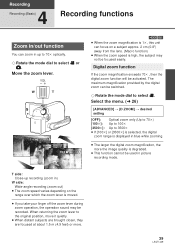
...may be used in blue while zooming. ≥ The larger the digital zoom magnification, the more . 39 LSQT1449 Move the zoom lever. 70 [HDD] [SD] ≥ When the zoom magnification is 1k, this unit can be focused easily. The maximum magnification provided by the digital zoom can focus on...lever is degraded. ≥ This function cannot be recorded. When returning the zoom lever to select . Select the menu. (l 26) [ADVANCED] # [D.ZOOM] # desired setting [OFF]: Optical zoom only (Up to 70k) [100k]: Up to 100k [3500k]: Up to select or . T side: Close-up to 70k optically. ¬ ...
...may be used in blue while zooming. ≥ The larger the digital zoom magnification, the more . 39 LSQT1449 Move the zoom lever. 70 [HDD] [SD] ≥ When the zoom magnification is 1k, this unit can be focused easily. The maximum magnification provided by the digital zoom can focus on...lever is degraded. ≥ This function cannot be recorded. When returning the zoom lever to select . Select the menu. (l 26) [ADVANCED] # [D.ZOOM] # desired setting [OFF]: Optical zoom only (Up to 70k) [100k]: Up to 100k [3500k]: Up to select or . T side: Close-up to 70k optically. ¬ ...
Sd/hdd Camcorder
Page 40
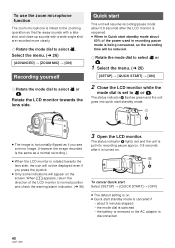
Rotate the LCD monitor towards the lens side, the icon will appear on . ≥ Quick start Select [SETUP] # [QUICK START] # [OFF] ≥ The default setting is set to normal position and check the warning/alarm indication. (l 98) 3 Open the LCD monitor. The status indicator A lights red and the unit is put into ...
Rotate the LCD monitor towards the lens side, the icon will appear on . ≥ Quick start Select [SETUP] # [QUICK START] # [OFF] ≥ The default setting is set to normal position and check the warning/alarm indication. (l 98) 3 Open the LCD monitor. The status indicator A lights red and the unit is put into ...


