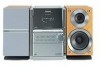

Cd Stereo System
Page 8
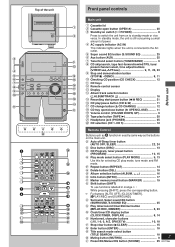
... connected to the AC power supply. 2 Standby/on switch (f/I, POWER) Press to switch the unit from on the main unit. Name Ref. CD, Tuner, Tape, Aux select button (SELECTOR 13, 24 .
... connected to the AC power supply. 2 Standby/on switch (f/I, POWER) Press to switch the unit from on the main unit. Name Ref. CD, Tuner, Tape, Aux select button (SELECTOR 13, 24 .

Cd Stereo System
Page 9
... for 4:25p.m.. Press [CLOCK/TIMER] to clear "AUTO OFF" from the display if either tuner or AUX is ON Press [CLOCK/TIMER] to function normally. Press and hold [-DEMO] until "NO DEMO" is tuner or AUX. "AUTO OFF" is shown on the power. To cancel Press [AUTO OFF] again to finish setting... the time. "AUTO OFF" disappears from the display. The display will return to set the time. To display the time when system is selected as described above. Note This...
... for 4:25p.m.. Press [CLOCK/TIMER] to clear "AUTO OFF" from the display if either tuner or AUX is ON Press [CLOCK/TIMER] to function normally. Press and hold [-DEMO] until "NO DEMO" is tuner or AUX. "AUTO OFF" is shown on the power. To cancel Press [AUTO OFF] again to finish setting... the time. "AUTO OFF" disappears from the display. The display will return to set the time. To display the time when system is selected as described above. Note This...

Cd Stereo System
Page 13
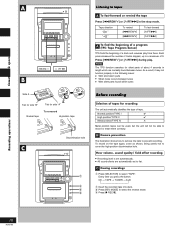
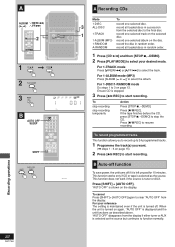
Play will also erase the entire program. Every time you press the button: CD → TAPE → TUNER → AUX Press [PROGRAM]. are shown on your program with [g] or [f], and press [CANCEL] within 10 seconds or so) Press [1] - [5] to select the disc you want. Select ... Program play mode Press [PROGRAM] in the stop mode. Pressing [L CLEAR] will cancel program play it will start in memory for about 2 weeks while the system is unplugged.
Play will also erase the entire program. Every time you press the button: CD → TAPE → TUNER → AUX Press [PROGRAM]. are shown on your program with [g] or [f], and press [CANCEL] within 10 seconds or so) Press [1] - [5] to select the disc you want. Select ... Program play mode Press [PROGRAM] in the stop mode. Pressing [L CLEAR] will cancel program play it will start in memory for about 2 weeks while the system is unplugged.
Cd Stereo System
Page 18
... The unit automatically identifies the type of about 4 seconds in the stop mode. Every time you press the button: CD → TAPE → TUNER → AUX 2 Insert the recorded tape into deck. 3 Press [REV MODE] to select "TAPE". How volume, sound quality/ field affect recording • Recording level is set automatically...
... The unit automatically identifies the type of about 4 seconds in the stop mode. Every time you press the button: CD → TAPE → TUNER → AUX 2 Insert the recorded tape into deck. 3 Press [REV MODE] to select "TAPE". How volume, sound quality/ field affect recording • Recording level is set automatically...
Cd Stereo System
Page 22
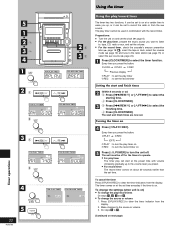
The play timer cannot be set to record the radio or from the aux source. Every time you press the button: PLAY REC (OFF) rPLAY : to turn the play ... on rREC : to turn the unit off for the timers to the radio station (A page 15) or select the aux source (A page 24). Turning the timer on . The timer comes on at the set time everyday if the timer...it can be off . Press [rPLAY/rREC] to clear the timer indicators from the display. 2. tape, CD, radio or aux, and set . To cancel the timer Press [rPLAY/rREC] to clear the timer indicator from the display. Make changes to...
The play timer cannot be set to record the radio or from the aux source. Every time you press the button: PLAY REC (OFF) rPLAY : to turn the play ... on rREC : to turn the unit off for the timers to the radio station (A page 15) or select the aux source (A page 24). Turning the timer on . The timer comes on at the set time everyday if the timer...it can be off . Press [rPLAY/rREC] to clear the timer indicators from the display. 2. tape, CD, radio or aux, and set . To cancel the timer Press [rPLAY/rREC] to clear the timer indicator from the display. Make changes to...

Cd Stereo System
Page 23
... on standby. Every time the button is pressed the setting changes as the source. Reset the Disc numbers and reverse mode if you switch the system to put the unit on the display. However, the Disc numbers and reverse mode do not get stored in the timer memory and the timer... will engage "AUX" as follow: PLAY REC (OFF) To check settings While the unit is on and the "rPLAY" (or "rREC") indicator is on). Notes • If you...
... on standby. Every time the button is pressed the setting changes as the source. Reset the Disc numbers and reverse mode if you switch the system to put the unit on the display. However, the Disc numbers and reverse mode do not get stored in the timer memory and the timer... will engage "AUX" as follow: PLAY REC (OFF) To check settings While the unit is on and the "rPLAY" (or "rREC") indicator is on). Notes • If you...

Cd Stereo System
Page 24
...overlap timer settings. Every time you attempt to prevent hearing damage. To confirm the remaining time: (only while system is turned off after 30 minutes. Be sure not to select "AUX". 3. To change the time remaining during operation: Press [SLEEP] to show the remaining time then press [... set time (Max. 2 hours, settable at 30-minute intervals). The figure shows how to set the system to music. It lets you press the button: CD → TAPE → TUNER → AUX 3. Press [f/7, POWER] to the owner's manual of the equipment.) C Listening with the play/record timer...
...overlap timer settings. Every time you attempt to prevent hearing damage. To confirm the remaining time: (only while system is turned off after 30 minutes. Be sure not to select "AUX". 3. To change the time remaining during operation: Press [SLEEP] to show the remaining time then press [... set time (Max. 2 hours, settable at 30-minute intervals). The figure shows how to set the system to music. It lets you press the button: CD → TAPE → TUNER → AUX 3. Press [f/7, POWER] to the owner's manual of the equipment.) C Listening with the play/record timer...

Cd Stereo System
Page 28
...905-624-5505, web site (www.panasonic.ca), or an authorized Servicentre closest to change without notice. Specifications AMPLIFIER SECTION Power output 10% Total harmonic distortion 1 kHz, both channels driven 70 Hz-16 kHz, both channels driven Input sensitivity AUX Input Impedance AUX 45 W per channel (6 Ω) ...AM S/N 20 dB (at 1000 kHz) 520 - 1710 kHz (10 kHz steps) 560 µV/m CASSETTE DECK SECTION Track system Heads Record/playback Erasure Motor Recording system Erasing system Tape speed Frequency response (+3 dB, -6 dB at DECK OUT) NORMAL (TYPE I) HIGH (TYPE II) S/N Wow and ...
...905-624-5505, web site (www.panasonic.ca), or an authorized Servicentre closest to change without notice. Specifications AMPLIFIER SECTION Power output 10% Total harmonic distortion 1 kHz, both channels driven 70 Hz-16 kHz, both channels driven Input sensitivity AUX Input Impedance AUX 45 W per channel (6 Ω) ...AM S/N 20 dB (at 1000 kHz) 520 - 1710 kHz (10 kHz steps) 560 µV/m CASSETTE DECK SECTION Track system Heads Record/playback Erasure Motor Recording system Erasing system Tape speed Frequency response (+3 dB, -6 dB at DECK OUT) NORMAL (TYPE I) HIGH (TYPE II) S/N Wow and ...
Mini Hes W/cd Player
Page 6
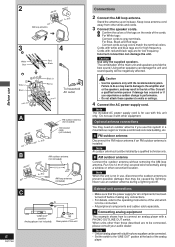
...EXT C 75 LOOP AM outdoor antenna (not included) 5-12 m AM loop antenna (included) (L) (R) "LINE OUT" position Analog player (not included) AUX R L Rear panel of the analog player. Run 5 to 12 m of vinyl-covered wire horizontally along a window or other wires and cords. 3 ... equalizer can be connected, please consult your audio dealer. Keep loose antenna cord away from other convenient location. Cords with the recommended system. External unit connections • Make sure that may be caused by a qualified technician only. When units other equipment. Caution •...
...EXT C 75 LOOP AM outdoor antenna (not included) 5-12 m AM loop antenna (included) (L) (R) "LINE OUT" position Analog player (not included) AUX R L Rear panel of the analog player. Run 5 to 12 m of vinyl-covered wire horizontally along a window or other wires and cords. 3 ... equalizer can be connected, please consult your audio dealer. Keep loose antenna cord away from other convenient location. Cords with the recommended system. External unit connections • Make sure that may be caused by a qualified technician only. When units other equipment. Caution •...
Mini Hes W/cd Player
Page 7
In standby mode, the unit is connected to the AC outlet. 5 Super sound EQ button (S.SOUND EQ 25 6 Aux button (AUX 25 7 Tuner/band select button (TUNER/BAND 9 8 CD skip/search, tape fast-forward/rewind/TPS, tune/ preset channel select, time adjust buttons 9 (4/REW/4, 3/FF 9, 11, ... labelled in exactly same way as the buttons çon to switch the unit from on the main unit. Top of power. POWER AC IN AUX FF REW CD CHECK S.SOUND EQ ALBUM/ TRACK REC TUNER BAND STOP DEMO CD 1 CD 2 CD TAPE CD 3 VOLUME CD 4 CD 5 DOWN CD CHANGE OPEN...
In standby mode, the unit is connected to the AC outlet. 5 Super sound EQ button (S.SOUND EQ 25 6 Aux button (AUX 25 7 Tuner/band select button (TUNER/BAND 9 8 CD skip/search, tape fast-forward/rewind/TPS, tune/ preset channel select, time adjust buttons 9 (4/REW/4, 3/FF 9, 11, ... labelled in exactly same way as the buttons çon to switch the unit from on the main unit. Top of power. POWER AC IN AUX FF REW CD CHECK S.SOUND EQ ALBUM/ TRACK REC TUNER BAND STOP DEMO CD 1 CD 2 CD TAPE CD 3 VOLUME CD 4 CD 5 DOWN CD CHANGE OPEN...
Mini Hes W/cd Player
Page 22
... (MP3) Press [ALBUM ( or )] to function normally. This function works only if CD or tape is tuner or AUX. Press [SHIFT] + [AUTO OFF]. "AUTO OFF" disappears from the display if either tuner or AUX is selected as the source but continues to select the album. If the tape finishes before the CD...
... (MP3) Press [ALBUM ( or )] to function normally. This function works only if CD or tape is tuner or AUX. Press [SHIFT] + [AUTO OFF]. "AUTO OFF" disappears from the display if either tuner or AUX is selected as the source but continues to select the album. If the tape finishes before the CD...

Mini Hes W/cd Player
Page 23
... play timer. Check the cassette's erasure prevention tabs (\ page 21), insert the cassette and tune to the radio station (\ page 10) or select the aux source (\ page 25). 1 Press [SHIFT] + [CLOCK/TIMER] to select: Every time you want to listen to turn off ) Timer ˚ ... alarm or radio recorder. Press [SHIFT] + [CLOCK/TIMER]. 1 3 Press [4/REW/4] or [3/FF/¢] to select the 2 starting time. tape, CD, radio or aux, and set the record timer. Press [SHIFT] + [CLOCK/TIMER]. turn off. (The indicator doesn't appear if the start and finish times (Within 3 seconds) 1 ...
... play timer. Check the cassette's erasure prevention tabs (\ page 21), insert the cassette and tune to the radio station (\ page 10) or select the aux source (\ page 25). 1 Press [SHIFT] + [CLOCK/TIMER] to select: Every time you want to listen to turn off ) Timer ˚ ... alarm or radio recorder. Press [SHIFT] + [CLOCK/TIMER]. 1 3 Press [4/REW/4] or [3/FF/¢] to select the 2 starting time. tape, CD, radio or aux, and set the record timer. Press [SHIFT] + [CLOCK/TIMER]. turn off. (The indicator doesn't appear if the start and finish times (Within 3 seconds) 1 ...

Mini Hes W/cd Player
Page 24
...the finish time setting will not be activated. • If the unit is selected as the source, when the timer comes on, the system turns on and engages AUX as the source. If you want to playback or record from a connected unit, set the other unit's timer to the same time. ... unit on the previous page, start time → Play finish time → Play source → Playback volume. Recording start in the standby mode. • If AUX is on previous page. The volume level (for play /record times source/volume Repeat steps 1, 2, 3, and 5 on Press [SHIFT] + [CLOCK/TIMER] until "˚...
...the finish time setting will not be activated. • If the unit is selected as the source, when the timer comes on, the system turns on and engages AUX as the source. If you want to playback or record from a connected unit, set the other unit's timer to the same time. ... unit on the previous page, start time → Play finish time → Play source → Playback volume. Recording start in the standby mode. • If AUX is on previous page. The volume level (for play /record times source/volume Repeat steps 1, 2, 3, and 5 on Press [SHIFT] + [CLOCK/TIMER] until "˚...
Mini Hes W/cd Player
Page 25
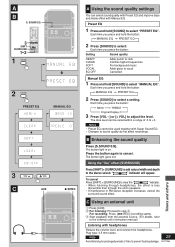
... BASS TREBLE Original Display 3 Press [VOL -] or [+ VOL] to prevent hearing damage. Timers and others C Using an external unit 12 3 Press [AUX]. To cancel Press [SHIFT] + [SURROUND] to +3. Plug type: 3.5 mm stereo. Each time you press and hold [SOUND] to sound quality do ...details, refer to the stereo sound. AB S. SOUND EQ 3 SHIFT SURROUND 1 2 1 SOUND 2 SOUND PRESET EQ MANUAL EQ 3 VOL VOL C AUX / REC A Using the sound quality settings You can be used together with headphones Reduce the volume level, and connect the headphones. Preset EQ 1 ...
... BASS TREBLE Original Display 3 Press [VOL -] or [+ VOL] to prevent hearing damage. Timers and others C Using an external unit 12 3 Press [AUX]. To cancel Press [SHIFT] + [SURROUND] to +3. Plug type: 3.5 mm stereo. Each time you press and hold [SOUND] to sound quality do ...details, refer to the stereo sound. AB S. SOUND EQ 3 SHIFT SURROUND 1 2 1 SOUND 2 SOUND PRESET EQ MANUAL EQ 3 VOL VOL C AUX / REC A Using the sound quality settings You can be used together with headphones Reduce the volume level, and connect the headphones. Preset EQ 1 ...


