
SAAK200 User Guide
Page 2
...Use numbers indicated in the space provided below and keep for supplied accessories 6 Optional antenna connections 7 External unit connection 7 Front panel controls 8 Turning the demo function off 10 Convenient functions 10 Auto-off function 11 Setting the time 11 Radio operations Listening to radio broadcasts 12 Presetting radio broadcasts 13 Compact disc operations About compact discs 14 Listening to compact discs 15 Playing MP3 (SC-AK500 and SC-AK490 only 15 Program play 17 To listen to specific CDs and tracks (CD Play Mode function 18 Direct access play 19 Repeat play...
...Use numbers indicated in the space provided below and keep for supplied accessories 6 Optional antenna connections 7 External unit connection 7 Front panel controls 8 Turning the demo function off 10 Convenient functions 10 Auto-off function 11 Setting the time 11 Radio operations Listening to radio broadcasts 12 Presetting radio broadcasts 13 Compact disc operations About compact discs 14 Listening to compact discs 15 Playing MP3 (SC-AK500 and SC-AK490 only 15 Program play 17 To listen to specific CDs and tracks (CD Play Mode function 18 Direct access play 19 Repeat play...
SAAK200 User Guide
Page 3
... settings 24 Enhancing the sound quality 24 Timer operations Using the timer 25 Using the play/record timer 25 Using the sleep timer 27 Reference Using an external unit 27 Troubleshooting guide 28 Servicenter List (ONLY FOR U.S.A 29 Warranty (ONLY FOR U.S.A 30 Specifications 31 Maintenance Back Cover Product Service Back Cover THE FOLLOWING APPLIES ONLY IN THE U.S.A.: CAUTION: This equipment has been tested and found to comply with the instructions...
... settings 24 Enhancing the sound quality 24 Timer operations Using the timer 25 Using the play/record timer 25 Using the sleep timer 27 Reference Using an external unit 27 Troubleshooting guide 28 Servicenter List (ONLY FOR U.S.A 29 Warranty (ONLY FOR U.S.A 30 Specifications 31 Maintenance Back Cover Product Service Back Cover THE FOLLOWING APPLIES ONLY IN THE U.S.A.: CAUTION: This equipment has been tested and found to comply with the instructions...
SAAK200 User Guide
Page 4
... outdoor antenna, take hold of antenna-discharge unit, connection to this can result in a confined space such as contact with wet hands. Damage requiring service -The unit should be careful not to authorized servicing personnel. 3. or (d) The unit does not operate normally or exhibits a marked change in these operating instructions. Do not install in fire or electric shock. 5. Replacement parts -When parts need replacing ensure the servicer uses parts...
... outdoor antenna, take hold of antenna-discharge unit, connection to this can result in a confined space such as contact with wet hands. Damage requiring service -The unit should be careful not to authorized servicing personnel. 3. or (d) The unit does not operate normally or exhibits a marked change in these operating instructions. Do not install in fire or electric shock. 5. Replacement parts -When parts need replacing ensure the servicer uses parts...
SAAK200 User Guide
Page 6
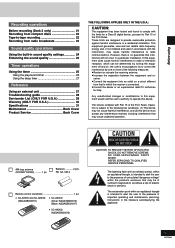
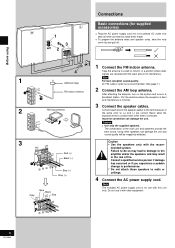
... exposed wires to walls or ceilings. 4 Connect the AC power supply cord. Consult a qualified service person if damage has occurred or if you experience a sudden change in a broadcast station. Using other when connected. Note For best reception sound quality: An FM outdoor antenna is for supplied accessories) • Plug the AC power supply cord into a household AC outlet only after all other equipment. 6 RQT6085 Caution • Use the speakers only...
... exposed wires to walls or ceilings. 4 Connect the AC power supply cord. Consult a qualified service person if damage has occurred or if you experience a sudden change in a broadcast station. Using other when connected. Note For best reception sound quality: An FM outdoor antenna is for supplied accessories) • Plug the AC power supply cord into a household AC outlet only after all other equipment. 6 RQT6085 Caution • Use the speakers only...
SAAK200 User Guide
Page 8
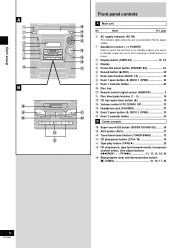
... Remote control signal sensor (SENSOR 5 # Disc direct play buttons (1 ~ 5 16 $ CD tray open/close button (c 16 % Volume control (VOL DOWN, UP 12 & Headphone jack (PHONES 27 ( Deck 2 open button (c DECK 1 OPEN 20 9 Deck 1 cassette holder 20 ! In standby mode, the unit is connected to the AC power supply. 2 Standby/on switch (f/I, POWER) Press to switch the unit from on to standby mode or vice versa. Name Ref. Before using A B 18 19 20 SUPER SOUND EQ AUX TUNER/BAND TAPE CD 21 22 REW DEMO...
... Remote control signal sensor (SENSOR 5 # Disc direct play buttons (1 ~ 5 16 $ CD tray open/close button (c 16 % Volume control (VOL DOWN, UP 12 & Headphone jack (PHONES 27 ( Deck 2 open button (c DECK 1 OPEN 20 9 Deck 1 cassette holder 20 ! In standby mode, the unit is connected to the AC power supply. 2 Standby/on switch (f/I, POWER) Press to switch the unit from on to standby mode or vice versa. Name Ref. Before using A B 18 19 20 SUPER SOUND EQ AUX TUNER/BAND TAPE CD 21 22 REW DEMO...
SAAK200 User Guide
Page 9
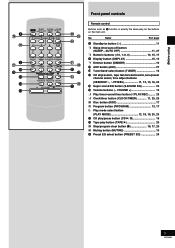
.../on the main unit. Clock/timer button (CLOCK/TIMER 11, 25, 26 @ Disc button (DISC 17 [ Program button (PROGRAM 13, 17 \ Play mode select button (PLAY MODE 12, 18, 19, 20, 23 - VOLUME 12 > Play timer/record timer button (rPLAY/REC) ......... 25 ? Sleep timer/auto off button (SLEEP, -AUTO OFF 11, 27 < Numeric buttons (≥10, 1-9, 0 13, 15, 17 3 Display button (DISPLAY 15, 19 = Dimmer button (DIMMER 10 + AUX button (AUX 27 , Tuner/band select button (TUNER 12 / CD skip/search, tape fast-forward/rewind, tune/preset channel select, time adjust buttons (g/REW/4, 3/FF/f 11...
.../on the main unit. Clock/timer button (CLOCK/TIMER 11, 25, 26 @ Disc button (DISC 17 [ Program button (PROGRAM 13, 17 \ Play mode select button (PLAY MODE 12, 18, 19, 20, 23 - VOLUME 12 > Play timer/record timer button (rPLAY/REC) ......... 25 ? Sleep timer/auto off button (SLEEP, -AUTO OFF 11, 27 < Numeric buttons (≥10, 1-9, 0 13, 15, 17 3 Display button (DISPLAY 15, 19 = Dimmer button (DIMMER 10 + AUX button (AUX 27 , Tuner/band select button (TUNER 12 / CD skip/search, tape fast-forward/rewind, tune/preset channel select, time adjust buttons (g/REW/4, 3/FF/f 11...
SAAK200 User Guide
Page 10
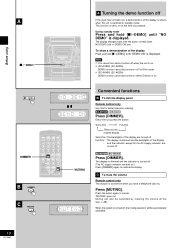
...-AK200) DEMO function cannot be cancelled by lowering the volume all the way (--dB). During standby mode Press and hold [L/-DEMO] until "NO DEMO" is turned off. (The AC supply indicator remains on at the time of the display and the indicator, except for better television viewing. Convenient functions B To dim the display panel Remote control only Use this for the AC supply indicator, are turned off. Press...
...-AK200) DEMO function cannot be cancelled by lowering the volume all the way (--dB). During standby mode Press and hold [L/-DEMO] until "NO DEMO" is turned off. (The AC supply indicator remains on at the time of the display and the indicator, except for better television viewing. Convenient functions B To dim the display panel Remote control only Use this for the AC supply indicator, are turned off. Press...
SAAK200 User Guide
Page 12
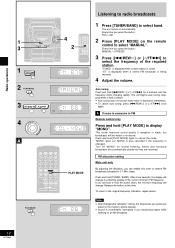
...; Auto tuning may not function when there is tuned. Turn off "MONO" for a moment until the frequency starts changing rapidly. If you previously preset in the memory will be cleared. • Sound is momentarily interrupted if you can enable this time. Release the button at this tuner to receive FM broadcasts allocated in FM Remote control only Press and hold [PLAY MODE] again to select "MANUAL". "TUNED" is displayed when a radio station...
...; Auto tuning may not function when there is tuned. Turn off "MONO" for a moment until the frequency starts changing rapidly. If you previously preset in the memory will be cleared. • Sound is momentarily interrupted if you can enable this time. Release the button at this tuner to receive FM broadcasts allocated in FM Remote control only Press and hold [PLAY MODE] again to select "MANUAL". "TUNED" is displayed when a radio station...
SAAK200 User Guide
Page 14
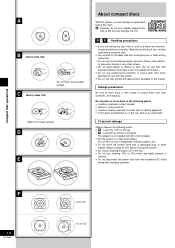
... the system while tray is not needed with 8 cm CDs (singles). • Set the system on the rear deck of the sort can only play compact discs having this mark. Wipe from tape or left over peeled off with a soft, dry, lint-free cloth before moving the system. • Do not put anything except a CD in their cases to clean CDs Do not...
... the system while tray is not needed with 8 cm CDs (singles). • Set the system on the rear deck of the sort can only play compact discs having this mark. Wipe from tape or left over peeled off with a soft, dry, lint-free cloth before moving the system. • Do not put anything except a CD in their cases to clean CDs Do not...
SAAK200 User Guide
Page 15
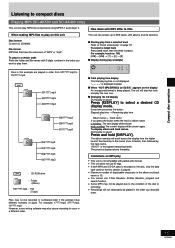
.... L Changing the CD display During play or pause Press and hold [DISPLAY]. File format MP3 files that track and play " on the disc, only the data type used for the first session is played. • Maximum number of "MP3" or "mp3". L When "NOT MP3/ERR0E2 (or E3/E4)" appears on this example are played in a different order. → L Total playing time display The total playing time is not displayed...
.... L Changing the CD display During play or pause Press and hold [DISPLAY]. File format MP3 files that track and play " on the disc, only the data type used for the first session is played. • Maximum number of "MP3" or "mp3". L When "NOT MP3/ERR0E2 (or E3/E4)" appears on this example are played in a different order. → L Total playing time display The total playing time is not displayed...
SAAK200 User Guide
Page 16
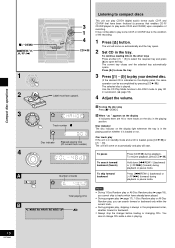
... not. Compact disc operations 3 1 4 DEMO 1 1 5 2 43 2 Label must face upward. 3 1 5 2 43 Track number Disc indicator Elapsed playing time (Of current track number) 4 DOWN VOL UP A Number of tracks Total playing time B Listening to compact discs This unit can play CD-DA (digital audio) format audio CD-R and CD-RW that enables CD-R/ CD-RW players to play Press [L/-DEMO]. Hold down [g/REW/4] (backward) or [3/FF/f] (forward) during playback or pause mode. The current tray closes and the selected tray automatically opens. The unit will come on...
... not. Compact disc operations 3 1 4 DEMO 1 1 5 2 43 2 Label must face upward. 3 1 5 2 43 Track number Disc indicator Elapsed playing time (Of current track number) 4 DOWN VOL UP A Number of tracks Total playing time B Listening to compact discs This unit can play CD-DA (digital audio) format audio CD-R and CD-RW that enables CD-R/ CD-RW players to play Press [L/-DEMO]. Hold down [g/REW/4] (backward) or [3/FF/f] (forward) during playback or pause mode. The current tray closes and the selected tray automatically opens. The unit will come on...
SAAK200 User Guide
Page 18
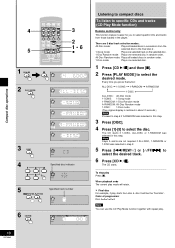
... selected disc in random order. When playback ends The current play starts from disc 4, disc 3 will retain. 4 5 1 2 Compact disc operations 3 DISC 4 5 6 18 RQT6085 3 2 1 • 6 Specified disc indicator Specified track number Listening to compact discs To listen to specific CDs and tracks (CD Play Mode function) Remote control only This function makes it easier for you press the button: ALL-DISC 1-SONG 1-RANDOM A-RANDOM 1-DISC ALL-DISC: All-Disc mode 1-SONG: 1-Song mode 1-RANDOM: 1-Disc Random mode A-RANDOM: All-Disc Random mode 1-DISC: 1-Disc mode (The original display is...
... selected disc in random order. When playback ends The current play starts from disc 4, disc 3 will retain. 4 5 1 2 Compact disc operations 3 DISC 4 5 6 18 RQT6085 3 2 1 • 6 Specified disc indicator Specified track number Listening to compact discs To listen to specific CDs and tracks (CD Play Mode function) Remote control only This function makes it easier for you press the button: ALL-DISC 1-SONG 1-RANDOM A-RANDOM 1-DISC ALL-DISC: All-Disc mode 1-SONG: 1-Song mode 1-RANDOM: 1-Disc Random mode A-RANDOM: All-Disc Random mode 1-DISC: 1-Disc mode (The original display is...

SAAK200 User Guide
Page 19
... the last track of the current track. 2 3 1 2 3 A B DISPLAY DISPLAY Compact disc operations Listening to compact discs Direct access play Remote control only 1 1 Press [DISC]. 2 (within 10 seconds or so. To cancel repeat play time Note When track number 25 or greater is cleared. Program the tracks you press the button: Elapsed play time ↔ Remaining play Press and hold [PLAY MODE] before or during playback, and make sure "REPEAT ON" and " " are displayed. During play with CD Play Mode function Set the desired mode (A page 18), press and hold [PLAY MODE] once...
... the last track of the current track. 2 3 1 2 3 A B DISPLAY DISPLAY Compact disc operations Listening to compact discs Direct access play Remote control only 1 1 Press [DISC]. 2 (within 10 seconds or so. To cancel repeat play time Note When track number 25 or greater is cleared. Program the tracks you press the button: Elapsed play time ↔ Remaining play Press and hold [PLAY MODE] before or during playback, and make sure "REPEAT ON" and " " are displayed. During play with CD Play Mode function Set the desired mode (A page 18), press and hold [PLAY MODE] once...
SAAK200 User Guide
Page 20
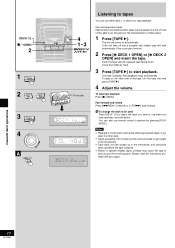
... played. • Failure to operate endless tapes correctly may cause the tape to start automatically (One touch play function). 2 Press [c DECK 1 OPEN] or [c DECK 2 OPEN] and insert the tape. A To change the deck to be used Press [DECK 1/2] to select the deck you want to the characteristics of the tape, turn the tape over and press [TAPE :]. 4 Adjust the volume. Cassette deck operations 20 RQT6085 To stop tape playback Press [L/-DEMO]. Use normal position tapes...
... played. • Failure to operate endless tapes correctly may cause the tape to start automatically (One touch play function). 2 Press [c DECK 1 OPEN] or [c DECK 2 OPEN] and insert the tape. A To change the deck to be used Press [DECK 1/2] to select the deck you want to the characteristics of the tape, turn the tape over and press [TAPE :]. 4 Adjust the volume. Cassette deck operations 20 RQT6085 To stop tape playback Press [L/-DEMO]. Use normal position tapes...
SAAK200 User Guide
Page 22
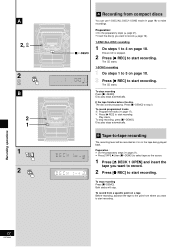
.... Disc play stops automatically. To stop recording Press [L/-DEMO]. To record programmed tracks 1 Program the tracks (z page 17). 2 Press [a REC] to start recording. Preparation: • Do the preparatory steps (z page 21). • Insert the disc(s) you want to record (z page 16). 1-DISC/ALL-DISC recording 1 Do steps 1 to 4 on a tape Before recording, advance the tape to the point from compact discs You can use 1-DISC/ALL-DISC/1-SONG mode (z page 18) to make recordings. A REC B 2 1 1 DECK 1 OPEN 2 REC Recording operations 22...
.... Disc play stops automatically. To stop recording Press [L/-DEMO]. To record programmed tracks 1 Program the tracks (z page 17). 2 Press [a REC] to start recording. Preparation: • Do the preparatory steps (z page 21). • Insert the disc(s) you want to record (z page 16). 1-DISC/ALL-DISC recording 1 Do steps 1 to 4 on a tape Before recording, advance the tape to the point from compact discs You can use 1-DISC/ALL-DISC/1-SONG mode (z page 18) to make recordings. A REC B 2 1 1 DECK 1 OPEN 2 REC Recording operations 22...
SAAK200 User Guide
Page 25
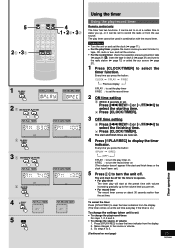
... the source or volume. 3. Every time you press the button: CLOCK PLAY REC Previous display rPLAY : to clear the timer indicator from the display. (The timer comes on ) • To change the settings (when unit is on at the preset time with the record timer. Press [rPLAY/REC] to set the play /record timer Remote control only The timer has two functions. Every time you press the button: PLAY REC (OFF) rPLAY : to turn the record timer on next page...
... the source or volume. 3. Every time you press the button: CLOCK PLAY REC Previous display rPLAY : to clear the timer indicator from the display. (The timer comes on ) • To change the settings (when unit is on at the preset time with the record timer. Press [rPLAY/REC] to set the play /record timer Remote control only The timer has two functions. Every time you press the button: PLAY REC (OFF) rPLAY : to turn the record timer on next page...
SAAK200 User Guide
Page 26
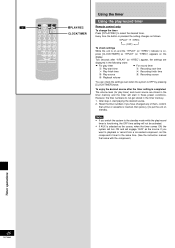
... to playback or record from a connected component, set the component's timer to select the desired timer. However, the Disc numbers do not get stored in the following order: • For play /record timer Remote control only To change the timer Press [rPLAY/REC] to the same time. (See the instruction manual that a Disc or cassette is completed The volume level (for play /record timer is functioning, the OFF time setting will not be activated. • If AUX is...
... to playback or record from a connected component, set the component's timer to select the desired timer. However, the Disc numbers do not get stored in the following order: • For play /record timer Remote control only To change the timer Press [rPLAY/REC] to the same time. (See the instruction manual that a Disc or cassette is completed The volume level (for play /record timer is functioning, the OFF time setting will not be activated. • If AUX is...
SAAK200 User Guide
Page 28
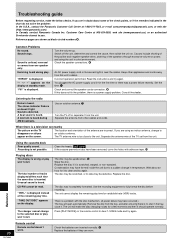
...play time for variable bit rate (VBR) tracks. The disc was a power failure recently. The unit cannot display the remaining play . Reference 28 RQT6085 Remote control Remote control doesn't work. Common Problems No sound. Check the speaker connections. 6 An AC power supply cord or fluorescent light is a power supply problem. Read the instructions and try again. Check and correct the speaker cords connection. 6 If this unit's cables. A beat sound is displayed. Clean the heads. Press [PLAY MODE] on . Troubleshooting guide Before requesting service, make the disc...
...play time for variable bit rate (VBR) tracks. The disc was a power failure recently. The unit cannot display the remaining play . Reference 28 RQT6085 Remote control Remote control doesn't work. Common Problems No sound. Check the speaker connections. 6 An AC power supply cord or fluorescent light is a power supply problem. Read the instructions and try again. Check and correct the speaker cords connection. 6 If this unit's cables. A beat sound is displayed. Clean the heads. Press [PLAY MODE] on . Troubleshooting guide Before requesting service, make the disc...
SAAK200 User Guide
Page 30
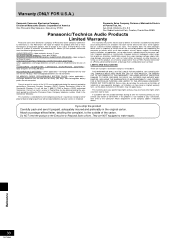
... repair or replace this product develops during normal use of a defect in shipment or failures which are caused by products not supplied by contacting a Panasonic Services Company (PASC) Factory Servicenter listed in the original carton. If a problem with this product with a new or refurbished one for ten (10) days. Serial No. TECHNICS STAND ALONE SPEAKERS, SUBWOOFER SPEAKERS-labor and parts for one (1) year. USB READER-WRITER, PERSONAL COMPUTER CARD ADAPTERS...
... repair or replace this product develops during normal use of a defect in shipment or failures which are caused by products not supplied by contacting a Panasonic Services Company (PASC) Factory Servicenter listed in the original carton. If a problem with this product with a new or refurbished one for ten (10) days. Serial No. TECHNICS STAND ALONE SPEAKERS, SUBWOOFER SPEAKERS-labor and parts for one (1) year. USB READER-WRITER, PERSONAL COMPUTER CARD ADAPTERS...
SAAK200 User Guide
Page 32
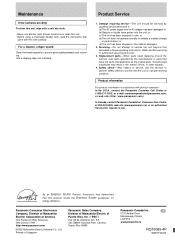
.... Reference As an ENERGY STAR® Partner, Panasonic has determined that this unit. • Before using a chemically treated cloth, read the instructions that described in fire, electric shock, or other servicing to authorized servicing personnel. 3. Product Service 1. Replacement parts -When parts need replacing ensure the servicer uses parts specified by qualified service personnel if: (a)The AC power supply cord or AC adaptor has been damaged; Maintenance If the surfaces are...
.... Reference As an ENERGY STAR® Partner, Panasonic has determined that this unit. • Before using a chemically treated cloth, read the instructions that described in fire, electric shock, or other servicing to authorized servicing personnel. 3. Product Service 1. Replacement parts -When parts need replacing ensure the servicer uses parts specified by qualified service personnel if: (a)The AC power supply cord or AC adaptor has been damaged; Maintenance If the surfaces are...


