

Vhs-c Camcorder
Page 6
... Mode 14 Setting the Clock (Time Zone, Auto Daylight Saving Time 15~16 AccuBrite™ Built-in Light (Using the Light, Replacing the Bulb 17 Camera Recording (Basic, Stand-by, Programmed Recording 18~20 Playing Back Recordings (Basic Playback, Visual Search, Still Picture, Tracking, TV/VCR Playback 21~22 Copying your... Warranty 42 Customer Services Directory 43 Index ...44 6 For assistance, please call : 1-800-211-PANA(7262) or, contact us via the web at:http://www.panasonic.com/contactinfo
... Mode 14 Setting the Clock (Time Zone, Auto Daylight Saving Time 15~16 AccuBrite™ Built-in Light (Using the Light, Replacing the Bulb 17 Camera Recording (Basic, Stand-by, Programmed Recording 18~20 Playing Back Recordings (Basic Playback, Visual Search, Still Picture, Tracking, TV/VCR Playback 21~22 Copying your... Warranty 42 Customer Services Directory 43 Index ...44 6 For assistance, please call : 1-800-211-PANA(7262) or, contact us via the web at:http://www.panasonic.com/contactinfo
Vhs-c Camcorder
Page 7
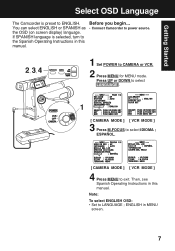
... language is preset to LANGUAGE ; Press UP or DOWN to select LANGUAGE . 1 [ CAMERA MODE ] [ VCR MODE ] 3 Press M.FOCUS to the Spanish Operating Instructions in this manual. Getting Started Select OSD Language The Camcorder is selected, turn to select IDIOMA ; Note: To select ENGLISH OSD: • Set... to ENGLISH. Before you begin... • Connect Camcorder to power source. 2, 3, 4 1 Set POWER to exit. Then, see Spanish Operating Instructions in MENU screen. 7 ENGLISH in this manual...
... language is preset to LANGUAGE ; Press UP or DOWN to select LANGUAGE . 1 [ CAMERA MODE ] [ VCR MODE ] 3 Press M.FOCUS to the Spanish Operating Instructions in this manual. Getting Started Select OSD Language The Camcorder is selected, turn to select IDIOMA ; Note: To select ENGLISH OSD: • Set... to ENGLISH. Before you begin... • Connect Camcorder to power source. 2, 3, 4 1 Set POWER to exit. Then, see Spanish Operating Instructions in MENU screen. 7 ENGLISH in this manual...
Vhs-c Camcorder
Page 8
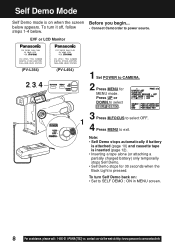
... battery) only temporarily stops Self Demo. • Self Demo stops for MENU mode. below . steps 1-4 below appears. To turn it off, follow • Connect Camcorder to power source. Self Demo Mode Self Demo mode is on : • Set to SELF DEMO ; Press UP or DOWN to select SELF DEMO . 1 3 ...Press M.FOCUS to select OFF. 4 Press MENU to CAMERA. 2 Press MENU for 30 seconds when the Back Light is pressed. ON in MENU screen. 8 For assistance, please call : 1-800-211-PANA(7262) or, contact...
... battery) only temporarily stops Self Demo. • Self Demo stops for MENU mode. below . steps 1-4 below appears. To turn it off, follow • Connect Camcorder to power source. Self Demo Mode Self Demo mode is on : • Set to SELF DEMO ; Press UP or DOWN to select SELF DEMO . 1 3 ...Press M.FOCUS to select OFF. 4 Press MENU to CAMERA. 2 Press MENU for 30 seconds when the Back Light is pressed. ON in MENU screen. 8 For assistance, please call : 1-800-211-PANA(7262) or, contact...

Vhs-c Camcorder
Page 9
... the LCD Monitor See page 21. 1 Press LCD-OPEN to unlock the LCD monitor. Swing it fully open and adjust the angle. 2 Set POWER to CAMERA. 3 Press RECORD/PAUSE to start playback. 5 Press (STOP) to close door. Swing it fully open door. 3Insert cassette (page 12). 4Press here to stop playback...
... the LCD Monitor See page 21. 1 Press LCD-OPEN to unlock the LCD monitor. Swing it fully open and adjust the angle. 2 Set POWER to CAMERA. 3 Press RECORD/PAUSE to start playback. 5 Press (STOP) to close door. Swing it fully open door. 3Insert cassette (page 12). 4Press here to stop playback...
Vhs-c Camcorder
Page 14
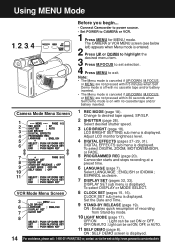
... CAMERA or VCR. 1 Press MENU for MENU mode. To select DIGITAL ZOOM, MOTIONSENSOR, or FADE. 7 8 5 PROGRAMMED REC (page 20). ON : Enables quick resumption of recording from Stand-by mode. 10 LIGHT MODE (page 17). Camcorder starts and stops recording at :http://www.panasonic.com.../contactinfo ON : SELF DEMO screen is displayed. Using MENU Mode 1, 2, 3, 4 Before you begin... • Connect Camcorder to power source. • Set POWER to desired tape ...
... CAMERA or VCR. 1 Press MENU for MENU mode. To select DIGITAL ZOOM, MOTIONSENSOR, or FADE. 7 8 5 PROGRAMMED REC (page 20). ON : Enables quick resumption of recording from Stand-by mode. 10 LIGHT MODE (page 17). Camcorder starts and stops recording at :http://www.panasonic.com.../contactinfo ON : SELF DEMO screen is displayed. Using MENU Mode 1, 2, 3, 4 Before you begin... • Connect Camcorder to power source. • Set POWER to desired tape ...
Vhs-c Camcorder
Page 15
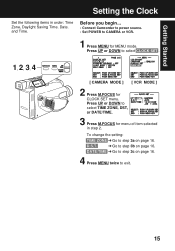
...item selected in order: Time Zone, Daylight Saving Time, Date, and Time. Press UP or DOWN to exit. 15 D.S.T. ➔ Go to CAMERA or VCR. 1 Press MENU for CLOCK SET menu. Getting Started Setting the Clock Set the following items in step 2. Before you begin... • ...Connect Camcorder to power source. • Set POWER to step 3b on page 16. To change the setting: TIME ZONE ➔ Go to select CLOCK SET . 1, 2, 3, 4 [ CAMERA MODE ] [ VCR MODE ] 2 Press M.FOCUS for MENU mode. Press UP...
...item selected in order: Time Zone, Daylight Saving Time, Date, and Time. Press UP or DOWN to exit. 15 D.S.T. ➔ Go to CAMERA or VCR. 1 Press MENU for CLOCK SET menu. Getting Started Setting the Clock Set the following items in step 2. Before you begin... • ...Connect Camcorder to power source. • Set POWER to step 3b on page 16. To change the setting: TIME ZONE ➔ Go to select CLOCK SET . 1, 2, 3, 4 [ CAMERA MODE ] [ VCR MODE ] 2 Press M.FOCUS for MENU mode. Press UP...
Vhs-c Camcorder
Page 17
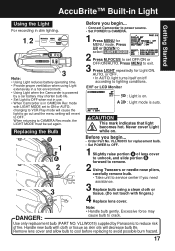
... force may shorten bulb life. • Set Light to OFF when not in use. • When Camcorder is in a hot environment. • Using Light when the Camcorder is powered by Panasonic to reduce risk of lens cover to unhook, and slide portion B forward to remove. 2 Using Tweezers or... needle-nose pliers, carefully remove bulb. • Take unit to service center if you need assistance. 3 Replace bulb using Light extensively in CAMERA Rec mode...
... force may shorten bulb life. • Set Light to OFF when not in use. • When Camcorder is in a hot environment. • Using Light when the Camcorder is powered by Panasonic to reduce risk of lens cover to unhook, and slide portion B forward to remove. 2 Using Tweezers or... needle-nose pliers, carefully remove bulb. • Take unit to service center if you need assistance. 3 Replace bulb using Light extensively in CAMERA Rec mode...
Vhs-c Camcorder
Page 18
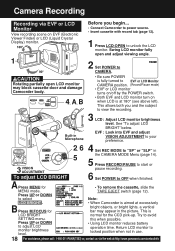
... LCD BRIGHT normal for the CCD pick-up. A Press MENU for bright objects, or bright lights, a vertical bar may block cassette door and damage Camcorder body. 4, A, B • Be sure POWER is at 180° (see above left). this when possible. • Using LCD monitor reduces... ADJUSTMENT To adjust LCD BRIGHT pause recording. 6 Set POWER to CAMERA. This is aimed at excessively B Press M.FOCUS for • To remove the cassette, slide the MENU mode. Camera Recording Recording via the web at:http://www.panasonic.com/contactinfo See "To adjust LCD BRIGHT" below. Before you...
... LCD BRIGHT normal for the CCD pick-up. A Press MENU for bright objects, or bright lights, a vertical bar may block cassette door and damage Camcorder body. 4, A, B • Be sure POWER is at 180° (see above left). this when possible. • Using LCD monitor reduces... ADJUSTMENT To adjust LCD BRIGHT pause recording. 6 Set POWER to CAMERA. This is aimed at excessively B Press M.FOCUS for • To remove the cassette, slide the MENU mode. Camera Recording Recording via the web at:http://www.panasonic.com/contactinfo See "To adjust LCD BRIGHT" below. Before you...

Vhs-c Camcorder
Page 19
... Battery. Easy Edit Stand-by mode to conserve battery. When set POWER to CAMERA. 2 Press MENU for 5 minutes, Camcorder switches to CAMERA. ON : From Stand-by mode, set to OFF at the factory. 1 Set POWER to CAMERA. c Press (PLAY/STILL) where you want to VCR. b Set POWER ...is set POWER to OFF, then to Stand-by For a smooth transition between scenes if recording is resumed. 19 Basic Operation Camera Recording Before you begin... • Connect Camcorder to review recording. b Press (PLAY/STILL) to power source. • Insert cassette with record tab (page 12). C...
... Battery. Easy Edit Stand-by mode to conserve battery. When set POWER to CAMERA. 2 Press MENU for 5 minutes, Camcorder switches to CAMERA. ON : From Stand-by mode, set to OFF at the factory. 1 Set POWER to CAMERA. c Press (PLAY/STILL) where you want to VCR. b Set POWER ...is set POWER to OFF, then to Stand-by For a smooth transition between scenes if recording is resumed. 19 Basic Operation Camera Recording Before you begin... • Connect Camcorder to review recording. b Press (PLAY/STILL) to power source. • Insert cassette with record tab (page 12). C...
Vhs-c Camcorder
Page 20
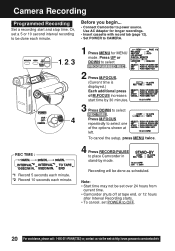
...from current time. • Camcorder shuts off at tape end, or 12 hours after Interval Recording starts. • To cancel, set a 5 or 10 second interval recording to select PROGRAMMED REC . 2 Press M.FOCUS. (Current time is displayed.) Each additional press of the options shown at :http://www.panasonic.com/contactinfo Or, set ... time may not be done as scheduled. Use AC Adaptor for MENU mode. To cancel the setup, press MENU twice. 4 Press RECORD/PAUSE to CAMERA. Press M.FOCUS repeatedly to select one of M.FOCUS increases start and stop time. Before you begin... • Connect...
...from current time. • Camcorder shuts off at tape end, or 12 hours after Interval Recording starts. • To cancel, set a 5 or 10 second interval recording to select PROGRAMMED REC . 2 Press M.FOCUS. (Current time is displayed.) Each additional press of the options shown at :http://www.panasonic.com/contactinfo Or, set ... time may not be done as scheduled. Use AC Adaptor for MENU mode. To cancel the setup, press MENU twice. 4 Press RECORD/PAUSE to CAMERA. Press M.FOCUS repeatedly to select one of M.FOCUS increases start and stop time. Before you begin... • Connect...
Vhs-c Camcorder
Page 22
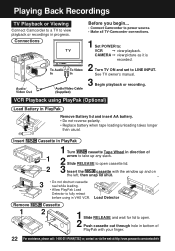
CAMERA © view picture as it is recorded. 2 Turn TV ON and set to : VCR © view playback. See TV owner's manual. 3 Begin playback or recording. VCR Playback using in VHS VCR. Load Detector Cassette 2 1 Slide RELEASE and wait for lid to open... cassette lid. 2 3 Insert the cassette with your finger. 22 For assistance, please call : 1-800-211-PANA(7262) or, contact us via the web at:http://www.panasonic.com/contactinfo Connections Audio/ Video Out Before you begin... • Connect Camcorder...
CAMERA © view picture as it is recorded. 2 Turn TV ON and set to : VCR © view playback. See TV owner's manual. 3 Begin playback or recording. VCR Playback using in VHS VCR. Load Detector Cassette 2 1 Slide RELEASE and wait for lid to open... cassette lid. 2 3 Insert the cassette with your finger. 22 For assistance, please call : 1-800-211-PANA(7262) or, contact us via the web at:http://www.panasonic.com/contactinfo Connections Audio/ Video Out Before you begin... • Connect Camcorder...
Vhs-c Camcorder
Page 24
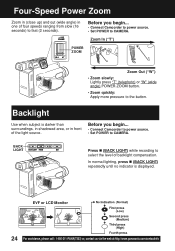
...subject is displayed. Before you begin ... • Connect Camcorder to power source. • Set POWER to CAMERA. EVF or LCD Monitor 24 For assistance, please call : 1-800-211-PANA(7262) or, contact us via the web at:http://www.panasonic.com/contactinfo Four-Speed Power Zoom Zoom in (close up)... and out (wide angle) in front of the light source. Before you begin ... • Connect Camcorder to power source. • Set POWER to CAMERA. BACK LIGHT Press (BACK LIGHT) while recording...
...subject is displayed. Before you begin ... • Connect Camcorder to power source. • Set POWER to CAMERA. EVF or LCD Monitor 24 For assistance, please call : 1-800-211-PANA(7262) or, contact us via the web at:http://www.panasonic.com/contactinfo Four-Speed Power Zoom Zoom in (close up)... and out (wide angle) in front of the light source. Before you begin ... • Connect Camcorder to power source. • Set POWER to CAMERA. BACK LIGHT Press (BACK LIGHT) while recording...
Vhs-c Camcorder
Page 25
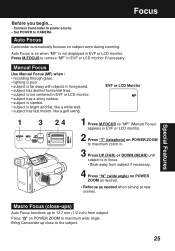
...desired. • Refocus as needed when aiming at new scenes. Bring Camcorder up to the subject. 25 Focus Before you begin... • Connect Camcorder to power source. • Set POWER to maximum wide angle. Auto Focus Camcorder automatically focuses on when "MF" is not displayed in EVF or LCD...or LCD Monitor 1 3 2, 4 1 Press M.FOCUS so "MF" (Manual Focus) appears in EVF or LCD monitor. 2 Press "T" (telephoto) on POWER ZOOM to CAMERA. Press "W" on POWER ZOOM to remove "MF" in focus. • Back away from subject. Auto Focus is bright and flat, like a white wall. • ...
...desired. • Refocus as needed when aiming at new scenes. Bring Camcorder up to the subject. 25 Focus Before you begin... • Connect Camcorder to power source. • Set POWER to maximum wide angle. Auto Focus Camcorder automatically focuses on when "MF" is not displayed in EVF or LCD...or LCD Monitor 1 3 2, 4 1 Press M.FOCUS so "MF" (Manual Focus) appears in EVF or LCD monitor. 2 Press "T" (telephoto) on POWER ZOOM to CAMERA. Press "W" on POWER ZOOM to remove "MF" in focus. • Back away from subject. Auto Focus is bright and flat, like a white wall. • ...
Vhs-c Camcorder
Page 26
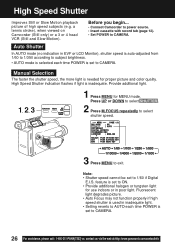
...light for use indoors or in inadequate light. • Setting reverts to CAMERA. Provide additional light. 1, 2, 3 1 Press MENU for proper picture and color quality. feature is needed for MENU mode. a tennis stroke), when viewed on Camcorder (Still only) or a 3 or 4 head VCR (Still and Slow...60 if Digital E.I.S. High Speed Shutter indication flashes if light is set to CAMERA. 26 For assistance, please call : 1-800-211-PANA(7262) or, contact us via the web at:http://www.panasonic.com/contactinfo Fluorescent light degrades picture. • Auto Focus may not function...
...light for use indoors or in inadequate light. • Setting reverts to CAMERA. Provide additional light. 1, 2, 3 1 Press MENU for proper picture and color quality. feature is needed for MENU mode. a tennis stroke), when viewed on Camcorder (Still only) or a 3 or 4 head VCR (Still and Slow...60 if Digital E.I.S. High Speed Shutter indication flashes if light is set to CAMERA. 26 For assistance, please call : 1-800-211-PANA(7262) or, contact us via the web at:http://www.panasonic.com/contactinfo Fluorescent light degrades picture. • Auto Focus may not function...
Vhs-c Camcorder
Page 27
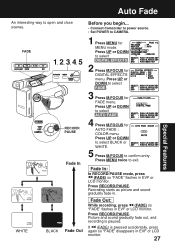
... select DIGITAL EFFECTS . 2 Press M.FOCUS for DIGITAL EFFECTS menu. Press UP or DOWN to CAMERA. 1 Press MENU for FADE menu. Press RECORD/PAUSE. FADE 1, 2, 3, 4, 5 RECORD/ PAUSE Fade In WHITE BLACK Fade Out Before you begin... • Connect Camcorder to power source. • Set POWER to select FADE . 3 Press M.FOCUS for MENU mode...
... select DIGITAL EFFECTS . 2 Press M.FOCUS for DIGITAL EFFECTS menu. Press UP or DOWN to CAMERA. 1 Press MENU for FADE menu. Press RECORD/PAUSE. FADE 1, 2, 3, 4, 5 RECORD/ PAUSE Fade In WHITE BLACK Fade Out Before you begin... • Connect Camcorder to power source. • Set POWER to select FADE . 3 Press M.FOCUS for MENU mode...
Vhs-c Camcorder
Page 28
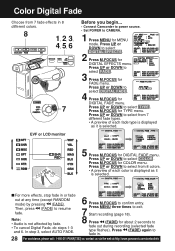
... 18). Press UP or DOWN to CAMERA. 1 Press MENU for MENU mode. I For more effects, stop fade in or fade out at :http://www.panasonic.com/contactinfo Color Digital Fade Choose from 7 fade effects in 8 different colors. 8 1, 2, 3, 4, 5, 6 7 EVF or LCD monitor Before you begin... • Connect Camcorder to power source. • Set POWER...
... 18). Press UP or DOWN to CAMERA. 1 Press MENU for MENU mode. I For more effects, stop fade in or fade out at :http://www.panasonic.com/contactinfo Color Digital Fade Choose from 7 fade effects in 8 different colors. 8 1, 2, 3, 4, 5, 6 7 EVF or LCD monitor Before you begin... • Connect Camcorder to power source. • Set POWER...
Vhs-c Camcorder
Page 29
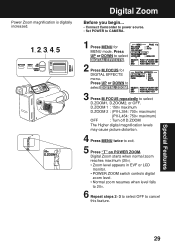
...; Normal zoom resumes when level falls to 20×. 6 Repeat steps 2~3 to select OFF to CAMERA. 1 Press MENU for DIGITAL EFFECTS menu. Power Zoom magnification is digitally increased. 1, 2, 3, 4, 5 Digital Zoom Before you begin... • Connect Camcorder to power source. • Set POWER to cancel this feature. Press UP or DOWN to select...
...; Normal zoom resumes when level falls to 20×. 6 Repeat steps 2~3 to select OFF to CAMERA. 1 Press MENU for DIGITAL EFFECTS menu. Power Zoom magnification is digitally increased. 1, 2, 3, 4, 5 Digital Zoom Before you begin... • Connect Camcorder to power source. • Set POWER to cancel this feature. Press UP or DOWN to select...
Vhs-c Camcorder
Page 30
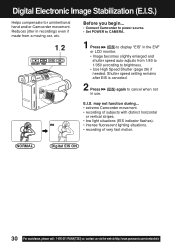
...when not E.I .S.) Helps compensate for unintentional hand and/or Camcorder movement. NORMAL Digital EIS ON 30 For assistance, please call : 1-800-211-PANA(7262) or, contact us via the web at:http://www.panasonic.com/contactinfo Shutter speed setting remains after EIS is canceled.... 2 Press in the EVF or LCD monitor. • Image becomes slightly enlarged and shutter speed auto-adjusts from a moving car, etc. 1, 2 Before you begin... • Connect Camcorder to power source. • Set POWER to CAMERA....
...when not E.I .S.) Helps compensate for unintentional hand and/or Camcorder movement. NORMAL Digital EIS ON 30 For assistance, please call : 1-800-211-PANA(7262) or, contact us via the web at:http://www.panasonic.com/contactinfo Shutter speed setting remains after EIS is canceled.... 2 Press in the EVF or LCD monitor. • Image becomes slightly enlarged and shutter speed auto-adjusts from a moving car, etc. 1, 2 Before you begin... • Connect Camcorder to power source. • Set POWER to CAMERA....
Vhs-c Camcorder
Page 31
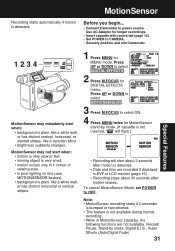
... flash.) • Recording will start when: • background is plain, like a venetian blind. • brightness suddenly changes. Press UP or DOWN to CAMERA. • Securely position and aim Camcorder. To cancel MotionSensor Mode, set POWER to power source. MotionSensor may mistakenly start about 30 seconds after motion ceases. Note: • MotionSensor recording...
... flash.) • Recording will start when: • background is plain, like a venetian blind. • brightness suddenly changes. Press UP or DOWN to CAMERA. • Securely position and aim Camcorder. To cancel MotionSensor Mode, set POWER to power source. MotionSensor may mistakenly start about 30 seconds after motion ceases. Note: • MotionSensor recording...

Vhs-c Camcorder
Page 32
... level can be displayed. 2, 3, 4, 5, 6 1 Battery Remaining: Tape Remaining: Before you begin... • Connect Camcorder to power source. 1 Set POWER to CAMERA. 2 Press MENU for MODE SELECT menu. 5 Press M.FOCUS repeatedly to select the following displays. Press UP or DOWN... to exit. • Tape remaining indicator operates a few seconds after tape starts moving. 32 For assistance, please call : 1-800-211-PANA(7262) or, contact us via the web at:http://www.panasonic...
... level can be displayed. 2, 3, 4, 5, 6 1 Battery Remaining: Tape Remaining: Before you begin... • Connect Camcorder to power source. 1 Set POWER to CAMERA. 2 Press MENU for MODE SELECT menu. 5 Press M.FOCUS repeatedly to select the following displays. Press UP or DOWN... to exit. • Tape remaining indicator operates a few seconds after tape starts moving. 32 For assistance, please call : 1-800-211-PANA(7262) or, contact us via the web at:http://www.panasonic...
