

Vhs-c Camcorder
Page 6
... Mode 14 Setting the Clock (Time Zone, Auto Daylight Saving Time 15~16 AccuBrite™ Built-in Light (Using the Light, Replacing the Bulb 17 Camera Recording (Basic, Stand-by, Programmed Recording 18~20 Playing Back Recordings (Basic Playback, Visual Search, Still Picture, Tracking, TV/VCR Playback 21~22 Copying your... Warranty 42 Customer Services Directory 43 Index ...44 6 For assistance, please call : 1-800-211-PANA(7262) or, contact us via the web at:http://www.panasonic.com/contactinfo
... Mode 14 Setting the Clock (Time Zone, Auto Daylight Saving Time 15~16 AccuBrite™ Built-in Light (Using the Light, Replacing the Bulb 17 Camera Recording (Basic, Stand-by, Programmed Recording 18~20 Playing Back Recordings (Basic Playback, Visual Search, Still Picture, Tracking, TV/VCR Playback 21~22 Copying your... Warranty 42 Customer Services Directory 43 Index ...44 6 For assistance, please call : 1-800-211-PANA(7262) or, contact us via the web at:http://www.panasonic.com/contactinfo
Vhs-c Camcorder
Page 7
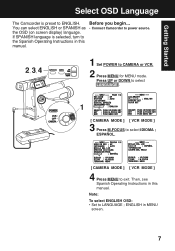
... to the Spanish Operating Instructions in MENU screen. 7 Then, see Spanish Operating Instructions in this manual. Before you begin... • Connect Camcorder to power source. 2, 3, 4 1 Set POWER to LANGUAGE ; Note: To select ENGLISH OSD: • Set to CAMERA or VCR. 2 Press MENU for MENU mode. Press UP or DOWN to select LANGUAGE...
... to the Spanish Operating Instructions in MENU screen. 7 Then, see Spanish Operating Instructions in this manual. Before you begin... • Connect Camcorder to power source. 2, 3, 4 1 Set POWER to LANGUAGE ; Note: To select ENGLISH OSD: • Set to CAMERA or VCR. 2 Press MENU for MENU mode. Press UP or DOWN to select LANGUAGE...
Vhs-c Camcorder
Page 8
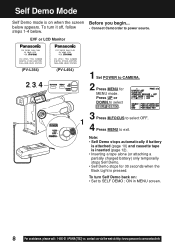
..., follow • Connect Camcorder to power source. Self Demo Mode Self Demo mode is on : • Set to SELF DEMO ; EVF or LCD Monitor (PV-L354) 2, 3, 4 (PV-L454) 1 Set POWER to exit. below . Press UP or DOWN to select SELF DEMO . 1 3 Press M.FOCUS to select OFF. 4 Press MENU to CAMERA. 2 Press MENU... screen Before you begin... ON in MENU screen. 8 For assistance, please call : 1-800-211-PANA(7262) or, contact us via the web at:http://www.panasonic.com/contactinfo
..., follow • Connect Camcorder to power source. Self Demo Mode Self Demo mode is on : • Set to SELF DEMO ; EVF or LCD Monitor (PV-L354) 2, 3, 4 (PV-L454) 1 Set POWER to exit. below . Press UP or DOWN to select SELF DEMO . 1 3 Press M.FOCUS to select OFF. 4 Press MENU to CAMERA. 2 Press MENU... screen Before you begin... ON in MENU screen. 8 For assistance, please call : 1-800-211-PANA(7262) or, contact us via the web at:http://www.panasonic.com/contactinfo

Vhs-c Camcorder
Page 9
...Charge Battery Pack fully before operation (page 10). 1 Plug in AC Adaptor. 2 Insert Battery. CHARGE Lamp flashes, then stays lit when charging is complete. Camera Recording See page 18. 1 Press LCD-OPEN to unlock the LCD monitor. Playback using the LCD Monitor See page 21. 1 Press LCD-OPEN to unlock.... Press RECORD/PAUSE again to start playback. 5 Press (STOP) to close door. Swing it fully open and adjust the angle. 2 Set POWER to CAMERA. 3 Press RECORD/PAUSE to pause recording. Swing it fully open door. 3Insert cassette (page 12). 4Press here to stop playback. 9
...Charge Battery Pack fully before operation (page 10). 1 Plug in AC Adaptor. 2 Insert Battery. CHARGE Lamp flashes, then stays lit when charging is complete. Camera Recording See page 18. 1 Press LCD-OPEN to unlock the LCD monitor. Playback using the LCD Monitor See page 21. 1 Press LCD-OPEN to unlock.... Press RECORD/PAUSE again to start playback. 5 Press (STOP) to close door. Swing it fully open and adjust the angle. 2 Set POWER to CAMERA. 3 Press RECORD/PAUSE to pause recording. Swing it fully open door. 3Insert cassette (page 12). 4Press here to stop playback. 9
Vhs-c Camcorder
Page 14
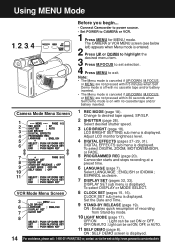
... To select DIGITAL ZOOM, MOTIONSENSOR, or FADE. 7 8 5 PROGRAMMED REC (page 20). Set the Date and Time. 9 STAND-BY RELEASE (page 19). Camera Mode Menu Screen 1 REC MODE (page 18). ON : Enables quick resumption of recording from Stand-by mode. 10 LIGHT MODE (page 17). Press M.FOCUS to...For assistance, please call : 1-800-211-PANA(7262) or, contact us via the web at a preset time. 9 6 LANGUAGE (page 7). 10 Select LANGUAGE ; Camcorder starts and stops recording at :http://www.panasonic.com/contactinfo DISPLAY SET sub menu is displayed. CLOCK SET sub menu is displayed.
... To select DIGITAL ZOOM, MOTIONSENSOR, or FADE. 7 8 5 PROGRAMMED REC (page 20). Set the Date and Time. 9 STAND-BY RELEASE (page 19). Camera Mode Menu Screen 1 REC MODE (page 18). ON : Enables quick resumption of recording from Stand-by mode. 10 LIGHT MODE (page 17). Press M.FOCUS to...For assistance, please call : 1-800-211-PANA(7262) or, contact us via the web at a preset time. 9 6 LANGUAGE (page 7). 10 Select LANGUAGE ; Camcorder starts and stops recording at :http://www.panasonic.com/contactinfo DISPLAY SET sub menu is displayed. CLOCK SET sub menu is displayed.
Vhs-c Camcorder
Page 15
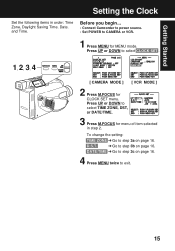
... VCR. 1 Press MENU for MENU mode. DATE/TIME ➔ Go to exit. 15 Before you begin... • Connect Camcorder to power source. • Set POWER to select CLOCK SET . 1, 2, 3, 4 [ CAMERA MODE ] [ VCR MODE ] 2 Press M.FOCUS for menu of item selected in order: Time Zone, Daylight Saving Time, Date, and Time. Getting Started...
... VCR. 1 Press MENU for MENU mode. DATE/TIME ➔ Go to exit. 15 Before you begin... • Connect Camcorder to power source. • Set POWER to select CLOCK SET . 1, 2, 3, 4 [ CAMERA MODE ] [ VCR MODE ] 2 Press M.FOCUS for menu of item selected in order: Time Zone, Daylight Saving Time, Date, and Time. Getting Started...
Vhs-c Camcorder
Page 17
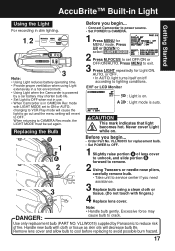
... Light to OFF when not in use. • When Camcorder is in a hot environment. • Using Light when the Camcorder is powered by Panasonic to avoid possible burn hazard. 17 Replacing the Bulb B 1 A 2 3 Before you begin ... • Connect Camcorder to power source. • Set POWER to lighting conditions....supplied by a car battery may DANGER: cause bulb to service center if you need assistance. 3 Replace bulb using Light extensively in CAMERA Rec mode with cloth or tissue as skin oils will revert to OFF. When returning to set again. CAUTION This mark indicates that ...
... Light to OFF when not in use. • When Camcorder is in a hot environment. • Using Light when the Camcorder is powered by Panasonic to avoid possible burn hazard. 17 Replacing the Bulb B 1 A 2 3 Before you begin ... • Connect Camcorder to power source. • Set POWER to lighting conditions....supplied by a car battery may DANGER: cause bulb to service center if you need assistance. 3 Replace bulb using Light extensively in CAMERA Rec mode with cloth or tissue as skin oils will revert to OFF. When returning to set again. CAUTION This mark indicates that ...
Vhs-c Camcorder
Page 18
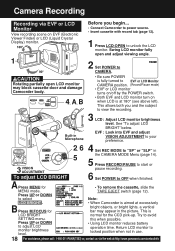
Press UP or DOWN to CAMERA. Built-in the picture. Swing LCD monitor fully open LCD monitor may appear in Microphone 3 LCD : Adjust LCD monitor brightness level. This allows both you begin... • Connect Camcorder to power source. • Insert cassette with record tab (... A Press MENU for the CCD pick-up. Camera Recording Recording via the web at:http://www.panasonic.com/contactinfo CAUTION Rotating partially open and adjust viewing angle. 1 2 Set POWER to select Note: LCD BRIGHT . • When Camcorder is at 180° (see above left). Try...
Press UP or DOWN to CAMERA. Built-in the picture. Swing LCD monitor fully open LCD monitor may appear in Microphone 3 LCD : Adjust LCD monitor brightness level. This allows both you begin... • Connect Camcorder to power source. • Insert cassette with record tab (... A Press MENU for the CCD pick-up. Camera Recording Recording via the web at:http://www.panasonic.com/contactinfo CAUTION Rotating partially open and adjust viewing angle. 1 2 Set POWER to select Note: LCD BRIGHT . • When Camcorder is at 180° (see above left). Try...

Vhs-c Camcorder
Page 19
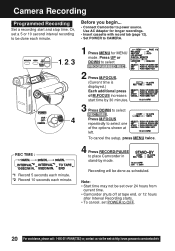
...left ) if more than 24 hours before recording is stopped, and then started within 24 hours. Press RECORD/ PAUSE to record. 4 Press MENU to CAMERA. C Set POWER to exit. D Press RECORD/PAUSE to stop recording. a Press RECORD/PAUSE to resume recording. d Press RECORD/PAUSE to rewind a...cassette in RECORD/PAUSE mode for MENU mode. c To resume recording, set to OFF at the factory. 1 Set POWER to CAMERA. 2 Press MENU for 5 minutes, Camcorder switches to Stand-by For a smooth transition between scenes if recording is resumed. 19 Easy Edit Stand-by mode to conserve battery...
...left ) if more than 24 hours before recording is stopped, and then started within 24 hours. Press RECORD/ PAUSE to record. 4 Press MENU to CAMERA. C Set POWER to exit. D Press RECORD/PAUSE to stop recording. a Press RECORD/PAUSE to resume recording. d Press RECORD/PAUSE to rewind a...cassette in RECORD/PAUSE mode for MENU mode. c To resume recording, set to OFF at the factory. 1 Set POWER to CAMERA. 2 Press MENU for 5 minutes, Camcorder switches to Stand-by For a smooth transition between scenes if recording is resumed. 19 Easy Edit Stand-by mode to conserve battery...
Vhs-c Camcorder
Page 20
...M.FOCUS. (Current time is displayed.) Each additional press of the options shown at :http://www.panasonic.com/contactinfo Note: • Start time may not be set over 24 hours from current time. • Camcorder shuts off at tape end, or 12 hours after Interval Recording starts. • To cancel.... 20 For assistance, please call : 1-800-211-PANA(7262) or, contact us via the web at left. Before you begin... • Connect Camcorder to CAMERA. Use AC Adaptor for MENU mode. Recording will be done each minute. REC TIME : 1, 2, 3 4 1 Press MENU for longer recordings. •...
...M.FOCUS. (Current time is displayed.) Each additional press of the options shown at :http://www.panasonic.com/contactinfo Note: • Start time may not be set over 24 hours from current time. • Camcorder shuts off at tape end, or 12 hours after Interval Recording starts. • To cancel.... 20 For assistance, please call : 1-800-211-PANA(7262) or, contact us via the web at left. Before you begin... • Connect Camcorder to CAMERA. Use AC Adaptor for MENU mode. Recording will be done each minute. REC TIME : 1, 2, 3 4 1 Press MENU for longer recordings. •...
Vhs-c Camcorder
Page 22
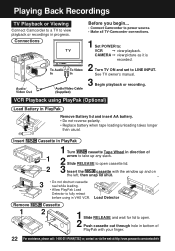
Connections Audio/ Video Out Before you begin... • Connect Camcorder to power source. • Make all TV-Camcorder connections. 1 Set POWER to LINE INPUT. Insert Remove 1 Cassette in PlayPak 1 Turn ...your finger. 22 For assistance, please call : 1-800-211-PANA(7262) or, contact us via the web at:http://www.panasonic.com/contactinfo CAMERA © view picture as it is recorded. 2 Turn TV ON and set to : VCR © view playback. Playing ...take up any slack. 2 Slide RELEASE to open . 2 Push cassette out through hole in VHS VCR. See TV owner's manual. 3 Begin playback or recording.
Connections Audio/ Video Out Before you begin... • Connect Camcorder to power source. • Make all TV-Camcorder connections. 1 Set POWER to LINE INPUT. Insert Remove 1 Cassette in PlayPak 1 Turn ...your finger. 22 For assistance, please call : 1-800-211-PANA(7262) or, contact us via the web at:http://www.panasonic.com/contactinfo CAMERA © view picture as it is recorded. 2 Turn TV ON and set to : VCR © view playback. Playing ...take up any slack. 2 Slide RELEASE to open . 2 Push cassette out through hole in VHS VCR. See TV owner's manual. 3 Begin playback or recording.
Vhs-c Camcorder
Page 24
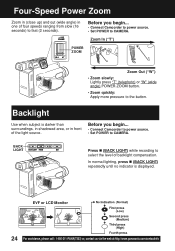
... up) and out (wide angle) in front of backlight compensation. Before you begin ... • Connect Camcorder to power source. • Set POWER to CAMERA. Before you begin ... • Connect Camcorder to power source. • Set POWER to CAMERA. In normal lighting, press (BACK LIGHT) repeatedly until no indicator is darker than surroundings, in shadowed... the light source. EVF or LCD Monitor 24 For assistance, please call : 1-800-211-PANA(7262) or, contact us via the web at:http://www.panasonic.com/contactinfo
... up) and out (wide angle) in front of backlight compensation. Before you begin ... • Connect Camcorder to power source. • Set POWER to CAMERA. Before you begin ... • Connect Camcorder to power source. • Set POWER to CAMERA. In normal lighting, press (BACK LIGHT) repeatedly until no indicator is darker than surroundings, in shadowed... the light source. EVF or LCD Monitor 24 For assistance, please call : 1-800-211-PANA(7262) or, contact us via the web at:http://www.panasonic.com/contactinfo
Vhs-c Camcorder
Page 25
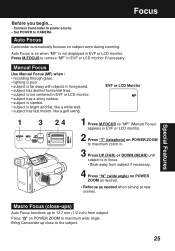
...• subject is slanted. • subject is bright and flat, like a white wall. • subject has fast motion, like a golf swing. Bring Camcorder up to 12.7 mm (1/2 inch) from subject if necessary. 4 Press "W" (wide angle) on POWER ZOOM to remove "MF" in EVF or LCD monitor... is not displayed in EVF or LCD monitor if necessary. Special Features Macro Focus (close-ups) Auto Focus functions up close to CAMERA. Focus Before you begin... • Connect Camcorder to power source. • Set POWER to the subject. 25 EVF or LCD Monitor 1 3 2, 4 1 Press M.FOCUS so...
...• subject is slanted. • subject is bright and flat, like a white wall. • subject has fast motion, like a golf swing. Bring Camcorder up to 12.7 mm (1/2 inch) from subject if necessary. 4 Press "W" (wide angle) on POWER ZOOM to remove "MF" in EVF or LCD monitor... is not displayed in EVF or LCD monitor if necessary. Special Features Macro Focus (close-ups) Auto Focus functions up close to CAMERA. Focus Before you begin... • Connect Camcorder to power source. • Set POWER to the subject. 25 EVF or LCD Monitor 1 3 2, 4 1 Press M.FOCUS so...
Vhs-c Camcorder
Page 26
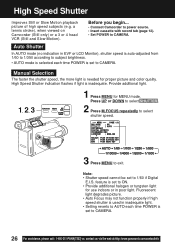
... subject brightness. • AUTO mode is selected each time POWER is set to CAMERA. 26 For assistance, please call : 1-800-211-PANA(7262) or, contact us via the web at:http://www.panasonic.com/contactinfo Fluorescent light degrades picture. • Auto Focus may not function properly ...the more light is inadequate. Press UP or DOWN to select SHUTTER . 2 Press M.FOCUS repeatedly to select shutter speed. 3 Press MENU to CAMERA. a tennis stroke), when viewed on Camcorder (Still only) or a 3 or 4 head VCR (Still and Slow Motion). Note: • Shutter speed cannot be set to ON. ...
... subject brightness. • AUTO mode is selected each time POWER is set to CAMERA. 26 For assistance, please call : 1-800-211-PANA(7262) or, contact us via the web at:http://www.panasonic.com/contactinfo Fluorescent light degrades picture. • Auto Focus may not function properly ...the more light is inadequate. Press UP or DOWN to select SHUTTER . 2 Press M.FOCUS repeatedly to select shutter speed. 3 Press MENU to CAMERA. a tennis stroke), when viewed on Camcorder (Still only) or a 3 or 4 head VCR (Still and Slow Motion). Note: • Shutter speed cannot be set to ON. ...
Vhs-c Camcorder
Page 27
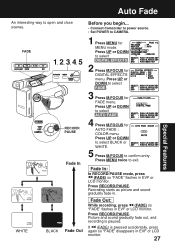
... accidentally, press again so "FADE" disappears in EVF or LCD monitor. FADE 1, 2, 3, 4, 5 RECORD/ PAUSE Fade In WHITE BLACK Fade Out Before you begin... • Connect Camcorder to power source. • Set POWER to open and close scenes. Press UP or DOWN to select BLACK or WHITE. 5 Press M.FOCUS to exit. Fade...: While recording, press (FADE) so "FADE" flashes in EVF or LCD monitor. 27 If (FADE) is paused. Auto Fade Special Features An interesting way to CAMERA. 1 Press MENU for AUTO FADE ;
... accidentally, press again so "FADE" disappears in EVF or LCD monitor. FADE 1, 2, 3, 4, 5 RECORD/ PAUSE Fade In WHITE BLACK Fade Out Before you begin... • Connect Camcorder to power source. • Set POWER to open and close scenes. Press UP or DOWN to select BLACK or WHITE. 5 Press M.FOCUS to exit. Fade...: While recording, press (FADE) so "FADE" flashes in EVF or LCD monitor. 27 If (FADE) is paused. Auto Fade Special Features An interesting way to CAMERA. 1 Press MENU for AUTO FADE ;
Vhs-c Camcorder
Page 28
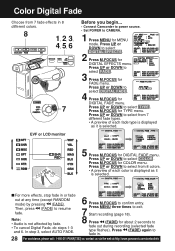
...selected fade type flashes). I For more effects, stop fade in or fade out at :http://www.panasonic.com/contactinfo In step 3, select AUTO FADE. 8 Press (FADE) for about 2 seconds to ... fade type is displayed as it is not affected by pressing (FADE). Press UP or DOWN to CAMERA. 1 Press MENU for DIGITAL FADE menu. Press UP or DOWN to confirm entry. Press M.FOCUS... in 8 different colors. 8 1, 2, 3, 4, 5, 6 7 EVF or LCD monitor Before you begin... • Connect Camcorder to power source. • Set POWER to select from 7 fade effects in . 28 For assistance, please call : 1-800...
...selected fade type flashes). I For more effects, stop fade in or fade out at :http://www.panasonic.com/contactinfo In step 3, select AUTO FADE. 8 Press (FADE) for about 2 seconds to ... fade type is displayed as it is not affected by pressing (FADE). Press UP or DOWN to CAMERA. 1 Press MENU for DIGITAL FADE menu. Press UP or DOWN to confirm entry. Press M.FOCUS... in 8 different colors. 8 1, 2, 3, 4, 5, 6 7 EVF or LCD monitor Before you begin... • Connect Camcorder to power source. • Set POWER to select from 7 fade effects in . 28 For assistance, please call : 1-800...
Vhs-c Camcorder
Page 29
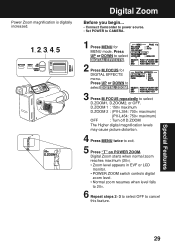
... : Turn off D.ZOOM The Higher digital magnification levels may cause picture distortion. 4 Press MENU twice to CAMERA. 1 Press MENU for DIGITAL EFFECTS menu. Power Zoom magnification is digitally increased. 1, 2, 3, 4, 5 Digital Zoom Before you begin... • Connect Camcorder to power source. • Set POWER to exit. 5 Press "T" on POWER ZOOM. Digital Zoom starts...
... : Turn off D.ZOOM The Higher digital magnification levels may cause picture distortion. 4 Press MENU twice to CAMERA. 1 Press MENU for DIGITAL EFFECTS menu. Power Zoom magnification is digitally increased. 1, 2, 3, 4, 5 Digital Zoom Before you begin... • Connect Camcorder to power source. • Set POWER to exit. 5 Press "T" on POWER ZOOM. Digital Zoom starts...
Vhs-c Camcorder
Page 30
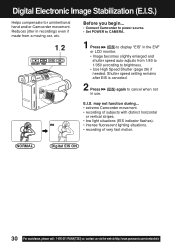
...PANA(7262) or, contact us via the web at:http://www.panasonic.com/contactinfo Reduces jitter in recordings even if made from a moving car, etc. 1, 2 Before you begin... • Connect Camcorder to power source. • Set POWER to CAMERA. 1 Press (EIS) to display "EIS" in use. (...EIS) again to brightness. • Use High Speed Shutter (page 26) if needed. may not function during... • extreme Camcorder movement. • recording of subjects ...
...PANA(7262) or, contact us via the web at:http://www.panasonic.com/contactinfo Reduces jitter in recordings even if made from a moving car, etc. 1, 2 Before you begin... • Connect Camcorder to power source. • Set POWER to CAMERA. 1 Press (EIS) to display "EIS" in use. (...EIS) again to brightness. • Use High Speed Shutter (page 26) if needed. may not function during... • extreme Camcorder movement. • recording of subjects ...
Vhs-c Camcorder
Page 31
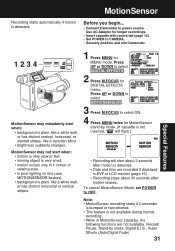
... may not start about 3 seconds after motion ceases. Press UP or DOWN to select MOTIONSENSOR . 3 Press M.FOCUS to CAMERA. • Securely position and aim Camcorder. MotionSensor Recording starts automatically if motion is plain, like a venetian blind. • brightness suddenly changes. Before you begin...... for MotionSensor stand-by mode, Digital E.I.S., Video Effects (Auto/Digital Fade). 31 Note: • MotionSensor recording starts if Camcorder is bumped or repositioned. • This feature is not available during normal recording. • While in MotionSensor stand-by,...
... may not start about 3 seconds after motion ceases. Press UP or DOWN to select MOTIONSENSOR . 3 Press M.FOCUS to CAMERA. • Securely position and aim Camcorder. MotionSensor Recording starts automatically if motion is plain, like a venetian blind. • brightness suddenly changes. Before you begin...... for MotionSensor stand-by mode, Digital E.I.S., Video Effects (Auto/Digital Fade). 31 Note: • MotionSensor recording starts if Camcorder is bumped or repositioned. • This feature is not available during normal recording. • While in MotionSensor stand-by,...

Vhs-c Camcorder
Page 32
... level can be displayed. 2, 3, 4, 5, 6 1 Battery Remaining: Tape Remaining: Before you begin... • Connect Camcorder to power source. 1 Set POWER to CAMERA. 2 Press MENU for MODE SELECT menu. 5 Press M.FOCUS repeatedly to select the following displays. Press UP or DOWN ...to exit. • Tape remaining indicator operates a few seconds after tape starts moving. 32 For assistance, please call : 1-800-211-PANA(7262) or, contact us via the web at:http://www.panasonic...
... level can be displayed. 2, 3, 4, 5, 6 1 Battery Remaining: Tape Remaining: Before you begin... • Connect Camcorder to power source. 1 Set POWER to CAMERA. 2 Press MENU for MODE SELECT menu. 5 Press M.FOCUS repeatedly to select the following displays. Press UP or DOWN ...to exit. • Tape remaining indicator operates a few seconds after tape starts moving. 32 For assistance, please call : 1-800-211-PANA(7262) or, contact us via the web at:http://www.panasonic...
