
Vhs-c Camcorder
Page 2
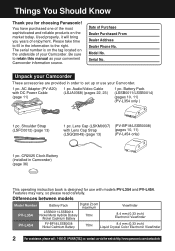
.... CR2025 Clock Battery (installed in the information to set up or use with models PV-L354 and PV-L454. Used properly, it will bring you for use your Camcorder. Date of the most sophisticated and reliable products on the underside of your Camcorder. 1 pc. Lens Cap (LSKM0937) (PV-BP18/LSSB0008) with DC Power Cable (page 11) 1 pc. Features may vary, so please read carefully. Audio/Video Cable...
.... CR2025 Clock Battery (installed in the information to set up or use with models PV-L354 and PV-L454. Used properly, it will bring you for use your Camcorder. Date of the most sophisticated and reliable products on the underside of your Camcorder. 1 pc. Lens Cap (LSKM0937) (PV-BP18/LSSB0008) with DC Power Cable (page 11) 1 pc. Features may vary, so please read carefully. Audio/Video Cable...
Vhs-c Camcorder
Page 3
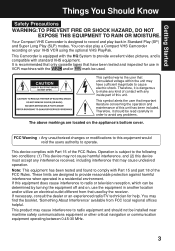
... booklet, 'Something About Interference' available from that used . This symbol alerts the user that have sufficient magnitude to provide reasonable protection against harmful interference when operated in Standard Play (SP) and Super Long Play (SLP) modes. FCC Warning : Any unauthorized changes or modifications to provide excellent video pictures, and is recommended that only cassette tapes that important literature concerning the operation and maintenance of this unit...
... booklet, 'Something About Interference' available from that used . This symbol alerts the user that have sufficient magnitude to provide reasonable protection against harmful interference when operated in Standard Play (SP) and Super Long Play (SLP) modes. FCC Warning : Any unauthorized changes or modifications to provide excellent video pictures, and is recommended that only cassette tapes that important literature concerning the operation and maintenance of this unit...

Vhs-c Camcorder
Page 4
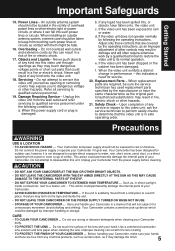
... having one way. These openings must not be operated from the wall outlet and disconnect the antenna or cable system. This is a safety feature. Power-Cord Protection - Outdoor Antenna Grounding - For added protection of this video unit near a swimming pool, and the like. 8. Do not use attachments not recommended by the manufacturer. Accessories - Any mounting of time, unplug it from the...
... having one way. These openings must not be operated from the wall outlet and disconnect the antenna or cable system. This is a safety feature. Power-Cord Protection - Outdoor Antenna Grounding - For added protection of this video unit near a swimming pool, and the like. 8. Do not use attachments not recommended by the manufacturer. Accessories - Any mounting of time, unplug it from the...
Vhs-c Camcorder
Page 5
...). Adjust only those controls that will often require extensive work by following conditions: a. this unit. Replacement Parts - Unauthorized substitutions may result in damage and will not subject it to a heater, etc... Do not connect the power supply or operate your Camcorder in a manner that are free from touching such power lines or circuits as , in performance - Use a commercial camcorder lens solution and lens paper when cleaning...
...). Adjust only those controls that will often require extensive work by following conditions: a. this unit. Replacement Parts - Unauthorized substitutions may result in damage and will not subject it to a heater, etc... Do not connect the power supply or operate your Camcorder in a manner that are free from touching such power lines or circuits as , in performance - Use a commercial camcorder lens solution and lens paper when cleaning...

Vhs-c Camcorder
Page 6
... Mode 8 Quick Operation Guide 9 Supplying Power (Battery Charge/Use/Refresh/Care, AC Adaptor, Car Battery Cord) .. 10~11 Cassette Information 12 Before Using (Using the Shoulder and Hand Straps, Lens Cap 13 Using MENU Mode 14 Setting the Clock (Time Zone, Auto Daylight Saving Time 15~16 AccuBrite™ Built-in Light (Using the Light, Replacing the Bulb 17 Camera Recording (Basic, Stand-by, Programmed Recording 18~20 Playing Back Recordings (Basic Playback, Visual Search, Still Picture, Tracking, TV/VCR Playback 21~22 Copying your Tapes...
... Mode 8 Quick Operation Guide 9 Supplying Power (Battery Charge/Use/Refresh/Care, AC Adaptor, Car Battery Cord) .. 10~11 Cassette Information 12 Before Using (Using the Shoulder and Hand Straps, Lens Cap 13 Using MENU Mode 14 Setting the Clock (Time Zone, Auto Daylight Saving Time 15~16 AccuBrite™ Built-in Light (Using the Light, Replacing the Bulb 17 Camera Recording (Basic, Stand-by, Programmed Recording 18~20 Playing Back Recordings (Basic Playback, Visual Search, Still Picture, Tracking, TV/VCR Playback 21~22 Copying your Tapes...

Vhs-c Camcorder
Page 12
Tape Speed Cassette type TC-20 TC-30 TC-40 SP (Standard Play) 20 minutes 30 minutes 40 minutes SLP (Super Long Play) 1 hour 1 hour 30 minutes 2 hours • SLP playback may contain more picture noise. Record/Playback Time Use tapes with adhesive tape. (Or, slide tab closed.) 12 For assistance, please call : 1-800-211-PANA(7262) or, contact us via the web at:http://www.panasonic.com/contactinfo...
Tape Speed Cassette type TC-20 TC-30 TC-40 SP (Standard Play) 20 minutes 30 minutes 40 minutes SLP (Super Long Play) 1 hour 1 hour 30 minutes 2 hours • SLP playback may contain more picture noise. Record/Playback Time Use tapes with adhesive tape. (Or, slide tab closed.) 12 For assistance, please call : 1-800-211-PANA(7262) or, contact us via the web at:http://www.panasonic.com/contactinfo...
Vhs-c Camcorder
Page 14
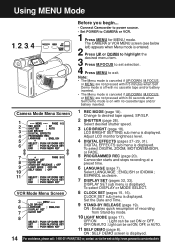
... monitor brightness level. 5 4 DIGITAL EFFECTS (pages 27~29, 31). 6 DIGITAL EFFECTS sub menu is on with no cassette tape and/or battery inserted. DISPLAY SET sub menu is displayed. ON : Enables quick resumption of recording from Stand-by mode. 10 LIGHT MODE (page 17). Press M.FOCUS to set ON, OFF, or AUTO. 11 SELF DEMO (page 8). CLOCK SET sub menu is displayed. OFF/ON : Light can be set ON or OFF. Change to CAMERA or VCR...
... monitor brightness level. 5 4 DIGITAL EFFECTS (pages 27~29, 31). 6 DIGITAL EFFECTS sub menu is on with no cassette tape and/or battery inserted. DISPLAY SET sub menu is displayed. ON : Enables quick resumption of recording from Stand-by mode. 10 LIGHT MODE (page 17). Press M.FOCUS to set ON, OFF, or AUTO. 11 SELF DEMO (page 8). CLOCK SET sub menu is displayed. OFF/ON : Light can be set ON or OFF. Change to CAMERA or VCR...

Vhs-c Camcorder
Page 16
... entry. • When traveling, repeat this operation and select one of the 8 listed time zones to set clock, see "Setting the Time Zone" above). 3c Setting Date and Time Date and time including leap years are calculated up to 2 minutes per month. • When traveling outside the listed time zones, set clock to local time manually. • To adjust or set the clock to daylight saving time (DST). DST: AUTO Spring (First Sunday in October...
... entry. • When traveling, repeat this operation and select one of the 8 listed time zones to set clock, see "Setting the Time Zone" above). 3c Setting Date and Time Date and time including leap years are calculated up to 2 minutes per month. • When traveling outside the listed time zones, set clock to local time manually. • To adjust or set the clock to daylight saving time (DST). DST: AUTO Spring (First Sunday in October...
Vhs-c Camcorder
Page 17
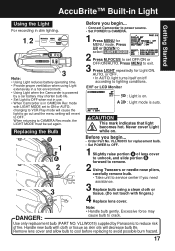
...; Set POWER to CAMERA Rec mode, the LIGHT MODE must be set OFF/ON or OFF/ON/AUTO. Excessive force may shorten bulb life. • Set Light to OFF when not in use. • When Camcorder is in CAMERA Rec mode with LIGHT MODE set to ON or AUTO, changing to VCR Play mode will cause the light to go out and the menu setting will decrease bulb life. Use only replacement bulb (PART NO. EVF or LCD Monitor A : Light...
...; Set POWER to CAMERA Rec mode, the LIGHT MODE must be set OFF/ON or OFF/ON/AUTO. Excessive force may shorten bulb life. • Set Light to OFF when not in use. • When Camcorder is in CAMERA Rec mode with LIGHT MODE set to ON or AUTO, changing to VCR Play mode will cause the light to go out and the menu setting will decrease bulb life. Use only replacement bulb (PART NO. EVF or LCD Monitor A : Light...
Vhs-c Camcorder
Page 18
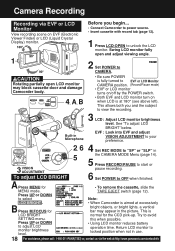
... Display) monitor. CAUTION Rotating partially open and adjust viewing angle. 1 2 Set POWER to OFF when finished. Built-in use. 18 For assistance, please call : 1-800-211-PANA(7262) or, contact us via EVF or LCD Monitor View recording scene on when LCD is LCD BRIGHT normal for • To remove the cassette, slide the MENU mode. TAPE EJECT switch (page 12). This allows both you begin... • Connect Camcorder...
... Display) monitor. CAUTION Rotating partially open and adjust viewing angle. 1 2 Set POWER to OFF when finished. Built-in use. 18 For assistance, please call : 1-800-211-PANA(7262) or, contact us via EVF or LCD Monitor View recording scene on when LCD is LCD BRIGHT normal for • To remove the cassette, slide the MENU mode. TAPE EJECT switch (page 12). This allows both you begin... • Connect Camcorder...
Vhs-c Camcorder
Page 20
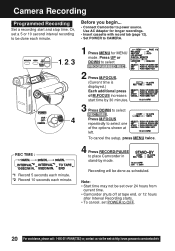
...; Set POWER to select one of M.FOCUS increases start and stop time. Before you begin... • Connect Camcorder to select PROGRAMMED REC . 2 Press M.FOCUS. (Current time is displayed.) Each additional press of the options shown at :http://www.panasonic.com/contactinfo Recording will be done each minute. Use AC Adaptor for MENU mode. Press M.FOCUS repeatedly to CAMERA. To cancel the setup, press MENU twice. 4 Press RECORD/PAUSE...
...; Set POWER to select one of M.FOCUS increases start and stop time. Before you begin... • Connect Camcorder to select PROGRAMMED REC . 2 Press M.FOCUS. (Current time is displayed.) Each additional press of the options shown at :http://www.panasonic.com/contactinfo Recording will be done each minute. Use AC Adaptor for MENU mode. Press M.FOCUS repeatedly to CAMERA. To cancel the setup, press MENU twice. 4 Press RECORD/PAUSE...
Vhs-c Camcorder
Page 21
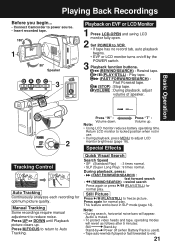
...... • Connect Camcorder to power source. • Insert recorded tape. 1 Speaker 3 D A B C E Playback on EVF or LCD Monitor 1 Press LCD-OPEN and swing LCD monitor fully open. 2 Set POWER to VCR. • If tape has no record tab, auto playback begins. • EVF or LCD monitor turns on/off (when Battery Pack is muted. • To protect video heads and tape, operating modes will appear. C (FAST FORWARD/SEARCH) : Fast Forward tape. Press UP or DOWN until Playback picture clears...
...... • Connect Camcorder to power source. • Insert recorded tape. 1 Speaker 3 D A B C E Playback on EVF or LCD Monitor 1 Press LCD-OPEN and swing LCD monitor fully open. 2 Set POWER to VCR. • If tape has no record tab, auto playback begins. • EVF or LCD monitor turns on/off (when Battery Pack is muted. • To protect video heads and tape, operating modes will appear. C (FAST FORWARD/SEARCH) : Fast Forward tape. Press UP or DOWN until Playback picture clears...
Vhs-c Camcorder
Page 22
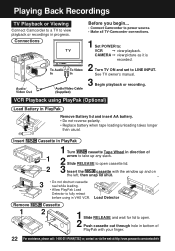
VCR Playback using in direction of PlayPak with your finger. 22 For assistance, please call : 1-800-211-PANA(7262) or, contact us via the web at:http://www.panasonic.com/contactinfo CAMERA © view picture as it is recorded. 2 Turn TV ON and set to : VCR © view playback. See TV owner's manual. 3 Begin playback or recording. Insert Remove 1 Cassette in PlayPak 1 Turn cassette Tape Wheel in VHS VCR. Load Detector Cassette 2 1 Slide RELEASE and wait for lid to open. 2 Push...
VCR Playback using in direction of PlayPak with your finger. 22 For assistance, please call : 1-800-211-PANA(7262) or, contact us via the web at:http://www.panasonic.com/contactinfo CAMERA © view picture as it is recorded. 2 Turn TV ON and set to : VCR © view playback. See TV owner's manual. 3 Begin playback or recording. Insert Remove 1 Cassette in PlayPak 1 Turn cassette Tape Wheel in VHS VCR. Load Detector Cassette 2 1 Slide RELEASE and wait for lid to open. 2 Push...
Vhs-c Camcorder
Page 23
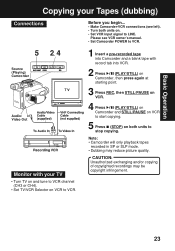
... units on. • Set VCR input signal to stop copying. Note: • Camcorder will only playback tapes recorded in SP or SLP mode. • Dubbing may be copyright infringement. 23 CAUTION: Unauthorized exchanging and/or copying of copyrighted recordings may reduce picture quality. Please see VCR owner's manual. • Set Camcorder POWER to VCR. 5 2, 4 Source (Playing) Camcorder Audio/ Video Out Monitor with your Tapes (dubbing) Connections Before you begin... • Make Camcorder-VCR connections (see left). • Turn both units to LINE...
... units on. • Set VCR input signal to stop copying. Note: • Camcorder will only playback tapes recorded in SP or SLP mode. • Dubbing may be copyright infringement. 23 CAUTION: Unauthorized exchanging and/or copying of copyrighted recordings may reduce picture quality. Please see VCR owner's manual. • Set Camcorder POWER to VCR. 5 2, 4 Source (Playing) Camcorder Audio/ Video Out Monitor with your Tapes (dubbing) Connections Before you begin... • Make Camcorder-VCR connections (see left). • Turn both units to LINE...
Vhs-c Camcorder
Page 26
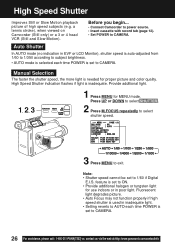
... via the web at:http://www.panasonic.com/contactinfo a tennis stroke), when viewed on Camcorder (Still only) or a 3 or 4 head VCR (Still and Slow Motion). feature is set to exit. High Speed Shutter indication flashes if light is needed for MENU mode. Auto Shutter In AUTO mode (no indication in poor light. Before you begin... • Connect Camcorder to power source. • Insert cassette with record tab (page 12). • Set POWER to CAMERA.
... via the web at:http://www.panasonic.com/contactinfo a tennis stroke), when viewed on Camcorder (Still only) or a 3 or 4 head VCR (Still and Slow Motion). feature is set to exit. High Speed Shutter indication flashes if light is needed for MENU mode. Auto Shutter In AUTO mode (no indication in poor light. Before you begin... • Connect Camcorder to power source. • Insert cassette with record tab (page 12). • Set POWER to CAMERA.
Vhs-c Camcorder
Page 31
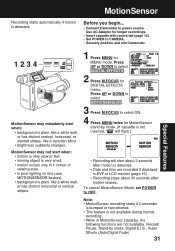
... if Camcorder is bumped or repositioned. • This feature is not available during normal recording. • While in MotionSensor stand-by mode, Digital E.I.S., Video Effects (Auto/Digital Fade). 31 Use AC Adaptor for DIGITAL EFFECTS menu. Press UP or DOWN to select DIGITAL EFFECTS . 2 Press M.FOCUS for longer recordings. • Insert cassette with record tab (page 12). • Set POWER to select ON. 4 Press MENU twice for MENU mode. MotionSensor Recording...
... if Camcorder is bumped or repositioned. • This feature is not available during normal recording. • While in MotionSensor stand-by mode, Digital E.I.S., Video Effects (Auto/Digital Fade). 31 Use AC Adaptor for DIGITAL EFFECTS menu. Press UP or DOWN to select DIGITAL EFFECTS . 2 Press M.FOCUS for longer recordings. • Insert cassette with record tab (page 12). • Set POWER to select ON. 4 Press MENU twice for MENU mode. MotionSensor Recording...
Vhs-c Camcorder
Page 39
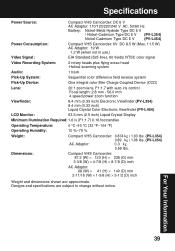
... DC 6 V (PV-L454) Power Consumption: Compact VHS Camcorder: 6V DC 8.5 W (Max. 11.5 W) AC Adaptor: 19 W 1.2 W (when not in use.) Video Signal: EIA Standard (525 lines, 60 fields) NTSC color signal Video Recording System: 2 rotary heads plus flying erase head Helical scanning system Audio: 1 track Pick-Up System: Sequential color difference field reverse system Pick-Up Device: One integral color filter Charge Coupled Device (CCD) Lens...
... DC 6 V (PV-L454) Power Consumption: Compact VHS Camcorder: 6V DC 8.5 W (Max. 11.5 W) AC Adaptor: 19 W 1.2 W (when not in use.) Video Signal: EIA Standard (525 lines, 60 fields) NTSC color signal Video Recording System: 2 rotary heads plus flying erase head Helical scanning system Audio: 1 track Pick-Up System: Sequential color difference field reverse system Pick-Up Device: One integral color filter Charge Coupled Device (CCD) Lens...
Vhs-c Camcorder
Page 40
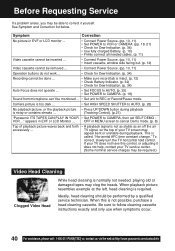
... playback picture, or the playback picture • Press UP/DOWN button during playback. When playback picture resembles example at :http://www.panasonic.com/contactinfo Camera picture is too dark ... • Set HIGH SPEED SHUTTER to REC or Record/Pause mode. Be sure to CAMERA, then set SELF DEMO : VCR ..." See Symptom and Correction list below. This is noisy or contains streaks ... (Tracking Control). (p.21) "Panasonic ITS TAPES CAN PLAY IN YOUR • Set POWER to follow cleaning cassette instructions...
... playback picture, or the playback picture • Press UP/DOWN button during playback. When playback picture resembles example at :http://www.panasonic.com/contactinfo Camera picture is too dark ... • Set HIGH SPEED SHUTTER to REC or Record/Pause mode. Be sure to CAMERA, then set SELF DEMO : VCR ..." See Symptom and Correction list below. This is noisy or contains streaks ... (Tracking Control). (p.21) "Panasonic ITS TAPES CAN PLAY IN YOUR • Set POWER to follow cleaning cassette instructions...
Vhs-c Camcorder
Page 42
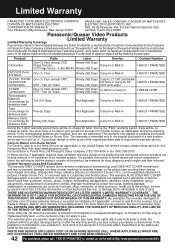
..., misapplication, alteration, faulty installation, set-up adjustments, misadjustment of consumer controls, improper maintenance, power line surge, lightning damage, modification, or commercial use (such as is attributable to and from viewing fixed images (including, among...date is required for shop diagnosis and/or repair and then returned. Product Parts Labor Service Contact Number Camcorder One (1) Year (except CCD Ninety (90) Days Image Sensor) Carry-In or Mail-In CCD Image Sensor - 6 (Six) Months Ninety (90) Days 1-800-211-PANA(7262) DVD/VCR Deck, A/V Mixer One (1) Year...
..., misapplication, alteration, faulty installation, set-up adjustments, misadjustment of consumer controls, improper maintenance, power line surge, lightning damage, modification, or commercial use (such as is attributable to and from viewing fixed images (including, among...date is required for shop diagnosis and/or repair and then returned. Product Parts Labor Service Contact Number Camcorder One (1) Year (except CCD Ninety (90) Days Image Sensor) Carry-In or Mail-In CCD Image Sensor - 6 (Six) Months Ninety (90) Days 1-800-211-PANA(7262) DVD/VCR Deck, A/V Mixer One (1) Year...
Vhs-c Camcorder
Page 44
..., 29 Programmed Recording . 20 Q Quick Operation Guide .... 9 R RECORD/PAUSE Button 18 Record/Playback Time ... 12 Replacing Clock Battery . 36 Request for Service Notice 41 REWIND/SEARCH Button 21 S Safety Precautions 3 Self Demo Mode 8 Shoulder Strap 13 Speaker 21 Special Effects 21 Specifications 39 Still Picture 21 STOP Button 21 T Tab 12 TAPE EJECT Switch 12 Tracking Control 21 Tripod Mounting Hole ..... 36 U UP (FAR) / DOWN (NEAR) Button 14, 21, 25 V VHF Connecting Cable .. 23 Video Cassettes (tapes) . 12 Video Head Cleaning...
..., 29 Programmed Recording . 20 Q Quick Operation Guide .... 9 R RECORD/PAUSE Button 18 Record/Playback Time ... 12 Replacing Clock Battery . 36 Request for Service Notice 41 REWIND/SEARCH Button 21 S Safety Precautions 3 Self Demo Mode 8 Shoulder Strap 13 Speaker 21 Special Effects 21 Specifications 39 Still Picture 21 STOP Button 21 T Tab 12 TAPE EJECT Switch 12 Tracking Control 21 Tripod Mounting Hole ..... 36 U UP (FAR) / DOWN (NEAR) Button 14, 21, 25 V VHF Connecting Cable .. 23 Video Cassettes (tapes) . 12 Video Head Cleaning...


