
PVL353 User Guide
Page 3
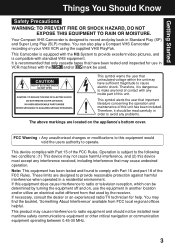
... to record and play a Compact VHS Camcorder recording on your VHS VCR using the supplied VHS PlayPak. These limits are located on , use in another location and/or utilize an electrical outlet different from FCC local regional offices helpful. You may find the booklet, '...Operation is recommended that only cassette tapes that have sufficient magnitude to make any kind of contact with Part 15 of this device must accept any problems. The above markings are designed to radio equipment and should be read carefully in order to radio or television reception, which can also play...
... to record and play a Compact VHS Camcorder recording on your VHS VCR using the supplied VHS PlayPak. These limits are located on , use in another location and/or utilize an electrical outlet different from FCC local regional offices helpful. You may find the booklet, '...Operation is recommended that only cassette tapes that have sufficient magnitude to make any kind of contact with Part 15 of this device must accept any problems. The above markings are designed to radio equipment and should be read carefully in order to radio or television reception, which can also play...
PVL353 User Guide
Page 4
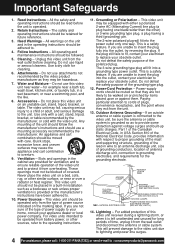
... operating and maintenance instructions should be sure the antenna or cable system is provided or the manufacturer's instructions have been adhered to the unit. Slots and openings in installation such as a bookcase or rack unless proper ventilation is grounded so as they may be adhered to provide some protection against them. This video unit should be equipped with the video unit. Part 1 of power...
... operating and maintenance instructions should be sure the antenna or cable system is provided or the manufacturer's instructions have been adhered to the unit. Slots and openings in installation such as a bookcase or rack unless proper ventilation is grounded so as they may be adhered to provide some protection against them. This video unit should be equipped with the video unit. Part 1 of power...

PVL353 User Guide
Page 5
... push objects of any kind into this video unit through openings as they may result in the vicinity of overhead power lines or other hazards. 21. If any kind onto the video unit. 18. When replacement parts are free from any service or repairs to this indicates a need for outdoor use strong or abrasive detergents when cleaning your Camcorder from a cold place to a warm place, moisture...
... push objects of any kind into this video unit through openings as they may result in the vicinity of overhead power lines or other hazards. 21. If any kind onto the video unit. 18. When replacement parts are free from any service or repairs to this indicates a need for outdoor use strong or abrasive detergents when cleaning your Camcorder from a cold place to a warm place, moisture...

PVL353 User Guide
Page 6
... Demo Mode 7 Quick Operation Guide 8 Supplying Power (Battery Charge/Use/Refresh/Care, AC Adaptor, Car Battery Cord) .... 9~10 Cassette Information 11 Before Using (Remove the Sensor tag, Using the Shoulder and Hand Straps, Lens Cap) ...... 12 Using MENU Mode 13 Setting the Clock (Time Zone, Auto Daylight Saving Time 14~15 AccuBrite™ Built-in Light (Using the Light, Replacing the Bulb 16 Camera Recording (Basic, Stand-by, Programmed Recording 17~19 Playing Back Recordings (Basic Playback, Visual Search, Still Picture, Tracking, TV/VCR Playback 20~21...
... Demo Mode 7 Quick Operation Guide 8 Supplying Power (Battery Charge/Use/Refresh/Care, AC Adaptor, Car Battery Cord) .... 9~10 Cassette Information 11 Before Using (Remove the Sensor tag, Using the Shoulder and Hand Straps, Lens Cap) ...... 12 Using MENU Mode 13 Setting the Clock (Time Zone, Auto Daylight Saving Time 14~15 AccuBrite™ Built-in Light (Using the Light, Replacing the Bulb 16 Camera Recording (Basic, Stand-by, Programmed Recording 17~19 Playing Back Recordings (Basic Playback, Visual Search, Still Picture, Tracking, TV/VCR Playback 20~21...
PVL353 User Guide
Page 10
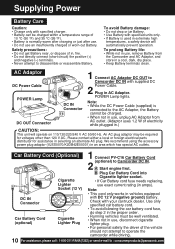
... to Camcorder DC IN with your car/truck dealer. Supplying Power Battery Care Caution: • Charge only with DC 12 V (negative ground) battery. Note: • This cord only works in vehicles equipped with specified charger. • Battery can be well ventilated. • When not in a cool, dark, dry place. • Keep Battery terminals clean. To prolong Battery life: • While not in use , disconnect...
... to Camcorder DC IN with your car/truck dealer. Supplying Power Battery Care Caution: • Charge only with DC 12 V (negative ground) battery. Note: • This cord only works in vehicles equipped with specified charger. • Battery can be well ventilated. • When not in a cool, dark, dry place. • Keep Battery terminals clean. To prolong Battery life: • While not in use , disconnect...
PVL353 User Guide
Page 11
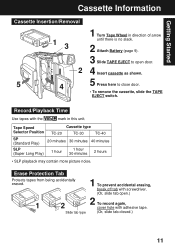
Record/Playback Time Use tapes with adhesive tape. (Or, slide tab closed.) 11 Getting Started Cassette Information Cassette Insertion/Removal 13 2 5 4 1 Turn Tape Wheel in this unit. Tape Speed Selector Position Cassette type TC-20 TC-30 TC-40 SP (Standard Play) 20 minutes 30 minutes 40 minutes SLP (Super Long Play) 1 hour 1 hour 30 minutes 2 hours • SLP playback may contain more picture noise. Erase Protection Tab Protects tapes from being accidentally erased. 1 2 Slide...
Record/Playback Time Use tapes with adhesive tape. (Or, slide tab closed.) 11 Getting Started Cassette Information Cassette Insertion/Removal 13 2 5 4 1 Turn Tape Wheel in this unit. Tape Speed Selector Position Cassette type TC-20 TC-30 TC-40 SP (Standard Play) 20 minutes 30 minutes 40 minutes SLP (Super Long Play) 1 hour 1 hour 30 minutes 2 hours • SLP playback may contain more picture noise. Erase Protection Tab Protects tapes from being accidentally erased. 1 2 Slide...
PVL353 User Guide
Page 13
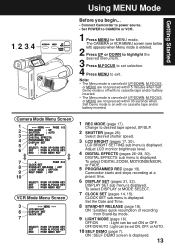
... 7). To select DIGITAL ZOOM, MOTIONSENSOR, or FADE. 5 PROGRAMMED REC (page 19). OFF/ON/AUTO : Light can be set ON or OFF. To select DISPLAY or MODE SELECT. 7 CLOCK SET (pages 14, 15). Using MENU Mode Getting Started 1, 2, 3, 4 Before you begin... • Connect Camcorder to power source. • Set POWER to CAMERA or VCR. 1 Press MENU for MENU mode. Set the Date and Time. 8 STAND-BY RELEASE (page 18). Camcorder starts and stops recording at a preset time. 6 DISPLAY SET (pages 31...
... 7). To select DIGITAL ZOOM, MOTIONSENSOR, or FADE. 5 PROGRAMMED REC (page 19). OFF/ON/AUTO : Light can be set ON or OFF. To select DISPLAY or MODE SELECT. 7 CLOCK SET (pages 14, 15). Using MENU Mode Getting Started 1, 2, 3, 4 Before you begin... • Connect Camcorder to power source. • Set POWER to CAMERA or VCR. 1 Press MENU for MENU mode. Set the Date and Time. 8 STAND-BY RELEASE (page 18). Camcorder starts and stops recording at a preset time. 6 DISPLAY SET (pages 31...

PVL353 User Guide
Page 15
...; When traveling, repeat this operation and select one hour. Note: • Auto DST does not function if time zone is not observed in your area, set clock, see "Setting the Time Zone" above). 3c Setting Date and Time Date and time including leap year are calculated up to 2 minutes per month. • When traveling outside the listed time zones, set clock to local time manually. • To adjust or set to OFF by...
...; When traveling, repeat this operation and select one hour. Note: • Auto DST does not function if time zone is not observed in your area, set clock, see "Setting the Time Zone" above). 3c Setting Date and Time Date and time including leap year are calculated up to 2 minutes per month. • When traveling outside the listed time zones, set clock to local time manually. • To adjust or set to OFF by...
PVL353 User Guide
Page 16
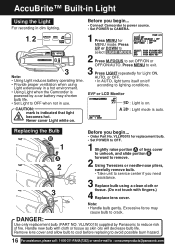
... CAMERA. 1, 2 3 Note: • Using Light reduces battery operating time. • Provide proper ventilation when using Light extensively in dim lighting. DANGER: Use only replacement bulb (PART NO. CAUTION: mark is powered by Panasonic to reduce risk of lens cover to unhook, and slide portion B forward to remove. 2 Using Tweezers or needle-nose pliers, carefully remove bulb. • Take unit to service center if you begin ... • Connect Camcorder to power source. • Set POWER...
... CAMERA. 1, 2 3 Note: • Using Light reduces battery operating time. • Provide proper ventilation when using Light extensively in dim lighting. DANGER: Use only replacement bulb (PART NO. CAUTION: mark is powered by Panasonic to reduce risk of lens cover to unhook, and slide portion B forward to remove. 2 Using Tweezers or needle-nose pliers, carefully remove bulb. • Take unit to service center if you begin ... • Connect Camcorder to power source. • Set POWER...
PVL353 User Guide
Page 17
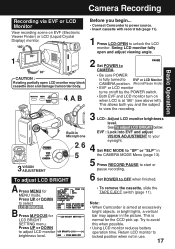
...-OPEN to unlock the LCD monitor. EVF : Look into EVF and adjust VISION ADJUSTMENT to your eyesight. 4 Set REC MODE to OFF when finished. • To remove the cassette, slide the TAPE EJECT switch (page 11). Try to select LCD BRIGHT . Press UP or DOWN to avoid this when possible. • Using LCD monitor reduces battery operation time. Return LCD monitor to locked position when not in the CAMERA MODE Menu...
...-OPEN to unlock the LCD monitor. EVF : Look into EVF and adjust VISION ADJUSTMENT to your eyesight. 4 Set REC MODE to OFF when finished. • To remove the cassette, slide the TAPE EJECT switch (page 11). Try to select LCD BRIGHT . Press UP or DOWN to avoid this when possible. • Using LCD monitor reduces battery operation time. Return LCD monitor to locked position when not in the CAMERA MODE Menu...
PVL353 User Guide
Page 18
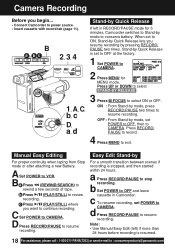
... 24 hours. b Press (PLAY/STILL) to continue recording. c Press (PLAY/STILL) where you want to review recording. b Set POWER to : consumerproducts@panasonic.com Note: • Use Manual Easy Edit (left in Camcorder. ON : From Stand-by mode, set to OFF at the factory. 1 Set POWER to CAMERA. 2 Press MENU for 5 minutes, Camcorder switches to CAMERA. Manual Easy Editing For proper continuity when taping from Stop mode or after attaching a new Battery. When set POWER to VCR. B a Press...
... 24 hours. b Press (PLAY/STILL) to continue recording. c Press (PLAY/STILL) where you want to review recording. b Set POWER to : consumerproducts@panasonic.com Note: • Use Manual Easy Edit (left in Camcorder. ON : From Stand-by mode, set to OFF at the factory. 1 Set POWER to CAMERA. 2 Press MENU for 5 minutes, Camcorder switches to CAMERA. Manual Easy Editing For proper continuity when taping from Stop mode or after attaching a new Battery. When set POWER to VCR. B a Press...
PVL353 User Guide
Page 20
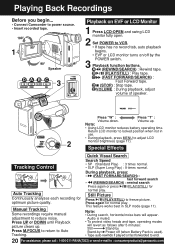
... press normal play . E VOLUME : During playback, adjust volume of speaker. Playing Back Recordings Before you begin... • Connect Camcorder to power source. • Insert recorded tape. 1 Speaker 3 D A B C E Playback on EVF or LCD Monitor 1 Press LCD-OPEN and swing LCD monitor fully open. 2 Set POWER to VCR. • If tape has no record tab, auto playback begins. • EVF or LCD monitor turns on/off by Power off (when Battery Pack is muted. • To protect video heads and tape, operating modes will appear...
... press normal play . E VOLUME : During playback, adjust volume of speaker. Playing Back Recordings Before you begin... • Connect Camcorder to power source. • Insert recorded tape. 1 Speaker 3 D A B C E Playback on EVF or LCD Monitor 1 Press LCD-OPEN and swing LCD monitor fully open. 2 Set POWER to VCR. • If tape has no record tab, auto playback begins. • EVF or LCD monitor turns on/off by Power off (when Battery Pack is muted. • To protect video heads and tape, operating modes will appear...
PVL353 User Guide
Page 21
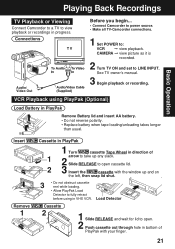
... to power source. • Make all TV-Camcorder connections. 1 Set POWER to LINE INPUT. VCR Playback using in VHS VCR. Load Detector Cassette 2 1 Slide RELEASE and wait for lid to open cassette lid. 2 3 Insert the cassette with your finger. 21 See TV owner's manual. 3 Begin playback or recording. CAMERA © view picture as it is recorded. 2 Turn TV ON and set to : VCR © view playback. Playing Back Recordings Basic Operation TV Playback or Viewing Connect Camcorder to a TV to fully retract before using PlayPak (Optional) Load Battery in PlayPak Remove Battery lid...
... to power source. • Make all TV-Camcorder connections. 1 Set POWER to LINE INPUT. VCR Playback using in VHS VCR. Load Detector Cassette 2 1 Slide RELEASE and wait for lid to open cassette lid. 2 3 Insert the cassette with your finger. 21 See TV owner's manual. 3 Begin playback or recording. CAMERA © view picture as it is recorded. 2 Turn TV ON and set to : VCR © view playback. Playing Back Recordings Basic Operation TV Playback or Viewing Connect Camcorder to a TV to fully retract before using PlayPak (Optional) Load Battery in PlayPak Remove Battery lid...
PVL353 User Guide
Page 22
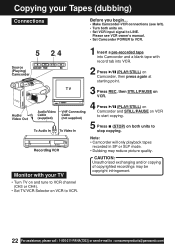
...: • Camcorder will only playback tapes recorded in SP or SLP mode. • Dubbing may be copyright infringement. 22 For assistance, please call : 1-800-211-PANA(7262) or send e-mail to : consumerproducts@panasonic.com Copying your Tapes (dubbing) Connections Before you begin... • Make Camcorder-VCR connections (see VCR owner's manual. • Set Camcorder POWER to VCR. 5 Source (Playing) Camcorder 2, 4 Audio/ Video Out Monitor with your TV • Turn TV on and tune to VCR channel (CH3...
...: • Camcorder will only playback tapes recorded in SP or SLP mode. • Dubbing may be copyright infringement. 22 For assistance, please call : 1-800-211-PANA(7262) or send e-mail to : consumerproducts@panasonic.com Copying your Tapes (dubbing) Connections Before you begin... • Make Camcorder-VCR connections (see VCR owner's manual. • Set Camcorder POWER to VCR. 5 Source (Playing) Camcorder 2, 4 Audio/ Video Out Monitor with your TV • Turn TV on and tune to VCR channel (CH3...
PVL353 User Guide
Page 25
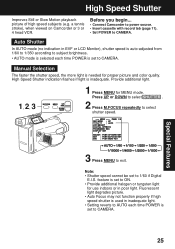
... poor light. a tennis stroke), when viewed on Camcorder or 3 or 4 head VCR. Auto Shutter In AUTO mode (no indication in inadequate light. • Setting reverts to AUTO each time POWER is set to CAMERA. 25 feature is set to CAMERA. Manual Selection The faster the shutter speed, the more light is inadequate. Fluorescent light degrades picture. • Auto Focus may not function properly if high speed shutter is used in EVF or LCD Monitor), shutter speed is auto-adjusted from...
... poor light. a tennis stroke), when viewed on Camcorder or 3 or 4 head VCR. Auto Shutter In AUTO mode (no indication in inadequate light. • Setting reverts to AUTO each time POWER is set to CAMERA. 25 feature is set to CAMERA. Manual Selection The faster the shutter speed, the more light is inadequate. Fluorescent light degrades picture. • Auto Focus may not function properly if high speed shutter is used in EVF or LCD Monitor), shutter speed is auto-adjusted from...

PVL353 User Guide
Page 30
.... To cancel MotionSensor Mode, set POWER to power source. Use AC Adaptor for MENU mode. Before you begin... • Connect Camcorder to OFF. Note: • MotionSensor recording starts if Camcorder is bumped or repositioned. • This feature is not available during normal recording. • While in MotionSensor stand-by, the following functions are recorded if displayed in EVF or LCD monitor (page 15). • Recording stops about...
.... To cancel MotionSensor Mode, set POWER to power source. Use AC Adaptor for MENU mode. Before you begin... • Connect Camcorder to OFF. Note: • MotionSensor recording starts if Camcorder is bumped or repositioned. • This feature is not available during normal recording. • While in MotionSensor stand-by, the following functions are recorded if displayed in EVF or LCD monitor (page 15). • Recording stops about...
PVL353 User Guide
Page 38
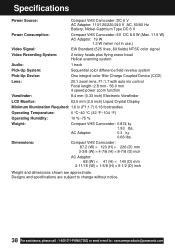
...@panasonic.com Designs and specifications are approximate. AC Adaptor: 0.3 kg 0.66 Ibs. Specifications Power Source: Compact VHS Camcorder: DC 6 V AC Adaptor: 110/120/220/240 V AC, 50/60 Hz Battery: Nickel-Cadmium Type DC 6 V Power Consumption: Compact VHS Camcorder: 6V DC 8.5 W (Max. 11.5 W) AC Adaptor: 19 W 1.2 W (when not in use.) Video Signal: EIA Standard (525 lines, 60 fields) NTSC color signal Video Recording System: 2 rotary heads plus flying...
...@panasonic.com Designs and specifications are approximate. AC Adaptor: 0.3 kg 0.66 Ibs. Specifications Power Source: Compact VHS Camcorder: DC 6 V AC Adaptor: 110/120/220/240 V AC, 50/60 Hz Battery: Nickel-Cadmium Type DC 6 V Power Consumption: Compact VHS Camcorder: 6V DC 8.5 W (Max. 11.5 W) AC Adaptor: 19 W 1.2 W (when not in use.) Video Signal: EIA Standard (525 lines, 60 fields) NTSC color signal Video Recording System: 2 rotary heads plus flying...

PVL353 User Guide
Page 39
...; Set HIGH SPEED SHUTTER to REC or Record/Pause mode. Ideally, head cleaning should be monitored ... • Set unit to AUTO. (p. 25) No playback picture, or the playback • Press UP/DOWN button during playback. When playback picture resembles example at the left, head cleaning is noisy or contains streaks ... (Tracking Control). (p.20) "Panasonic ITS TAPES CAN PLAY • Set POWER to CAMERA. (p. 17) Sound from microphone can't be performed by a qualified service technician. See Symptom and Correction list below...
...; Set HIGH SPEED SHUTTER to REC or Record/Pause mode. Ideally, head cleaning should be monitored ... • Set unit to AUTO. (p. 25) No playback picture, or the playback • Press UP/DOWN button during playback. When playback picture resembles example at the left, head cleaning is noisy or contains streaks ... (Tracking Control). (p.20) "Panasonic ITS TAPES CAN PLAY • Set POWER to CAMERA. (p. 17) Sound from microphone can't be performed by a qualified service technician. See Symptom and Correction list below...

PVL353 User Guide
Page 41
... United States call toll free contact number listed above or visit Panasonic Web Site: http://www.panasonic.com For assistance in -home service, as "the warrantor") will be removed for lost time, cost of having someone remove or re-install an installed unit if applicable, or travel to and from accidents, misuse, abuse, neglect, mishandling, misapplication, alteration, faulty installation, set-up adjustments, misadjustment of consumer controls, improper maintenance, power line...
... United States call toll free contact number listed above or visit Panasonic Web Site: http://www.panasonic.com For assistance in -home service, as "the warrantor") will be removed for lost time, cost of having someone remove or re-install an installed unit if applicable, or travel to and from accidents, misuse, abuse, neglect, mishandling, misapplication, alteration, faulty installation, set-up adjustments, misadjustment of consumer controls, improper maintenance, power line...
PVL353 User Guide
Page 44
... Programmed Recording . 19 Q Quick Operation Guide .... 8 R RECORD/PAUSE Button 17 Record/Playback Time .... 11 Replacing Clock Battery . 35 Request for Service Notice 40 REWIND/SEARCH Button 20 S Safety Precautions 3 Self Demo Mode 7 Shoulder Strap 12 Speaker 20 Special Effects 20 Specifications 38 Still Picture 20 STOP Button 20 T Tab 11 TAPE EJECT Switch . 11, 17 Tracking Control 20 Tripod Mounting Hole ..... 35 U UP (FAR) / DOWN (NEAR) Button 13, 20, 24 V VHF Connecting Cable .. 22 Video Cassettes (tapes) .. 11 Video Head Cleaning...
... Programmed Recording . 19 Q Quick Operation Guide .... 8 R RECORD/PAUSE Button 17 Record/Playback Time .... 11 Replacing Clock Battery . 35 Request for Service Notice 40 REWIND/SEARCH Button 20 S Safety Precautions 3 Self Demo Mode 7 Shoulder Strap 12 Speaker 20 Special Effects 20 Specifications 38 Still Picture 20 STOP Button 20 T Tab 11 TAPE EJECT Switch . 11, 17 Tracking Control 20 Tripod Mounting Hole ..... 35 U UP (FAR) / DOWN (NEAR) Button 13, 20, 24 V VHF Connecting Cable .. 22 Video Cassettes (tapes) .. 11 Video Head Cleaning...


