
PVDV201 User Guide
Page 1
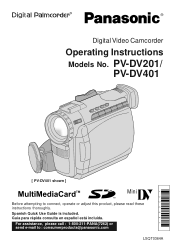
PV-DV201/ PV-DV401 [ PV-DV401 shown ] Mini *0364A* Before attempting to : consumerproducts@panasonic.com LSQT0364A Guía para rápida consulta en español está incluida. R R Digital Video Camcorder Operating Instructions Models No. For assistance, please call : 1-800-211-PANA(7262) or send e-mail to connect, operate or adjust this product, please read these instructions thoroughly. Spanish Quick Use Guide is included.
PV-DV201/ PV-DV401 [ PV-DV401 shown ] Mini *0364A* Before attempting to : consumerproducts@panasonic.com LSQT0364A Guía para rápida consulta en español está incluida. R R Digital Video Camcorder Operating Instructions Models No. For assistance, please call : 1-800-211-PANA(7262) or send e-mail to connect, operate or adjust this product, please read these instructions thoroughly. Spanish Quick Use Guide is included.
PVDV201 User Guide
Page 2
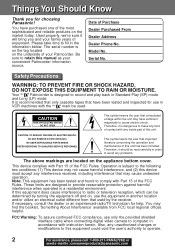
... continued FCC compliance, use in VCR machines with the Mini mark be read carefully in order to computer in Standard Play (SP) mode and Long (LP) mode. You have been tested and inspected for use only the provided shielded interface cable when connecting digital video camera to avoid any unauthorized changes or modifications to this equipment could void the user's authority to operate. 2 For assistance...
... continued FCC compliance, use in VCR machines with the Mini mark be read carefully in order to computer in Standard Play (SP) mode and Long (LP) mode. You have been tested and inspected for use only the provided shielded interface cable when connecting digital video camera to avoid any unauthorized changes or modifications to this equipment could void the user's authority to operate. 2 For assistance...
PVDV201 User Guide
Page 3
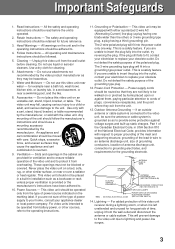
... should be equipped with care. If an outside antenna or cable system is connected to the operating instructions. 11. Any mounting of time, unplug it from battery power, or other ) or 3-wire grounding type plug, a plug having one way. These openings must not be followed. 5. The 3-wire grounding type plug will fit into the outlet, contact your electrician to . 4. This is a safety feature...
... should be equipped with care. If an outside antenna or cable system is connected to the operating instructions. 11. Any mounting of time, unplug it from battery power, or other ) or 3-wire grounding type plug, a plug having one way. These openings must not be followed. 5. The 3-wire grounding type plug will fit into the outlet, contact your electrician to . 4. This is a safety feature...

PVDV201 User Guide
Page 4
... video unit through openings as they may expose you to dangerous voltage or other hazards. 21. c. d. Adjust only those controls that will often require extensive work by a qualified technician to restore the video unit to qualified service personnel under the following the operating instructions. If the video unit has been dropped or the cabinet has been damaged. When replacement parts are no user serviceable parts...
... video unit through openings as they may expose you to dangerous voltage or other hazards. 21. c. d. Adjust only those controls that will often require extensive work by a qualified technician to restore the video unit to qualified service personnel under the following the operating instructions. If the video unit has been dropped or the cabinet has been damaged. When replacement parts are no user serviceable parts...
PVDV201 User Guide
Page 5
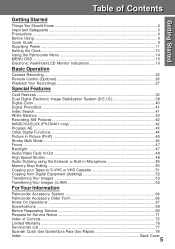
... Using ...6 Quick Guide ...9 Supplying Power ...11 Setting the Clock ...13 Using the Palmcorder Menu 14 MENU OSD ...15 Electronic Viewfinder/LCD Monitor Indications 19 Basic Operation Camera Recording ...22 Remote Control (Optional 26 Playback Your Recordings 27 Special Features Card Features ...32 Dual Digital Electronic Image Stabilization System (D.E.I.S 39 Digital Zoom ...40 Digital PhotoShot ...41 Index Search ...41 White Balance ...42 Recording Still Pictures 42 MAGICVU/0LUX (PV-DV401 only 42 Program AE ...43 Other Digital Functions 44 Picture...
... Using ...6 Quick Guide ...9 Supplying Power ...11 Setting the Clock ...13 Using the Palmcorder Menu 14 MENU OSD ...15 Electronic Viewfinder/LCD Monitor Indications 19 Basic Operation Camera Recording ...22 Remote Control (Optional 26 Playback Your Recordings 27 Special Features Card Features ...32 Dual Digital Electronic Image Stabilization System (D.E.I.S 39 Digital Zoom ...40 Digital PhotoShot ...41 Index Search ...41 White Balance ...42 Recording Still Pictures 42 MAGICVU/0LUX (PV-DV401 only 42 Program AE ...43 Other Digital Functions 44 Picture...
PVDV201 User Guide
Page 6
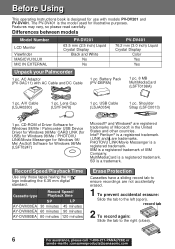
... Software for use with AC Cable and DC Cable 1 pc. IBM is a registered trademark. MultiMediaCard is a registered trademark of IBM Company. Battery Pack (PV-DBP8A) 1 pc. 8 MB MultiMediaCard (LSFT0198A) 1 pc. Shoulder Strap (LSFC0013) 1 pc. Intel® Pentium® is a trademark. Record Speed/Playback Time Use only those tapes having the Mini logo indicating the 6.35 mm digital standard. BBeeffore Using This operating Instructions book is designed for Windows...
... Software for use with AC Cable and DC Cable 1 pc. IBM is a registered trademark. MultiMediaCard is a registered trademark of IBM Company. Battery Pack (PV-DBP8A) 1 pc. 8 MB MultiMediaCard (LSFT0198A) 1 pc. Shoulder Strap (LSFC0013) 1 pc. Intel® Pentium® is a trademark. Record Speed/Playback Time Use only those tapes having the Mini logo indicating the 6.35 mm digital standard. BBeeffore Using This operating Instructions book is designed for Windows...

PVDV201 User Guide
Page 7
... remove the cassette... Slide TAPE EJECT to turn ON or OFF. Especially advisable when you begin • Connect the Palmcorder to a power source. (See pages 11, 12.) • Set POWER to CAMERA or M-CARD. 1 Slide Light into place. 2 2LIGHT Button Press LIGHT to open the 2 Cassette Compartment Cover. LIGHT RELEASE Button To remove the Light: Press LIGHT RELEASE and slide the Light out of the mount. Hint to locate recording position when inserting cassette...
... remove the cassette... Slide TAPE EJECT to turn ON or OFF. Especially advisable when you begin • Connect the Palmcorder to a power source. (See pages 11, 12.) • Set POWER to CAMERA or M-CARD. 1 Slide Light into place. 2 2LIGHT Button Press LIGHT to open the 2 Cassette Compartment Cover. LIGHT RELEASE Button To remove the Light: Press LIGHT RELEASE and slide the Light out of the mount. Hint to locate recording position when inserting cassette...
PVDV201 User Guide
Page 14
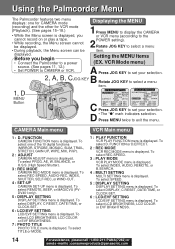
.... BALANCE, or H.S.S. (High Speed Shutter). 3 : REC MODE CAMERA REC-MODE menu is displayed. To select one for CAMERA mode Displaying the MENU (recording) and the other for VCR mode (Playback). (See pages 15~18.) • While the Menu screen is displayed, you begin • Connect the Palmcorder to the 2POWER setting). To select DISPLAY, C.RESET, DATE/TIME, or CLOCK-SET. 6 : LCD/EVF SETTING LCD/EVF SETTING menu is displayed. To select REC-SPEED, AUDIO-REC, INDEX, SHUTTER, SELF-REC, or WIND-CUT. 4 : SET-UP CAMERA SET-UP menu is displayed. To select REC-SPEED. 3 : PLAY MODE VCR...
.... BALANCE, or H.S.S. (High Speed Shutter). 3 : REC MODE CAMERA REC-MODE menu is displayed. To select one for CAMERA mode Displaying the MENU (recording) and the other for VCR mode (Playback). (See pages 15~18.) • While the Menu screen is displayed, you begin • Connect the Palmcorder to the 2POWER setting). To select DISPLAY, C.RESET, DATE/TIME, or CLOCK-SET. 6 : LCD/EVF SETTING LCD/EVF SETTING menu is displayed. To select REC-SPEED, AUDIO-REC, INDEX, SHUTTER, SELF-REC, or WIND-CUT. 4 : SET-UP CAMERA SET-UP menu is displayed. To select REC-SPEED. 3 : PLAY MODE VCR...

PVDV201 User Guide
Page 19
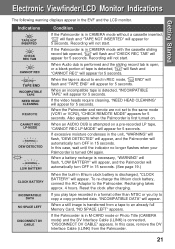
... VCR menu. e Tape Speed Indication (See page 15.) Indicates the tape speed (SP or LP). Time Code Memory Counter M 0:00:00 The Palmcorder will take several seconds for MF, AE, W.BALANCE or BACK LIGHT indications to operate after the tape starts moving. d Playback Effect (See page 44.) This display appears when SEPIA or MONO is set to OFF and T.CODE. 19 IMPORTANT NOTE: • Display must be recorded onto the tape...
... VCR menu. e Tape Speed Indication (See page 15.) Indicates the tape speed (SP or LP). Time Code Memory Counter M 0:00:00 The Palmcorder will take several seconds for MF, AE, W.BALANCE or BACK LIGHT indications to operate after the tape starts moving. d Playback Effect (See page 44.) This display appears when SEPIA or MONO is set to OFF and T.CODE. 19 IMPORTANT NOTE: • Display must be recorded onto the tape...
PVDV201 User Guide
Page 21
... not set to copy a copy-protected data. In this case, remove the DV Interface Cable (i.LINK) from a tape to the Palmcorder. Recharging takes approx. 4 hours. To re-charge the lithium clock battery, connect the AC Adaptor to an already full Memory Card, "NO SPACE LEFT" appears. Recording will not start . When a still image is transferred from the Palmcorder. 21 Reset the clock after charging. If the video heads require cleaning, "NEED HEAD CLEANING...
... not set to copy a copy-protected data. In this case, remove the DV Interface Cable (i.LINK) from a tape to the Palmcorder. Recharging takes approx. 4 hours. To re-charge the lithium clock battery, connect the AC Adaptor to an already full Memory Card, "NO SPACE LEFT" appears. Recording will not start . When a still image is transferred from the Palmcorder. 21 Reset the clock after charging. If the video heads require cleaning, "NEED HEAD CLEANING...
PVDV201 User Guide
Page 27
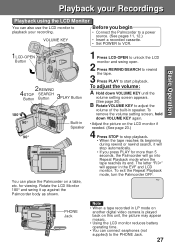
... a tape recorded in LP mode on another digital video camera is played back on the LCD monitor if needed. (See page 23.) 4 Press STOP to stop automatically. • If you begin • Connect the Palmcorder to a power source. (See pages 11, 12.) • Insert a recorded cassette. • Set POWER to adjust the volume of the built-in speaker. VOLUME KEY Before you press PLAY for viewing. B Rotate VOLUME KEY to VCR. 1LCD-OPEN Button 2REWIND 4 3 STOP SEARCH Button Button PLAY Button...
... a tape recorded in LP mode on another digital video camera is played back on the LCD monitor if needed. (See page 23.) 4 Press STOP to stop automatically. • If you begin • Connect the Palmcorder to a power source. (See pages 11, 12.) • Insert a recorded cassette. • Set POWER to adjust the volume of the built-in speaker. VOLUME KEY Before you press PLAY for viewing. B Rotate VOLUME KEY to VCR. 1LCD-OPEN Button 2REWIND 4 3 STOP SEARCH Button Button PLAY Button...

PVDV201 User Guide
Page 30
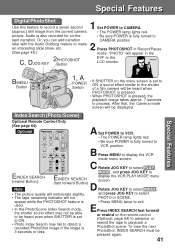
...-PANA(7262) or send e -mail to : consumerproducts@panasonic.com SPKR VOL + CAMCORDER CAMERA DISPLAY ON TV DATE / TIME PHOTO SHOT COUNTER / A.DUB TC RESET REC REC / PAUSE T W 1Set the POWER to VCR. • The POWER lamp lights red. • Be sure POWER is fully turned to VCR position. 2 Press MENU to display the VCR mode menu screen. 3 Rotate JOG KEY to select PLAY MODE , then press JOG KEY to display the VCR PLAY MODE menu screen. 4 Rotate JOG KEY to select INDEX , and...
...-PANA(7262) or send e -mail to : consumerproducts@panasonic.com SPKR VOL + CAMCORDER CAMERA DISPLAY ON TV DATE / TIME PHOTO SHOT COUNTER / A.DUB TC RESET REC REC / PAUSE T W 1Set the POWER to VCR. • The POWER lamp lights red. • Be sure POWER is fully turned to VCR position. 2 Press MENU to display the VCR mode menu screen. 3 Rotate JOG KEY to select PLAY MODE , then press JOG KEY to display the VCR PLAY MODE menu screen. 4 Rotate JOG KEY to select INDEX , and...

PVDV201 User Guide
Page 38
... start recording with Photo Title. • WIPE or MIX screen is performed, Digital Function turns off. 5 • There are 12 pre-installed files. Press REC/PAUSE to the Camera mode screen. • After Photo Title is displayed at beginning of the recording. Then the Photo Title setting will appear before inserting a recorded Memory Card. (See pages 32, 33.) 1 Set POWER to CAMERA. • The POWER lamp lights red. • Be sure POWER is processed. effect. 1st : Select and set MODE...
... start recording with Photo Title. • WIPE or MIX screen is performed, Digital Function turns off. 5 • There are 12 pre-installed files. Press REC/PAUSE to the Camera mode screen. • After Photo Title is displayed at beginning of the recording. Then the Photo Title setting will appear before inserting a recorded Memory Card. (See pages 32, 33.) 1 Set POWER to CAMERA. • The POWER lamp lights red. • Be sure POWER is processed. effect. 1st : Select and set MODE...
PVDV201 User Guide
Page 41
... to record a seven second 1 Set POWER to display the VCR MENU REW / PLAY FF / mode menu screen. PHOTO SSppeecciiaall FFeeaattuurreess BMENU Button 1, A POWER Switch • If SHUTTER on the remote control (Optional, page 64) to advance or rewind the tape to spot narration. DISPLAY ON TV DATE / TIME PHOTO SHOT REC / PAUSE T • The POWER lamp lights red. • Be sure POWER is fully turned to playback a PhotoShot scene. RESET W REC B Press MENU to CAMERA. (approx.) still image from the current camera • The POWER lamp lights red. To view...
... to record a seven second 1 Set POWER to display the VCR MENU REW / PLAY FF / mode menu screen. PHOTO SSppeecciiaall FFeeaattuurreess BMENU Button 1, A POWER Switch • If SHUTTER on the remote control (Optional, page 64) to advance or rewind the tape to spot narration. DISPLAY ON TV DATE / TIME PHOTO SHOT REC / PAUSE T • The POWER lamp lights red. • Be sure POWER is fully turned to playback a PhotoShot scene. RESET W REC B Press MENU to CAMERA. (approx.) still image from the current camera • The POWER lamp lights red. To view...

PVDV201 User Guide
Page 48
Fluorescent light will gradually fade in the menu. 2 monitor. Rotate and press JOG KEY to select ADJUST , then rotate and press 3 JOG KEY to start 3 recording. Press JOG KEY to display the Camera mode menu in ) for the fastest shutter speeds. • The Auto Focus system may not operate properly in " is recommended that you cannot manually select the shutter speed. • When MAGICVU is displayed. Press REC/PAUSE to...
Fluorescent light will gradually fade in the menu. 2 monitor. Rotate and press JOG KEY to select ADJUST , then rotate and press 3 JOG KEY to start 3 recording. Press JOG KEY to display the Camera mode menu in ) for the fastest shutter speeds. • The Auto Focus system may not operate properly in " is recommended that you cannot manually select the shutter speed. • When MAGICVU is displayed. Press REC/PAUSE to...
PVDV201 User Guide
Page 51
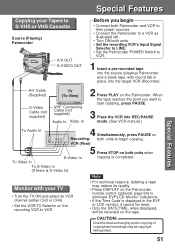
.../LCD Monitor indications. • If the Time Code is completed. SSppeecciiaall FFeeaattuurreess Copying your TV • Turn the TV ON and select its VCR channel (either CH3 or CH4). • Set the VCR/TV Selector on the recording VCR to VCR. • For technical reasons, dubbing a tape may be recorded on the tape. A/V Cable (Supplied) TV (To View) S-Video Cable (not supplied) VHF Connecting Cable (not supplied) Audio In Video In 2 Press PLAY...
.../LCD Monitor indications. • If the Time Code is completed. SSppeecciiaall FFeeaattuurreess Copying your TV • Turn the TV ON and select its VCR channel (either CH3 or CH4). • Set the VCR/TV Selector on the recording VCR to VCR. • For technical reasons, dubbing a tape may be recorded on the tape. A/V Cable (Supplied) TV (To View) S-Video Cable (not supplied) VHF Connecting Cable (not supplied) Audio In Video In 2 Press PLAY...
PVDV201 User Guide
Page 54
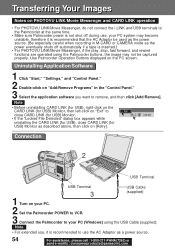
... Software 1 Click "Start," "Settings," and "Control Panel." 2 Double-click on "Add/Remove Programs" in M-CARD or CAMERA mode as the power eventually shuts off automatically if a tape is inserted.) • For PHOTOVU LINK/Movie Messenger, if the play, stop, fast forward, and rewind functions are operated using the USB Cable (supplied). Use Palmcorder Operation Buttons displayed on the PC screen. Note • Before uninstalling CARD LINK (for USB), right-click on the CARD LINK (for USB...
... Software 1 Click "Start," "Settings," and "Control Panel." 2 Double-click on "Add/Remove Programs" in M-CARD or CAMERA mode as the power eventually shuts off automatically if a tape is inserted.) • For PHOTOVU LINK/Movie Messenger, if the play, stop, fast forward, and rewind functions are operated using the USB Cable (supplied). Use Palmcorder Operation Buttons displayed on the PC screen. Note • Before uninstalling CARD LINK (for USB), right-click on the CARD LINK (for USB...

PVDV201 User Guide
Page 65
... These preset titles will also be erased when the Card is a compact, lightweight and removable external memory card. Palmcorder Accessory System Concerning the MultiMediaCard and SD Memory Card MultiMediaCard The MultiMediaCard is formatted. It has a write protect switch to prevent the data writing and card formatting, and it comes with a copyright protection function that complies with an SD Memory Card. • SD Logo is a trademark. •...
... These preset titles will also be erased when the Card is a compact, lightweight and removable external memory card. Palmcorder Accessory System Concerning the MultiMediaCard and SD Memory Card MultiMediaCard The MultiMediaCard is formatted. It has a write protect switch to prevent the data writing and card formatting, and it comes with a copyright protection function that complies with an SD Memory Card. • SD Logo is a trademark. •...

PVDV201 User Guide
Page 70
... the Audio on the VCR MENU is set to VCR or CAMERA. (pp. 22, 27) • Check the Dew Indicator. (p. 21) • Make sure the Battery is fully charged. (p. 11) • Make sure all necessary cables are connected correctly and firmly. (p. 12) • Make sure the Lens Cap is removed. (p. 22) • Make sure the Power Source is connected. (pp. 11, 12) • Insert the cassette record...
... the Audio on the VCR MENU is set to VCR or CAMERA. (pp. 22, 27) • Check the Dew Indicator. (p. 21) • Make sure the Battery is fully charged. (p. 11) • Make sure all necessary cables are connected correctly and firmly. (p. 12) • Make sure the Lens Cap is removed. (p. 22) • Make sure the Power Source is connected. (pp. 11, 12) • Insert the cassette record...
PVDV201 User Guide
Page 80
... Battery Remaining Indication Battery Warning Before Requesting Service Blank Search 47 6, 9, 11, 64 19 21 69, 70 25 C CARD EJECT Switch 10 Camera Recording 22, 23, 24, 25 Cleaning Care for Video Heads 70 Clock Battery 21 Clock Set 13 Color Enhancement Light 7, 64 Copying from Digital Equipment 52 Copying your Tapes 51 D Date and Time Indication 20 DC Power Cable 6, 12, 64 DEW Indication 21 Digital E.I.S. 39 Digital Functions 44 Digital PhotoShot 41 Digital Video Cassette Tape 6 Digital Zoom 40 Dubbing over Audio (Microphone...
... Battery Remaining Indication Battery Warning Before Requesting Service Blank Search 47 6, 9, 11, 64 19 21 69, 70 25 C CARD EJECT Switch 10 Camera Recording 22, 23, 24, 25 Cleaning Care for Video Heads 70 Clock Battery 21 Clock Set 13 Color Enhancement Light 7, 64 Copying from Digital Equipment 52 Copying your Tapes 51 D Date and Time Indication 20 DC Power Cable 6, 12, 64 DEW Indication 21 Digital E.I.S. 39 Digital Functions 44 Digital PhotoShot 41 Digital Video Cassette Tape 6 Digital Zoom 40 Dubbing over Audio (Microphone...


