
Digital Video Camera
Page 1
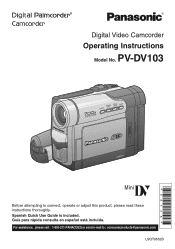
R Digital Video Camcorder Operating Instructions Model No. For assistance, please call : 1-800-211-PANA(7262) or send e-mail to connect, operate or adjust this product, please read these instructions thoroughly. Spanish Quick Use Guide is included. Guía para rápida consulta en español está incluida. PV-DV103 Mini Before attempting to : consumerproducts@panasonic.com LSQT0652B
R Digital Video Camcorder Operating Instructions Model No. For assistance, please call : 1-800-211-PANA(7262) or send e-mail to connect, operate or adjust this product, please read these instructions thoroughly. Spanish Quick Use Guide is included. Guía para rápida consulta en español está incluida. PV-DV103 Mini Before attempting to : consumerproducts@panasonic.com LSQT0652B

Digital Video Camera
Page 2
It is recommended that only cassette tapes that have been tested and inspected for help. Declaration of Conformity Model Number : PV-DV103 Trade Name : Panasonic Responsibility Party : Matsushita Electric Corporation of the FCC Rules. FCC Warning: To assure continued FCC compliance, use only the provided shielded interface cable when connecting digital video camcorder to computer in accordance with Part 15 of America Address : One...
It is recommended that only cassette tapes that have been tested and inspected for help. Declaration of Conformity Model Number : PV-DV103 Trade Name : Panasonic Responsibility Party : Matsushita Electric Corporation of the FCC Rules. FCC Warning: To assure continued FCC compliance, use only the provided shielded interface cable when connecting digital video camcorder to computer in accordance with Part 15 of America Address : One...
Digital Video Camera
Page 3
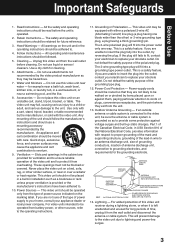
... to proper grounding of the mast and supporting structure, grounding of the unit should follow the manufacturer's instructions and should not be walked on a bed, sofa, rug, or other ) or 3-wire grounding type plug, a plug having one way. Power-Cord Protection - Important Safeguards Before Use 1. Heed Warnings - for cleaning. 6. Ventilation - This video unit should use attachments not recommended by items placed upon...
... to proper grounding of the mast and supporting structure, grounding of the unit should follow the manufacturer's instructions and should not be walked on a bed, sofa, rug, or other ) or 3-wire grounding type plug, a plug having one way. Power-Cord Protection - Important Safeguards Before Use 1. Heed Warnings - for cleaning. 6. Ventilation - This video unit should use attachments not recommended by items placed upon...

Digital Video Camera
Page 4
... through openings as the original part. Adjust only those controls that could permanently damage the internal parts of coffee. f. Safety Check- Precautions USE & LOCATION • TO AVOID SHOCK HAZARD ... Do not connect the power supply or operate your Palmcorder in safe operating order. Do not use , however it can scratch the lens coating. • TO PROTECT THE FINISH OF YOUR PALMCORDER ... When replacement parts are no user serviceable parts...
... through openings as the original part. Adjust only those controls that could permanently damage the internal parts of coffee. f. Safety Check- Precautions USE & LOCATION • TO AVOID SHOCK HAZARD ... Do not connect the power supply or operate your Palmcorder in safe operating order. Do not use , however it can scratch the lens coating. • TO PROTECT THE FINISH OF YOUR PALMCORDER ... When replacement parts are no user serviceable parts...

Digital Video Camera
Page 5
... You Should Know 2 Important Safeguards ...3 Precautions ...4 Before Using ...6 • Easy Cassette Eject/Insertion 7 Quick Guide ...12 Supplying Power ...14 Setting the Clock ...16 Using the Palmcorder Menu 17 Camera Recording ...18 • Simple Recording 18 • Digital PhotoShot™ Mode 20 • Zoom ...21 Special Effect Features 23 Advanced Settings ...26 Playback Your Recordings 30 Special Effect Features 32 Digital Features ...38 Editing Features ...43 PC Connection ...47 PHOTOVU LINK (Optional...
... You Should Know 2 Important Safeguards ...3 Precautions ...4 Before Using ...6 • Easy Cassette Eject/Insertion 7 Quick Guide ...12 Supplying Power ...14 Setting the Clock ...16 Using the Palmcorder Menu 17 Camera Recording ...18 • Simple Recording 18 • Digital PhotoShot™ Mode 20 • Zoom ...21 Special Effect Features 23 Advanced Settings ...26 Playback Your Recordings 30 Special Effect Features 32 Digital Features ...38 Editing Features ...43 PC Connection ...47 PHOTOVU LINK (Optional...

Digital Video Camera
Page 6
... 90 minutes AY-DVM80EJ 80 minutes 120 minutes 2 Remove the Sensor tag. Erase Protection Cassettes have a sliding record tab to ensure recordings are registered trademarks of IBM Company. record tab 2 To record again: Slide the tab to the left . 1 2 Hand Strap Record Speed/Playback Time Use only those tapes having the Mini logo indicating the 6.35 mm digital standard. Intel® Pentium® is a trademark...
... 90 minutes AY-DVM80EJ 80 minutes 120 minutes 2 Remove the Sensor tag. Erase Protection Cassettes have a sliding record tab to ensure recordings are registered trademarks of IBM Company. record tab 2 To record again: Slide the tab to the left . 1 2 Hand Strap Record Speed/Playback Time Use only those tapes having the Mini logo indicating the 6.35 mm digital standard. Intel® Pentium® is a trademark...

Digital Video Camera
Page 17
...; Connect the Palmcorder to a power source. (pp. 14, 15) • Set POWER to CAMERA or VCR. 2, A, B, C JOG KEY 1, D MENU Displaying the MENU 1Press MENU to display the CAMERA or VCR menu (according to select a menu item. ZOOM, or CINEMA. 2 : DIGITAL EFFECT To select EFFECT. 3 : RECORDING SETUP To select REC SPEED, AUDIO REC, SCENEINDEX, WIND CUT, or ZOOM MIC. 4 : DISPLAY SETUP To select DATE/TIME, C. Before you cannot record on or play a tape. • While recording, the Menu screen cannot be displayed. • During playback, the Menu screen can be displayed.
...; Connect the Palmcorder to a power source. (pp. 14, 15) • Set POWER to CAMERA or VCR. 2, A, B, C JOG KEY 1, D MENU Displaying the MENU 1Press MENU to display the CAMERA or VCR menu (according to select a menu item. ZOOM, or CINEMA. 2 : DIGITAL EFFECT To select EFFECT. 3 : RECORDING SETUP To select REC SPEED, AUDIO REC, SCENEINDEX, WIND CUT, or ZOOM MIC. 4 : DISPLAY SETUP To select DATE/TIME, C. Before you cannot record on or play a tape. • While recording, the Menu screen cannot be displayed. • During playback, the Menu screen can be displayed.
Digital Video Camera
Page 24
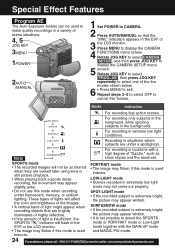
...-LIGHT mode • Scenes recorded in locations with the GAIN UP mode and MAGIC PIX mode. 24 Forassistance,pleasecall:1-800-211-PANA(7262)orsende-mailto:consumerproducts@panasonic.com Repeat steps 2~5 to select OFF to display the CAMERA 4 FUNCTIONS menu screen. Special Effect Features Program AE The Auto Exposure feature can be so blurred when they are viewed later using slow or still picture playback. • When playing back...
...-LIGHT mode • Scenes recorded in locations with the GAIN UP mode and MAGIC PIX mode. 24 Forassistance,pleasecall:1-800-211-PANA(7262)orsende-mailto:consumerproducts@panasonic.com Repeat steps 2~5 to select OFF to display the CAMERA 4 FUNCTIONS menu screen. Special Effect Features Program AE The Auto Exposure feature can be so blurred when they are viewed later using slow or still picture playback. • When playing back...
Digital Video Camera
Page 26
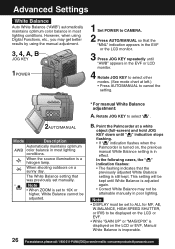
... "MAGICPIX" is displayed on the LCD or EVF, Manual White Balance is in most lighting conditions. Note • DISPLAY must be set to cancel the setting. * For manual White Balance adjustment: A. Rotate JOG KEY to select " " . 2AUTO/MANUAL Mode Description Automatically maintains optimum AWB color balance in the EVF or LCD monitor. 4 Rotate JOG KEY to CAMERA. 2 Press AUTO/MANUAL so that the previously adjusted White Balance setting is turned on a sunny day. However, when using Digital Functions, etc...
... "MAGICPIX" is displayed on the LCD or EVF, Manual White Balance is in most lighting conditions. Note • DISPLAY must be set to cancel the setting. * For manual White Balance adjustment: A. Rotate JOG KEY to select " " . 2AUTO/MANUAL Mode Description Automatically maintains optimum AWB color balance in the EVF or LCD monitor. 4 Rotate JOG KEY to CAMERA. 2 Press AUTO/MANUAL so that the previously adjusted White Balance setting is turned on a sunny day. However, when using Digital Functions, etc...

Digital Video Camera
Page 27
... motions, like a golf swing. the EVF or the LCD monitor. • a scene with shiny surfaces. • an obliquely angled subject. 3 Press FOCUS so that the "MF" • a bright, flat subject such as 25 mm (1 inch) in low light situations. Auto Focus will remain in focus over the entire zoom range. Set POWER to focus the image properly. 2AUTO/MANUAL Macro Focus (for close as a white...
... motions, like a golf swing. the EVF or the LCD monitor. • a scene with shiny surfaces. • an obliquely angled subject. 3 Press FOCUS so that the "MF" • a bright, flat subject such as 25 mm (1 inch) in low light situations. Auto Focus will remain in focus over the entire zoom range. Set POWER to focus the image properly. 2AUTO/MANUAL Macro Focus (for close as a white...
Digital Video Camera
Page 28
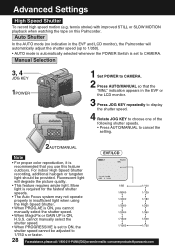
... feature requires ample light. Fluorescent light will automatically adjust the shutter speed (up to 1/350). • AUTO mode is automatically selected whenever the POWER Switch is set to ON, the shutter speed cannot be provided. cannot manually select the shutter speed. • When PROGRESSIVE is set to CAMERA. Auto Shutter In the AUTO mode (no indication in the EVF or the LCD monitor. 3 Press JOG KEY repeatedly to display the shutter speed. 4 Rotate JOG KEY...
... feature requires ample light. Fluorescent light will automatically adjust the shutter speed (up to 1/350). • AUTO mode is automatically selected whenever the POWER Switch is set to ON, the shutter speed cannot be provided. cannot manually select the shutter speed. • When PROGRESSIVE is set to CAMERA. Auto Shutter In the AUTO mode (no indication in the EVF or the LCD monitor. 3 Press JOG KEY repeatedly to display the shutter speed. 4 Rotate JOG KEY...

Digital Video Camera
Page 29
... the microphone. 3, 4 JOG KEY 1POWER 2MENU 5REC/PAUSE 1 Set POWER to CAMERA. 2 Press MENU to display the CAMERA FUNCTIONS menu screen. 3 Rotate JOG KEY to select RECORDING SETUP , then press JOG KEY to display the RECORDING SETUP menu screen. 4 Rotate JOG KEY to select WIND CUT , and then press JOG KEY to select ON. • Press MENU to cancel the setting. EVF/LCD 2AUTO/MANUAL Iris Setting Note • The value to CAMERA. 2 Press AUTO/MANUAL...
... the microphone. 3, 4 JOG KEY 1POWER 2MENU 5REC/PAUSE 1 Set POWER to CAMERA. 2 Press MENU to display the CAMERA FUNCTIONS menu screen. 3 Rotate JOG KEY to select RECORDING SETUP , then press JOG KEY to display the RECORDING SETUP menu screen. 4 Rotate JOG KEY to select WIND CUT , and then press JOG KEY to select ON. • Press MENU to cancel the setting. EVF/LCD 2AUTO/MANUAL Iris Setting Note • The value to CAMERA. 2 Press AUTO/MANUAL...

Digital Video Camera
Page 30
..., 15) • Insert a recorded cassette. 1 Set the POWER to VCR. • The POWER lamp lights red. • Be sure POWER is played back on this unit, the picture may appear mosaic. • Using the LCD monitor reduces battery operating time. • You can connect earphones (not supplied) to the PHONE Jack. Note • When a tape recorded in LP mode on another digital video camera is fully turned to the VCR position. 2 Use OPEN tab on a table, etc...
..., 15) • Insert a recorded cassette. 1 Set the POWER to VCR. • The POWER lamp lights red. • Be sure POWER is played back on this unit, the picture may appear mosaic. • Using the LCD monitor reduces battery operating time. • You can connect earphones (not supplied) to the PHONE Jack. Note • When a tape recorded in LP mode on another digital video camera is fully turned to the VCR position. 2 Use OPEN tab on a table, etc...

Digital Video Camera
Page 40
...-mailto:consumerproducts@panasonic.com is too extreme. • Recording a subject with very fast motions. 3REC/ PAUSE BPLAY VCR mode A Set POWER to cancel. • Be sure that D.E.I .S. Digital Features Dual Digital Electronic Image Stabilization System (D.E.I .S. C Press EIS to cancel. • Be sure that D.E.I .S. may be used in VCR mode, the image size is turned off automatically when the EIS and Digital Zoom are turned off when not needed . 1, A POWER D.E.I .S.) This feature helps compensate...
...-mailto:consumerproducts@panasonic.com is too extreme. • Recording a subject with very fast motions. 3REC/ PAUSE BPLAY VCR mode A Set POWER to cancel. • Be sure that D.E.I .S. Digital Features Dual Digital Electronic Image Stabilization System (D.E.I .S. C Press EIS to cancel. • Be sure that D.E.I .S. may be used in VCR mode, the image size is turned off automatically when the EIS and Digital Zoom are turned off when not needed . 1, A POWER D.E.I .S.) This feature helps compensate...

Digital Video Camera
Page 45
... A/V OUT TV (To View) A/V Cable (Supplied) VHF Connecting Cable (not supplied) Recording: VCR (Rear) Audio In Video In To Audio In To Video In Monitor with record tab in the EVF or LCD monitor, it cannot be reset. • Only the DATE/TIME, when displayed, will be copyright infringement. 45 When the tape reaches the point you begin copying. 5 Press STOP on both units. • Set the recording VCR's Input Signal Selector to...
... A/V OUT TV (To View) A/V Cable (Supplied) VHF Connecting Cable (not supplied) Recording: VCR (Rear) Audio In Video In To Audio In To Video In Monitor with record tab in the EVF or LCD monitor, it cannot be reset. • Only the DATE/TIME, when displayed, will be copyright infringement. 45 When the tape reaches the point you begin copying. 5 Press STOP on both units. • Set the recording VCR's Input Signal Selector to...
Digital Video Camera
Page 57
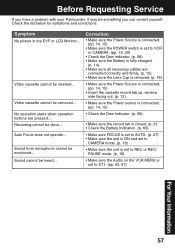
... the POWER switch is set to VCR or CAMERA. (pp. 18, 30) • Check the Dew Indicator. (p. 58) • Make sure the Battery is set to ST1. (pp. 43, 67) For Your Information 57 Symptom No picture in the EVF or LCD Monitor... Recording cannot be removed... Before Requesting Service If you have a problem with your Palmcorder, it may be inserted... Auto Focus does not operate... Video cassette cannot...
... the POWER switch is set to VCR or CAMERA. (pp. 18, 30) • Check the Dew Indicator. (p. 58) • Make sure the Battery is set to ST1. (pp. 43, 67) For Your Information 57 Symptom No picture in the EVF or LCD Monitor... Recording cannot be removed... Before Requesting Service If you have a problem with your Palmcorder, it may be inserted... Auto Focus does not operate... Video cassette cannot...
Digital Video Camera
Page 60
... from viewing fixed images (including, among other business), rental use of the product, service by the authorized servicer and does not include removal or re-installation of God. If a problem with the date of incidental or consequential damages, or limitations on the picture tube resulting from accidents, misuse, abuse, neglect, mishandling, misapplication, alteration, faulty installation, set-up adjustments, misadjustment of consumer controls, improper maintenance, power line...
... from viewing fixed images (including, among other business), rental use of the product, service by the authorized servicer and does not include removal or re-installation of God. If a problem with the date of incidental or consequential damages, or limitations on the picture tube resulting from accidents, misuse, abuse, neglect, mishandling, misapplication, alteration, faulty installation, set-up adjustments, misadjustment of consumer controls, improper maintenance, power line...

Digital Video Camera
Page 65
Camera Mode Menu Screen 1 2 3 4 5 6 7 8 9 10 1 PROG. ZOOM (p. 38) To select 25X (from 10X to 25X) or 700X (from 10X to OFF cancels the previously selected digital function. 6 REC SPEED (pp. 6, 18) SP: Normal recording speed mode. Setting to OFF cancels the previously selected digital zoom. 4 CINEMA (p. 23) When set to ON, the microphone's directional angle and sensitivity vary according to ON, you can record a picture compatible with a wide-screen TV equipped with normal...
Camera Mode Menu Screen 1 2 3 4 5 6 7 8 9 10 1 PROG. ZOOM (p. 38) To select 25X (from 10X to 25X) or 700X (from 10X to OFF cancels the previously selected digital function. 6 REC SPEED (pp. 6, 18) SP: Normal recording speed mode. Setting to OFF cancels the previously selected digital zoom. 4 CINEMA (p. 23) When set to ON, the microphone's directional angle and sensitivity vary according to ON, you can record a picture compatible with a wide-screen TV equipped with normal...

Digital Video Camera
Page 68
... the Remote Control. 16 CLOCK SET (p. 16) When set on the screen. 11 C. OFF : To prevent reception of display changes to all function display, Partial display, and Minimum display. 14 LCD/EVF SETUP (p. 19) Setting to ON displays the menu for adjusting the LCD brightness, color level, and the EVF brightness. 15 REMOTE (p. 10) VCR1 : To receive signals from the Remote Control, set to use the Audio Dub feature. 10 DATE/TIME (p. 69) The date and time can be set and displayed...
... the Remote Control. 16 CLOCK SET (p. 16) When set on the screen. 11 C. OFF : To prevent reception of display changes to all function display, Partial display, and Minimum display. 14 LCD/EVF SETUP (p. 19) Setting to ON displays the menu for adjusting the LCD brightness, color level, and the EVF brightness. 15 REMOTE (p. 10) VCR1 : To receive signals from the Remote Control, set to use the Audio Dub feature. 10 DATE/TIME (p. 69) The date and time can be set and displayed...

Digital Video Camera
Page 75
... C CINEMA Mode 23 Cleaning Care for Video Heads 56 Clock Battery 53, 58 Clock Set 16 Connecting Earphone ... 30 Copying from Digital Equipment 46 Copying your Tapes ...... 45 Customer Services Directory 61 D Date and Time Indication 69 DC Power Cable .. 6, 15, 51 DEW Indication 58 Digital E.I.S 40 Digital Functions 41 Digital PhotoShot™ Mode 20 Digital Video Cassette Tape 6 Digital Zoom 38, 39 DV Interface Cable (i.LINK 46, 47, 51 E Easy Cassette Eject ........ 7 EfficiBright™ LED Light .. 8 Erase Protection Tab ....... 6 EVF/LCD Monitor...
... C CINEMA Mode 23 Cleaning Care for Video Heads 56 Clock Battery 53, 58 Clock Set 16 Connecting Earphone ... 30 Copying from Digital Equipment 46 Copying your Tapes ...... 45 Customer Services Directory 61 D Date and Time Indication 69 DC Power Cable .. 6, 15, 51 DEW Indication 58 Digital E.I.S 40 Digital Functions 41 Digital PhotoShot™ Mode 20 Digital Video Cassette Tape 6 Digital Zoom 38, 39 DV Interface Cable (i.LINK 46, 47, 51 E Easy Cassette Eject ........ 7 EfficiBright™ LED Light .. 8 Erase Protection Tab ....... 6 EVF/LCD Monitor...


