
Operating Instructions
Page 1
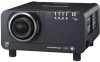
PT-DZ12000U Read these instructions completely before operating this unit. TQBJ 0263-1 Operating Instructions 3-chip DLP®-based Projector Commercial Use PT-D12000U Models No.
PT-DZ12000U Read these instructions completely before operating this unit. TQBJ 0263-1 Operating Instructions 3-chip DLP®-based Projector Commercial Use PT-D12000U Models No.

Operating Instructions
Page 2
Model number: PT-D12000U/PT-DZ12000U Serial number: 2 - The serial number of your Panasonic DLP® based projector. ENGLISH We hope it in the space provided below and retain this booklet in case service is required. You should note it will be found on an attached label. Dear Panasonic Customer: This instruction booklet provides all the necessary operating information that you will help you to get the most performance out of your product may be pleased with your new product, and that you might require.
Model number: PT-D12000U/PT-DZ12000U Serial number: 2 - The serial number of your Panasonic DLP® based projector. ENGLISH We hope it in the space provided below and retain this booklet in case service is required. You should note it will be found on an attached label. Dear Panasonic Customer: This instruction booklet provides all the necessary operating information that you will help you to get the most performance out of your product may be pleased with your new product, and that you might require.

Operating Instructions
Page 20
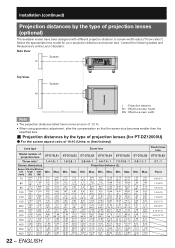
... menu to choose the desired projection scheme. (p. 78) Installation geometry When planning the projector and screen geometry, refer to the figures below and the information on the next page for the PT-DZ12000U. When attaching an optional ceiling mount bracket (ET-PKD100H) Side View (unit :...H Vertical distance between the lens center level and the bottom edge of the projected image * For PT-D12000U: H = 0 to SH For PT-DZ12000U: H = -0.1 × SH to SH for reference. After the projector is uneven. (Front) (Rear) Projection scheme All four combinations of Front, Rear, Ceiling or...
... menu to choose the desired projection scheme. (p. 78) Installation geometry When planning the projector and screen geometry, refer to the figures below and the information on the next page for the PT-DZ12000U. When attaching an optional ceiling mount bracket (ET-PKD100H) Side View (unit :...H Vertical distance between the lens center level and the bottom edge of the projected image * For PT-D12000U: H = 0 to SH For PT-DZ12000U: H = -0.1 × SH to SH for reference. After the projector is uneven. (Front) (Rear) Projection scheme All four combinations of Front, Rear, Ceiling or...
Operating Instructions
Page 22
Consult the following tables and Panasonics's online Lens Calculator. Max. Min. Max. 2.72 4.10 4.11 6.90 (8´11˝) (13´5˝) (13´5˝) (22´7˝) 3....2.8-4.6 : 1 4.6-7.4 : 1 7.3-13.8 : 1 Projection distance (L) 0.9-1.1 : 1 Min. Select the appropriate lens model for PT-DZ12000U) z For the screen aspect ratio of 16:10 (Units: m (feet/inches)) Lens type Model number of projection lenses (optional) The available lenses have been designed with different projector-distance to screen-width ratios ("throw ratios"). Max. Min. Installation (continued) Projection...
Consult the following tables and Panasonics's online Lens Calculator. Max. Min. Max. 2.72 4.10 4.11 6.90 (8´11˝) (13´5˝) (13´5˝) (22´7˝) 3....2.8-4.6 : 1 4.6-7.4 : 1 7.3-13.8 : 1 Projection distance (L) 0.9-1.1 : 1 Min. Select the appropriate lens model for PT-DZ12000U) z For the screen aspect ratio of 16:10 (Units: m (feet/inches)) Lens type Model number of projection lenses (optional) The available lenses have been designed with different projector-distance to screen-width ratios ("throw ratios"). Max. Min. Installation (continued) Projection...

Operating Instructions
Page 25
Getting Started If the projector is used with a screen size not listed in this manual, check the diagonal dimension (inch) of your screen and calculate the projection distance using the following formulas. „ Calculation formulas for projection distance by lens types (for PT-DZ12000U) Model number of projection lens Throw ratio Aspect ratio 1.4-1.8 : 1 16...
Getting Started If the projector is used with a screen size not listed in this manual, check the diagonal dimension (inch) of your screen and calculate the projection distance using the following formulas. „ Calculation formulas for projection distance by lens types (for PT-DZ12000U) Model number of projection lens Throw ratio Aspect ratio 1.4-1.8 : 1 16...
Operating Instructions
Page 30
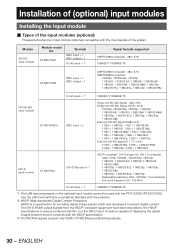
... the optional input module cannot be used with the projector. *2: HDCP (High-bandwidth Digital Content Protection) HDCP is a specification for encoding digital image signals which was developed to ensure content protection, but the DVI-D input module is provided as standard with the PT-D12000U/PT-DZ12000U. Use the LAN terminal that is capable of displaying...
... the optional input module cannot be used with the projector. *2: HDCP (High-bandwidth Digital Content Protection) HDCP is a specification for encoding digital image signals which was developed to ensure content protection, but the DVI-D input module is provided as standard with the PT-D12000U/PT-DZ12000U. Use the LAN terminal that is capable of displaying...
Operating Instructions
Page 33
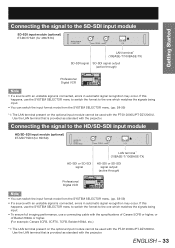
... from the SYSTEM SELECTOR menu. (pp. 58-59) • If a source with an unstable signal is provided as standard with the PT-D12000U/PT-DZ12000U. ENGLISH - 33 Use the LAN terminal that is connected, errors in automatic signal recognition may occur. Use the LAN terminal that is connected...SD-SDI signal output (active through ) Professional Digital VCR Note • If a source with an unstable signal is provided as standard with the projector. If this happens, use a connecting cable with the specifications of Canare 5CFB or higher, or of Belden1694A or higher. (For example: Canare...
... from the SYSTEM SELECTOR menu. (pp. 58-59) • If a source with an unstable signal is provided as standard with the PT-D12000U/PT-DZ12000U. ENGLISH - 33 Use the LAN terminal that is connected, errors in automatic signal recognition may occur. Use the LAN terminal that is connected...SD-SDI signal output (active through ) Professional Digital VCR Note • If a source with an unstable signal is provided as standard with the projector. If this happens, use a connecting cable with the specifications of Canare 5CFB or higher, or of Belden1694A or higher. (For example: Canare...
Operating Instructions
Page 35
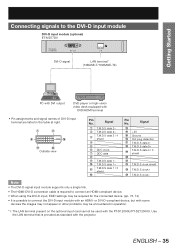
...-MD77DV DVI-D IN LAN DVI-D signal LAN terminal*1 (10BASE-T/100BASE-TX) PC with DVI output DVD player or high-vision video deck equipped with the projector. or DVI-D-compliant device, but with some devices the images may not appear or other problems may be used with an HDMI- Use the LAN... be encountered in the table at right. 1 8 9 p q x Outside view Pin No. ENGLISH - 35 Getting Started Connecting signals to connect the DVI-D input module with the PT-D12000U/PT-DZ12000U.
...-MD77DV DVI-D IN LAN DVI-D signal LAN terminal*1 (10BASE-T/100BASE-TX) PC with DVI output DVD player or high-vision video deck equipped with the projector. or DVI-D-compliant device, but with some devices the images may not appear or other problems may be used with an HDMI- Use the LAN... be encountered in the table at right. 1 8 9 p q x Outside view Pin No. ENGLISH - 35 Getting Started Connecting signals to connect the DVI-D input module with the PT-D12000U/PT-DZ12000U.
Operating Instructions
Page 41
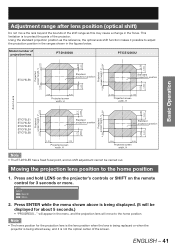
... or SHIFT on the remote control for the projection lens is the lens position when the lens is being replaced or when the projector is to the home position 1. ENGLISH - 41 Adjustment range after lens position (optical shift) Do not move to adjust the projection ... beyond the bounds of the shift range as the reference, the optical axis shift function makes it is not the optical center of projection lens PT-D12000U PT-DZ12000U 0.15V 0.50V Projected 0.15V screen height, V0.15V 0.12V 0.40V 0.12V screen height, V Projected Basic Operation ET-D75LE6 0.12V Standard projection ...
... or SHIFT on the remote control for the projection lens is the lens position when the lens is being replaced or when the projector is to the home position 1. ENGLISH - 41 Adjustment range after lens position (optical shift) Do not move to adjust the projection ... beyond the bounds of the shift range as the reference, the optical axis shift function makes it is not the optical center of projection lens PT-D12000U PT-DZ12000U 0.15V 0.50V Projected 0.15V screen height, V0.15V 0.12V 0.40V 0.12V screen height, V Projected Basic Operation ET-D75LE6 0.12V Standard projection ...
Operating Instructions
Page 61
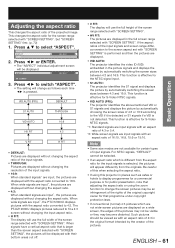
... choosing the screen sizes of the input signals. • 16:9: When standard signals*1 are input, the pictures are input*2, the PT-D12000U displays pictures with the aspect ratio converted to the screen aspect set with "SCREEN SETTING" is larger than the screen aspect selected with... the NTSC signal input. • S1 AUTO: The projector identifies the S1 signal and displays the picture by the creator of input signals. This changes the aspect ratio for the screen range selected with "SCREEN SETTING". The PT-DZ12000U displays pictures reduced to select "ASPECT". Set "SCREEN SETTING...
... choosing the screen sizes of the input signals. • 16:9: When standard signals*1 are input, the pictures are input*2, the PT-D12000U displays pictures with the aspect ratio converted to the screen aspect set with "SCREEN SETTING" is larger than the screen aspect selected with... the NTSC signal input. • S1 AUTO: The projector identifies the S1 signal and displays the picture by the creator of input signals. This changes the aspect ratio for the screen range selected with "SCREEN SETTING". The PT-DZ12000U displays pictures reduced to select "ASPECT". Set "SCREEN SETTING...
Operating Instructions
Page 72
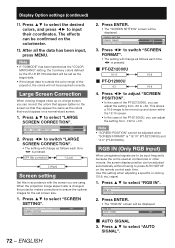
...are to press AUTO SETUP on the screen so that they appear the same as follows each time ◄► is "16:10" (PT-DZ12000U) and "4:3" (PT-D12000U). Press ▲▼ to ensure the optimal images for the set as follows each time ◄► is used at conferences or other...input, press MENU. Press ENTER. • The "SCREEN SETTING" screen will change as the target data. • If the target data is changed, the projector makes corrections to select "RGB IN". This allows a 16:9 image to +60. SCREEN SETTING RGB IN DVI-D IN 2. Display Option settings (continued) 11...
...are to press AUTO SETUP on the screen so that they appear the same as follows each time ◄► is "16:10" (PT-DZ12000U) and "4:3" (PT-D12000U). Press ▲▼ to ensure the optimal images for the set as follows each time ◄► is used at conferences or other...input, press MENU. Press ENTER. • The "SCREEN SETTING" screen will change as the target data. • If the target data is changed, the projector makes corrections to select "RGB IN". This allows a 16:9 image to +60. SCREEN SETTING RGB IN DVI-D IN 2. Display Option settings (continued) 11...
Operating Instructions
Page 121
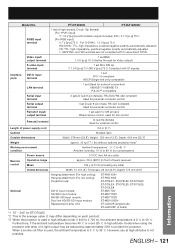
Furthermore, if the ambient temperature becomes 40 ˃C or more (35 ˃C in high altitude mode) when using the projector with lamp 4 lit, light output may differ depending on each for M3 pin jack Wired remote control, used , the ambient ...700 m), the ambient temperature is 0 ˃C to 35 ˃C. When a smoke cut filter is the average value. Model No. PT-D12000U PT-DZ12000U RGB2 input terminal 1 set each product. *3 When the projector is used in front of beam receiver) 134 g (0.31 lb) (including dry cells) Outside dimensions Width: 51 mm (2˝), Thickness:...
Furthermore, if the ambient temperature becomes 40 ˃C or more (35 ˃C in high altitude mode) when using the projector with lamp 4 lit, light output may differ depending on each for M3 pin jack Wired remote control, used , the ambient ...700 m), the ambient temperature is 0 ˃C to 35 ˃C. When a smoke cut filter is the average value. Model No. PT-D12000U PT-DZ12000U RGB2 input terminal 1 set each product. *3 When the projector is used in front of beam receiver) 134 g (0.31 lb) (including dry cells) Outside dimensions Width: 51 mm (2˝), Thickness:...

