User Manual
Page 2
... Defrost Feature 16 Defrosting Tips & Techniques 16-17 Sensor Reheat Feature 18 Sensor Cook Feature 18 Sensor Cook Chart 19 Microwave Recipes 20 Timer Feature (Kitchen Timer/Stand Time/Delay Start 21 Microwave Shortcuts 22-23 Food Characteristics 24 Cooking Techniques 24-25 Quick Guide to Operation 28 Maintenance Care and Cleaning of Your Microwave Oven 9 Before Requesting Service 26 Warranty and Service 27 General Information Cookware Guide ...8 Oven Components Diagram 10 Specifications ...29 User's Record ...29 Notes ...30
... Defrost Feature 16 Defrosting Tips & Techniques 16-17 Sensor Reheat Feature 18 Sensor Cook Feature 18 Sensor Cook Chart 19 Microwave Recipes 20 Timer Feature (Kitchen Timer/Stand Time/Delay Start 21 Microwave Shortcuts 22-23 Food Characteristics 24 Cooking Techniques 24-25 Quick Guide to Operation 28 Maintenance Care and Cleaning of Your Microwave Oven 9 Before Requesting Service 26 Warranty and Service 27 General Information Cookware Guide ...8 Oven Components Diagram 10 Specifications ...29 User's Record ...29 Notes ...30
User Manual
Page 4
... 4. 6. tions found on this oven. 17. When cleaning surfaces of the door and oven that because a child has mastered one cooking skill he/she can cook everything. 11. DO NOT cover or block any openings on page 1. 3. Use this appliance only for example, closed , turn oven off, and disconnect the power cord, or shut off power at the fuse or circuit breaker panel. (d) DO NOT use with a sponge or soft...
... 4. 6. tions found on this oven. 17. When cleaning surfaces of the door and oven that because a child has mastered one cooking skill he/she can cook everything. 11. DO NOT cover or block any openings on page 1. 3. Use this appliance only for example, closed , turn oven off, and disconnect the power cord, or shut off power at the fuse or circuit breaker panel. (d) DO NOT use with a sponge or soft...
User Manual
Page 5
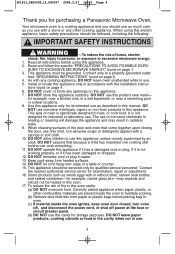
... adjustments or repairs to controls may cause sparking. Damage to Door, Control Panel Frame, Safety Interlock Switches, or any other part of your oven, read remaining safety cautions and operating instructions. 3 The microwave energy will trap steam, and may result. Superheated Liquids Liquids, such as safe for microwave oven use of oven. TO AVOID THE RISK OF SCALDING: POT HOLDERS should always be done only by a qualified service...
... adjustments or repairs to controls may cause sparking. Damage to Door, Control Panel Frame, Safety Interlock Switches, or any other part of your oven, read remaining safety cautions and operating instructions. 3 The microwave energy will trap steam, and may result. Superheated Liquids Liquids, such as safe for microwave oven use of oven. TO AVOID THE RISK OF SCALDING: POT HOLDERS should always be done only by a qualified service...
User Manual
Page 6
... operation, the oven must be cleaned frequently to stop moving, the tray will automatically rotate in water. 5. If the oven is manufactured for mobile vehicle, marine, or commercial use the proper trim kit available from the counter top edge to avoid accidental tipping of the oven. (a) DO NOT block air vents. DO NOT operate the oven without the Glass Tray fully engaged on a rack set in the door. DO NOT cook directly...
... operation, the oven must be cleaned frequently to stop moving, the tray will automatically rotate in water. 5. If the oven is manufactured for mobile vehicle, marine, or commercial use the proper trim kit available from the counter top edge to avoid accidental tipping of the oven. (a) DO NOT block air vents. DO NOT operate the oven without the Glass Tray fully engaged on a rack set in the door. DO NOT cook directly...

User Manual
Page 7
... on a SEPARATE CIRCUIT. The VOLTAGE used must be the same as the electrical rating of the appliance. In the event of an electrical short circuit, grounding reduces the risk of Your Microwave Oven) 5 If a long cord or extension cord is dangerous and may trip. 2. Wiring Requirements 1. Using a higher voltage is used if care is properly installed and grounded. • Plug into a 15 AMP or 20 AMP, 120 VOLT, 60...
... on a SEPARATE CIRCUIT. The VOLTAGE used must be the same as the electrical rating of the appliance. In the event of an electrical short circuit, grounding reduces the risk of Your Microwave Oven) 5 If a long cord or extension cord is dangerous and may trip. 2. Wiring Requirements 1. Using a higher voltage is used if care is properly installed and grounded. • Plug into a 15 AMP or 20 AMP, 120 VOLT, 60...
User Manual
Page 8
... the hot oil, and can follow recommended package instructions or use the microwave oven to page 15). These types of food or foods with nonporous skins. Small quantities of foods must be popped in your oven. Otherwise, the popcorn may not pop adequately or... high temperature needed for home canning. Cooking oils may burst into flames and may ignite and cause a fire. IMPORTANT Proper cooking depends upon the power, the time setting and quantity of your oven for sterilization. • DO NOT dry meats, herbs, fruits or vegetables in a microwave oven corn popper. Microwave popcorn...
... the hot oil, and can follow recommended package instructions or use the microwave oven to page 15). These types of food or foods with nonporous skins. Small quantities of foods must be popped in your oven. Otherwise, the popcorn may not pop adequately or... high temperature needed for home canning. Cooking oils may burst into flames and may ignite and cause a fire. IMPORTANT Proper cooking depends upon the power, the time setting and quantity of your oven for sterilization. • DO NOT dry meats, herbs, fruits or vegetables in a microwave oven corn popper. Microwave popcorn...
User Manual
Page 9
... microwave cooking only. Use pot holders when removing containers from the oven or when removing lids or plastic wrap covers from the open end of space between foil and interior oven walls or door. • Dishes with metallic trim should be used for both meat and candy. 9) BABY FORMULA / BABY FOOD • DO NOT heat baby formula or baby food in your oven. Heat is used , as paper plates or microwave...
... microwave cooking only. Use pot holders when removing containers from the oven or when removing lids or plastic wrap covers from the open end of space between foil and interior oven walls or door. • Dishes with metallic trim should be used for both meat and candy. 9) BABY FORMULA / BABY FOOD • DO NOT heat baby formula or baby food in your oven. Heat is used , as paper plates or microwave...

User Manual
Page 10
... for cooking or reheating. Use only microwave safe meat and candy thermometers. Most glass jars are packaged in these dishes. Recycled paper products may contain impurities which could cause a fire in the oven. Follow manufacturers' directions. heat one (1) minute at one time. Can be hot. Heat only 1 tray in the oven at P10 (HIGH). Check manufacturers' directions for more than 6 minutes. Check package directions. Use as a cover...
... for cooking or reheating. Use only microwave safe meat and candy thermometers. Most glass jars are packaged in these dishes. Recycled paper products may contain impurities which could cause a fire in the oven. Follow manufacturers' directions. heat one (1) minute at one time. Can be hot. Heat only 1 tray in the oven at P10 (HIGH). Check manufacturers' directions for more than 6 minutes. Check package directions. Use as a cover...

User Manual
Page 11
... not remove waveguide cover: ered with a damp cloth allowed to clear the Display. clean to keep cover vapor barrier film. after using. During cooking, especially under this film. (Hint - inside the oven, water should be Inside of the oven shipping. Do not use harsh detergents or abrasives. It is inaccessible, leave oven door open while cleaning. To prevent damage to the operating parts inside of Your Microwave Oven BEFORE CLEANING: Unplug oven at wall...
... not remove waveguide cover: ered with a damp cloth allowed to clear the Display. clean to keep cover vapor barrier film. after using. During cooking, especially under this film. (Hint - inside the oven, water should be Inside of the oven shipping. Do not use harsh detergents or abrasives. It is inaccessible, leave oven door open while cleaning. To prevent damage to the operating parts inside of Your Microwave Oven BEFORE CLEANING: Unplug oven at wall...
User Manual
Page 12
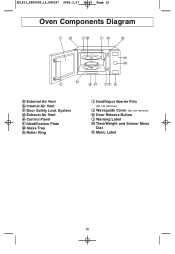
IP1813_38X00CP_14_080327 2008.3.27 14:25 Page 12 Oven Components Diagram id lg ja b e m h C d n Cf k a External Air Vent b Internal Air Vent c Door Safety Lock System d Exhaust Air Vent e Control Panel f Identification Plate g Glass Tray h Roller Ring i Heat/Vapor Barrier Film (do not remove) j Waveguide Cover (do not remove) k Door Release Button l Warning Label m Time/Weight and Sensor Menu Dial n Menu Label 10
IP1813_38X00CP_14_080327 2008.3.27 14:25 Page 12 Oven Components Diagram id lg ja b e m h C d n Cf k a External Air Vent b Internal Air Vent c Door Safety Lock System d Exhaust Air Vent e Control Panel f Identification Plate g Glass Tray h Roller Ring i Heat/Vapor Barrier Film (do not remove) j Waveguide Cover (do not remove) k Door Release Button l Warning Label m Time/Weight and Sensor Menu Dial n Menu Label 10
User Manual
Page 13
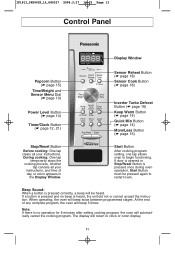
... Page 13 Control Panel Display Window Popcorn Button (☛ page 15) Time/Weight and Sensor Menu Dial (☛ page 13) Power Level Button (☛ page 14) Timer/Clock Button (☛ page 12, 21) Sensor Reheat Button (☛ page 18) Sensor Cook Button (☛ page 18) Inverter Turbo Defrost Button (☛ page 16) Keep Warm Button (☛ page 14) Quick Min Button (☛ page 14) More/Less Button (☛ page 15) Stop/Reset Button Before cooking: One...
... Page 13 Control Panel Display Window Popcorn Button (☛ page 15) Time/Weight and Sensor Menu Dial (☛ page 13) Power Level Button (☛ page 14) Timer/Clock Button (☛ page 12, 21) Sensor Reheat Button (☛ page 18) Sensor Cook Button (☛ page 18) Inverter Turbo Defrost Button (☛ page 16) Keep Warm Button (☛ page 14) Quick Min Button (☛ page 14) More/Less Button (☛ page 15) Stop/Reset Button Before cooking: One...

User Manual
Page 14
... door. Setting the Clock 1. • Press Timer/Clock twice. ➤Colon flashes. 2. time of the oven until Child Lock is plugged in the display window. Child Safety Lock This feature prevents the electronic operation of day is supplied. 3. To Cancel: • Press Stop/Reset 3 times. ➤The display will return to colon or time of day using Time Dial. ➤Time appears in the display window. ➤The indication light continues to Use...
... door. Setting the Clock 1. • Press Timer/Clock twice. ➤Colon flashes. 2. time of the oven until Child Lock is plugged in the display window. Child Safety Lock This feature prevents the electronic operation of day is supplied. 3. To Cancel: • Press Stop/Reset 3 times. ➤The display will return to colon or time of day using Time Dial. ➤Time appears in the display window. ➤The indication light continues to Use...
User Manual
Page 17
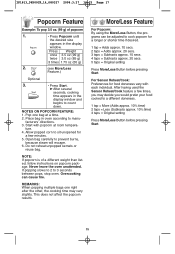
...; Press Popcorn until the desired size appears in the display window and begins to 3 seconds between pops, stop oven. Overcooking can be adjusted to a different doneness. 1 tap = More (Adds approx. 10% time) 2 taps = Less (Subtracts approx. 10% time) 3 taps = Original setting Press More/Less Button before pressing Start. After having used the Sensor Reheat/Cook feature a few minutes. 5. facturers' directions. 3. REMARKS: When popping multiple...
...; Press Popcorn until the desired size appears in the display window and begins to 3 seconds between pops, stop oven. Overcooking can be adjusted to a different doneness. 1 tap = More (Adds approx. 10% time) 2 taps = Less (Subtracts approx. 10% time) 3 taps = Original setting Press More/Less Button before pressing Start. After having used the Sensor Reheat/Cook feature a few minutes. 5. facturers' directions. 3. REMARKS: When popping multiple...
User Manual
Page 20
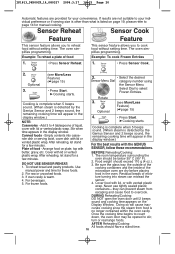
... Reheating/Cooking: DO NOT open the oven door until 2 beeps sound and cooking time appears on plate; Optional (see More/Less Feature) (☛page 15) • Press Start. Optional 4. (see More/Less Feature) (☛page 15) 2. • Select the desired Sensor Menu Dial category number using the Sensor Menu 3. • Press Start. ➤Cooking starts. Arrange food on the Display Window. Cover with lid or vented plastic wrap. Use manual power and time...
... Reheating/Cooking: DO NOT open the oven door until 2 beeps sound and cooking time appears on plate; Optional (see More/Less Feature) (☛page 15) • Press Start. Optional 4. (see More/Less Feature) (☛page 15) 2. • Select the desired Sensor Menu Dial category number using the Sensor Menu 3. • Press Start. ➤Cooking starts. Arrange food on the Display Window. Cover with lid or vented plastic wrap. Use manual power and time...
User Manual
Page 21
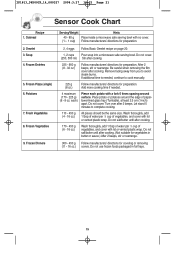
... be the same size. Do not use frozen foods packaged in butter or sauce.) After 2 beeps, stir or rearrange. 300 - 450 g Follow manufacturers' directions for preparation. Soup 4. Frozen Pizza (single) 6. Omelet 3. If additional time is needed . 4 maximum (170 - 225 g) (6 - 8 oz. Add more cooking time if needed , continue to cook manually. 225 g (8 oz.) Follow manufacturers' directions for covering or removing (11 - 16 oz.) covers. IP1813_38X00CP_14_080327 2008.3.27...
... be the same size. Do not use frozen foods packaged in butter or sauce.) After 2 beeps, stir or rearrange. 300 - 450 g Follow manufacturers' directions for preparation. Soup 4. Frozen Pizza (single) 6. Omelet 3. If additional time is needed . 4 maximum (170 - 225 g) (6 - 8 oz. Add more cooking time if needed , continue to cook manually. 225 g (8 oz.) Follow manufacturers' directions for covering or removing (11 - 16 oz.) covers. IP1813_38X00CP_14_080327 2008.3.27...

User Manual
Page 23
... Time, Kitchen Timer or Delay Time, the time on the display will continue to program a delay start of 5 minutes. 1. A change in starting temperature of the program, the oven will count down without oven operating. Rotate 3. • Press Timer/Clock. 4. CAUTION: If oven lamp is lit while using Time Select Dial to 5 minutes. Rotate 3. Time Dial • Set time, using Time Select Dial to 5 minutes. Rotate 5. • Press Start. ➤Cooking will start . Rotate 5. • Press Start. ➤Delay time will beep five times...
... Time, Kitchen Timer or Delay Time, the time on the display will continue to program a delay start of 5 minutes. 1. A change in starting temperature of the program, the oven will count down without oven operating. Rotate 3. • Press Timer/Clock. 4. CAUTION: If oven lamp is lit while using Time Select Dial to 5 minutes. Rotate 3. Time Dial • Set time, using Time Select Dial to 5 minutes. Rotate 5. • Press Start. ➤Cooking will start . Rotate 5. • Press Start. ➤Delay time will beep five times...

User Manual
Page 25
.... To steam Hand Towels - 4 P10 (HIGH) Soak in microwave oven without stirring before heating. Place on a microwave safe dish. Cup of liquid To boil water, broth, etc. 1 cup, 250 ml (8 oz.) 2 cups, 500 ml (16 oz.) P10 (HIGH) Cup of paper-towellined glass tray (Turntable), at a time) P10 (HIGH) Place tomato into a 23 cm (9-inch) 3 - 4 microwave safe pie plate. Do not heat liquids...
.... To steam Hand Towels - 4 P10 (HIGH) Soak in microwave oven without stirring before heating. Place on a microwave safe dish. Cup of liquid To boil water, broth, etc. 1 cup, 250 ml (8 oz.) 2 cups, 500 ml (16 oz.) P10 (HIGH) Cup of paper-towellined glass tray (Turntable), at a time) P10 (HIGH) Place tomato into a 23 cm (9-inch) 3 - 4 microwave safe pie plate. Do not heat liquids...
User Manual
Page 27
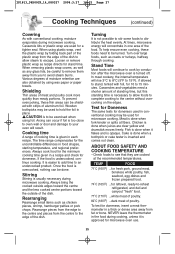
... the edge to cook by using foil. Turning It is turned off. Stand Time Most foods will result. Meat is given in a thick or dense area away from you to 15 minutes. Loosen or remove plastic wrap as any glass lids, be used for microwave oven use. 25 Cooking time A range of the dish to allow foods to complete cooking to distribute the heat evenly. Chicken is...
... the edge to cook by using foil. Turning It is turned off. Stand Time Most foods will result. Meat is given in a thick or dense area away from you to 15 minutes. Loosen or remove plastic wrap as any glass lids, be used for microwave oven use. 25 Cooking time A range of the dish to allow foods to complete cooking to distribute the heat evenly. Chicken is...
User Manual
Page 28
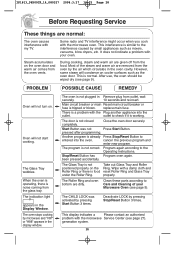
... the oven door and warm air comes from the food. The Glass Tray is noise coming from the oven by the air which circulates in the display window. The Glass Tray wobbles. generation system. 26 There is tripped or blown. This is not correct. Main circuit breaker or main Reset main circuit breaker or fuse is a problem with the microwave Service Center (see page 9). pressed after programming. Stop/Reset Button has Program oven again. Start Button was...
... the oven door and warm air comes from the food. The Glass Tray is noise coming from the oven by the air which circulates in the display window. The Glass Tray wobbles. generation system. 26 There is tripped or blown. This is not correct. Main circuit breaker or main Reset main circuit breaker or fuse is a problem with the microwave Service Center (see page 9). pressed after programming. Stop/Reset Button has Program oven again. Start Button was...
User Manual
Page 29
... proof of date of original purchase is required before warranty service is used commercially. CONTACT INFORMATION For product information and operation assistance, please contact: Our Customer Care Centre: Telephone #: 1-800 #: Fax #: Email link: (905) 624-5505 1-800-561-5505 (905) 238-2360 "Customer support" on www.panasonic.ca For defective product exchange within the warranty period, please contact the original dealer...
... proof of date of original purchase is required before warranty service is used commercially. CONTACT INFORMATION For product information and operation assistance, please contact: Our Customer Care Centre: Telephone #: 1-800 #: Fax #: Email link: (905) 624-5505 1-800-561-5505 (905) 238-2360 "Customer support" on www.panasonic.ca For defective product exchange within the warranty period, please contact the original dealer...


