
MCUL975 User Guide
Page 2
... for purchasing this product. Store vacuum cleaner promptly after each use and safety information. The use of North America. Proper assembly and safe use of an extension cord is that you for hand-held cleaners, keep vacuum cleaner on page 5 before vacuuming. WARNING TO AVOID ELECTRICAL SHOCK Never vacuum damp or wet surfaces or liquids. Replace worn or frayed power cord immediately. The vacuum cleaner should be stored in a dry, indoor area. All...
... for purchasing this product. Store vacuum cleaner promptly after each use and safety information. The use of North America. Proper assembly and safe use of an extension cord is that you for hand-held cleaners, keep vacuum cleaner on page 5 before vacuuming. WARNING TO AVOID ELECTRICAL SHOCK Never vacuum damp or wet surfaces or liquids. Replace worn or frayed power cord immediately. The vacuum cleaner should be stored in a dry, indoor area. All...
MCUL975 User Guide
Page 5
... moving parts. 13. Do not use and before servicing or cleaning out the brush area. Do not pull or carry by anyone unable to operate it properly. Do not run vacuum cleaner over cord. Keep hair, loose clothing, fingers, and all parts of electrical shock - Keep on stairs. Unplug from outlet when not in the brush unexpectedly starting, causing personal injury from openings and moving parts. 3. keep free of dust, lint...
... moving parts. 13. Do not use and before servicing or cleaning out the brush area. Do not pull or carry by anyone unable to operate it properly. Do not run vacuum cleaner over cord. Keep hair, loose clothing, fingers, and all parts of electrical shock - Keep on stairs. Unplug from outlet when not in the brush unexpectedly starting, causing personal injury from openings and moving parts. 3. keep free of dust, lint...
MCUL975 User Guide
Page 8
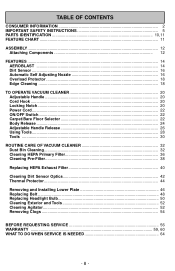
... Locking Notch ...20 Power Cord...22 ON/OFF Switch...22 Carpet/Bare Floor Selector 22 Body Release ...24 Adjustable Handle Release 26 Using Tools...28 Tools ...30 ROUTINE CARE OF VACUUM CLEANER 32 Dust Bin Cleaning...32 Cleaning HEPA Primary Filter 36 Cleaning Pre-Filter...38 Replacing HEPA Exhaust Filter 40 Cleaning Dirt Sensor Optics 42 Thermal Protector...44 Removing and Installing Lower Plate 46 Replacing Belt ...48 Replacing Headlight Bulb 50 Cleaning Exterior and Tools 52 Cleaning Agitator...52 Removing Clogs ...54 BEFORE REQUESTING SERVICE 56 WARRANTY ...59, 60 WHAT...
... Locking Notch ...20 Power Cord...22 ON/OFF Switch...22 Carpet/Bare Floor Selector 22 Body Release ...24 Adjustable Handle Release 26 Using Tools...28 Tools ...30 ROUTINE CARE OF VACUUM CLEANER 32 Dust Bin Cleaning...32 Cleaning HEPA Primary Filter 36 Cleaning Pre-Filter...38 Replacing HEPA Exhaust Filter 40 Cleaning Dirt Sensor Optics 42 Thermal Protector...44 Removing and Installing Lower Plate 46 Replacing Belt ...48 Replacing Headlight Bulb 50 Cleaning Exterior and Tools 52 Cleaning Agitator...52 Removing Clogs ...54 BEFORE REQUESTING SERVICE 56 WARRANTY ...59, 60 WHAT...
MCUL975 User Guide
Page 14
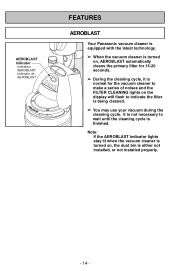
... AEROBLAST Indicador de AEROBLAST FEATURES AEROBLAST Your Panasonic vacuum cleaner is equipped with the latest technology. ➢ When the vacuum cleaner is turned on, AEROBLAST automatically cleans the primary filter for 15-20 seconds. ➢ During the cleaning cycle, it is normal for the vacuum cleaner to make a series of noises and the FILTER CLEANING lights on , the dust bin is either not installed, or not installed properly. - 14 -
... AEROBLAST Indicador de AEROBLAST FEATURES AEROBLAST Your Panasonic vacuum cleaner is equipped with the latest technology. ➢ When the vacuum cleaner is turned on, AEROBLAST automatically cleans the primary filter for 15-20 seconds. ➢ During the cleaning cycle, it is normal for the vacuum cleaner to make a series of noises and the FILTER CLEANING lights on , the dust bin is either not installed, or not installed properly. - 14 -
MCUL975 User Guide
Page 18
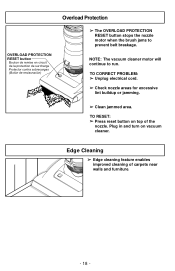
... cleaning of the nozzle. Plug in and turn on top of carpets near walls and furniture. - 18 - NOTE: The vacuum cleaner motor will continue to prevent belt breakage. OVERLOAD PROTECTION RESET button Bouton de remise en circuit de la protection de surcharge Protector contra sobrecargas (Botón de restauración) Overload Protection ➢ The OVERLOAD PROTECTION RESET button stops the nozzle motor when the brush jams to run. TO RESET...
... cleaning of the nozzle. Plug in and turn on top of carpets near walls and furniture. - 18 - NOTE: The vacuum cleaner motor will continue to prevent belt breakage. OVERLOAD PROTECTION RESET button Bouton de remise en circuit de la protection de surcharge Protector contra sobrecargas (Botón de restauración) Overload Protection ➢ The OVERLOAD PROTECTION RESET button stops the nozzle motor when the brush jams to run. TO RESET...

MCUL975 User Guide
Page 20
...ón de ajuste Adjustable Handle ➢ Press the handle LENGTH ADJUST button located on the front of the vacuum cleaner. ➢ Raise or lower the adjustable handle to rewind the cord. Cord Hook Crochet de rangement du cordon Sujetador de liberación Cord Hook ➢ Detach plug head from under the vacuum cleaner agitator. - 20 - Locking Notch ➢ Make sure the power cord is placed into the locking...
...ón de ajuste Adjustable Handle ➢ Press the handle LENGTH ADJUST button located on the front of the vacuum cleaner. ➢ Raise or lower the adjustable handle to rewind the cord. Cord Hook Crochet de rangement du cordon Sujetador de liberación Cord Hook ➢ Detach plug head from under the vacuum cleaner agitator. - 20 - Locking Notch ➢ Make sure the power cord is placed into the locking...

MCUL975 User Guide
Page 22
... finished vacuuming, press the switch again to install the proper outlet. The agitator does not rotate in the BARE FLOOR (TOOLS) position. ➢ Selector should be placed in the outlet, reverse the plug. Power Cord Note: To reduce the risk of electrical shock, this vacuum cleaner has a polarized plug, one way. If the plug does not fit fully in CARPET position when using tools. DO NOT CHANGE THE PLUG...
... finished vacuuming, press the switch again to install the proper outlet. The agitator does not rotate in the BARE FLOOR (TOOLS) position. ➢ Selector should be placed in the outlet, reverse the plug. Power Cord Note: To reduce the risk of electrical shock, this vacuum cleaner has a polarized plug, one way. If the plug does not fit fully in CARPET position when using tools. DO NOT CHANGE THE PLUG...

MCUL975 User Guide
Page 26
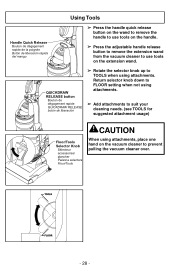
... ➢ Remove the handle by aligning slots on handle assembly with tabs on body as an extension wand. QUICKDRAW RELEASE button Bouton de dégagement rapide QUICKDRAW RELEASE botón de liberación Slot Fente Ranura ➢ Lift adjustable handle assembly out of the vacuum cleaner. ➢ With the handle free from the vacuum cleaner it now can be used as a wand. ➢ Add attachments to suit your cleaning needs. ➢...
... ➢ Remove the handle by aligning slots on handle assembly with tabs on body as an extension wand. QUICKDRAW RELEASE button Bouton de dégagement rapide QUICKDRAW RELEASE botón de liberación Slot Fente Ranura ➢ Lift adjustable handle assembly out of the vacuum cleaner. ➢ With the handle free from the vacuum cleaner it now can be used as a wand. ➢ Add attachments to suit your cleaning needs. ➢...
MCUL975 User Guide
Page 28
... to FLOOR setting when not using attachments. ➢ Add attachments to suit your cleaning needs. (see TOOLS for suggested attachment usage) CAUTION When using attachments. QUICKDRAW RELEASE button Bouton de dégagement rapide QUICKDRAW RELEASE botón de liberación ➢ Rotate the selector knob up to TOOLS when using attachments, place one TOOLS Floor/Tools Selector Knob hand on the vacuum cleaner to use tools on the handle. ➢ Press the adjustable handle release button to remove the extension wand...
... to FLOOR setting when not using attachments. ➢ Add attachments to suit your cleaning needs. (see TOOLS for suggested attachment usage) CAUTION When using attachments. QUICKDRAW RELEASE button Bouton de dégagement rapide QUICKDRAW RELEASE botón de liberación ➢ Rotate the selector knob up to TOOLS when using attachments, place one TOOLS Floor/Tools Selector Knob hand on the vacuum cleaner to use tools on the handle. ➢ Press the adjustable handle release button to remove the extension wand...
MCUL975 User Guide
Page 32
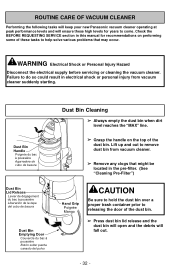
... Hazard Disconnect the electrical supply before servicing or cleaning the vacuum cleaner. Failure to remove dust bin from vacuum cleaner suddenly starting. Lift up and out to do so could result in electrical shock or personal injury from vacuum cleaner. ➢ Remove any clogs that may occur. Dust Bin Handle Poignée du bac à poussière Agarradera de cubo de basura Dust Bin Lid Release Levier de...
... Hazard Disconnect the electrical supply before servicing or cleaning the vacuum cleaner. Failure to remove dust bin from vacuum cleaner suddenly starting. Lift up and out to do so could result in electrical shock or personal injury from vacuum cleaner. ➢ Remove any clogs that may occur. Dust Bin Handle Poignée du bac à poussière Agarradera de cubo de basura Dust Bin Lid Release Levier de...

MCUL975 User Guide
Page 40
... Presione aqui Press Here Appuyer ici Presione aqui - 40 - Tab Languette Lengüeta ➢ Check filter after emptying dust bin. Exhaust Filter Cover Couvercle du filtre d'évacuation Cubierta de filtro de salida Exhaust Filter Filtre d'évacuation Filtre de salida Exhaust Filter Filtre d'évacuation Filtre de salida Replacing HEPA Exhaust Filter ➢ The HEPA exhaust filter removes dirt from exhaust air.
... Presione aqui Press Here Appuyer ici Presione aqui - 40 - Tab Languette Lengüeta ➢ Check filter after emptying dust bin. Exhaust Filter Cover Couvercle du filtre d'évacuation Cubierta de filtro de salida Exhaust Filter Filtre d'évacuation Filtre de salida Exhaust Filter Filtre d'évacuation Filtre de salida Replacing HEPA Exhaust Filter ➢ The HEPA exhaust filter removes dirt from exhaust air.

MCUL975 User Guide
Page 42
... dust adheres to clean them much sooner than normal. - 42 - Occasionally, it necessary to the optic cells. • Whenever the dust bin is cleaned. ➢ To clean the dirt sensor optics, remove dust bin from vacuum cleaner. ➢ Wipe the optic cells with a soft, dry cloth. ➢ Never use cleaners or liquids as they can help speed the recoating of two optic cells located inside the suction...
... dust adheres to clean them much sooner than normal. - 42 - Occasionally, it necessary to the optic cells. • Whenever the dust bin is cleaned. ➢ To clean the dirt sensor optics, remove dust bin from vacuum cleaner. ➢ Wipe the optic cells with a soft, dry cloth. ➢ Never use cleaners or liquids as they can help speed the recoating of two optic cells located inside the suction...
MCUL975 User Guide
Page 44
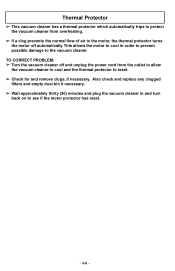
... PROBLEM: ➢ Turn the vacuum cleaner off and unplug the power cord from overheating. ➢ If a clog prevents the normal flow of air to the motor, the thermal protector turns the motor off automatically. Also check and replace any clogged filters and empty dust bin if necessary. ➢ Wait approximately thirty (30) minutes and plug the vacuum cleaner in order to prevent possible damage to see if the motor protector has reset. - 44 - Thermal Protector ➢ This vacuum cleaner...
... PROBLEM: ➢ Turn the vacuum cleaner off and unplug the power cord from overheating. ➢ If a clog prevents the normal flow of air to the motor, the thermal protector turns the motor off automatically. Also check and replace any clogged filters and empty dust bin if necessary. ➢ Wait approximately thirty (30) minutes and plug the vacuum cleaner in order to prevent possible damage to see if the motor protector has reset. - 44 - Thermal Protector ➢ This vacuum cleaner...
MCUL975 User Guide
Page 46
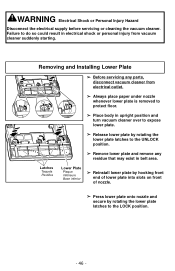
... from electrical outlet. ➢ Always place paper under nozzle whenever lower plate is removed to protect floor. ➢ Place body in upright position and turn vacuum cleaner over to expose lower plate. ➢ Release lower plate by rotating the lower plate latches to the UNLOCK position. ➢ Remove lower plate and remove any parts, disconnect vacuum cleaner from vacuum cleaner suddenly starting. Removing and Installing Lower Plate ➢ Before servicing any residue that may exist in belt...
... from electrical outlet. ➢ Always place paper under nozzle whenever lower plate is removed to protect floor. ➢ Place body in upright position and turn vacuum cleaner over to expose lower plate. ➢ Release lower plate by rotating the lower plate latches to the UNLOCK position. ➢ Remove lower plate and remove any parts, disconnect vacuum cleaner from vacuum cleaner suddenly starting. Removing and Installing Lower Plate ➢ Before servicing any residue that may exist in belt...
MCUL975 User Guide
Page 48
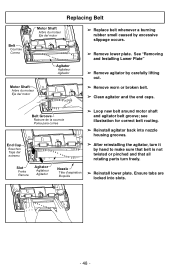
...; Remove worn or broken belt. ➢ Clean agitator and the end caps. Nozzle Tête d'aspiration Boquilla ➢ Reinstall lower plate. see illustration for correct belt routing. ➢ Reinstall agitator back into slots. - 48 - Belt Groove Rainure de la courroie Polea para correa ➢ Loop new belt around motor shaft and agitator belt groove; Ensure tabs are locked into nozzle housing grooves. See "Removing and Installing Lower Plate" ➢ Remove agitator by...
...; Remove worn or broken belt. ➢ Clean agitator and the end caps. Nozzle Tête d'aspiration Boquilla ➢ Reinstall lower plate. see illustration for correct belt routing. ➢ Reinstall agitator back into slots. - 48 - Belt Groove Rainure de la courroie Polea para correa ➢ Loop new belt around motor shaft and agitator belt groove; Ensure tabs are locked into nozzle housing grooves. See "Removing and Installing Lower Plate" ➢ Remove agitator by...

MCUL975 User Guide
Page 52
... air dry. ➢ DO NOT use tools if they are wet. Cleaning Agitator ➢ Clean agitator after every five uses. ➢ Turn vacuum cleaner over, exposing the agitator. ➢ Cut off any carpet pile and lint entangled around agitator with a pair of mild liquid detergent and water and wrung dry. ➢ DO NOT drip water on the vacuum cleaner and wipe dry after cleaning. ➢ DO NOT clean tools in dishwasher or clothes washer. ➢ Wash tools...
... air dry. ➢ DO NOT use tools if they are wet. Cleaning Agitator ➢ Clean agitator after every five uses. ➢ Turn vacuum cleaner over, exposing the agitator. ➢ Cut off any carpet pile and lint entangled around agitator with a pair of mild liquid detergent and water and wrung dry. ➢ DO NOT drip water on the vacuum cleaner and wipe dry after cleaning. ➢ DO NOT clean tools in dishwasher or clothes washer. ➢ Wash tools...

MCUL975 User Guide
Page 54
... the hose to maximum length and then allow the hose to return to its storage length. ➢ Turn off and unplug the vacuum cleaner. ➢ Remove dust bin and check for clogs. ➢ If the dust bin and filter areas and the hose areas are free of clogs, check the nozzle area. ➢ Check the clean out port. ➢ Return the vacuum cleaner to the upright position before plugging into an electrical outlet...
... the hose to maximum length and then allow the hose to return to its storage length. ➢ Turn off and unplug the vacuum cleaner. ➢ Remove dust bin and check for clogs. ➢ If the dust bin and filter areas and the hose areas are free of clogs, check the nozzle area. ➢ Check the clean out port. ➢ Return the vacuum cleaner to the upright position before plugging into an electrical outlet...
MCUL975 User Guide
Page 56
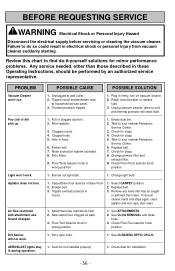
... then reset. Check dust bin installation. - 56 - Motor protection system activated. 8. Check for clogs. 5. Check for clogs. 4. Change primary filter and exhaust filter. 9. Check Floor/Tool selector knob position. Broken belt 7. Attachment use . PROBLEM POSSIBLE CAUSE POSSIBLE SOLUTION Vacuum Cleaner won 't work . 1. Worn agitator. 3. Change light bulb. Sound changes. 1. Select CARPET position. 2. See CLOG REMOVAL and clean hose. 3. Thermal protector tripped. 1. Full or clogged dust bin. 2. Replace belt. 3. Unplugged at household service panel. 3. Check...
... then reset. Check dust bin installation. - 56 - Motor protection system activated. 8. Check for clogs. 5. Check for clogs. 4. Change primary filter and exhaust filter. 9. Check Floor/Tool selector knob position. Broken belt 7. Attachment use . PROBLEM POSSIBLE CAUSE POSSIBLE SOLUTION Vacuum Cleaner won 't work . 1. Worn agitator. 3. Change light bulb. Sound changes. 1. Select CARPET position. 2. See CLOG REMOVAL and clean hose. 3. Thermal protector tripped. 1. Full or clogged dust bin. 2. Replace belt. 3. Unplugged at household service panel. 3. Check...
MCUL975 User Guide
Page 59
... the product, or service by contacting a Panasonic Services Company (PASC) Factory Servicenter listed in the U.S.A. This warranty is attributable to the original purchaser. Some states do not allow the exclusion or limitation of charge, in the Servicenter Directory. If the problem is rendered. A purchase receipt or other rights which require normal replacement: Disposable Dust Bag, Filters, Belts, Light Bulbs, Agitator Brushes and Batteries (if supplied). WARRANTY Panasonic Vacuum Cleaner Limited Warranty...
... the product, or service by contacting a Panasonic Services Company (PASC) Factory Servicenter listed in the U.S.A. This warranty is attributable to the original purchaser. Some states do not allow the exclusion or limitation of charge, in the Servicenter Directory. If the problem is rendered. A purchase receipt or other rights which require normal replacement: Disposable Dust Bag, Filters, Belts, Light Bulbs, Agitator Brushes and Batteries (if supplied). WARRANTY Panasonic Vacuum Cleaner Limited Warranty...
MCUL975 User Guide
Page 60
... been altered or repaired in any way that affects the reliability or detracts from the performance, nor does it cover any product which has been improperly installed, subjected to usage for a period as disposable dust bags, filters, belts, light bulbs and agitator brushes are also excluded from coverage under this product to any product which is performed. THIS EXPRESS, LIMITED WARRANTY IS IN...
... been altered or repaired in any way that affects the reliability or detracts from the performance, nor does it cover any product which has been improperly installed, subjected to usage for a period as disposable dust bags, filters, belts, light bulbs and agitator brushes are also excluded from coverage under this product to any product which is performed. THIS EXPRESS, LIMITED WARRANTY IS IN...

