MCUG509 User Guide
Page 2
... not followed. Always check the carpet or floor covering manufacturer's recommended cleaning instructions before use. WARNING TO AVOID RISK OF SMOKE / FIRE / ELECTRICAL SHOCK When any abnormality/failure occurs, stop using the product immediately and disconnect the power plug. Unplug from outlet when not in use to the possibility of our many satisfied customers. Store vacuum cleaner promptly after each use and before servicing. WARNING WARNING statements...
... not followed. Always check the carpet or floor covering manufacturer's recommended cleaning instructions before use. WARNING TO AVOID RISK OF SMOKE / FIRE / ELECTRICAL SHOCK When any abnormality/failure occurs, stop using the product immediately and disconnect the power plug. Unplug from outlet when not in use to the possibility of our many satisfied customers. Store vacuum cleaner promptly after each use and before servicing. WARNING WARNING statements...
MCUG509 User Guide
Page 5
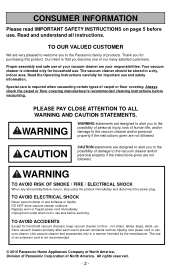
....Use extra care when cleaning on floor. 15. Turn off all instructions in this manual before servicing or cleaning out the brush area. If vacuum cleaner is burning or smoking, such as a handle, close a door on cord. Do not unplug by cord, use cord as cigarettes, matches, or hot ashes. 17.Do not use vacuum cleaner without dust bag and/or filters in use with a damaged cord or plug. Do not use with any objects into openings...
....Use extra care when cleaning on floor. 15. Turn off all instructions in this manual before servicing or cleaning out the brush area. If vacuum cleaner is burning or smoking, such as a handle, close a door on cord. Do not unplug by cord, use cord as cigarettes, matches, or hot ashes. 17.Do not use vacuum cleaner without dust bag and/or filters in use with a damaged cord or plug. Do not use with any objects into openings...
MCUG509 User Guide
Page 8
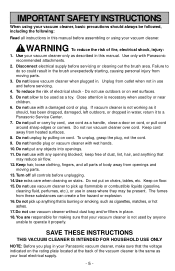
...11 ASSEMBLY ...12 Attaching Handle ...12 Using Cord Hook ...14 Tool Storage ...14 FEATURES ...16 Carpet-Bare Floor Selector 16 Thermal Protector ...18 Edge Cleaning ...18 Bag / Hose Check Indicator 18 TO OPERATE VACUUM CLEANER 20 Power Cord ...20 ON-OFF Switch ...20 Handle Adjustments...22 Tool Usage ...22 ROUTINE CARE OF VACUUM CLEANER 24 Replacing Secondary HEPA Filter 24 Changing Dust Bag ...26 Removing and Installing Lower Plate 28 Replacing Belt ...30 Cleaning Agitator ...30 Replacing Headlight Bulb 32 Cleaning Exterior and Tools 34 Removing Clogs ...36 BEFORE REQUESTING SERVICE...
...11 ASSEMBLY ...12 Attaching Handle ...12 Using Cord Hook ...14 Tool Storage ...14 FEATURES ...16 Carpet-Bare Floor Selector 16 Thermal Protector ...18 Edge Cleaning ...18 Bag / Hose Check Indicator 18 TO OPERATE VACUUM CLEANER 20 Power Cord ...20 ON-OFF Switch ...20 Handle Adjustments...22 Tool Usage ...22 ROUTINE CARE OF VACUUM CLEANER 24 Replacing Secondary HEPA Filter 24 Changing Dust Bag ...26 Removing and Installing Lower Plate 28 Replacing Belt ...30 Cleaning Agitator ...30 Replacing Headlight Bulb 32 Cleaning Exterior and Tools 34 Removing Clogs ...36 BEFORE REQUESTING SERVICE...

MCUG509 User Guide
Page 12
Power Cord Cordon d'alimentation Cordón eléctrico Retainer (Plug Head) Agrafe de fixation de la fiche du cordon Clavija ➢ Wrap power cord around cord hooks. ➢ Secure retainer (plug head) to power cord. - 12 - Handle Manche Mango Hole Orifice Orificio Screw Vis Tornillo Handle Screw Vis du manche Tornillo del mango ASSEMBLY Attaching Handle ➢ DO NOT plug in until assembly is complete. ➢ Remove handle screw. ➢ Insert handle. ➢ Insert screw. ➢ Tighten screw. ➢ Push power cord into cord clip.
Power Cord Cordon d'alimentation Cordón eléctrico Retainer (Plug Head) Agrafe de fixation de la fiche du cordon Clavija ➢ Wrap power cord around cord hooks. ➢ Secure retainer (plug head) to power cord. - 12 - Handle Manche Mango Hole Orifice Orificio Screw Vis Tornillo Handle Screw Vis du manche Tornillo del mango ASSEMBLY Attaching Handle ➢ DO NOT plug in until assembly is complete. ➢ Remove handle screw. ➢ Insert handle. ➢ Insert screw. ➢ Tighten screw. ➢ Push power cord into cord clip.

MCUG509 User Guide
Page 14
... ➢ Some tools may already be stored on wand with dusting brush on top, in round front slot of tool holder. ➢ Place crevice tool into rectangular rear slot of handle on hose holder. ➢ Attach wand to hose by aligning the two (2) raised tabs on vacuum cleaner. ➢ Place hose in front of tool holder. ➢ Refer to PARTS IDENTIFICATION section for tool location. - 14 - Wand Tube Tubo "J" Slot...
... ➢ Some tools may already be stored on wand with dusting brush on top, in round front slot of tool holder. ➢ Place crevice tool into rectangular rear slot of handle on hose holder. ➢ Attach wand to hose by aligning the two (2) raised tabs on vacuum cleaner. ➢ Place hose in front of tool holder. ➢ Refer to PARTS IDENTIFICATION section for tool location. - 14 - Wand Tube Tubo "J" Slot...
MCUG509 User Guide
Page 16
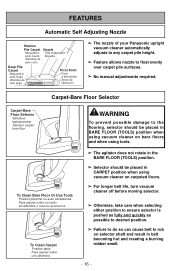
... carpet pile height. ➢ Feature allows nozzle to rub on bare floors and when using vacuum cleaner on selector shaft and result in belt becoming hot and creating a burning rubber smell. - 16 - To Clean Bare Floor Or Use Tools Position plancher ou avec accessoires Para aspirar sobre un suelo sin alfombra o usar los accesorios To Clean Carpet Position tapis Para aspirar sobre una alfombra ➢ The agitator...
... carpet pile height. ➢ Feature allows nozzle to rub on bare floors and when using vacuum cleaner on selector shaft and result in belt becoming hot and creating a burning rubber smell. - 16 - To Clean Bare Floor Or Use Tools Position plancher ou avec accessoires Para aspirar sobre un suelo sin alfombra o usar los accesorios To Clean Carpet Position tapis Para aspirar sobre una alfombra ➢ The agitator...
MCUG509 User Guide
Page 18
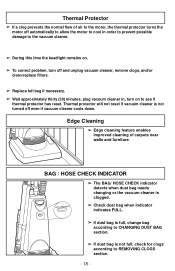
... motor to cool in , turn off even if vacuum cleaner cools down. BAG / HOSE CHECK INDICATOR HOSE / BAG CHECK HOSE / BAG CHECK ➢ The BAG/ HOSE CHECK indicator detects when dust bag needs changing or the vacuum cleaner is clogged. ➢ Check dust bag when indicator indicates FULL. ➢ If dust bag is full, change bag according to CHANGING DUST BAG section. ➢ If dust bag is not turned off and unplug vacuum cleaner, remove clogs, and/or clean/replace filters. ➢ Replace full bag if necessary. ➢ Wait approximately thirty (30) minutes, plug vacuum cleaner...
... motor to cool in , turn off even if vacuum cleaner cools down. BAG / HOSE CHECK INDICATOR HOSE / BAG CHECK HOSE / BAG CHECK ➢ The BAG/ HOSE CHECK indicator detects when dust bag needs changing or the vacuum cleaner is clogged. ➢ Check dust bag when indicator indicates FULL. ➢ If dust bag is full, change bag according to CHANGING DUST BAG section. ➢ If dust bag is not turned off and unplug vacuum cleaner, remove clogs, and/or clean/replace filters. ➢ Replace full bag if necessary. ➢ Wait approximately thirty (30) minutes, plug vacuum cleaner...
MCUG509 User Guide
Page 20
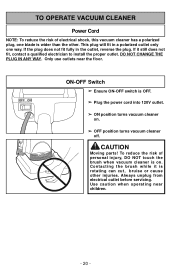
... turns vacuum cleaner off. CAUTION Moving parts! Contacting the brush while it still does not fit, contact a qualified electrician to install the proper outlet. If the plug does not fit fully in a polarized outlet only one blade is OFF. ➢ Plug the power cord into 120V outlet. ➢ ON position turns vacuum cleaner on . Use caution when operating near the floor. Always unplug from electrical outlet before servicing...
... turns vacuum cleaner off. CAUTION Moving parts! Contacting the brush while it still does not fit, contact a qualified electrician to install the proper outlet. If the plug does not fit fully in a polarized outlet only one blade is OFF. ➢ Plug the power cord into 120V outlet. ➢ ON position turns vacuum cleaner on . Use caution when operating near the floor. Always unplug from electrical outlet before servicing...

MCUG509 User Guide
Page 22
Handle Adjustments ➢ Step on the following items: • Furniture • Cushions • Drapes • Stairs • Walls ➢ The Dusting Brush may be used on the following items: • Furniture • Drapes • Stairs • Walls - 22 - Tool Usage ➢ The Crevice Tool may be used on handle release pedal to change handle position. ➢ Move vacuum cleaner to upright position for storage and tool use. ➢ Move vacuum cleaner to middle position for normal use. ➢ Use low position for cleaning under furniture.
Handle Adjustments ➢ Step on the following items: • Furniture • Cushions • Drapes • Stairs • Walls ➢ The Dusting Brush may be used on the following items: • Furniture • Drapes • Stairs • Walls - 22 - Tool Usage ➢ The Crevice Tool may be used on handle release pedal to change handle position. ➢ Move vacuum cleaner to upright position for storage and tool use. ➢ Move vacuum cleaner to middle position for normal use. ➢ Use low position for cleaning under furniture.
MCUG509 User Guide
Page 24
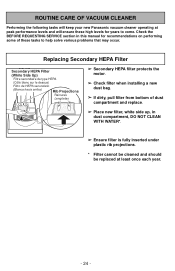
... keep your new Panasonic vacuum cleaner operating at least once each year. - 24 - Replacing Secondary HEPA Filter Secondary HEPA Filter (White Side Up) Filtre secondaire de type HEPA (Côté blanc sur le dessus) Filtro de HEPA secundario (Blanca hacia arriba) Rib Projections Rainures Lengüetas ➢ Secondary HEPA filter protects the motor. ➢ Check filter when installing a new dust bag. ➢ If dirty, pull filter from bottom of dust compartment and replace. ➢ Place new filter...
... keep your new Panasonic vacuum cleaner operating at least once each year. - 24 - Replacing Secondary HEPA Filter Secondary HEPA Filter (White Side Up) Filtre secondaire de type HEPA (Côté blanc sur le dessus) Filtro de HEPA secundario (Blanca hacia arriba) Rib Projections Rainures Lengüetas ➢ Secondary HEPA filter protects the motor. ➢ Check filter when installing a new dust bag. ➢ If dirty, pull filter from bottom of dust compartment and replace. ➢ Place new filter...
MCUG509 User Guide
Page 26
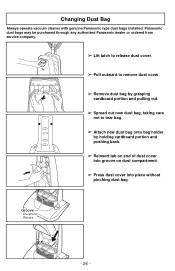
... to remove dust cover. ➢ Remove dust bag by grasping cardboard portion and pulling out. ➢ Spread out new dust bag, taking care not to tear bag. ➢ Attach new dust bag onto bag holder by holding cardboard portion and pushing back. ➢ Reinsert tab on end of dust cover into groove on dust compartment. ➢ Press dust cover into place without pinching dust bag. Changing Dust Bag Always operate vacuum cleaner with genuine Panasonic type dust bags installed. Groove...
... to remove dust cover. ➢ Remove dust bag by grasping cardboard portion and pulling out. ➢ Spread out new dust bag, taking care not to tear bag. ➢ Attach new dust bag onto bag holder by holding cardboard portion and pushing back. ➢ Reinsert tab on end of dust cover into groove on dust compartment. ➢ Press dust cover into place without pinching dust bag. Changing Dust Bag Always operate vacuum cleaner with genuine Panasonic type dust bags installed. Groove...
MCUG509 User Guide
Page 28
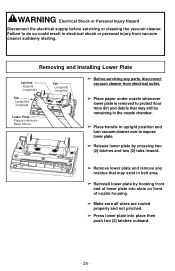
...; Release lower plate by pressing two (2) latches and two (2) tabs inward. ➢ Remove lower plate and remove any parts, disconnect vacuum cleaner from electrical outlet. ➢ Place paper under nozzle whenever lower plate is removed to protect floor from dirt and debris that may exist in electrical shock or personal injury from vacuum cleaner suddenly starting. WARNING Electrical Shock or Personal Injury Hazard Disconnect the electrical supply before servicing or cleaning the vacuum cleaner.
...; Release lower plate by pressing two (2) latches and two (2) tabs inward. ➢ Remove lower plate and remove any parts, disconnect vacuum cleaner from electrical outlet. ➢ Place paper under nozzle whenever lower plate is removed to protect floor from dirt and debris that may exist in electrical shock or personal injury from vacuum cleaner suddenly starting. WARNING Electrical Shock or Personal Injury Hazard Disconnect the electrical supply before servicing or cleaning the vacuum cleaner.

MCUG509 User Guide
Page 30
...; Remove worn or broken belt. ➢ Clean agitator. Lift Agitator Up Soulever l'agitateur Levantar el agitador Motor Shaft Arbre d'entraînement du moteur Eje del motor Agitator Pulley Poulie de l'agitateur Polea del agitador Replacing Belt ➢ Replace belt whenever a burning rubber smell caused by excessive belt slippage occurs. ➢ Remove lower plate. See: "Removing and Installing Lower Plate" - 30 - See: "Cleaning Agitator" ➢ Loop new belt (Panasonic Type UB8 only) around motor shaft and agitator...
...; Remove worn or broken belt. ➢ Clean agitator. Lift Agitator Up Soulever l'agitateur Levantar el agitador Motor Shaft Arbre d'entraînement du moteur Eje del motor Agitator Pulley Poulie de l'agitateur Polea del agitador Replacing Belt ➢ Replace belt whenever a burning rubber smell caused by excessive belt slippage occurs. ➢ Remove lower plate. See: "Removing and Installing Lower Plate" - 30 - See: "Cleaning Agitator" ➢ Loop new belt (Panasonic Type UB8 only) around motor shaft and agitator...

MCUG509 User Guide
Page 32
...;installer Para reinstalarse ➢ Disconnect power cord from the bulb could overheat surrounding plastic parts. ➢ To replace the light bulb carefully insert securely into place. - 32 - Cleaning Agitator ➢ Clean agitator after every five uses and every time the belt is replaced. ➢ Remove lower plate. ➢ Cut off any carpet pile and lint entangled around agitator with a pair of scissors. ➢ Remove agitator. ➢ Remove any string or debris located...
...;installer Para reinstalarse ➢ Disconnect power cord from the bulb could overheat surrounding plastic parts. ➢ To replace the light bulb carefully insert securely into place. - 32 - Cleaning Agitator ➢ Clean agitator after every five uses and every time the belt is replaced. ➢ Remove lower plate. ➢ Cut off any carpet pile and lint entangled around agitator with a pair of scissors. ➢ Remove agitator. ➢ Remove any string or debris located...
MCUG509 User Guide
Page 34
Cleaning Exterior and Tools ➢ Unplug cord from wall outlet. ➢ Clean exterior using a clean, soft cloth that has been dipped in a solution of mild liquid detergent and water and wrung dry. ➢ DO NOT drip water on vacuum cleaner and wipe dry after cleaning. ➢ DO NOT clean tools in dishwasher or clothes washer. ➢ Wash tools in warm soapy water, rinse and air dry. ➢ DO NOT use tools if they are wet. - 34 -
Cleaning Exterior and Tools ➢ Unplug cord from wall outlet. ➢ Clean exterior using a clean, soft cloth that has been dipped in a solution of mild liquid detergent and water and wrung dry. ➢ DO NOT drip water on vacuum cleaner and wipe dry after cleaning. ➢ DO NOT clean tools in dishwasher or clothes washer. ➢ Wash tools in warm soapy water, rinse and air dry. ➢ DO NOT use tools if they are wet. - 34 -

MCUG509 User Guide
Page 36
...; Disconnect wand and stretch hose in vacuum cleaner and turn vacuum cleaner OFF and UNPLUG POWER CORD. ➢ Remove lower plate. ➢ Inspect inlet of the vacuum cleaner carries the dirt from short hose and check wand and hose. If the hose should become clogged: ➢ Unplug vacuum cleaner. ➢ Pull open suction inlet cover and check for clogging. ➢ Disconnect wand from the nozzle up to remove clog. Short Hose Tuyau court Manguera corta ➢ Plug in and out to the dust bag.
...; Disconnect wand and stretch hose in vacuum cleaner and turn vacuum cleaner OFF and UNPLUG POWER CORD. ➢ Remove lower plate. ➢ Inspect inlet of the vacuum cleaner carries the dirt from short hose and check wand and hose. If the hose should become clogged: ➢ Unplug vacuum cleaner. ➢ Pull open suction inlet cover and check for clogging. ➢ Disconnect wand from the nozzle up to remove clog. Short Hose Tuyau court Manguera corta ➢ Plug in and out to the dust bag.
MCUG509 User Guide
Page 38
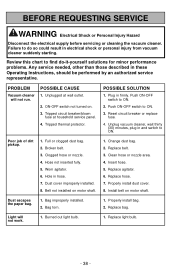
... cleaner, wait thirty (30) minutes, plug in firmly. Worn agitator. 6. Replace agitator. 6. Replace hose. 7. Bag improperly installed. 2. Replace bag. Replace light bulb. - 38 - Plug in and switch to ON. Push ON-OFF switch to ON. 3. Clogged hose or nozzle. 4. Hole in electrical shock or personal injury from vacuum cleaner suddenly starting. Install belt on motor shaft. 1. Burned out light bulb. 1. PROBLEM Vacuum cleaner will not work. 1. Tripped circuit breaker/blown fuse at wall outlet. 2. Hose not inserted fully. 5. Clean hose or nozzle area. 4. Dust...
... cleaner, wait thirty (30) minutes, plug in firmly. Worn agitator. 6. Replace agitator. 6. Replace hose. 7. Bag improperly installed. 2. Replace bag. Replace light bulb. - 38 - Plug in and switch to ON. Push ON-OFF switch to ON. 3. Clogged hose or nozzle. 4. Hole in electrical shock or personal injury from vacuum cleaner suddenly starting. Install belt on motor shaft. 1. Burned out light bulb. 1. PROBLEM Vacuum cleaner will not work. 1. Tripped circuit breaker/blown fuse at wall outlet. 2. Hose not inserted fully. 5. Clean hose or nozzle area. 4. Dust...
MCUG509 User Guide
Page 41
... which vary from accident, misuse, abuse, neglect, bug infestation, mishandling, misapplication, faulty installation, improper operation or maintenance, alteration, modification, power line surge, improper voltage supply, lightning damage, commercial use and does not cover damages which require normal replacement: Disposable Dust Bag, Filters, Belts, Light Bulbs, Agitator Brushes and Batteries (if supplied). WARRANTY Panasonic Platinum Series Vacuum Cleaner Limited Warranty Panasonic Consumer Electronics Company (collectively referred to as "the warrantor") will be required before...
... which vary from accident, misuse, abuse, neglect, bug infestation, mishandling, misapplication, faulty installation, improper operation or maintenance, alteration, modification, power line surge, improper voltage supply, lightning damage, commercial use and does not cover damages which require normal replacement: Disposable Dust Bag, Filters, Belts, Light Bulbs, Agitator Brushes and Batteries (if supplied). WARRANTY Panasonic Platinum Series Vacuum Cleaner Limited Warranty Panasonic Consumer Electronics Company (collectively referred to as "the warrantor") will be required before...
MCUG509 User Guide
Page 42
... - IN NO EVENT WILL PANASONIC CANADA INC. This warranty gives you specific legal rights and you in new condition in materials or workmanship, and DOES NOT COVER normal wear and tear or cosmetic damage. WARRANTY / Garantie / Garantia Panasonic Canada Inc. 5770, Ambler Drive, Mississauga (Ontario) L4W 2T3 PANASONIC PRODUCT - Platinum Series Vacuum Cleaner - IN ORDER TO BE ELIGIBLE TO RECEIVE WARRANTY SERVICE HEREUNDER, A PURCHASE RECEIPT...
... - IN NO EVENT WILL PANASONIC CANADA INC. This warranty gives you specific legal rights and you in new condition in materials or workmanship, and DOES NOT COVER normal wear and tear or cosmetic damage. WARRANTY / Garantie / Garantia Panasonic Canada Inc. 5770, Ambler Drive, Mississauga (Ontario) L4W 2T3 PANASONIC PRODUCT - Platinum Series Vacuum Cleaner - IN ORDER TO BE ELIGIBLE TO RECEIVE WARRANTY SERVICE HEREUNDER, A PURCHASE RECEIPT...
MCUG509 User Guide
Page 48
...: www.panasonic.ca For product repairs, please contact one of the following: • Your Dealer who will inform you of the telephone book under HOME APPLIANCE SERVICE for your nearest Panasonic Services Company ("PASC") Factory Servicenter, or PASC authorized Servicenter, or call, 1-800-211-PANA (7262) toll free to do when service is needed Service après-vente (Canada) WARRANTY SERVICE For product operation and...
...: www.panasonic.ca For product repairs, please contact one of the following: • Your Dealer who will inform you of the telephone book under HOME APPLIANCE SERVICE for your nearest Panasonic Services Company ("PASC") Factory Servicenter, or PASC authorized Servicenter, or call, 1-800-211-PANA (7262) toll free to do when service is needed Service après-vente (Canada) WARRANTY SERVICE For product operation and...


