

MCGG773 User Guide
Page 2
... use of products. Special care is intended only for important use to welcome you become one provided with the vacuum cleaner is that you to the vacuum cleaner and/or personal property if the instructions given are your vacuum cleaner are not followed. Always check the carpet or floor covering manufacturer's recommended cleaning instructions before servicing. CAUTION CAUTION statements are designed to alert you for hand-held vacuum cleaners, keep vacuum cleaner...
... use of products. Special care is intended only for important use to welcome you become one provided with the vacuum cleaner is that you to the vacuum cleaner and/or personal property if the instructions given are your vacuum cleaner are not followed. Always check the carpet or floor covering manufacturer's recommended cleaning instructions before servicing. CAUTION CAUTION statements are designed to alert you for hand-held vacuum cleaners, keep vacuum cleaner...
MCGG773 User Guide
Page 5
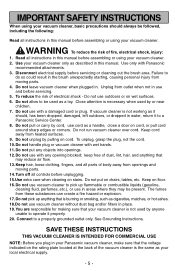
... use with a damaged cord or plug. Do not use vacuum cleaner to pick up anything that your vacuum cleaner. 2. Do not pick up flammable or combustible liquids (gasoline, cleaning fluid, perfumes, etc.), or use vacuum cleaner without dust bag and/or filters in place. 19. SAVE THESE INSTRUCTIONS THIS VACUUM CLEANER IS INTENDED FOR COMMERCIAL USE NOTE: Before you plug in your Panasonic vacuum cleaner, make sure that is not working as a toy. Unplug from openings and moving parts...
... use with a damaged cord or plug. Do not use vacuum cleaner to pick up anything that your vacuum cleaner. 2. Do not pick up flammable or combustible liquids (gasoline, cleaning fluid, perfumes, etc.), or use vacuum cleaner without dust bag and/or filters in place. 19. SAVE THESE INSTRUCTIONS THIS VACUUM CLEANER IS INTENDED FOR COMMERCIAL USE NOTE: Before you plug in your Panasonic vacuum cleaner, make sure that is not working as a toy. Unplug from openings and moving parts...

MCGG773 User Guide
Page 8
...14 Power / Extension Cord Retainer 16 Tool Storage ...16 FEATURES ...18 Automatic Self Adjusting Nozzle 18 Edge Cleaning ...18 Thermal Protector ...18 Motor Protector ...20 TO OPERATE VACUUM CLEANER 22 ON-OFF Switch ...22 Handle Adjustments...24 Tool Usage ...24 ROUTINE CARE OF VACUUM CLEANER 26 Replacing Primary HEPA Filter 26 Replacing Secondary Filter 26 Changing Dust Bag ...28 Removing and Installing Lower Plate 30 Replacing Belt ...32 Agitator Assembly ...34 Replacing Brushes...34 Cleaning Agitator ...36 Cleaning Exterior and Tools 36 Removing Clogs ...38 BEFORE REQUESTING SERVICE...
...14 Power / Extension Cord Retainer 16 Tool Storage ...16 FEATURES ...18 Automatic Self Adjusting Nozzle 18 Edge Cleaning ...18 Thermal Protector ...18 Motor Protector ...20 TO OPERATE VACUUM CLEANER 22 ON-OFF Switch ...22 Handle Adjustments...24 Tool Usage ...24 ROUTINE CARE OF VACUUM CLEANER 26 Replacing Primary HEPA Filter 26 Replacing Secondary Filter 26 Changing Dust Bag ...28 Removing and Installing Lower Plate 30 Replacing Belt ...32 Agitator Assembly ...34 Replacing Brushes...34 Cleaning Agitator ...36 Cleaning Exterior and Tools 36 Removing Clogs ...38 BEFORE REQUESTING SERVICE...
MCGG773 User Guide
Page 10
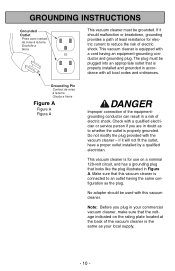
... plate located at the back of electric shock. This vacuum cleaner is properly installed and grounded in a risk of the vacuum cleaner is connected to whether the outlet is equipped with all local codes and ordinances. The plug must be used with the vacuum cleaner - if it should be grounded. Make sure that is for electric current to reduce the risk of electric shock. This vacuum cleaner...
... plate located at the back of electric shock. This vacuum cleaner is properly installed and grounded in a risk of the vacuum cleaner is connected to whether the outlet is equipped with all local codes and ordinances. The plug must be used with the vacuum cleaner - if it should be grounded. Make sure that is for electric current to reduce the risk of electric shock. This vacuum cleaner...

MCGG773 User Guide
Page 14
... (plug head) to power cord. ➢ Place the body hose back on the wand holder pressing firmly on back of vacuum cleaner. - 14 - Make sure body hose is complete. ➢ Remove handle screw from holder. ➢ When installing the handle, firmly press the handle onto the body. ➢ Insert and tighten handle screw. Cord Clip Crochet de rangement du cordon Soporte del cordón Power Cord Cordon d'alimentation Cordó...
... (plug head) to power cord. ➢ Place the body hose back on the wand holder pressing firmly on back of vacuum cleaner. - 14 - Make sure body hose is complete. ➢ Remove handle screw from holder. ➢ When installing the handle, firmly press the handle onto the body. ➢ Insert and tighten handle screw. Cord Clip Crochet de rangement du cordon Soporte del cordón Power Cord Cordon d'alimentation Cordó...

MCGG773 User Guide
Page 16
Power / Extension Cord Retainer ➢ This vacuum cleaner is equipped with a replaceable extension power cord. ➢ Use the cord retainer as illustrated to PARTS IDENTIFICATION section for tool location. Wand Tube Tubo Combination Brush Suceur combiné Cepillo combinación Crevice Tool Suceur plat Herramienta para hendiduras Fabric Brush Brosse à tissu Cepillo para telas Dusting Brush Brosse à épousseter Cepillo para sacudir - 16 - extension cord connection. Tool Storage Wand Tube Tubo "J" Slot Fente en "J" Ranura...
Power / Extension Cord Retainer ➢ This vacuum cleaner is equipped with a replaceable extension power cord. ➢ Use the cord retainer as illustrated to PARTS IDENTIFICATION section for tool location. Wand Tube Tubo Combination Brush Suceur combiné Cepillo combinación Crevice Tool Suceur plat Herramienta para hendiduras Fabric Brush Brosse à tissu Cepillo para telas Dusting Brush Brosse à épousseter Cepillo para sacudir - 16 - extension cord connection. Tool Storage Wand Tube Tubo "J" Slot Fente en "J" Ranura...
MCGG773 User Guide
Page 18
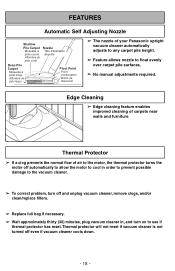
Thermal protector will not reset if vacuum cleaner is not turned off and unplug vacuum cleaner, remove clogs, and/or clean/replace filters. ➢ Replace full bag if necessary. ➢ Wait approximately thirty (30) minutes, plug vacuum cleaner in order to prevent possible damage to float evenly over carpet pile surfaces. ➢ No manual adjustments required. FEATURES Automatic Self Adjusting Nozzle Shallow Pile Carpet Moquette à poils courts Alfombra de pelo corto Deep...
Thermal protector will not reset if vacuum cleaner is not turned off and unplug vacuum cleaner, remove clogs, and/or clean/replace filters. ➢ Replace full bag if necessary. ➢ Wait approximately thirty (30) minutes, plug vacuum cleaner in order to prevent possible damage to float evenly over carpet pile surfaces. ➢ No manual adjustments required. FEATURES Automatic Self Adjusting Nozzle Shallow Pile Carpet Moquette à poils courts Alfombra de pelo corto Deep...

MCGG773 User Guide
Page 20
Motor Protector Protecteur du moteur Protector de motor Motor Protector ➢ The motor protector is located behind the wand holder on the back of the vacuum cleaner. ➢ Automatically opens to provide cooling air to the motor when a clog occurs or when dust bag is full. ➢ Motor protector may open when using tools. ➢ Check operation by placing hand over end of hose. ➢ If the motor protector opens, the vacuum cleaner will make a different sound. ➢ Do not block motor protector. - 20 -
Motor Protector Protecteur du moteur Protector de motor Motor Protector ➢ The motor protector is located behind the wand holder on the back of the vacuum cleaner. ➢ Automatically opens to provide cooling air to the motor when a clog occurs or when dust bag is full. ➢ Motor protector may open when using tools. ➢ Check operation by placing hand over end of hose. ➢ If the motor protector opens, the vacuum cleaner will make a different sound. ➢ Do not block motor protector. - 20 -
MCGG773 User Guide
Page 22
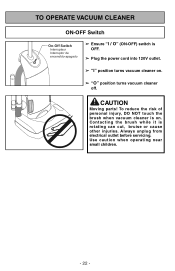
..., DO NOT touch the brush when vacuum cleaner is rotating can cut, bruise or cause other injuries. CAUTION Moving parts! Contacting the brush while it is on . ➢ "O" position turns vacuum cleaner off. P O WER TO OPERATE VACUUM CLEANER ON-OFF Switch On-Off Switch Interrupteur Interruptor de encendido-apagado ➢ Ensure "I / O" (ON-OFF) switch is OFF. ➢ Plug the power cord into 120V outlet. ➢ "I" position turns vacuum cleaner on .
..., DO NOT touch the brush when vacuum cleaner is rotating can cut, bruise or cause other injuries. CAUTION Moving parts! Contacting the brush while it is on . ➢ "O" position turns vacuum cleaner off. P O WER TO OPERATE VACUUM CLEANER ON-OFF Switch On-Off Switch Interrupteur Interruptor de encendido-apagado ➢ Ensure "I / O" (ON-OFF) switch is OFF. ➢ Plug the power cord into 120V outlet. ➢ "I" position turns vacuum cleaner on .

MCGG773 User Guide
Page 24
Dusting Brush Brosse à épousseter Cepillo para sacudir Tool Usage Fabric Brush Brosse à tissu Cepillo para telas ➢ The Crevice Tool may be used on the following items: • Furniture • Cushions • Drapes • Stairs • Walls ➢ The Combination Brush may be used on handle release pedal to change handle position. 2) ➢ Move vacuum cleaner to upright position for storage and tool use. 3) ➢ Move vacuum cleaner to...
Dusting Brush Brosse à épousseter Cepillo para sacudir Tool Usage Fabric Brush Brosse à tissu Cepillo para telas ➢ The Crevice Tool may be used on the following items: • Furniture • Cushions • Drapes • Stairs • Walls ➢ The Combination Brush may be used on handle release pedal to change handle position. 2) ➢ Move vacuum cleaner to upright position for storage and tool use. 3) ➢ Move vacuum cleaner to...
MCGG773 User Guide
Page 26
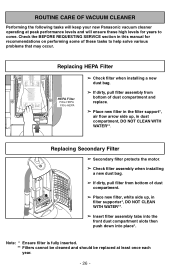
... HEPA ➢ Check filter when installing a new dust bag. ➢ If dirty, pull filter assembly from bottom of dust compartment. ➢ Place new filter, white side up , in dust compartment, DO NOT CLEAN WITH WATER**. Note: * Ensure filter is fully inserted. ** Filters cannot be cleaned and should be replaced at peak performance levels and will keep your new Panasonic vacuum cleaner operating at least once each year. - 26 - P O WER Replacing Secondary Filter ➢ Secondary filter protects the motor. ➢ Check filter assembly...
... HEPA ➢ Check filter when installing a new dust bag. ➢ If dirty, pull filter assembly from bottom of dust compartment. ➢ Place new filter, white side up , in dust compartment, DO NOT CLEAN WITH WATER**. Note: * Ensure filter is fully inserted. ** Filters cannot be cleaned and should be replaced at peak performance levels and will keep your new Panasonic vacuum cleaner operating at least once each year. - 26 - P O WER Replacing Secondary Filter ➢ Secondary filter protects the motor. ➢ Check filter assembly...
MCGG773 User Guide
Page 28
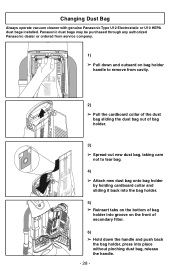
... bag holder by holding cardboard collar and sliding it back into the bag holder. 5) ➢ Reinsert tabs on the bottom of bag holder into groove on the front of secondary filter. 6) ➢ Hold down the handle and push back the bag holder, press into place without pinching dust bag, release the handle. - 28 - Changing Dust Bag Always operate vacuum cleaner with genuine Panasonic Type U12 Electrostatic or U10 HEPA dust bags installed...
... bag holder by holding cardboard collar and sliding it back into the bag holder. 5) ➢ Reinsert tabs on the bottom of bag holder into groove on the front of secondary filter. 6) ➢ Hold down the handle and push back the bag holder, press into place without pinching dust bag, release the handle. - 28 - Changing Dust Bag Always operate vacuum cleaner with genuine Panasonic Type U12 Electrostatic or U10 HEPA dust bags installed...
MCGG773 User Guide
Page 30
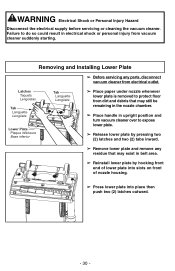
.... - 30 - Removing and Installing Lower Plate ➢ Before servicing any residue that may still be remaining in the nozzle chamber. ➢ Place handle in upright position and turn vacuum cleaner over to protect floor from dirt and debris that may exist in electrical shock or personal injury from electrical outlet. WARNING Electrical Shock or Personal Injury Hazard Disconnect the electrical supply before servicing or cleaning the vacuum cleaner. Latches Taquets...
.... - 30 - Removing and Installing Lower Plate ➢ Before servicing any residue that may still be remaining in the nozzle chamber. ➢ Place handle in upright position and turn vacuum cleaner over to protect floor from dirt and debris that may exist in electrical shock or personal injury from electrical outlet. WARNING Electrical Shock or Personal Injury Hazard Disconnect the electrical supply before servicing or cleaning the vacuum cleaner. Latches Taquets...
MCGG773 User Guide
Page 32
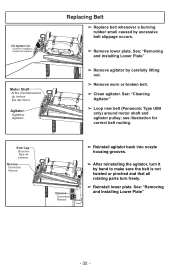
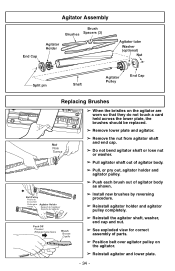
...; Reinstall agitator back into nozzle housing grooves. ➢ After reinstalling the agitator, turn it by carefully lifting out. ➢ Remove worn or broken belt. ➢ Clean agitator. See: "Removing and Installing Lower Plate" - 32 - See: "Cleaning Agitator" ➢ Loop new belt (Panasonic Type UB8 only) around motor shaft and agitator pulley; See: "Removing and Installing Lower Plate" ➢ Remove agitator by hand to make sure the belt is not twisted or pinched and that all rotating parts turn freely...
...; Reinstall agitator back into nozzle housing grooves. ➢ After reinstalling the agitator, turn it by carefully lifting out. ➢ Remove worn or broken belt. ➢ Clean agitator. See: "Removing and Installing Lower Plate" - 32 - See: "Cleaning Agitator" ➢ Loop new belt (Panasonic Type UB8 only) around motor shaft and agitator pulley; See: "Removing and Installing Lower Plate" ➢ Remove agitator by hand to make sure the belt is not twisted or pinched and that all rotating parts turn freely...
MCGG773 User Guide
Page 34
...; Pull, or pry out, agitator holder and agitator pulley. ➢ Push each brush out of agitator body as shown. ➢ Install new brushes by reversing procedure. ➢ Reinstall agitator holder and agitator pulley completely. ➢ Reinstall the agitator shaft, washer, end cap and nut. ➢ See exploded view for correct assembly of parts. ➢ Position belt over agitator pulley on the agitator. ➢ Reinstall agitator and lower plate. - 34 -
...; Pull, or pry out, agitator holder and agitator pulley. ➢ Push each brush out of agitator body as shown. ➢ Install new brushes by reversing procedure. ➢ Reinstall agitator holder and agitator pulley completely. ➢ Reinstall the agitator shaft, washer, end cap and nut. ➢ See exploded view for correct assembly of parts. ➢ Position belt over agitator pulley on the agitator. ➢ Reinstall agitator and lower plate. - 34 -
MCGG773 User Guide
Page 36
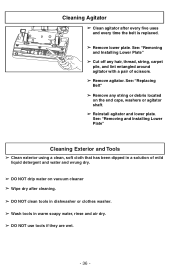
... scissors. ➢ Remove agitator. See: "Removing and Installing Lower Plate" ➢ Cut off any string or debris located on vacuum cleaner ➢ Wipe dry after every five uses and every time the belt is replaced. ➢ Remove lower plate. See: "Removing and Installing Lower Plate" Cleaning Exterior and Tools ➢ Clean exterior using a clean, soft cloth that has been dipped in warm soapy water, rinse and air dry. ➢ DO NOT use tools if they are wet. - 36 -
... scissors. ➢ Remove agitator. See: "Removing and Installing Lower Plate" ➢ Cut off any string or debris located on vacuum cleaner ➢ Wipe dry after every five uses and every time the belt is replaced. ➢ Remove lower plate. See: "Removing and Installing Lower Plate" Cleaning Exterior and Tools ➢ Clean exterior using a clean, soft cloth that has been dipped in warm soapy water, rinse and air dry. ➢ DO NOT use tools if they are wet. - 36 -

MCGG773 User Guide
Page 38
... dirt from wand holder and check hose ends. ➢ Plug in and out to the dust bag. Cover (Suction Inlet) Couvercle (entrée d'aspiration) Cubierta (Abertura de aspiración) Nozzle Hose Tuyau de tête d'aspiration Manguera de Boquilla ➢ Pull open suction inlet cover and check for clogging. Body Hose Tuyau Manguera Removing Clogs The body hose located on . ➢ Stretch body hose in vacuum cleaner and turn vacuum cleaner OFF and UNPLUG POWER CORD. ➢ Remove...
... dirt from wand holder and check hose ends. ➢ Plug in and out to the dust bag. Cover (Suction Inlet) Couvercle (entrée d'aspiration) Cubierta (Abertura de aspiración) Nozzle Hose Tuyau de tête d'aspiration Manguera de Boquilla ➢ Pull open suction inlet cover and check for clogging. Body Hose Tuyau Manguera Removing Clogs The body hose located on . ➢ Stretch body hose in vacuum cleaner and turn vacuum cleaner OFF and UNPLUG POWER CORD. ➢ Remove...
MCGG773 User Guide
Page 40
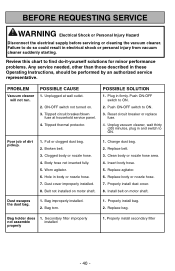
... of dirt pickup. 1. Worn agitator. 6. Change dust bag. 2. Replace body or nozzle hose. 7. Properly install secondary filter - 40 - ON-OFF switch not turned on motor shaft. POSSIBLE SOLUTION 1. Unplug vacuum cleaner, wait thirty (30) minutes, plug in and switch to do -it-yourself solutions for minor performance problems. Any service needed, other than those described in electrical shock or personal injury from vacuum cleaner suddenly starting. Clean body or nozzle hose area. 4. Install belt on . 3. Secondary filter improperly not assemble installed properly...
... of dirt pickup. 1. Worn agitator. 6. Change dust bag. 2. Replace body or nozzle hose. 7. Properly install secondary filter - 40 - ON-OFF switch not turned on motor shaft. POSSIBLE SOLUTION 1. Unplug vacuum cleaner, wait thirty (30) minutes, plug in and switch to do -it-yourself solutions for minor performance problems. Any service needed, other than those described in electrical shock or personal injury from vacuum cleaner suddenly starting. Clean body or nozzle hose area. 4. Install belt on . 3. Secondary filter improperly not assemble installed properly...
MCGG773 User Guide
Page 43
... normal replacement: Disposable Dust Bag, Filters, Belts, Light Bulbs, Agitator Brushes and Batteries (if supplied). If the problem is rendered. ALL EXPRESS AND IMPLIED WARRANTIES, INCLUDING THE WARRANTIES OF MERCHANTABILITY AND FITNESS FOR A PARTICULAR PURPOSE, ARE LIMITED TO THE APPLICABLE WARRANTY PERIOD SET FORTH ABOVE. If a problem with this product with new or refurbished parts free of original purchase will repair this product develops during the warranty period by calling the local Panasonic...
... normal replacement: Disposable Dust Bag, Filters, Belts, Light Bulbs, Agitator Brushes and Batteries (if supplied). If the problem is rendered. ALL EXPRESS AND IMPLIED WARRANTIES, INCLUDING THE WARRANTIES OF MERCHANTABILITY AND FITNESS FOR A PARTICULAR PURPOSE, ARE LIMITED TO THE APPLICABLE WARRANTY PERIOD SET FORTH ABOVE. If a problem with this product with new or refurbished parts free of original purchase will repair this product develops during the warranty period by calling the local Panasonic...

MCGG773 User Guide
Page 44
... defect for which the product was not designed, misused or abused, damaged during shipping, or which has been improperly installed, subjected to usage for a period as disposable dust bags, filters, belts, light bulbs and agitator brushes are also excluded from the performance. Parts such as stated below from the date of original purchase is required before warranty service is extended to be...
... defect for which the product was not designed, misused or abused, damaged during shipping, or which has been improperly installed, subjected to usage for a period as disposable dust bags, filters, belts, light bulbs and agitator brushes are also excluded from the performance. Parts such as stated below from the date of original purchase is required before warranty service is extended to be...


