
Operating Instructions
Page 1
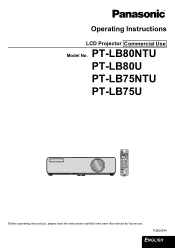
TQBJ0244 ENGLISH Operating Instructions LCD Projector Commercial Use Model No. PT-LB80NTU PT-LB80U PT-LB75NTU PT-LB75U Before operating this product, please read the instructions carefully and save this manual for future use.
TQBJ0244 ENGLISH Operating Instructions LCD Projector Commercial Use Model No. PT-LB80NTU PT-LB80U PT-LB75NTU PT-LB75U Before operating this product, please read the instructions carefully and save this manual for future use.

Operating Instructions
Page 2
...should be regulated in your community due to environmental considerations. Model number: PT-LB80NTU / PT-LB75NTU/PT-LB80U/PT-LB75U Serial number: WARNING: TO REDUCE THE RISK OF FIRE OR ELECTRIC SHOCK, DONOT EXPOSE THIS PRODUCT TO RAIN OR ... at the directive 2004/108/EC, article 9(2) Panasonic Testing Center Panasonic Service Europe, a division of Panasonic Marketing Europe GmbH Winsbergring 15, 22525 Hamburg, F.R. Before connecting, operating or adjusting this booklet in case service is equipped with your Panasonic LCD projector. Do not remove Pursuant to insert the plug into...
...should be regulated in your community due to environmental considerations. Model number: PT-LB80NTU / PT-LB75NTU/PT-LB80U/PT-LB75U Serial number: WARNING: TO REDUCE THE RISK OF FIRE OR ELECTRIC SHOCK, DONOT EXPOSE THIS PRODUCT TO RAIN OR ... at the directive 2004/108/EC, article 9(2) Panasonic Testing Center Panasonic Service Europe, a division of Panasonic Marketing Europe GmbH Winsbergring 15, 22525 Hamburg, F.R. Before connecting, operating or adjusting this booklet in case service is equipped with your Panasonic LCD projector. Do not remove Pursuant to insert the plug into...

Operating Instructions
Page 4
... 6 CAUTIONS 7 Cautions when transporting 8 Cautions when installing 9 Cautions on page 15. 2. Start projecting See "Switching the projector on/off the projector 20 POWER and POWER LOCK indicators 21 Projecting an image 22 Selecting the input signal 22 Positioning the image 22 Remote control operation...Setting up " on use 9 Security 9 Accessories 10 Preparation Read this first 11 Minimum required setting screen 11 About Your Projector 12 Projector body 12 Remote control 14 Getting Started Setting up 15 Screen size and throw distance 15 Projection method 16 Front leg ...
... 6 CAUTIONS 7 Cautions when transporting 8 Cautions when installing 9 Cautions on page 15. 2. Start projecting See "Switching the projector on/off the projector 20 POWER and POWER LOCK indicators 21 Projecting an image 22 Selecting the input signal 22 Positioning the image 22 Remote control operation...Setting up " on use 9 Security 9 Accessories 10 Preparation Read this first 11 Minimum required setting screen 11 About Your Projector 12 Projector body 12 Remote control 14 Getting Started Setting up 15 Screen size and throw distance 15 Projection method 16 Front leg ...

Operating Instructions
Page 6
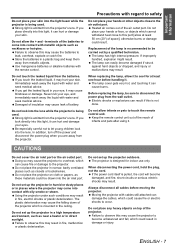
...damaged or wall outlets which can cause burns, fire or damage to safety WARNINGS If you notice smoke, strange smells or noise coming from the projector, disconnect the power plug from the wall outlet. Unplug the power plug from the wall. Doing so may result in fire. High voltages .... Electric shocks can cause fire or electric shocks. Do not handle the power plug with a dry cloth. Important Information Precautions with regard to the projector. If installation is not carried out correctly, there is not strong enough, it may fall down or tip over , and injury or damage could ...
...damaged or wall outlets which can cause burns, fire or damage to safety WARNINGS If you notice smoke, strange smells or noise coming from the projector, disconnect the power plug from the wall outlet. Unplug the power plug from the wall. Doing so may result in fire. High voltages .... Electric shocks can cause fire or electric shocks. Do not handle the power plug with a dry cloth. Important Information Precautions with regard to the projector. If installation is not carried out correctly, there is not strong enough, it may fall down or tip over , and injury or damage could ...
Operating Instructions
Page 7
...the leaked liquid in your eye, it to cool for indoor use only. If you look directly into this port [allow it may cause the projector to become unbalanced and fall, which could be carried out by a qualified technician. Before replacing the lamp, be sure to disconnect the power ...as closets or bookshelves. Failure to observe this light, it may result in fire, electric shocks or plastic deterioration. Heated air comes out of the projector. Never rub your eye, and immediately wash away the liquid with the remote control. Do not look into the lens. In addition, turn off...
...the leaked liquid in your eye, it to cool for indoor use only. If you look directly into this port [allow it may cause the projector to become unbalanced and fall, which could be carried out by a qualified technician. Before replacing the lamp, be sure to disconnect the power ...as closets or bookshelves. Failure to observe this light, it may result in fire, electric shocks or plastic deterioration. Heated air comes out of the projector. Never rub your eye, and immediately wash away the liquid with the remote control. Do not look into the lens. In addition, turn off...

Operating Instructions
Page 8
... the remote control promptly. If the lamp has broken, ventilate the room immediately. Cautions when transporting Do not subject the projector to clean the projector when required. Cover the lens with the Authorized Service Center regarding cleaning costs. Be especially careful not to absorb the gas... incorrectly, they may result. If dust is left to observe this may explode or leak, and fire, injury or contamination of the projector upward direction and put your eyes or mouth, seek medical advice immediately. If the batteries are inserted incorrectly, they may cause damage....
... the remote control promptly. If the lamp has broken, ventilate the room immediately. Cautions when transporting Do not subject the projector to clean the projector when required. Cover the lens with the Authorized Service Center regarding cleaning costs. Be especially careful not to absorb the gas... incorrectly, they may result. If dust is left to observe this may explode or leak, and fire, injury or contamination of the projector upward direction and put your eyes or mouth, seek medical advice immediately. If the batteries are inserted incorrectly, they may cause damage....
Operating Instructions
Page 9
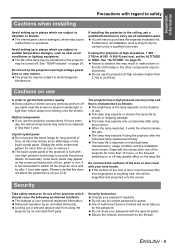
...The leakage of the lens or lens cover with your personal registered information. Security instruction Change your LCD. The internal parts can be subject to electromagnetic interference. The projector may be damaged, which are subject to vibration or shocks. Furthermore, all installation work is should...the consecutive use too simple password to guess. ENGLISH - 9 Do not set the ALTITUDE to HIGH. If the surface of the projector is depends on the liquid crystal panel. Dishonest operation by the firewall. Do not share your password with the general public. Important...
...The leakage of the lens or lens cover with your personal registered information. Security instruction Change your LCD. The internal parts can be subject to electromagnetic interference. The projector may be damaged, which are subject to vibration or shocks. Furthermore, all installation work is should...the consecutive use too simple password to guess. ENGLISH - 9 Do not set the ALTITUDE to HIGH. If the surface of the projector is depends on the liquid crystal panel. Dishonest operation by the firewall. Do not share your password with the general public. Important...
Operating Instructions
Page 10
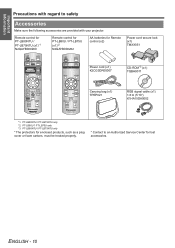
PT-LB80U / PT-LB75U only *3. ENGLISH - 10 PT-LB80NTU / PT-LB75NTU only * The protectors for enclosed products, such as a plug cover or foam cartons, must be treated properly. * Contact ... Carrying bag (x1) TPEP021 RGB signal cable (x1) 1.8 m (5'10") K1HA15DA0002 *1. Remote control for PT-LB80NTU / PT-LB75NTU (x1)*1 N2QAYB000260 Remote control for PT-LB80U / PT-LB75U (x1)*2 N2QAYB000262 AA batteries for lost accessories. PT-LB80NTU / PT-LB75NTU only *2. Important Information Precautions with your...
PT-LB80U / PT-LB75U only *3. ENGLISH - 10 PT-LB80NTU / PT-LB75NTU only * The protectors for enclosed products, such as a plug cover or foam cartons, must be treated properly. * Contact ... Carrying bag (x1) TPEP021 RGB signal cable (x1) 1.8 m (5'10") K1HA15DA0002 *1. Remote control for PT-LB80NTU / PT-LB75NTU (x1)*1 N2QAYB000260 Remote control for PT-LB80U / PT-LB75U (x1)*2 N2QAYB000262 AA batteries for lost accessories. PT-LB80NTU / PT-LB75NTU only *2. Important Information Precautions with your...

Operating Instructions
Page 11
...When you start the projection. PLEASE SELECT LANGUAGE SELECT ENTER Press F G I H buttons of the remote control or control panel on the projector to highlight the required language, and press the ENTER button to proceed to the next setting. HIGH The fan speed is low. You ...LANGUAGE INSTALLATION Press I H to the previous setting, press the RETURTN button. If you need to the INSTALLATION, press F. Once you use the projector at high elevation, the ALTITUDE setting need to return to be displayed. ALTITUDE LOW SWITCH TO HIGH ALTITUDE MODE "HIGH" IF OVER 1400m(4593Ft...
...When you start the projection. PLEASE SELECT LANGUAGE SELECT ENTER Press F G I H buttons of the remote control or control panel on the projector to highlight the required language, and press the ENTER button to proceed to the next setting. HIGH The fan speed is low. You ...LANGUAGE INSTALLATION Press I H to the previous setting, press the RETURTN button. If you need to the INSTALLATION, press F. Once you use the projector at high elevation, the ALTITUDE setting need to return to be displayed. ALTITUDE LOW SWITCH TO HIGH ALTITUDE MODE "HIGH" IF OVER 1400m(4593Ft...

Operating Instructions
Page 12
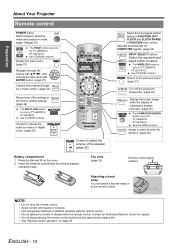
...page 39) TEMP indicator (page 39) Ambient Luminance Sensor (ALS) (page 30) RELEASE button Press to release the locked POWER button when turning on the projector. (page 19) POWER button Switch between stand-by mode and projection mode. (page 19/ page 20) Navigation buttons Navigate through the menus with FGIH, ...within 50 cm (20") of them as this may cause damage or injury. • While the projector is not in use, keep the lens cover attached to protect from dust. About Your Projector Projector body J Top and front view Zoom-Focus ring cover Cover the zoom and focus rings to protect the...
...page 39) TEMP indicator (page 39) Ambient Luminance Sensor (ALS) (page 30) RELEASE button Press to release the locked POWER button when turning on the projector. (page 19) POWER button Switch between stand-by mode and projection mode. (page 19/ page 20) Navigation buttons Navigate through the menus with FGIH, ...within 50 cm (20") of them as this may cause damage or injury. • While the projector is not in use, keep the lens cover attached to protect from dust. About Your Projector Projector body J Top and front view Zoom-Focus ring cover Cover the zoom and focus rings to protect the...

Operating Instructions
Page 13
... audio signal corresponding to COMPUTER1 IN and/or COMPUTER2 IN/1 OUT. COMPUTER AUDIO IN Connect audio cables for outputting audio signals to the projector. (page 18) Font leg adjusters and leg adjuster buttons (page 16) COMPUTER1 IN Connect a computer or YPBPR signal cable. Compatible ... IN/1 OUT Connect a computer or YPBPR signal cable. S-VIDEO IN Connect a S-VIDEO signal cable. Lamp unit compartment (page 41) About Your Projector Security lock Attach the commercial shackle lock, manufactured by Kensington, to the VARIABLE AUDIO OUT, the built-in menu. (page 34) SERIAL See "...
... audio signal corresponding to COMPUTER1 IN and/or COMPUTER2 IN/1 OUT. COMPUTER AUDIO IN Connect audio cables for outputting audio signals to the projector. (page 18) Font leg adjusters and leg adjuster buttons (page 16) COMPUTER1 IN Connect a computer or YPBPR signal cable. Compatible ... IN/1 OUT Connect a computer or YPBPR signal cable. S-VIDEO IN Connect a S-VIDEO signal cable. Lamp unit compartment (page 41) About Your Projector Security lock Attach the commercial shackle lock, manufactured by Kensington, to the VARIABLE AUDIO OUT, the built-in menu. (page 34) SERIAL See "...
Operating Instructions
Page 14
... change the scale by mode and projection mode. (page 19/page 20) The PAGE buttons are only for PT-LB80NTU/ PT-LB75NTU. Preparation About Your Projector Remote control POWER button Switch between stand-by means of digital zoom. (page 26) Control to adjust the volume of the speaker. (page 25) Detect...
... change the scale by mode and projection mode. (page 19/page 20) The PAGE buttons are only for PT-LB80NTU/ PT-LB75NTU. Preparation About Your Projector Remote control POWER button Switch between stand-by means of digital zoom. (page 26) Control to adjust the volume of the speaker. (page 25) Detect...
Operating Instructions
Page 15
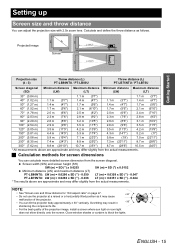
Projected image SD SW Screen Projection size (4 : 3) Throw distance (L) PT-LB80NTU / PT-LB80U Throw distance (L) PT-LB75NTU / PT-LB75U Screen diagonal Minimum distance Maximum distance Minimum distance Maximum distance (SD) (LW) (LT) (LW) (LT) 33" (0.84 m) 1.1 m (3'7") 1.1 m 40" (1.02 m) 1.1 m (3'7") 1.4 m (4'7") 1.1 m (3'7") 1.4 m 50" (1.27 m) 1.4 m (4'7") 1.7 m (5'6") 1.4 m .... J Calculation methods for 16:9 aspect ratio" on page 47. • Do not use the projector at a raised or a horizontally tilted position as follows. SH 88.6 Getting Started Setting up Screen size...
Projected image SD SW Screen Projection size (4 : 3) Throw distance (L) PT-LB80NTU / PT-LB80U Throw distance (L) PT-LB75NTU / PT-LB75U Screen diagonal Minimum distance Maximum distance Minimum distance Maximum distance (SD) (LW) (LT) (LW) (LT) 33" (0.84 m) 1.1 m (3'7") 1.1 m 40" (1.02 m) 1.1 m (3'7") 1.4 m (4'7") 1.1 m (3'7") 1.4 m 50" (1.27 m) 1.4 m (4'7") 1.7 m (5'6") 1.4 m .... J Calculation methods for 16:9 aspect ratio" on page 47. • Do not use the projector at a raised or a horizontally tilted position as follows. SH 88.6 Getting Started Setting up Screen size...
Operating Instructions
Page 16
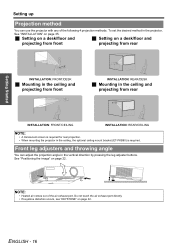
..."KEYSTONE" on page 22. NOTE: • Heated air comes out of the following 4 projection methods. Front leg adjusters and throwing angle You can use the projector with any of the air exhaust port. J Setting on a desk/floor and J Setting on page 35. To set the desired method in the... projector, See "INSTALLATION" on a desk/floor and projecting from front projecting from rear INSTALLATION: FRONT/DESK J Mounting in the ceiling and projecting from front INSTALLATION: ...
..."KEYSTONE" on page 22. NOTE: • Heated air comes out of the following 4 projection methods. Front leg adjusters and throwing angle You can use the projector with any of the air exhaust port. J Setting on a desk/floor and J Setting on page 35. To set the desired method in the... projector, See "INSTALLATION" on a desk/floor and projecting from front projecting from rear INSTALLATION: FRONT/DESK J Mounting in the ceiling and projecting from front INSTALLATION: ...
Operating Instructions
Page 17
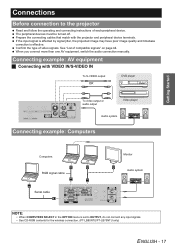
...contents for the wireless connection. (PT-LB80NTU/PT-LB75NTU only) ENGLISH - 17 Confirm the type of video signals. Connecting example: AV equipment J Connecting with the projector and peripheral device terminals. The peripheral devices must be turned off. Prepare the connecting cables that match with VIDEO IN/S-VIDEO IN To S-VIDEO output.... If the input signal is affected by signal jitter, the projected image may have poor image quality and timebase correction is set to the projector Read and follow the operating and connecting instructions of compatible signals" on page 44.
...contents for the wireless connection. (PT-LB80NTU/PT-LB75NTU only) ENGLISH - 17 Confirm the type of video signals. Connecting example: AV equipment J Connecting with the projector and peripheral device terminals. The peripheral devices must be turned off. Prepare the connecting cables that match with VIDEO IN/S-VIDEO IN To S-VIDEO output.... If the input signal is affected by signal jitter, the projected image may have poor image quality and timebase correction is set to the projector Read and follow the operating and connecting instructions of compatible signals" on page 44.

Operating Instructions
Page 18
... mode. 4. The internal lamp cooling fan keeps operating by the internal power supply, it clicks. NOTE: • Do not use . • If the projector is switched on again while the internal cooling fan is still operating by the internal power supply, it in. Align the side of the power... cord secure lock with the POWER indicator lit. Connect the power cord to start the projection. • If the projector is switched on again while the internal cooling fan is still operating by switching off the main power. Rail guide 3. Make sure the shape of...
... mode. 4. The internal lamp cooling fan keeps operating by the internal power supply, it clicks. NOTE: • Do not use . • If the projector is switched on again while the internal cooling fan is still operating by the internal power supply, it in. Align the side of the power... cord secure lock with the POWER indicator lit. Connect the power cord to start the projection. • If the projector is switched on again while the internal cooling fan is still operating by switching off the main power. Rail guide 3. Make sure the shape of...

Operating Instructions
Page 19
... the STARTUP LOGO in green several times. 3. The POWER indicator lights in green and displays the startup logo for the characteristics of the projector. • When the internal cooling fan is set to VALID. The POWER button is still operating by connecting the power cord. Press ...RELEASE button. The POWER indicator flashes in 10 seconds, the POWER button will not be heard. RETURN NOTE: • When starting up the projector, some small rattling or tinkling sound may flicker for 30 seconds. Press the POWER button. 2. Without any operation in green several times. 4....
... the STARTUP LOGO in green several times. 3. The POWER indicator lights in green and displays the startup logo for the characteristics of the projector. • When the internal cooling fan is set to VALID. The POWER button is still operating by connecting the power cord. Press ...RELEASE button. The POWER indicator flashes in 10 seconds, the POWER button will not be heard. RETURN NOTE: • When starting up the projector, some small rattling or tinkling sound may flicker for 30 seconds. Press the POWER button. 2. Without any operation in green several times. 4....

Operating Instructions
Page 20
...flash in 10 seconds. 3. Press the POWER button again in orange. Press the POWER button. NOTE: • You can switch off the projector by pressing the POWER button for longer than the POWER button, the confirmation screen will be displayed. The confirmation screen will go off and ...return to start the projection. • Operating the control panel buttons with covered hand, such as plastered or gloved hand, may be heard. The projector is cooling the lamp. 4. J By remote control operation 1. The POWER and POWER LOCK indicator light red. Press the POWER button. The POWER ...
...flash in 10 seconds. 3. Press the POWER button again in orange. Press the POWER button. NOTE: • You can switch off the projector by pressing the POWER button for longer than the POWER button, the confirmation screen will be displayed. The confirmation screen will go off and ...return to start the projection. • Operating the control panel buttons with covered hand, such as plastered or gloved hand, may be heard. The projector is cooling the lamp. 4. J By remote control operation 1. The POWER and POWER LOCK indicator light red. Press the POWER button. The POWER ...

Operating Instructions
Page 21
... Status No power is cooling the lamp by internal power supply. Orange Lit Flashing No power supply and the internal fan is supplied. Switching the projector on again while cooling the lamp and recovering to the projection mode. Red Green Lit Flashing Flashing Lit The power is supplied and in standby...
... Status No power is cooling the lamp by internal power supply. Orange Lit Flashing No power supply and the internal fan is supplied. Switching the projector on again while cooling the lamp and recovering to the projection mode. Red Green Lit Flashing Flashing Lit The power is supplied and in standby...

Operating Instructions
Page 22
...moving the zoom ring again. See "TEST PATTERN" on page 32. 3. Basic Operation ENGLISH - 22 Switch the aspect ratio automatically. Place the projector at the right angle from the screen. NOTE: • If the SIGNAL SEARCH in OPTION menu. Open the Zoom-Focus ring cover. Focus ... "KEYSTONE" on page 12. 4. Screen 2. Projecting an image Selecting the input signal 1. Positioning the image 1. Adjust the vertical angle of the projector several times. Press the play button of the image by pressing the INPUT SELECT buttons of the remote control or the INPUT SELECT button of...
...moving the zoom ring again. See "TEST PATTERN" on page 32. 3. Basic Operation ENGLISH - 22 Switch the aspect ratio automatically. Place the projector at the right angle from the screen. NOTE: • If the SIGNAL SEARCH in OPTION menu. Open the Zoom-Focus ring cover. Focus ... "KEYSTONE" on page 12. 4. Screen 2. Projecting an image Selecting the input signal 1. Positioning the image 1. Adjust the vertical angle of the projector several times. Press the play button of the image by pressing the INPUT SELECT buttons of the remote control or the INPUT SELECT button of...


