Operating Instructions
Page 2
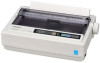
... of 2 manuals. Installation Manual (printed documentation) The Installation Manual explains installation procedures. 2 Operating Instructions In most cases, there will be no need to operate with the most popular software packages. Introduction Introduction Thank you for purchasing the Panasonic KX-P1121E Impact Dot Matrix Printer. Your application software should control the printer's functions. Feature Highlights Printer Emulation: Font...
... of 2 manuals. Installation Manual (printed documentation) The Installation Manual explains installation procedures. 2 Operating Instructions In most cases, there will be no need to operate with the most popular software packages. Introduction Introduction Thank you for purchasing the Panasonic KX-P1121E Impact Dot Matrix Printer. Your application software should control the printer's functions. Feature Highlights Printer Emulation: Font...
Operating Instructions
Page 5
... 12 Unpacking ...12 Removing the Protective Paper 12 Installing the Platen Knob 12 Parts of the Printer ...13 Setup ...16 Installing the Software ...16 System Requirements ...16 Software Installation ...16 Connecting to a Computer 17 Power Supply ...17 Installing the Ribbon Cassette 18 Mounting the Ribbon Cassette 18... 31 Paper Parking (LOAD/PARK Switch 31 Maintenance & Troubleshooting 32 Periodic Maintenance ...32 Troubleshooting ...33 Appendix 35 Printer Specifications ...35 Paper Specifications ...37 Fanfold Paper ...37 Single Sheets ...37 Envelopes ...37 Operating Instructions 5
... 12 Unpacking ...12 Removing the Protective Paper 12 Installing the Platen Knob 12 Parts of the Printer ...13 Setup ...16 Installing the Software ...16 System Requirements ...16 Software Installation ...16 Connecting to a Computer 17 Power Supply ...17 Installing the Ribbon Cassette 18 Mounting the Ribbon Cassette 18... 31 Paper Parking (LOAD/PARK Switch 31 Maintenance & Troubleshooting 32 Periodic Maintenance ...32 Troubleshooting ...33 Appendix 35 Printer Specifications ...35 Paper Specifications ...37 Fanfold Paper ...37 Single Sheets ...37 Envelopes ...37 Operating Instructions 5
Operating Instructions
Page 11
...outlet form which you can easily unplug it is hot. Caution Labels Operation • Do not operate the printer without installing paper and a ribbon cassette. • Do not obstruct printhead movement while the printer is operating. • Protect the unit from rapid changes in temperature. • Do not place the...other items on the front and/or back of CD-ROM. • Do not touch the data side of the CD-ROM. Please ask your Panasonic sales company about the ink ribbon, please refer to 80 % RH). • Avoid condensation resulting from static electricity. Do not touch. CD-...
...outlet form which you can easily unplug it is hot. Caution Labels Operation • Do not operate the printer without installing paper and a ribbon cassette. • Do not obstruct printhead movement while the printer is operating. • Protect the unit from rapid changes in temperature. • Do not place the...other items on the front and/or back of CD-ROM. • Do not touch the data side of the CD-ROM. Please ask your Panasonic sales company about the ink ribbon, please refer to 80 % RH). • Avoid condensation resulting from static electricity. Do not touch. CD-...

Operating Instructions
Page 12
CD-ROM Installation Manual 12 Operating Instructions Push the platen knob onto the platen shaft to the store from which the unit was purchased. Removing the Protective Paper A Printer (KX-P1121E) Ribbon Cassette (KX-P145) Platen Knob A Protective paper Installing the Platen Knob Insert the platen knob into the hole on the right side of the contents shown below is missing or damaged. Report damage or shortages to secure. Before You Start Before You Start Unpacking Having unpacked the printer, make sure none of the printer and rotate it slowly until it slips onto the shaft.
CD-ROM Installation Manual 12 Operating Instructions Push the platen knob onto the platen shaft to the store from which the unit was purchased. Removing the Protective Paper A Printer (KX-P1121E) Ribbon Cassette (KX-P145) Platen Knob A Protective paper Installing the Platen Knob Insert the platen knob into the hole on the right side of the contents shown below is missing or damaged. Report damage or shortages to secure. Before You Start Before You Start Unpacking Having unpacked the printer, make sure none of the printer and rotate it slowly until it slips onto the shaft.
Operating Instructions
Page 15
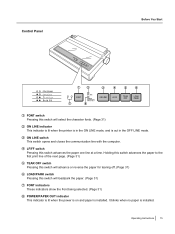
... off. (Page 31) LOAD/PARK switch Pressing this switch will select the character fonts. (Page 31) ON LINE indicator This indicator is lit when the printer is in the ON LINE mode, and is out in the OFF LINE mode. Control Panel Before You Start AB C D E F G H FONT switch Pressing ... indicators show the Font being selected. (Page 31) POWER/PAPER OUT indicator This indicator is lit when the power is on and paper is installed. ON LINE switch This switch opens and closes the communication line with the computer. Operating Instructions 15 LF/FF switch Pressing this switch advances the...
... off. (Page 31) LOAD/PARK switch Pressing this switch will select the character fonts. (Page 31) ON LINE indicator This indicator is lit when the printer is in the ON LINE mode, and is out in the OFF LINE mode. Control Panel Before You Start AB C D E F G H FONT switch Pressing ... indicators show the Font being selected. (Page 31) POWER/PAPER OUT indicator This indicator is lit when the power is on and paper is installed. ON LINE switch This switch opens and closes the communication line with the computer. Operating Instructions 15 LF/FF switch Pressing this switch advances the...
Operating Instructions
Page 16
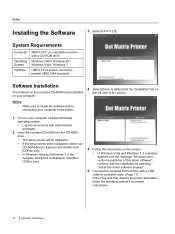
...and start Windows operating system. • Log into the CD-ROM drive. • The setup screen will be installed on your computer to the printer. 4. Select [Driver & Utility] from the "Installation" list on the screen. • In Windows Vista and Windows 7, if a window appears with the message ...KX-P1121E. Follow the instructions on the left side of this driver software anyway". 6. Notice • Make sure to the printer with the installation by selecting "Install this driver software", continue with a USB cable or a parallel cable. (Page 17) Once Plug and Play detects the...
...and start Windows operating system. • Log into the CD-ROM drive. • The setup screen will be installed on your computer to the printer. 4. Select [Driver & Utility] from the "Installation" list on the screen. • In Windows Vista and Windows 7, if a window appears with the message ...KX-P1121E. Follow the instructions on the left side of this driver software anyway". 6. Notice • Make sure to the printer with the installation by selecting "Install this driver software", continue with a USB cable or a parallel cable. (Page 17) Once Plug and Play detects the...
Operating Instructions
Page 17
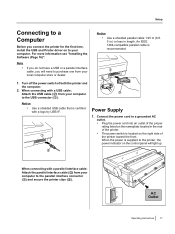
... by USB-IF. Note • If you do not have a USB or a parallel interface cable, you connect the printer for the first time, install the USB and Printer driver on to your local computer store or dealer. 1. Connect the power cord to a grounded AC outlet. • ... nameplate located in length. A B C Power Supply 1. AC Outlet Operating Instructions 17 For more information see "Installing the Software (Page 16)". Turn off the power switch of the printer toward the front. Notice • Use a shielded USB cable that is recommended. Setup Connecting to a Computer ...
... by USB-IF. Note • If you do not have a USB or a parallel interface cable, you connect the printer for the first time, install the USB and Printer driver on to your local computer store or dealer. 1. Connect the power cord to a grounded AC outlet. • ... nameplate located in length. A B C Power Supply 1. AC Outlet Operating Instructions 17 For more information see "Installing the Software (Page 16)". Turn off the power switch of the printer toward the front. Notice • Use a shielded USB cable that is recommended. Setup Connecting to a Computer ...
Operating Instructions
Page 18
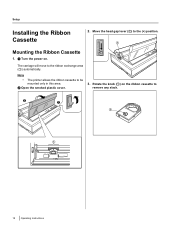
A Mounting the Ribbon Cassette 1. B Open the smoked plastic cover. 3. A Turn the power on the ribbon cassette to the (+) position. B A A A 18 Operating Instructions Rotate the knob (A) on . The carriage will move to be mounted only in this area. Note • The printer allows the ribbon cassette to the ribbon exchange area (A) automatically. Setup Installing the Ribbon Cassette 2. Move the head gap lever (A) to remove any slack.
A Mounting the Ribbon Cassette 1. B Open the smoked plastic cover. 3. A Turn the power on the ribbon cassette to the (+) position. B A A A 18 Operating Instructions Rotate the knob (A) on . The carriage will move to be mounted only in this area. Note • The printer allows the ribbon cassette to the ribbon exchange area (A) automatically. Setup Installing the Ribbon Cassette 2. Move the head gap lever (A) to remove any slack.
Operating Instructions
Page 20
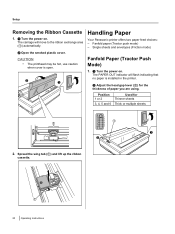
...up the ribbon cassette. Position 1 or 2 3, 4, 5 and 6 Used for the thickness of paper you are using. B A Handling Paper Your Panasonic printer offers two paper feed choices: - Single sheets and envelopes (Friction mode) Fanfold Paper (Tractor Push Mode) 1. A 20 Operating Instructions CAUTION • ...The printhead may be hot, use caution when cover is installed in the printer. Setup Removing the Ribbon Cassette 1. A Turn the power on . B Open the smoked plastic cover. B Adjust the head gap ...
...up the ribbon cassette. Position 1 or 2 3, 4, 5 and 6 Used for the thickness of paper you are using. B A Handling Paper Your Panasonic printer offers two paper feed choices: - Single sheets and envelopes (Friction mode) Fanfold Paper (Tractor Push Mode) 1. A 20 Operating Instructions CAUTION • ...The printhead may be hot, use caution when cover is installed in the printer. Setup Removing the Ribbon Cassette 1. A Turn the power on . B Open the smoked plastic cover. B Adjust the head gap ...
Operating Instructions
Page 23
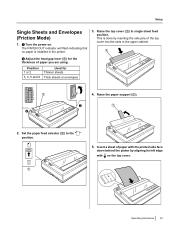
... edge with the printed side face down behind the platen by inserting the side pins of the top cover into the slots in the printer. 3. Raise the paper support (A). Set the paper feed selector (A) to single sheet feed position. Setup Single Sheets and Envelopes (Friction Mode) ...1. This is installed in the upper cabinet. A Operating Instructions 23 A Turn the power on the top cover. A B Adjust the head gap lever (A) for Thinner sheets...
... edge with the printed side face down behind the platen by inserting the side pins of the top cover into the slots in the printer. 3. Raise the paper support (A). Set the paper feed selector (A) to single sheet feed position. Setup Single Sheets and Envelopes (Friction Mode) ...1. This is installed in the upper cabinet. A Operating Instructions 23 A Turn the power on the top cover. A B Adjust the head gap lever (A) for Thinner sheets...
Operating Instructions
Page 25
...are required, you can also be no changes are rarely used to "EPSON". The printer is necessary to install the printer driver to use this software, you should be ready to change the configuration of the printer. Using this software. If no need to print. When using the Windows driver,...) Off (Not available) TOF set (# / 72 inch) Tractor: 0-360 Friction: 0-360 Note • The following items can also print out the printer's character table. In most popular software packages. It is compatible with most cases there will be set to change the initial setup items. To start...
...are required, you can also be no changes are rarely used to "EPSON". The printer is necessary to install the printer driver to use this software, you should be ready to change the configuration of the printer. Using this software. If no need to print. When using the Windows driver,...) Off (Not available) TOF set (# / 72 inch) Tractor: 0-360 Friction: 0-360 Note • The following items can also print out the printer's character table. In most popular software packages. It is compatible with most cases there will be set to change the initial setup items. To start...
Operating Instructions
Page 26
... the built-in font in Windows Vista and Windows 7, select [Uninstall a program]. 2. Select the desired table. Select [Panasonic KX-P1121 Series] to the printer. After pressing this button, the screen to select your computer, follow the procedure below to uninstall them. 1. Select your country... from the second time, the screen to select your country is displayed. Note • The screen to select your country is installed on your country is not displayed here, select [Other country]. When you want to the Command Reference Manual, select [Command Reference...
... the built-in font in Windows Vista and Windows 7, select [Uninstall a program]. 2. Select the desired table. Select [Panasonic KX-P1121 Series] to the printer. After pressing this button, the screen to select your computer, follow the procedure below to uninstall them. 1. Select your country... from the second time, the screen to select your country is displayed. Note • The screen to select your country is installed on your country is not displayed here, select [Other country]. When you want to the Command Reference Manual, select [Command Reference...
Operating Instructions
Page 33
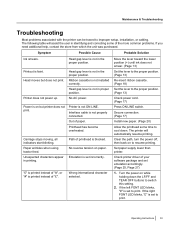
Head moves but printer does not print. Power is not installed correctly. Out of printhead is set incorrectly. Unexpected...to resume printing. Clear the path, turn the power off, then back on but does not print. Check printer driver of "£". Operating Instructions 33 Ribbon cassette is on to the proper position. (Page 13) Check power...No AC power. Emulation is printed instead of your software package and set to improper setup, installation, or cabling. Secure connection. (Page 17) Install new paper. (Page 20) Allow the printhead some of "#", or "#" is set to ...
Head moves but printer does not print. Power is not installed correctly. Out of printhead is set incorrectly. Unexpected...to resume printing. Clear the path, turn the power off, then back on but does not print. Check printer driver of "£". Operating Instructions 33 Ribbon cassette is on to the proper position. (Page 13) Check power...No AC power. Emulation is printed instead of your software package and set to improper setup, installation, or cabling. Secure connection. (Page 17) Install new paper. (Page 20) Allow the printhead some of "#", or "#" is set to ...
Operating Instructions
Page 41
... switch 15 M Maintenance 32 Micron 35 O ON LINE indicator 15 ON LINE switch 15 Operating environment 11 Overheat Detector 36 P Page length 25 Paper 37 installation 20 specifications 37 Paper Feed 36 Friction Mode 23, 36 Tractor Mode 20, 36 Paper feed selector 13 Paper Feeding 31 Paper Out Detector 36... Paper Parking 31 Paper support 13 Paper thickness 13 Parallel Interface connector 13, 17 Parts of the Printer 13 Pica 35 Pitch 35 Platen knob 14 Power Requirements 35 Power switch 14, 17 POWER/PAPER OUT indicator 15 Precautions 11 Prestige 35 Print...
... switch 15 M Maintenance 32 Micron 35 O ON LINE indicator 15 ON LINE switch 15 Operating environment 11 Overheat Detector 36 P Page length 25 Paper 37 installation 20 specifications 37 Paper Feed 36 Friction Mode 23, 36 Tractor Mode 20, 36 Paper feed selector 13 Paper Feeding 31 Paper Out Detector 36... Paper Parking 31 Paper support 13 Paper thickness 13 Parallel Interface connector 13, 17 Parts of the Printer 13 Pica 35 Pitch 35 Platen knob 14 Power Requirements 35 Power switch 14, 17 POWER/PAPER OUT indicator 15 Precautions 11 Prestige 35 Print...


