Operating Instructions
Page 22
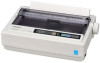
Replace the top cover. 10. If the ON LINE indicator (A) is straight. 7. B B A A 9. Press LOAD/PARK . Make sure the paper is not lit, press ON LINE to get ready to the first print line. B Lock the tractor clamping levers. A 22 Operating Instructions Place the paper with the printed side face down and align the paper sprocket holes with the tractor pins, then close the tractor covers. 8. This will load the paper to print. A Adjust the tractors to remove any slack. Setup 6.
Replace the top cover. 10. If the ON LINE indicator (A) is straight. 7. B B A A 9. Press LOAD/PARK . Make sure the paper is not lit, press ON LINE to get ready to the first print line. B Lock the tractor clamping levers. A 22 Operating Instructions Place the paper with the printed side face down and align the paper sprocket holes with the tractor pins, then close the tractor covers. 8. This will load the paper to print. A Adjust the tractors to remove any slack. Setup 6.
Operating Instructions
Page 23
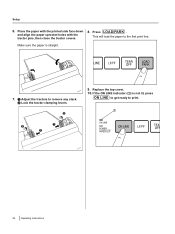
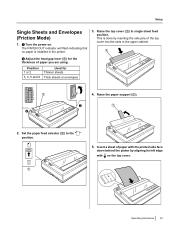
... the thickness of the top cover into the slots in the printer. 3. The PAPER OUT indicator will flash indicating that no paper is done by aligning its left edge with the printed side face down behind the platen by inserting the side pins of paper you are using. Raise the paper...
... the thickness of the top cover into the slots in the printer. 3. The PAPER OUT indicator will flash indicating that no paper is done by aligning its left edge with the printed side face down behind the platen by inserting the side pins of paper you are using. Raise the paper...
