
KXFL421 User Guide
Page 5
...procedures other than those specified herein may form inside the unit, causing malfunction. Do not touch the fuser unit. Toner cartridge Be careful of this unit utilizes a laser. CIS's LED light properties LED radiation output : Max. 1 mW Wavelength : Green 520 nm typical Emission ... Never install telephone wiring during a lightning storm. Direct eye exposure can cause eye damage. For assistance, please visit http://www.panasonic.com/help 5 Important Information Installation and relocation After moving the unit from cold areas to warmer areas, wait approximately 30 minutes...
...procedures other than those specified herein may form inside the unit, causing malfunction. Do not touch the fuser unit. Toner cartridge Be careful of this unit utilizes a laser. CIS's LED light properties LED radiation output : Max. 1 mW Wavelength : Green 520 nm typical Emission ... Never install telephone wiring during a lightning storm. Direct eye exposure can cause eye damage. For assistance, please visit http://www.panasonic.com/help 5 Important Information Installation and relocation After moving the unit from cold areas to warmer areas, wait approximately 30 minutes...

KXFL421 User Guide
Page 6
... injury. 1. This may damage the drum. L For optimal performance, genuine Panasonic toner cartridges and drum units are recommended. It will decrease the toner life. After you begin installation of time, unplug this unit to fuse toner onto the page. Exposing it is less than 10 °C (50 &#... noise generating devices, such as TVs or speakers which generate an intense magnetic field. L The unit should never be caused by a non-Panasonic toner cartridge or drum unit: - L Do not place heavy objects on the unit. L In the printing process, heat is skin irritation, ...
... injury. 1. This may damage the drum. L For optimal performance, genuine Panasonic toner cartridges and drum units are recommended. It will decrease the toner life. After you begin installation of time, unplug this unit to fuse toner onto the page. Exposing it is less than 10 °C (50 &#... noise generating devices, such as TVs or speakers which generate an intense magnetic field. L The unit should never be caused by a non-Panasonic toner cartridge or drum unit: - L Do not place heavy objects on the unit. L In the printing process, heat is skin irritation, ...

KXFL421 User Guide
Page 8
... 7.3 Advanced features 43 8. Reports 47 8.2 Error messages - Display 48 Troubleshooting 8.3 When a function does not work 50 Replacement 8.4 Replacing the toner cartridge and the drum unit 54 9. Copy Copying 6.1 Making a copy 39 7. Help Error Messages 8.1 Error messages - Distinctive Ring Distinctive Ring ... three or more phone numbers on a single telephone line 38 5.4 Programming the ring pattern assigned for fax 38 6. Table of buttons 11 1.4 Overview 12 Installation 1.5 Toner cartridge and drum unit 13 1.6 Paper tray 15 1.7 Paper stacker 15 1.8 Document stacker 16 1.9 ...
... 7.3 Advanced features 43 8. Reports 47 8.2 Error messages - Display 48 Troubleshooting 8.3 When a function does not work 50 Replacement 8.4 Replacing the toner cartridge and the drum unit 54 9. Copy Copying 6.1 Making a copy 39 7. Help Error Messages 8.1 Error messages - Distinctive Ring Distinctive Ring ... three or more phone numbers on a single telephone line 38 5.4 Programming the ring pattern assigned for fax 38 6. Table of buttons 11 1.4 Overview 12 Installation 1.5 Toner cartridge and drum unit 13 1.6 Paper tray 15 1.7 Paper stacker 15 1.8 Document stacker 16 1.9 ...

KXFL421 User Guide
Page 10
....) k Operating instructions l Quick installation guide (PNQX3022Z)*1 (PNQW1708Z)*1 10 For assistance, please visit http://www.panasonic.com/help L After unpacking the product, take care of Panasonic toner cartridge and drum unit. To ensure that the unit operates properly, we recommend the use of the packing... materials and/or power plug cap appropriately. 1.2 Accessory information Accessories for this unit can be ordered online, by fax, or by ...
....) k Operating instructions l Quick installation guide (PNQX3022Z)*1 (PNQW1708Z)*1 10 For assistance, please visit http://www.panasonic.com/help L After unpacking the product, take care of Panasonic toner cartridge and drum unit. To ensure that the unit operates properly, we recommend the use of the packing... materials and/or power plug cap appropriately. 1.2 Accessory information Accessories for this unit can be ordered online, by fax, or by ...

KXFL421 User Guide
Page 13
... assistance, please visit http://www.panasonic.com/help 13 Introduction and Installation Installation 1.5 Toner cartridge and drum unit The supplied toner cartridge is a starter toner cartridge. Exposing it vertically more than 5 times. 3 Place the toner cartridge (1) into the drum unit (2) vertically. 1 2 4 Press down the toner cartridge firmly (1). L Do not leave the toner cartridge out of the new...
... assistance, please visit http://www.panasonic.com/help 13 Introduction and Installation Installation 1.5 Toner cartridge and drum unit The supplied toner cartridge is a starter toner cartridge. Exposing it vertically more than 5 times. 3 Place the toner cartridge (1) into the drum unit (2) vertically. 1 2 4 Press down the toner cartridge firmly (1). L Do not leave the toner cartridge out of the new...
KXFL421 User Guide
Page 14
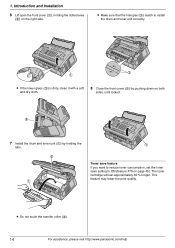
... will last approximately 40 % longer. L Do not touch the transfer roller (2). 14 For assistance, please visit http://www.panasonic.com/help L Make sure that the triangles (3) match to install the drum and toner unit correctly. 3 2 1 L If the lower glass (3) is dirty, clean it with a soft and dry cloth. 8 Close... the front cover (1) by pushing down on both sides, until locked. 3 7 Install the drum and toner unit (1) by holding the dotted area (2) on page 45). Introduction and Installation 6 Lift open the front cover (1), holding the tabs...
... will last approximately 40 % longer. L Do not touch the transfer roller (2). 14 For assistance, please visit http://www.panasonic.com/help L Make sure that the triangles (3) match to install the drum and toner unit correctly. 3 2 1 L If the lower glass (3) is dirty, clean it with a soft and dry cloth. 8 Close... the front cover (1) by pushing down on both sides, until locked. 3 7 Install the drum and toner unit (1) by holding the dotted area (2) on page 45). Introduction and Installation 6 Lift open the front cover (1), holding the tabs...

KXFL421 User Guide
Page 45
... status of paper. Programmable Features Feature/Code Setting the toner maintenance time {#}{6}{5} Setting the maximum fax speed {#}{6}{6} Setting the Error Correction Mode (ECM) {#}{6}{8} Setting flash time {#}{7}{2} Setting the connecting tone {#}{7}{6} Setting toner save feature {#}{7}{9} Selection The unit will last longer. ... unit automatically prints reports/lists. L The connecting tone volume cannot be a fax machine or may lower the print quality by reducing toner consumption. If you to hear connecting tones: fax tone, ring back tone and busy tone. Check with the other party. ...
... status of paper. Programmable Features Feature/Code Setting the toner maintenance time {#}{6}{5} Setting the maximum fax speed {#}{6}{6} Setting the Error Correction Mode (ECM) {#}{6}{8} Setting flash time {#}{7}{2} Setting the connecting tone {#}{7}{6} Setting toner save feature {#}{7}{9} Selection The unit will last longer. ... unit automatically prints reports/lists. L The connecting tone volume cannot be a fax machine or may lower the print quality by reducing toner consumption. If you to hear connecting tones: fax tone, ring back tone and busy tone. Check with the other party. ...

KXFL421 User Guide
Page 48
... Replace the drum unit as soon as possible (page 54). 48 For assistance, please visit http://www.panasonic.com/help 8. Re-insert it . L The unit has a document in a warmer area. L There...not installed or the unit has run out of the following messages will be operated. For fax memory capacity, see page 65. Contact our service personnel. Contact our service personnel. Re-...one or more sheets and try again. L There is complete. Replace the drum unit and the toner cartridge (page 54). Install paper (page 17) and press {Start} to clear the message. ...
... Replace the drum unit as soon as possible (page 54). 48 For assistance, please visit http://www.panasonic.com/help 8. Re-insert it . L The unit has a document in a warmer area. L There...not installed or the unit has run out of the following messages will be operated. For fax memory capacity, see page 65. Contact our service personnel. Contact our service personnel. Re-...one or more sheets and try again. L There is complete. Replace the drum unit and the toner cartridge (page 54). Install paper (page 17) and press {Start} to clear the message. ...

KXFL421 User Guide
Page 49
... paper or a recording paper jam. L The fax message was printed on paper which is cold. Use the appropriate size paper (page 65), and press {Start} to a lack of the unit is shorter than letter-size paper. L The toner life is complete. Let the unit warm up.... while. Display "RX MEMORY FULL" "TONER EMPTY" "CHANGE SUPPLIES" "TONER LOW" "CHANGE SUPPLIES" "TRANSMIT ERROR" "WARM UP" "WRONG PAPER" 8. L The toner life is near to an end. L A transmission error occurred. For assistance, please visit http://www.panasonic.com/help 49 Replace the toner cartridge as soon as possible (page 54...
... paper or a recording paper jam. L The fax message was printed on paper which is cold. Use the appropriate size paper (page 65), and press {Start} to a lack of the unit is shorter than letter-size paper. L The toner life is complete. Let the unit warm up.... while. Display "RX MEMORY FULL" "TONER EMPTY" "CHANGE SUPPLIES" "TONER LOW" "CHANGE SUPPLIES" "TRANSMIT ERROR" "WARM UP" "WRONG PAPER" 8. L The toner life is near to an end. L A transmission error occurred. For assistance, please visit http://www.panasonic.com/help 49 Replace the toner cartridge as soon as possible (page 54...

KXFL421 User Guide
Page 52
... Solution L If documents can be something wrong with a cotton and/or fiber content that they cannot send a document. Verify the remote fax activation code (feature #41 on . Make the copy after programming. Please do not insert a document before correction fluid has dried completely.... 52 For assistance, please visit http://www.panasonic.com/help I cannot receive documents by pressing {*}{#}{9}. L The unit is poor. L The remaining toner is still poor, replace the toner cartridge and drum unit. Install paper (page 17) or remove the jammed...
... Solution L If documents can be something wrong with a cotton and/or fiber content that they cannot send a document. Verify the remote fax activation code (feature #41 on . Make the copy after programming. Please do not insert a document before correction fluid has dried completely.... 52 For assistance, please visit http://www.panasonic.com/help I cannot receive documents by pressing {*}{#}{9}. L The unit is poor. L The remaining toner is still poor, replace the toner cartridge and drum unit. Install paper (page 17) or remove the jammed...
KXFL421 User Guide
Page 53
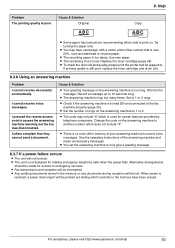
... arrangements should be lost. For assistance, please visit http://www.panasonic.com/help 53 I cannot receive documents automatically. L Check if the answering machine is too ...and erase unnecessary messages. L The code may have been erased. L The unit is poor. L Fax transmission and reception will not function. 8. Cause & Solution Original ABC Copy L Some paper has instructions... 1 or 2 rings. L The recording paper is low. Use new paper. L The remaining toner is too damp. I cannot receive voice messages. Cause & Solution L Your greeting message on the...
... arrangements should be lost. For assistance, please visit http://www.panasonic.com/help 53 I cannot receive documents automatically. L Check if the answering machine is too ...and erase unnecessary messages. L The code may have been erased. L The unit is poor. L Fax transmission and reception will not function. 8. Cause & Solution Original ABC Copy L Some paper has instructions... 1 or 2 rings. L The recording paper is low. Use new paper. L The remaining toner is too damp. I cannot receive voice messages. Cause & Solution L Your greeting message on the...

KXFL421 User Guide
Page 54
... (page 64). Once you have opened the protection bag: - L Do not leave the toner cartridge out of Panasonic toner cartridge (Model No. 8. Help Replacement 8.4 Replacing the toner cartridge and the drum unit When the display shows the following, replace the toner cartridge. See page 10 for any damage to direct sunlight. Caution: L We cannot be... the unit. Peel off the seal (1) from the use of the protection bag for more than 5 minutes. - If printing quality is still poor, replace the toner cartridge and drum unit. Loss of fax documents in a high humidity area. -
... (page 64). Once you have opened the protection bag: - L Do not leave the toner cartridge out of Panasonic toner cartridge (Model No. 8. Help Replacement 8.4 Replacing the toner cartridge and the drum unit When the display shows the following, replace the toner cartridge. See page 10 for any damage to direct sunlight. Caution: L We cannot be... the unit. Peel off the seal (1) from the use of the protection bag for more than 5 minutes. - If printing quality is still poor, replace the toner cartridge and drum unit. Loss of fax documents in a high humidity area. -
KXFL421 User Guide
Page 55
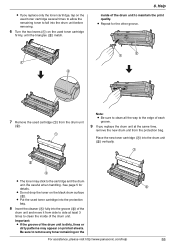
...L If the groove of the drum unit to maintain the print quality. Be sure to remove any toner remaining on the black drum surface (3). L Do not drop the toner on the For assistance, please visit http://www.panasonic.com/help 2 55 Help inside of each groove. 9 If you replace only the... toner cartridge, tap on the used toner cartridge several times to allow the remaining toner to fall into the drum unit before removing....
...L If the groove of the drum unit to maintain the print quality. Be sure to remove any toner remaining on the black drum surface (3). L Do not drop the toner on the For assistance, please visit http://www.panasonic.com/help 2 55 Help inside of each groove. 9 If you replace only the... toner cartridge, tap on the used toner cartridge several times to allow the remaining toner to fall into the drum unit before removing....
KXFL421 User Guide
Page 56
... the handset on each side of the toner cartridge towards you (2). 1 2 1 2 12 Install the drum and toner unit (1) by pushing down the toner cartridge firmly (1). L If the lower ...glass (2) is dirty, clean it with a soft and dry cloth. 2 2 13 Close the front cover (1) by holding the tabs. 1 11 Make sure that the triangles (1) match, to install the toner... cartridge correctly. 1 L Make sure that the triangles (2) match to install the drum and toner unit correctly. Keep pressing...
... the handset on each side of the toner cartridge towards you (2). 1 2 1 2 12 Install the drum and toner unit (1) by pushing down the toner cartridge firmly (1). L If the lower ...glass (2) is dirty, clean it with a soft and dry cloth. 2 2 13 Close the front cover (1) by holding the tabs. 1 11 Make sure that the triangles (1) match, to install the toner... cartridge correctly. 1 L Make sure that the triangles (2) match to install the drum and toner unit correctly. Keep pressing...

KXFL421 User Guide
Page 58
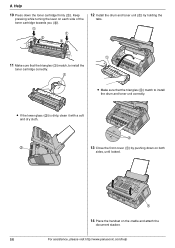
... touch it. 3 Remove the jammed paper (1) carefully by pushing down on both sides, until locked. 9.1.1 When the recording paper has jammed near the drum and toner unit 1 Remove the handset and document stacker. 2 Lift open the front cover (1), holding the dotted area (2) on the right side. 1 3 2 5 Place the handset on the...
... touch it. 3 Remove the jammed paper (1) carefully by pushing down on both sides, until locked. 9.1.1 When the recording paper has jammed near the drum and toner unit 1 Remove the handset and document stacker. 2 Lift open the front cover (1), holding the dotted area (2) on the right side. 1 3 2 5 Place the handset on the...

KXFL421 User Guide
Page 59
L Do not touch the transfer roller (4). 4 Lift both green levers (1) forward until they stop. 1 1 7 Close the front cover (1) by pulling it upwards carefully, then install the drum and toner unit. 4 1 2 1 3 6 Push back the levers (1) to the original position. Paper Jams 3 Remove the recording paper (1), then remove the drum and toner unit (2) to allow the jammed paper (3) to pull free from the rear cabinet. 5 Remove the jammed paper (1) from the fuser unit by pushing down on both sides, until locked. 1 59 9.
L Do not touch the transfer roller (4). 4 Lift both green levers (1) forward until they stop. 1 1 7 Close the front cover (1) by pulling it upwards carefully, then install the drum and toner unit. 4 1 2 1 3 6 Push back the levers (1) to the original position. Paper Jams 3 Remove the recording paper (1), then remove the drum and toner unit (2) to allow the jammed paper (3) to pull free from the rear cabinet. 5 Remove the jammed paper (1) from the fuser unit by pushing down on both sides, until locked. 1 59 9.

KXFL421 User Guide
Page 62
... not use paper products, such as paper towels or tissues, to clean the inside of the unit: - Caution: L Be careful when handling the drum and toner unit. Cleaning 1C0leCanleinagning 10.1 Cleaning the inside of the unit Clean the inside of your original, or on page 54 for the drum unit on...
... not use paper products, such as paper towels or tissues, to clean the inside of the unit: - Caution: L Be careful when handling the drum and toner unit. Cleaning 1C0leCanleinagning 10.1 Cleaning the inside of the unit Clean the inside of your original, or on page 54 for the drum unit on...

KXFL421 User Guide
Page 63
... (1) by holding the tabs. 1 3 1 2 L Do not damage the transparent sheet (3) when cleaning the document feeder roller. 7 Push back the inner cover. 8 Remove the drum and toner unit (1) by pushing down on the cradle and attach the document stacker. 13 Re-connect the power cord and the telephone line cord. 63 Cleaning... isopropyl rubbing alcohol, and let all parts dry thoroughly. 10. Clean the upper glass (2) with a soft and dry cloth. 10 Re-install the drum and toner unit (1) by holding the two tabs.
... (1) by holding the tabs. 1 3 1 2 L Do not damage the transparent sheet (3) when cleaning the document feeder roller. 7 Push back the inner cover. 8 Remove the drum and toner unit (1) by pushing down on the cradle and attach the document stacker. 13 Re-connect the power cord and the telephone line cord. 63 Cleaning... isopropyl rubbing alcohol, and let all parts dry thoroughly. 10. Clean the upper glass (2) with a soft and dry cloth. 10 Re-install the drum and toner unit (1) by holding the two tabs.

KXFL421 User Guide
Page 64
If printing quality is still poor, replace the toner cartridge and drum unit. - To print automatically after subscribing to a Caller ID service. "SETUP LIST": Provides you to start printing. "PRINTER TEST": Allows you with ... of the programming features (page 42 to exit. 64 General Information 1P1rinGtedneRraelpIonrftosrmation 11.1 Reference lists and reports You can be printed automatically after every 30 fax communications (feature #22 on page 43). - "BROADCAST LIST": Provides you with the current settings of the last 30 callers after every 30 callers, activate feature...
If printing quality is still poor, replace the toner cartridge and drum unit. - To print automatically after subscribing to a Caller ID service. "SETUP LIST": Provides you to start printing. "PRINTER TEST": Allows you with ... of the programming features (page 42 to exit. 64 General Information 1P1rinGtedneRraelpIonrftosrmation 11.1 Reference lists and reports You can be printed automatically after every 30 fax communications (feature #22 on page 43). - "BROADCAST LIST": Provides you with the current settings of the last 30 callers after every 30 callers, activate feature...

KXFL421 User Guide
Page 66
... your drum will be printed by your computer. 4.7 Fax sending/receiving using Multi-Function Station Thank you use for purchasing a Panasonic fax machine. L If you for printing small number sheets per print job. General Information Toner life Toner life depends on the rear of the unit) Dealer's... name and address Dealer's telephone number Note: L The image area changes with the depth, thickness and size of Attach your unit is often used for purchasing a Panasonic fax machine. The following...
... your drum will be printed by your computer. 4.7 Fax sending/receiving using Multi-Function Station Thank you use for purchasing a Panasonic fax machine. L If you for printing small number sheets per print job. General Information Toner life Toner life depends on the rear of the unit) Dealer's... name and address Dealer's telephone number Note: L The image area changes with the depth, thickness and size of Attach your unit is often used for purchasing a Panasonic fax machine. The following...
