Multi-line Phone
Page 1
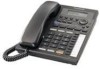
KX-TS3282B KX-TS3282W Pulse-or-tone dialing capability Basic Operation Advanced Operation Useful Information INTERCOM KX-TS3282W 2 LINE Caller ID Compatible PLEASE READ BEFORE USE AND SAVE. Panasonic World Wide Web address: http://www.panasonic.com for customers in the USA or Puerto Rico Preparation Integrated Telephone System Operating Instructions Model No.
KX-TS3282B KX-TS3282W Pulse-or-tone dialing capability Basic Operation Advanced Operation Useful Information INTERCOM KX-TS3282W 2 LINE Caller ID Compatible PLEASE READ BEFORE USE AND SAVE. Panasonic World Wide Web address: http://www.panasonic.com for customers in the USA or Puerto Rico Preparation Integrated Telephone System Operating Instructions Model No.
Multi-line Phone
Page 2
Attach your new Panasonic integrated telephone. After subscribing to both Caller ID with the first caller, requires a subscription to Caller ID, this phone will display a caller's name and ... address of dealer Date of purchase 2 Call Waiting Caller ID, which displays a second caller's name and phone number while the user is on the phone line with Name and Call Waiting Service.
Attach your new Panasonic integrated telephone. After subscribing to both Caller ID with the first caller, requires a subscription to Caller ID, this phone will display a caller's name and ... address of dealer Date of purchase 2 Call Waiting Caller ID, which displays a second caller's name and phone number while the user is on the phone line with Name and Call Waiting Service.
Multi-line Phone
Page 3
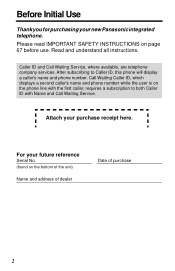
AC Adaptor (p. 10) Order No. Accessories (included) For extra orders, call : 1-800-211-PANA(7262) 3 PQJA212V (Black) PQJA212M (White) one For assistance, please call 1-800-332-5368. PQJXC0401Z (Black) PQJXC0402Z (White) three Handset Cord (p. 10) Order No. PQJA10075Z one one 4-Wire Telephone Line Cord with Transparent Plugs (p. 13, 14) Order No. KX-TCA1-G AA (R6, UM-3) Batteries (p. 9) one 2-Wire Telephone Line Cord with Green Plugs (p. 11-13) Order No. PQJA10088Z one Handset (p. 10) Order No.
AC Adaptor (p. 10) Order No. Accessories (included) For extra orders, call : 1-800-211-PANA(7262) 3 PQJA212V (Black) PQJA212M (White) one For assistance, please call 1-800-332-5368. PQJXC0401Z (Black) PQJXC0402Z (White) three Handset Cord (p. 10) Order No. PQJA10075Z one one 4-Wire Telephone Line Cord with Transparent Plugs (p. 13, 14) Order No. KX-TCA1-G AA (R6, UM-3) Batteries (p. 9) one 2-Wire Telephone Line Cord with Green Plugs (p. 11-13) Order No. PQJA10088Z one Handset (p. 10) Order No.
Multi-line Phone
Page 4
Contents Preparation Location of Controls 6 Display 8 Installation 9 Installing the Batteries 9 Connecting the Handset and AC Adaptor 10 Connecting Telephone Line Cords 11 Connecting a Communication Device 14 Programmable Settings 15 Time and Date 15 Assigning the Extension Number 17 Programming Summary 19 Dialing Mode 20 LCD ...
Contents Preparation Location of Controls 6 Display 8 Installation 9 Installing the Batteries 9 Connecting the Handset and AC Adaptor 10 Connecting Telephone Line Cords 11 Connecting a Communication Device 14 Programmable Settings 15 Time and Date 15 Assigning the Extension Number 17 Programming Summary 19 Dialing Mode 20 LCD ...

Multi-line Phone
Page 5
...Room Monitor Feature 49 Making/Answering Another Call During a Conversation 50 Conference 51 Special Features 52 How to Use the PAUSE Button (For PBX Line/Long Distance Calls). . . 52 Muting Your Conversation 52 For Call Waiting Service Users 52 Temporary Tone Dialing (For Rotary or Pulse Service... Users 53 FLASH Button 53 Incoming Call Tone 54 Line Selection 55 Setting the Password 56 Dial Lock 57 Call Restriction 58 Call Privacy Feature 60 Useful Information Optional Headset 61 Connecting the...
...Room Monitor Feature 49 Making/Answering Another Call During a Conversation 50 Conference 51 Special Features 52 How to Use the PAUSE Button (For PBX Line/Long Distance Calls). . . 52 Muting Your Conversation 52 For Call Waiting Service Users 52 Temporary Tone Dialing (For Rotary or Pulse Service... Users 53 FLASH Button 53 Incoming Call Tone 54 Line Selection 55 Setting the Password 56 Dial Lock 57 Call Restriction 58 Call Privacy Feature 60 Useful Information Optional Headset 61 Connecting the...
Multi-line Phone
Page 6
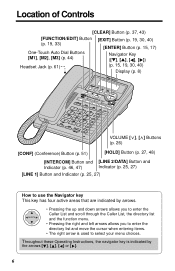
... Key ([w], [v p. 15, 19, 30, 40) Display (p. 8) w w w w VOLUME [ ], [ ] Buttons (p. 26) [CONF] (Conference) Button (p. 51) [HOLD] Button (p. 27, 48) [INTERCOM] Button and [LINE 2/DATA] Button and Indicator (p. 46, 47) Indicator (p. 25, 27) [LINE 1] Button and Indicator (p. 25, 27) How to select your menu choices. Throughout these Operating Instructions, the navigator key is indicated by...
... Key ([w], [v p. 15, 19, 30, 40) Display (p. 8) w w w w VOLUME [ ], [ ] Buttons (p. 26) [CONF] (Conference) Button (p. 51) [HOLD] Button (p. 27, 48) [INTERCOM] Button and [LINE 2/DATA] Button and Indicator (p. 46, 47) Indicator (p. 25, 27) [LINE 1] Button and Indicator (p. 25, 27) How to select your menu choices. Throughout these Operating Instructions, the navigator key is indicated by...
Multi-line Phone
Page 8
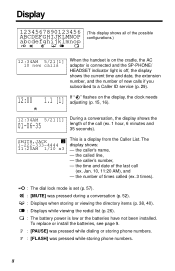
... directory items (p. 38, 40). : Displays while viewing the redial list (p. 26). : The battery power is a display from the Caller List. the number of times called line, -
... directory items (p. 38, 40). : Displays while viewing the redial list (p. 26). : The battery power is a display from the Caller List. the number of times called line, -

Multi-line Phone
Page 9
... intercom.) 2 1 1. Replace all of the arrow and remove it. 2. Press down the cover in proper order as shown, matching the correct polarity. 3. Disconnect the telephone line cord(s) before opening the battery cover. • You do not install the batteries, the data in the battery compartment. The unit will work as a standard...
... intercom.) 2 1 1. Replace all of the arrow and remove it. 2. Press down the cover in proper order as shown, matching the correct polarity. 3. Disconnect the telephone line cord(s) before opening the battery cover. • You do not install the batteries, the data in the battery compartment. The unit will work as a standard...
Multi-line Phone
Page 11
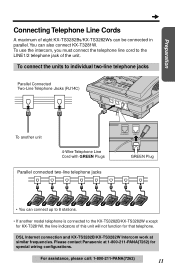
.... • If another model telephone is connected to the LINE1/2 telephone jack of the unit. Please contact Panasonic at similar frequencies. To use the intercom, you must connect the telephone line cord to the KX-TS3282B/KX-TS3282W e xcept for special wiring configurations. You can be connected in parallel. For assistance, please call...
.... • If another model telephone is connected to the LINE1/2 telephone jack of the unit. Please contact Panasonic at similar frequencies. To use the intercom, you must connect the telephone line cord to the KX-TS3282B/KX-TS3282W e xcept for special wiring configurations. You can be connected in parallel. For assistance, please call...
Multi-line Phone
Page 12
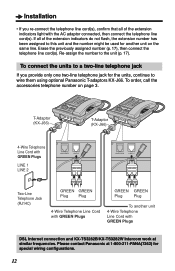
... number on the same line. To connect the units to a two-line telephone jack If you re-connect the telephone line cord(s), confirm that all of the extension indicators light with GREEN Plugs DSL Internet connection and KX-TS3282B/KX-TS3282W Intercom work at ...wire them using optional Panasonic T-adaptors KX-J66. Please contact Panasonic at similar frequencies. Re-assign the number to the unit (p. 17). T-Adaptor (KX-J66) T-Adaptor (KX-J66) 4-Wire Telephone Line Cord with GREEN Plugs LINE 1 LINE 2 LINE2/DATA LINE1/2 LINE2/DATA LINE1/2 Two-Line Telephone Jack (RJ14C)...
... number on the same line. To connect the units to a two-line telephone jack If you re-connect the telephone line cord(s), confirm that all of the extension indicators light with GREEN Plugs DSL Internet connection and KX-TS3282B/KX-TS3282W Intercom work at ...wire them using optional Panasonic T-adaptors KX-J66. Please contact Panasonic at similar frequencies. Re-assign the number to the unit (p. 17). T-Adaptor (KX-J66) T-Adaptor (KX-J66) 4-Wire Telephone Line Cord with GREEN Plugs LINE 1 LINE 2 LINE2/DATA LINE1/2 LINE2/DATA LINE1/2 Two-Line Telephone Jack (RJ14C)...
Multi-line Phone
Page 13
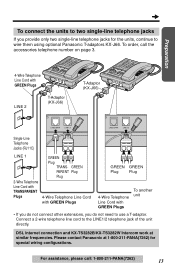
... KX-TS3282B/KX-TS3282W Intercom work at 1-800-211-PANA(7262) for the units, continue to the LINE1/2 telephone jack of the unit directly. Preparation To connect the units to two single-line telephone jacks If you do not need to use a T-adaptor. Please contact Panasonic ...at similar frequencies. Connect a 2-wire telephone line cord to wire them using optional Panasonic T-adaptors KX-J66. GREEN PARENT Plug Plug 4-Wire Telephone Line Cord with GREEN Plugs GREEN GREEN Plug Plug 4-Wire Telephone Line Cord with TRANSPARENT Plugs GREEN Plug ...
... KX-TS3282B/KX-TS3282W Intercom work at 1-800-211-PANA(7262) for the units, continue to the LINE1/2 telephone jack of the unit directly. Preparation To connect the units to two single-line telephone jacks If you do not need to use a T-adaptor. Please contact Panasonic ...at similar frequencies. Connect a 2-wire telephone line cord to wire them using optional Panasonic T-adaptors KX-J66. GREEN PARENT Plug Plug 4-Wire Telephone Line Cord with GREEN Plugs GREEN GREEN Plug Plug 4-Wire Telephone Line Cord with TRANSPARENT Plugs GREEN Plug ...
Multi-line Phone
Page 14
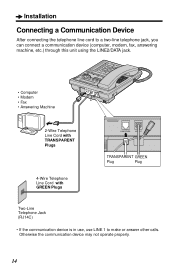
...; Computer • Modem • Fax • Answering Machine 2-Wire Telephone Line Cord with TRANSPARENT Plugs 4-Wire Telephone Line Cord with GREEN Plugs LINE2/DATA LINE1/2 TRANSPARENT GREEN Plug Plug Two-Line Telephone Jack (RJ14C) • If the communication device is in use, use LINE 1 to make or answer other calls. Otherwise the communication device...
...; Computer • Modem • Fax • Answering Machine 2-Wire Telephone Line Cord with TRANSPARENT Plugs 4-Wire Telephone Line Cord with GREEN Plugs LINE2/DATA LINE1/2 TRANSPARENT GREEN Plug Plug Two-Line Telephone Jack (RJ14C) • If the communication device is in use, use LINE 1 to make or answer other calls. Otherwise the communication device...
Multi-line Phone
Page 19
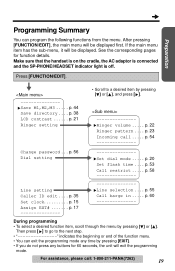
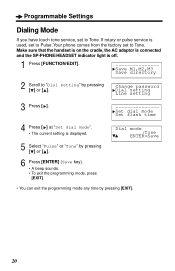
If the main menu item has the sub-menu, it will be displayed. Make sure that the handset is on the cradle, the AC adaptor is connected and the SP-PHONE/HEADSET indicator light is off. Preparation Programming Summary You can program the following functions from the menu. p. 38 LCD contrast p. 21 Ringer setting w • Scroll to a desired item by pressing [ ] or [ ], and press [ ]. p. 44 Save directory . . . . Press [FUNCTION/EDIT]. See the corresponding pages for function details. w w Save M1,M2,M3 . . . . . After pressing [FUNCTION/EDIT], the main menu will be ...
If the main menu item has the sub-menu, it will be displayed. Make sure that the handset is on the cradle, the AC adaptor is connected and the SP-PHONE/HEADSET indicator light is off. Preparation Programming Summary You can program the following functions from the menu. p. 38 LCD contrast p. 21 Ringer setting w • Scroll to a desired item by pressing [ ] or [ ], and press [ ]. p. 44 Save directory . . . . Press [FUNCTION/EDIT]. See the corresponding pages for function details. w w Save M1,M2,M3 . . . . . After pressing [FUNCTION/EDIT], the main menu will be ...
Multi-line Phone
Page 20
... AC adaptor is connected and the SP-PHONE/HEADSET indicator light is used, set to "Dial setting" by pressing [EXIT]. 20 w w Change password Dial setting Line setting Set dial mode Set flash time w 4 Press [ ] at "Set dial mode". • The current setting is displayed.
... AC adaptor is connected and the SP-PHONE/HEADSET indicator light is used, set to "Dial setting" by pressing [EXIT]. 20 w w Change password Dial setting Line setting Set dial mode Set flash time w 4 Press [ ] at "Set dial mode". • The current setting is displayed.
Multi-line Phone
Page 22
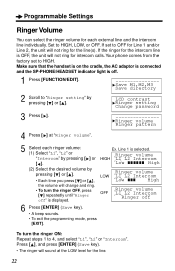
...ENTER] (Save key). • A beep sounds. • To exit the programming mode, press [EXIT]. Set to HIGH. If the ringer for the intercom line is displayed. Ringer volume HIGH L1 L2 Intercom Low s s s s s s High Ringer volume LOW L1 L2 Intercom Low s s s High Ringer volume... "L1", "L2" or "Intercom" by pressing [ ] or [ ]. (2) Select the desired volume by pressing [ ] or [ ]. w 5 Select each external line and the intercom line individually. Press [ ], and press [ENTER] (Save key). • The ringer will change and ring. • To turn the ringer ON: Repeat steps 1 to...
...ENTER] (Save key). • A beep sounds. • To exit the programming mode, press [EXIT]. Set to HIGH. If the ringer for the intercom line is displayed. Ringer volume HIGH L1 L2 Intercom Low s s s s s s High Ringer volume LOW L1 L2 Intercom Low s s s High Ringer volume... "L1", "L2" or "Intercom" by pressing [ ] or [ ]. (2) Select the desired volume by pressing [ ] or [ ]. w 5 Select each external line and the intercom line individually. Press [ ], and press [ENTER] (Save key). • The ringer will change and ring. • To turn the ringer ON: Repeat steps 1 to...
Multi-line Phone
Page 23
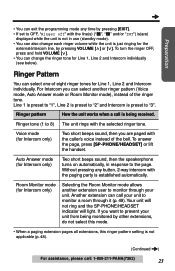
... Two short beeps sound, then the speakerphone turns on automatically, in use (standby mode). • You can also change the ringer tone for Line 1, Line 2 and Intercom individually (see below). < > < Ringer Pattern You can select one of eight ringer tones for Intercom only) Selecting the Room... Monitor mode allows another ringer pattern (Voice mode, Auto Answer mode or Room Monitor mode), instead of the bell. Room Monitor mode (for Line 1, Line 2 and Intercom individually. If you want to monitor through it (p. 49). To turn the ringer OFF, press and hold VOLUME [ ]. •...
... Two short beeps sound, then the speakerphone turns on automatically, in use (standby mode). • You can also change the ringer tone for Line 1, Line 2 and Intercom individually (see below). < > < Ringer Pattern You can select one of eight ringer tones for Intercom only) Selecting the Room... Monitor mode allows another ringer pattern (Voice mode, Auto Answer mode or Room Monitor mode), instead of the bell. Room Monitor mode (for Line 1, Line 2 and Intercom individually. If you want to monitor through it (p. 49). To turn the ringer OFF, press and hold VOLUME [ ]. •...
Multi-line Phone
Page 24
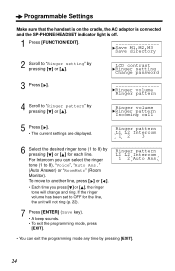
...Ringer volume Ringer pattern Incoming call w 5 Press [ ]. • The current settings are displayed. If the ringer volume has been set to another line, press [ ] or [ ]. • Each time you can exit the programming mode any time by pressing [ ] or [ ]. To move to OFF for each...• To exit the programming mode, press [EXIT]. • You can select the ringer tone (1 to "Ringer pattern" by pressing [ ] or [ ] for the line, the unit will change and ring. w Save M1,M2,M3 Save directory 2 Scroll to 8) by pressing [ ] or [ ]. Ringer pattern L1 L2 Intercom 12 3 ...
...Ringer volume Ringer pattern Incoming call w 5 Press [ ]. • The current settings are displayed. If the ringer volume has been set to another line, press [ ] or [ ]. • Each time you can exit the programming mode any time by pressing [ ] or [ ]. To move to OFF for each...• To exit the programming mode, press [EXIT]. • You can select the ringer tone (1 to "Ringer pattern" by pressing [ ] or [ ] for the line, the unit will change and ring. w Save M1,M2,M3 Save directory 2 Scroll to 8) by pressing [ ] or [ ]. Ringer pattern L1 L2 Intercom 12 3 ...

Multi-line Phone
Page 25
...[SP-PHONE/HEADSET] and Indicator Using the speakerphone 1 Press [SP-PHONE/HEADSET]. • The SP-PHONE/HEADSET indicator lights. • A free line is automatically selected and the line indicator lights. 2 Dial a phone number. • The dialed number is displayed. • After a few seconds, the display will show the length...35PM 11/24[1] the MIC (microphone). 00-01-10 4 To hang up, press [SP-PHONE/HEADSET]. • The SP-PHONE/HEADSET and the line indicator lights go out. • The length of the call : 1-800-211-PANA(7262) 25 For assistance, please call will remain on the ...
...[SP-PHONE/HEADSET] and Indicator Using the speakerphone 1 Press [SP-PHONE/HEADSET]. • The SP-PHONE/HEADSET indicator lights. • A free line is automatically selected and the line indicator lights. 2 Dial a phone number. • The dialed number is displayed. • After a few seconds, the display will show the length...35PM 11/24[1] the MIC (microphone). 00-01-10 4 To hang up, press [SP-PHONE/HEADSET]. • The SP-PHONE/HEADSET and the line indicator lights go out. • The length of the call : 1-800-211-PANA(7262) 25 For assistance, please call will remain on the ...
Multi-line Phone
Page 26
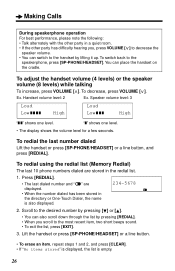
.... Press [REDIAL]. • The last dialed number and " " are stored in the redial list. 1. Lift the handset or press [SP-PHONE/HEADSET] or a line button. • To erase an item, repeat steps 1 and 2, and press [CLEAR]. • If "No items stored" is displayed, the list is also displayed.... 234-5678 2. To redial the last number dialed Lift the handset or press [SP-PHONE/HEADSET] or a line button, and press [REDIAL]. To redial using the redial list (Memory Redial) The last 10 phone numbers dialed are displayed. • When the number...
.... Press [REDIAL]. • The last dialed number and " " are stored in the redial list. 1. Lift the handset or press [SP-PHONE/HEADSET] or a line button. • To erase an item, repeat steps 1 and 2, and press [CLEAR]. • If "No items stored" is displayed, the list is also displayed.... 234-5678 2. To redial the last number dialed Lift the handset or press [SP-PHONE/HEADSET] or a line button, and press [REDIAL]. To redial using the redial list (Memory Redial) The last 10 phone numbers dialed are displayed. • When the number...
Multi-line Phone
Page 27
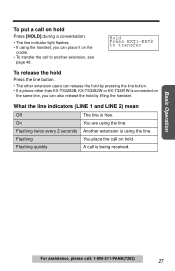
... assistance, please call to transfer To release the hold Press the line button. • The other extension users can place it on the same line, you can release the hold by pressing the line button. • If a phone other than KX-TS3282B, KX-TS3282W or KX-T3281W is free. To put a call on hold . Flashing twice every...
... assistance, please call to transfer To release the hold Press the line button. • The other extension users can place it on the same line, you can release the hold by pressing the line button. • If a phone other than KX-TS3282B, KX-TS3282W or KX-T3281W is free. To put a call on hold . Flashing twice every...


