Telephone
Page 1
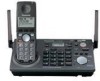
Charge the handset battery for 7 hours before using the unit and save for customers in the U.S.A. To use . For assistance, visit our website: http://www.panasonic.com/phonehelp for future reference. KX-TG6700 5.8 GHz Expandable Digital Cordless Answering System with Caller ID. or Puerto Rico. Please read these Operating Instructions before initial use this feature, you...
Charge the handset battery for 7 hours before using the unit and save for customers in the U.S.A. To use . For assistance, visit our website: http://www.panasonic.com/phonehelp for future reference. KX-TG6700 5.8 GHz Expandable Digital Cordless Answering System with Caller ID. or Puerto Rico. Please read these Operating Instructions before initial use this feature, you...
Telephone
Page 2
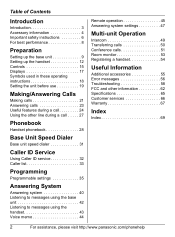
... 6 For best performance 8 Preparation Setting up the base unit 9 Setting up the handset 12 Controls 15 Displays 17 Symbols used in these operating instructions 18 Setting the unit before use 19 Making/Answering Calls Making calls 21 Answering ...Operation Intercom 49 Transferring calls 50 Conference calls 51 Room monitor 53 Registering a handset 54 Useful Information Additional accessories 55 Error messages 56 Troubleshooting 58 FCC and other information 62 Specifications 65 Customer services 66 Warranty 67 Index Index 69 2 For assistance, please visit http://www.panasonic...
... 6 For best performance 8 Preparation Setting up the base unit 9 Setting up the handset 12 Controls 15 Displays 17 Symbols used in these operating instructions 18 Setting the unit before use 19 Making/Answering Calls Making calls 21 Answering ...Operation Intercom 49 Transferring calls 50 Conference calls 51 Room monitor 53 Registering a handset 54 Useful Information Additional accessories 55 Error messages 56 Troubleshooting 58 FCC and other information 62 Specifications 65 Customer services 66 Warranty 67 Index Index 69 2 For assistance, please visit http://www.panasonic...
Telephone
Page 3
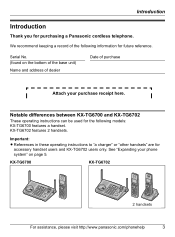
... on page 5. Notable differences between KX-TG6700 and KX-TG6702 These operating instructions can be used for accessory handset users and KX-TG6702 users only. Important: L References in these operating instructions to "a charger" or "other handsets" are for the following information for purchasing a Panasonic cordless telephone. We recommend keeping a record of purchase Attach your phone system" on the bottom of...
... on page 5. Notable differences between KX-TG6700 and KX-TG6702 These operating instructions can be used for accessory handset users and KX-TG6702 users only. Important: L References in these operating instructions to "a charger" or "other handsets" are for the following information for purchasing a Panasonic cordless telephone. We recommend keeping a record of purchase Attach your phone system" on the bottom of...
Telephone
Page 4
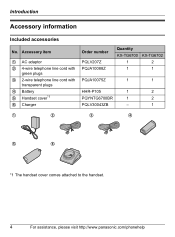
Introduction Accessory information Included accessories No. Accessory item 1 AC adaptor 2 4-wire telephone line cord with green plugs 3 2-wire telephone line cord with transparent plugs 4 Battery 5 Handset cover*1 6 Charger Order number PQLV207Z PQJA10088Z Quantity KX-TG6700 KX-TG6702 1 2 1 1 PQJA10075Z 1 1 HHR-P105 1 2 PQYNTG6700BR 1 2 PQLV30043ZB - 1 1 2 3 4 5 6 *1 The handset cover comes attached to the handset. 4 For assistance, please visit http://www.panasonic.com/phonehelp
Introduction Accessory information Included accessories No. Accessory item 1 AC adaptor 2 4-wire telephone line cord with green plugs 3 2-wire telephone line cord with transparent plugs 4 Battery 5 Handset cover*1 6 Charger Order number PQLV207Z PQJA10088Z Quantity KX-TG6700 KX-TG6702 1 2 1 1 PQJA10075Z 1 1 HHR-P105 1 2 PQYNTG6700BR 1 2 PQLV30043ZB - 1 1 2 3 4 5 6 *1 The handset cover comes attached to the handset. 4 For assistance, please visit http://www.panasonic.com/phonehelp
Telephone
Page 5
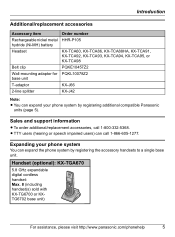
Handset (optional): KX-TGA670 5.8 GHz expandable digital cordless handset: Max. 8 (including handset(s) sold with KX-TG6700 or KXTG6702 base unit) For assistance, please visit http://www.panasonic.com/phonehelp 5 Expanding your phone system by registering the accessory handsets to a single base unit. L TTY users (hearing or speech impaired users) can call 1-800-332-5368. Sales and support information L To order...
Handset (optional): KX-TGA670 5.8 GHz expandable digital cordless handset: Max. 8 (including handset(s) sold with KX-TG6700 or KXTG6702 base unit) For assistance, please visit http://www.panasonic.com/phonehelp 5 Expanding your phone system by registering the accessory handsets to a single base unit. L TTY users (hearing or speech impaired users) can call 1-800-332-5368. Sales and support information L To order...
Telephone
Page 8
... you use the handset near 5.8 GHz electrical appliances may be heard. L Operating the product near another cordless phone's base unit, noise may be kept away from electrical appliances. Move away from the power outlet. 8 For assistance, please visit http://www.panasonic.com/phonehelp Damp ...basements should not be kept free from the electrical appliances. L The maximum calling distance may cause interference. Do not use radio waves to communicate with each other cordless phone's base unit and closer to ...
... you use the handset near 5.8 GHz electrical appliances may be heard. L Operating the product near another cordless phone's base unit, noise may be kept away from electrical appliances. Move away from the power outlet. 8 For assistance, please visit http://www.panasonic.com/phonehelp Damp ...basements should not be kept free from the electrical appliances. L The maximum calling distance may cause interference. Do not use radio waves to communicate with each other cordless phone's base unit and closer to ...
Telephone
Page 12
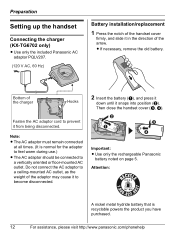
...oriented or floor-mounted AC outlet. B A C D Important: L Use only the rechargeable Panasonic battery noted on page 5. Preparation Setting up the handset Connecting the charger (KX-TG6702 only) L Use only the included Panasonic AC adaptor PQLV207. (120 V AC, 60 Hz) Battery installation/replacement 1 Press the ...notch of the handset cover firmly, and slide it in the direction...
...oriented or floor-mounted AC outlet. B A C D Important: L Use only the rechargeable Panasonic battery noted on page 5. Preparation Setting up the handset Connecting the charger (KX-TG6702 only) L Use only the included Panasonic AC adaptor PQLV207. (120 V AC, 60 Hz) Battery installation/replacement 1 Press the ...notch of the handset cover firmly, and slide it in the direction...
Telephone
Page 13
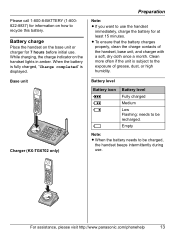
...base unit or charger for 7 hours before initial use. For assistance, please visit http://www.panasonic.com/phonehelp 13 When the battery is fully charged, "Charge completed" is subject to the exposure of the handset, base unit, and charger with a soft, dry cloth once a month. Battery level Battery... battery. Empty Note: L When the battery needs to use . Battery charge Place the handset on the handset lights in amber. Clean more often if the unit is displayed. Base unit Charger (KX-TG6702 only) Preparation Note: L If you want to be recharged. Please call 1-800-8-...
...base unit or charger for 7 hours before initial use. For assistance, please visit http://www.panasonic.com/phonehelp 13 When the battery is fully charged, "Charge completed" is subject to the exposure of the handset, base unit, and charger with a soft, dry cloth once a month. Battery level Battery... battery. Empty Note: L When the battery needs to use . Battery charge Place the handset on the handset lights in amber. Clean more often if the unit is displayed. Base unit Charger (KX-TG6702 only) Preparation Note: L If you want to be recharged. Please call 1-800-8-...
Telephone
Page 14
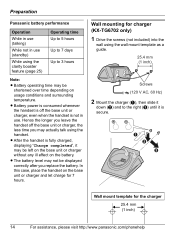
Wall mounting for charger (KX-TG6702 only) 1 Drive the screws (not included) into the wall using the handset. L After the handset is not in use . In this case, place the handset on usage conditions and surrounding temperature. L The battery level may be left on the base unit or ... off the base unit or charger, the less time you leave the handset off the base unit or charger, even when the handset is fully charged, displaying "Charge completed", it is secure. Preparation Panasonic battery performance Operation While in use (talking) While not in use (standby) While using ...
Wall mounting for charger (KX-TG6702 only) 1 Drive the screws (not included) into the wall using the handset. L After the handset is not in use . In this case, place the handset on usage conditions and surrounding temperature. L The battery level may be left on the base unit or ... off the base unit or charger, the less time you leave the handset off the base unit or charger, even when the handset is fully charged, displaying "Charge completed", it is secure. Preparation Panasonic battery performance Operation While in use (talking) While not in use (standby) While using ...

Telephone
Page 16
...{})/ SEARCH ({^} {V}) F {s} (SP-PHONE) G {*} (TONE) H {FLASH} {CALL WAIT} I Microphone J Charge contacts K Charge indicator Ringer indicator Message indicator Using the navigator key The handset navigator key can select the function displayed ...directly above it. By pressing a soft key, you can be used to navigate through menus and to select items shown on the display, by pressing {^}, {V}, {}. {^} {} {V} Handset soft keys The handset features 3 soft keys. LINE1 LINE2 REDIAL 16 For assistance, please visit http://www.panasonic...
...{})/ SEARCH ({^} {V}) F {s} (SP-PHONE) G {*} (TONE) H {FLASH} {CALL WAIT} I Microphone J Charge contacts K Charge indicator Ringer indicator Message indicator Using the navigator key The handset navigator key can select the function displayed ...directly above it. By pressing a soft key, you can be used to navigate through menus and to select items shown on the display, by pressing {^}, {V}, {}. {^} {} {V} Handset soft keys The handset features 3 soft keys. LINE1 LINE2 REDIAL 16 For assistance, please visit http://www.panasonic...
Telephone
Page 17
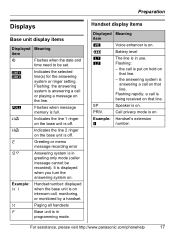
...you turn the answering system on. It is answering a call on . PRIV. Example: Handset's extension ! For assistance, please visit http://www.panasonic.com/phonehelp 17 H Paging all handsets P Base unit is on that line. SP Speaker is in programming mode. L2 Indicates .... - the answering system is off . Flashing: - LINE 1 LINE 2 Indicates the selected line(s) for the answering system or ringer setting. Handset display items Displayed Meaning item W Voice enhancer is on. 1 Battery level k l The line is being received on the line. Flashing rapidly:...
...you turn the answering system on. It is answering a call on . PRIV. Example: Handset's extension ! For assistance, please visit http://www.panasonic.com/phonehelp 17 H Paging all handsets P Base unit is on that line. SP Speaker is in programming mode. L2 Indicates .... - the answering system is off . Flashing: - LINE 1 LINE 2 Indicates the selected line(s) for the answering system or ringer setting. Handset display items Displayed Meaning item W Voice enhancer is on. 1 Battery level k l The line is being received on the line. Flashing rapidly:...

Telephone
Page 18
... or {V} to the next operation. Proceed to select the desired setting. 3 Press {SAVE}, then press {OFF}. Preparation Symbols used in these operating instructions Symbol { }: button ...name/soft key name Example: Unit keys: {C}, {OFF} Soft keys: {CID}, {C} i Example: "Ringer tone" Example: 1 {MENU} i {0}{2} 2 Select the desired setting. 3 {SAVE} i {OFF} Handset...: {^} {V} {} Base unit: {^} {V} {} Meaning The words in quotations indicate the menu on the handset and base unit. Press up , down , left ...
... or {V} to the next operation. Proceed to select the desired setting. 3 Press {SAVE}, then press {OFF}. Preparation Symbols used in these operating instructions Symbol { }: button ...name/soft key name Example: Unit keys: {C}, {OFF} Soft keys: {CID}, {C} i Example: "Ringer tone" Example: 1 {MENU} i {0}{2} 2 Select the desired setting. 3 {SAVE} i {OFF} Handset...: {^} {V} {} Base unit: {^} {V} {} Meaning The words in quotations indicate the menu on the handset and base unit. Press up , down , left ...
Telephone
Page 19
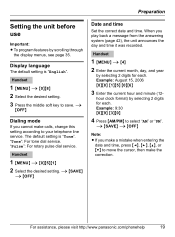
... to select "AM" or "PM". i {SAVE} i {OFF} Date and time Set the correct date and time. Handset 1 {MENU} i {0}{5}{1} 2 Select the desired setting. Example: 9:30 {0}{9} {3}{0} 4 Press {AM/PM} to save. For assistance, please visit http://www.panasonic.com/phonehelp 19 Example: August 15, 2006 {0}{8} {1}{5} {0}{6} 3 Enter the current hour and minute (12- "Pulse": For...
... to select "AM" or "PM". i {SAVE} i {OFF} Date and time Set the correct date and time. Handset 1 {MENU} i {0}{5}{1} 2 Select the desired setting. Example: 9:30 {0}{9} {3}{0} 4 Press {AM/PM} to save. For assistance, please visit http://www.panasonic.com/phonehelp 19 Example: August 15, 2006 {0}{8} {1}{5} {0}{6} 3 Enter the current hour and minute (12- "Pulse": For...
Telephone
Page 20
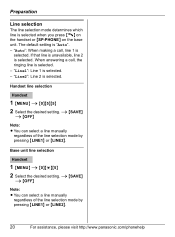
...} i {0}{5}{5} 2 Select the desired setting. "Line1": Line 1 is selected. The default setting is selected when you press {C} on the handset or {SP-PHONE} on the base unit. "Auto": When making a call , the ringing line is selected. i {SAVE} i {OFF} Note: L You can select a line ...manually regardless of the line selection mode by pressing {LINE1} or {LINE2}. 20 For assistance, please visit http://www.panasonic.com/phonehelp Preparation Line selection...
...} i {0}{5}{5} 2 Select the desired setting. "Line1": Line 1 is selected. The default setting is selected when you press {C} on the handset or {SP-PHONE} on the base unit. "Auto": When making a call , the ringing line is selected. i {SAVE} i {OFF} Note: L You can select a line ...manually regardless of the line selection mode by pressing {LINE1} or {LINE2}. 20 For assistance, please visit http://www.panasonic.com/phonehelp Preparation Line selection...
Telephone
Page 21
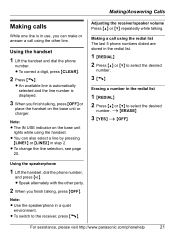
Note: L The IN USE indicator on the base unit or charger. Note: L Use the speakerphone in step 2. Using the handset 1 Lift the handset and dial the phone number. Making a call using the other party. 2 When you can also select a line by pressing {LINE1} or {LINE2... 2 Press {C}. L To change the line selection, see page 20. For assistance, please visit http://www.panasonic.com/phonehelp 21 i {ERASE} 3 {YES} i {OFF} Using the speakerphone 1 Lift the handset, dial the phone number, and press {s}. L Speak alternately with the other line. L To switch to select the desired number....
Note: L The IN USE indicator on the base unit or charger. Note: L Use the speakerphone in step 2. Using the handset 1 Lift the handset and dial the phone number. Making a call using the other party. 2 When you can also select a line by pressing {LINE1} or {LINE2... 2 Press {C}. L To change the line selection, see page 20. For assistance, please visit http://www.panasonic.com/phonehelp 21 i {ERASE} 3 {YES} i {OFF} Using the speakerphone 1 Lift the handset, dial the phone number, and press {s}. L Speak alternately with the other line. L To switch to select the desired number....
Telephone
Page 22
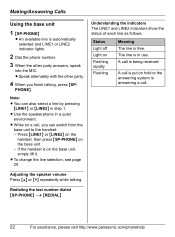
... with the other party answers, speak into the MIC. L While on a call . Press {LINE1} or {LINE2} on the handset, then press {SP-PHONE} on Flashing rapidly Flashing Meaning The line is free. Status Light off Light on the base unit. - Understanding the indicators The LINE1...in use. A call is put on the base unit, simply lift it. Redialing the last number dialed {SP-PHONE} i {REDIAL} 22 For assistance, please visit http://www.panasonic.com/phonehelp PHONE}. The line is in a quiet environment. L To change the line selection, see page 20. Making/Answering Calls...
... with the other party answers, speak into the MIC. L While on a call . Press {LINE1} or {LINE2} on the handset, then press {SP-PHONE} on Flashing rapidly Flashing Meaning The line is free. Status Light off Light on the base unit. - Understanding the indicators The LINE1...in use. A call is put on the base unit, simply lift it. Redialing the last number dialed {SP-PHONE} i {REDIAL} 22 For assistance, please visit http://www.panasonic.com/phonehelp PHONE}. The line is in a quiet environment. L To change the line selection, see page 20. Making/Answering Calls...

Telephone
Page 23
...You can also answer the call by simply lifting the handset off , press and hold {V} until the unit beeps. L To stop ringing, press {STOP}. L To change the line selection, see page 20. PHONE}. For assistance, please visit http://www.panasonic.com/phonehelp 23 Adjusting the ringer volume 1 Press ... allows you can also answer the call by pressing {LINE1} or {LINE2} in standby mode. Making/Answering Calls Answering calls Using the handset 1 Lift the handset and press {C} or {s}. L The called line is ringing for both lines at the same time. 2 Press {^} or {V} repeatedly ...
...You can also answer the call by simply lifting the handset off , press and hold {V} until the unit beeps. L To stop ringing, press {STOP}. L To change the line selection, see page 20. PHONE}. For assistance, please visit http://www.panasonic.com/phonehelp 23 Adjusting the ringer volume 1 Press ... allows you can also answer the call by pressing {LINE1} or {LINE2} in standby mode. Making/Answering Calls Answering calls Using the handset 1 Lift the handset and press {C} or {s}. L The called line is ringing for both lines at the same time. 2 Press {^} or {V} repeatedly ...
Telephone
Page 24
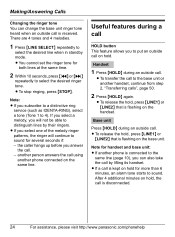
... 2, "Transferring calls", page 50. 2 Press {HOLD} again. L To stop ringing, press {STOP}. Handset 1 Press {HOLD} during an outside call is flashing on hold for handset and base unit: L If another phone is disconnected. 24 For assistance, please visit http://www.panasonic.com/phonehelp If you select a melody, you select one of the melody ringer...
... 2, "Transferring calls", page 50. 2 Press {HOLD} again. L To stop ringing, press {STOP}. Handset 1 Press {HOLD} during an outside call is flashing on hold for handset and base unit: L If another phone is disconnected. 24 For assistance, please visit http://www.panasonic.com/phonehelp If you select a melody, you select one of the melody ringer...

Telephone
Page 25
...hear a Call Waiting tone. During an outside call. 2 Press {3} to use Call Waiting, you to select "Booster on the phone. This feature allows you are already talking on " or "Booster off". Press {CALL WAIT} to receive calls while you to ...panasonic.com/phonehelp 25 FLASH button Pressing {FLASH} allows you must subscribe to access touch tone services (for example, answering services, telephone banking services, etc.). Press {*} (TONE) before entering access numbers which require tone dialing. Handset clarity booster This feature can be interference. the battery operating...
...hear a Call Waiting tone. During an outside call. 2 Press {3} to use Call Waiting, you to select "Booster on the phone. This feature allows you are already talking on " or "Booster off". Press {CALL WAIT} to receive calls while you to ...panasonic.com/phonehelp 25 FLASH button Pressing {FLASH} allows you must subscribe to access touch tone services (for example, answering services, telephone banking services, etc.). Press {*} (TONE) before entering access numbers which require tone dialing. Handset clarity booster This feature can be interference. the battery operating...
Telephone
Page 26
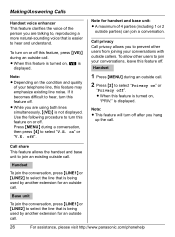
... unit: L A maximum of 4 parties (including 1 or 2 outside call . 26 For assistance, please visit http://www.panasonic.com/phonehelp Press {MENU} during an outside call . off . Handset 1 Press {MENU} during a conversation, then press {4} to hear and understand. If it becomes difficult to select the line... select "V.E. on , W is displayed. Note for an outside parties) can join a conversation. Note: L Depending on or off . Handset To join the conversation, press {LINE1} or {LINE2} to hear, turn this feature off ". Use the following procedure to prevent other ...
... unit: L A maximum of 4 parties (including 1 or 2 outside call . 26 For assistance, please visit http://www.panasonic.com/phonehelp Press {MENU} during an outside call . off . Handset 1 Press {MENU} during a conversation, then press {4} to hear and understand. If it becomes difficult to select the line... select "V.E. on , W is displayed. Note for an outside parties) can join a conversation. Note: L Depending on or off . Handset To join the conversation, press {LINE1} or {LINE2} to hear, turn this feature off ". Use the following procedure to prevent other ...


