
Programming Guide
Page 2
...File menu, which lets you to the PBX. Introduction About this PBX using Panasonic proprietary telephones (PTs) or the KX-TA Maintenance Console software. Sections from the Installation Manual are listed for your reference. Section 7, PC Programming-View Describes the ...-Utility Describes the Utility menu, which offers options for the Panasonic Advanced Hybrid System. References Found in the Programming Manual Installation Manual References The Installation Manual provides instructions detailing the installation and maintenance of programming the PBX, and information about password ...
...File menu, which lets you to the PBX. Introduction About this PBX using Panasonic proprietary telephones (PTs) or the KX-TA Maintenance Console software. Sections from the Installation Manual are listed for your reference. Section 7, PC Programming-View Describes the ...-Utility Describes the Utility menu, which offers options for the Panasonic Advanced Hybrid System. References Found in the Programming Manual Installation Manual References The Installation Manual provides instructions detailing the installation and maintenance of programming the PBX, and information about password ...

Programming Guide
Page 3
... trademarks identified herein are the property of Intel Corporation or its many features and facilities. Sections from Microsoft Corporation. Programming Manual 3 Linked items include: • Installation Manual References • Programming Manual References • Feature Manual References • Operating Manual References Trademarks • Microsoft and Windows are either registered trademarks or trademarks...
... trademarks identified herein are the property of Intel Corporation or its many features and facilities. Sections from Microsoft Corporation. Programming Manual 3 Linked items include: • Installation Manual References • Programming Manual References • Feature Manual References • Operating Manual References Trademarks • Microsoft and Windows are either registered trademarks or trademarks...
Programming Guide
Page 7
...] System Data Dump...70 [805] SMDR Account Code...71 [806] SMDR Language ...72 [807] BV Total Recording Time ...72 [808] BV Card Initialization...72 [900] Caller ID ...72 [901] Caller ID Area Code...73 [902] Caller ID Modification for Local Calls ...73 [903] Caller......77 [967] TRS Check Time after Answering...78 [968] KX-T7700 Series Incoming Lamp Control 78 [998] Firmware Version ...78 [999] System Data Clear...79 3 PC Programming-Introduction 81 3.1 Introduction ...82 3.2 PC Programming...82 3.2.1 Installing and Starting KX-TA Maintenance Console 82 3.3 Software Modes ...82 3.4 Status Bar...
...] System Data Dump...70 [805] SMDR Account Code...71 [806] SMDR Language ...72 [807] BV Total Recording Time ...72 [808] BV Card Initialization...72 [900] Caller ID ...72 [901] Caller ID Area Code...73 [902] Caller ID Modification for Local Calls ...73 [903] Caller......77 [967] TRS Check Time after Answering...78 [968] KX-T7700 Series Incoming Lamp Control 78 [998] Firmware Version ...78 [999] System Data Clear...79 3 PC Programming-Introduction 81 3.1 Introduction ...82 3.2 PC Programming...82 3.2.1 Installing and Starting KX-TA Maintenance Console 82 3.3 Software Modes ...82 3.4 Status Bar...
Programming Guide
Page 12
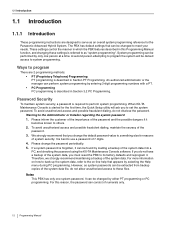
...importance of the system data into a PC, and checking the password using the KX-TA Maintenance Console software. However, as an overall system programming reference for reasons of... the password periodically. 5. Please change the default password value to something else for the Panasonic Advanced Hybrid System. Therefore, we strongly recommend maintaining a backup of 7 digits. 4. For...A second person attempting to program the system will ask you to the Administrator or Installer regarding the system password 1. To avoid unauthorized access and possible fraudulent dialing, maintain the...
...importance of the system data into a PC, and checking the password using the KX-TA Maintenance Console software. However, as an overall system programming reference for reasons of... the password periodically. 5. Please change the default password value to something else for the Panasonic Advanced Hybrid System. Therefore, we strongly recommend maintaining a backup of 7 digits. 4. For...A second person attempting to program the system will ask you to the Administrator or Installer regarding the system password 1. To avoid unauthorized access and possible fraudulent dialing, maintain the...

Programming Guide
Page 26
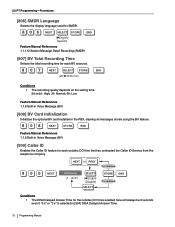
...- nSaEmLEe*CT STORE (1...6/ ) ( Enable/Disable) END Notes DTMF receiver number: 1-2: checking extension jacks 01-08 3-4: checking extension jacks 09-16 5-6: checking extension jacks 17-24 Installation Manual References 4.1.3 Operation [108] Flash/Recall Mode for the extension(s) assigned not to answer incoming outside (CO) line calls. The CO button indicator will flash...
...- nSaEmLEe*CT STORE (1...6/ ) ( Enable/Disable) END Notes DTMF receiver number: 1-2: checking extension jacks 01-08 3-4: checking extension jacks 09-16 5-6: checking extension jacks 17-24 Installation Manual References 4.1.3 Operation [108] Flash/Recall Mode for the extension(s) assigned not to answer incoming outside (CO) line calls. The CO button indicator will flash...
Programming Guide
Page 72
... depends on the setting time. 20 (min): High; 30: Normal; 60: Low Feature Manual References 1.1.8 Built-in Voice Message (BV) [808] BV Card Initialization Initializes the optional BV card installed in the PBX, clearing all messages stored using the BV feature. 808 NEXT STORE END Feature Manual References 1.1.8 Built-in Voice Message (BV...
... depends on the setting time. 20 (min): High; 30: Normal; 60: Low Feature Manual References 1.1.8 Built-in Voice Message (BV) [808] BV Card Initialization Initializes the optional BV card installed in the PBX, clearing all messages stored using the BV feature. 808 NEXT STORE END Feature Manual References 1.1.8 Built-in Voice Message (BV...

Programming Guide
Page 82
... of the PBX • Resetting the PBX, and clearing set values • Initializing the BV message card, and clearing all OGMs stored for DISA 3.2 PC Programming 3.2.1 Installing and Starting KX-TA Maintenance Console To program and administer the PBX by PC (Personal Computer), you need to... is connected to the PBX. The types of the software when no system data setting windows are connected, refer to the Installation Manual ( 3.1.1 Installing KX-TA Maintenance Console on your PC, without being connected to the PBX. KXTA Maintenance Console starts the program using Interactive mode...
... of the PBX • Resetting the PBX, and clearing set values • Initializing the BV message card, and clearing all OGMs stored for DISA 3.2 PC Programming 3.2.1 Installing and Starting KX-TA Maintenance Console To program and administer the PBX by PC (Personal Computer), you need to... is connected to the PBX. The types of the software when no system data setting windows are connected, refer to the Installation Manual ( 3.1.1 Installing KX-TA Maintenance Console on your PC, without being connected to the PBX. KXTA Maintenance Console starts the program using Interactive mode...
Programming Guide
Page 84
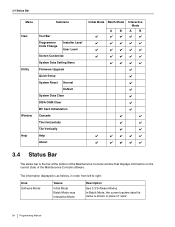
...state of "xxxx". 84 Programming Manual 3.4 Status Bar Menu View Utility Window Help Submenu Tool Bar Programmer Code Change Installer Level User Level Screen Customize System Data Setting Menu Firmware Upgrade Quick Setup System Reset Normal Default System Data Clear DISA OGM... Clear BV Card Initialization Cascade Tile Horizontally Tile Vertically Help About Initial Mode Batch Mode A B Interactive Mode A B 3.4 Status Bar The ...
...state of "xxxx". 84 Programming Manual 3.4 Status Bar Menu View Utility Window Help Submenu Tool Bar Programmer Code Change Installer Level User Level Screen Customize System Data Setting Menu Firmware Upgrade Quick Setup System Reset Normal Default System Data Clear DISA OGM... Clear BV Card Initialization Cascade Tile Horizontally Tile Vertically Help About Initial Mode Batch Mode A B Interactive Mode A B 3.4 Status Bar The ...
Programming Guide
Page 85
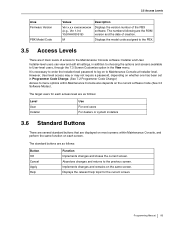
... 1.0.0 Y591AA030519) M Description Displays the version number of creation. The numbers following are 2 main levels of access to the previous screen. Installer-level users can view and edit all settings, in addition to choosing the options and screens available to User-level users, through the 7.3... Button OK Cancel Apply Help Function Implements changes and closes the current screen. Abandons changes and returns to the Maintenance Console software: Installer and User. However, User level access may or may not require a password, depending on the current software mode (See 3.3 ...
... 1.0.0 Y591AA030519) M Description Displays the version number of creation. The numbers following are 2 main levels of access to the previous screen. Installer-level users can view and edit all settings, in addition to choosing the options and screens available to User-level users, through the 7.3... Button OK Cancel Apply Help Function Implements changes and closes the current screen. Abandons changes and returns to the Maintenance Console software: Installer and User. However, User level access may or may not require a password, depending on the current software mode (See 3.3 ...
Programming Guide
Page 88
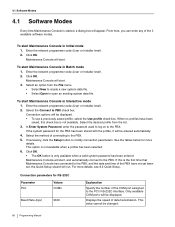
...available when a profile has been selected. 6. For more details. Only available COM ports will run. Enter the relevant programmer code (User or Installer level). 2. Click OK. Select the desired profile from the File menu. • Select New to create a new system data file. &#... the password used to log on to modify connection parameters. Maintenance Console will be displayed. Enter the relevant programmer code (User or Installer level). 2. This option is only available when a valid system password has been entered. Maintenance Console will appear. To start . If...
...available when a profile has been selected. 6. For more details. Only available COM ports will run. Enter the relevant programmer code (User or Installer level). 2. Click OK. Select the desired profile from the File menu. • Select New to create a new system data file. &#... the password used to log on to modify connection parameters. Maintenance Console will be displayed. Enter the relevant programmer code (User or Installer level). 2. This option is only available when a valid system password has been entered. Maintenance Console will appear. To start . If...

Programming Guide
Page 108
7.1 Tool Bar 7.1 Tool Bar Selects whether the tool bar, which provides icons allowing easy access to commonly used to log on at Installer level may change both Installer level and User level codes. However, users logged on at startup. The Programmer Code Change screen will be displayed. 2. Re-enter... the User level code. From the View menu, point to Programmer Code Change, and then click Installer Level. Click OK. Enter the desired new code. 108 Programming Manual To change the Installer level code 1. From the View menu, point to Programmer Code Change, and then click User Level...
7.1 Tool Bar 7.1 Tool Bar Selects whether the tool bar, which provides icons allowing easy access to commonly used to log on at Installer level may change both Installer level and User level codes. However, users logged on at startup. The Programmer Code Change screen will be displayed. 2. Re-enter... the User level code. From the View menu, point to Programmer Code Change, and then click Installer Level. Click OK. Enter the desired new code. 108 Programming Manual To change the Installer level code 1. From the View menu, point to Programmer Code Change, and then click User Level...

Programming Guide
Page 109
A list of the system data screens will be accessed when logged in to Maintenance Console at Installer level. 7.3 Screen Customize 3. If the entered codes do not want to open the relevant screen. This option is only available at User level. Programming Manual ...
A list of the system data screens will be accessed when logged in to Maintenance Console at Installer level. 7.3 Screen Customize 3. If the entered codes do not want to open the relevant screen. This option is only available at User level. Programming Manual ...

Programming Guide
Page 112
... a warning message will be displayed. • To accept the older ROM version, click Yes. Check the listed items. 2. Only install upgrades provided by Maintenance Console. Click Select. Click Start. A confirmation message will be displayed, as it may cause problems during system ...8226; If the PC freezes or loses power during the upgrade, a message will be supported by certified Panasonic dealers. 8.1 Firmware Upgrade 8.1 Firmware Upgrade Allows installation of each process has been completed. To upgrade system software 1. Navigate to the folder containing the system ...
... a warning message will be displayed. • To accept the older ROM version, click Yes. Check the listed items. 2. Only install upgrades provided by Maintenance Console. Click Select. Click Start. A confirmation message will be displayed, as it may cause problems during system ...8226; If the PC freezes or loses power during the upgrade, a message will be supported by certified Panasonic dealers. 8.1 Firmware Upgrade 8.1 Firmware Upgrade Allows installation of each process has been completed. To upgrade system software 1. Navigate to the folder containing the system ...

Programming Guide
Page 113
... connected to the PBX in either all programmable parameters. Any existing settings are met: • The user is logged on to Maintenance Console using the Installer level programmer code. • The date and time of the PBX have not yet been set to the PC. (→9.1.1 Date & Time [1-1]) • The system...
... connected to the PBX in either all programmable parameters. Any existing settings are met: • The user is logged on to Maintenance Console using the Installer level programmer code. • The date and time of the PBX have not yet been set to the PC. (→9.1.1 Date & Time [1-1]) • The system...

Programming Guide
Page 118
...will be displayed. 3. A confirmation message will be displayed. 2. To initialize the BV card 1. A confirmation message will be displayed. 2. Click OK. 8.6 BV Card Initialization Initializes the optional BV card installed in the PBX. Click OK. 118 Programming Manual DISA OGMs on both the preinstalled OGM... card and the optional OGM card (if present) will be deleted. Click Yes. 8.5...
...will be displayed. 3. A confirmation message will be displayed. 2. To initialize the BV card 1. A confirmation message will be displayed. 2. Click OK. 8.6 BV Card Initialization Initializes the optional BV card installed in the PBX. Click OK. 118 Programming Manual DISA OGMs on both the preinstalled OGM... card and the optional OGM card (if present) will be deleted. Click Yes. 8.5...

Programming Guide
Page 146
..., each extension. Value Range 01-24 146 Programming Manual 9.2 Extension [2] 1-2: checking extension jacks 01-08 3-4: checking extension jacks 09-16 5-6: checking extension jacks 17-24 Installation Manual References 4.1.3 Operation Programming Manual References [107] DTMF Receiver Check 9.2 Extension [2] 9.2.1 Main [2-1] Various parameters can be programmed for a certain jack or extension, double-click the...
..., each extension. Value Range 01-24 146 Programming Manual 9.2 Extension [2] 1-2: checking extension jacks 01-08 3-4: checking extension jacks 09-16 5-6: checking extension jacks 17-24 Installation Manual References 4.1.3 Operation Programming Manual References [107] DTMF Receiver Check 9.2 Extension [2] 9.2.1 Main [2-1] Various parameters can be programmed for a certain jack or extension, double-click the...

Programming Guide
Page 231
... [203] 32 Hunting Group Set [100] 23 Hunting Type [101] 24 I Incoming / Outgoing [3-2] 181 Incoming Permission [6-3] 207 Incoming/Outgoing Call Selection for Printing [802] 70 Installing and Starting KX-TA Maintenance Console 82 Intercept Time for Internal DISA [515] 53 Inter-digit Time [208] 33 Introduction 12, 82... K KX-T7700 Series Incoming Lamp Control [968] 78 L LCD Language [615] 60 Index LCD Time Display [010] 22 Line Mode [3-1] 180 Local Carrier-based VM [3-4] 188 ...
... [203] 32 Hunting Group Set [100] 23 Hunting Type [101] 24 I Incoming / Outgoing [3-2] 181 Incoming Permission [6-3] 207 Incoming/Outgoing Call Selection for Printing [802] 70 Installing and Starting KX-TA Maintenance Console 82 Intercept Time for Internal DISA [515] 53 Inter-digit Time [208] 33 Introduction 12, 82... K KX-T7700 Series Incoming Lamp Control [968] 78 L LCD Language [615] 60 Index LCD Time Display [010] 22 Line Mode [3-1] 180 Local Carrier-based VM [3-4] 188 ...


