
Operating Manual
Page 2
... Network] app 18 Setting up the camera (initial setup 19 Registering additional mobile devices to the camera 23 Registering the camera to your hub 24 Resetting the camera 25 Appendix Information about wireless communication 26 Information about sensor features 27 Information about night vision mode 29 Wall mounting 29 Adjusting the...
... Network] app 18 Setting up the camera (initial setup 19 Registering additional mobile devices to the camera 23 Registering the camera to your hub 24 Resetting the camera 25 Appendix Information about wireless communication 26 Information about sensor features 27 Information about night vision mode 29 Wall mounting 29 Adjusting the...
Operating Manual
Page 10
...enable the product's auto login feature, enable the screen lock or similar security feature on your passwords, protect that could be easily guessed by Panasonic. R If your mobile device will no longer be erased or changed as part of your mobile device. Configure your mobile device. R ...from your mobile device to this product to a third party for these settings. R To prevent disclosure of the product, perform a factory data reset to erase any data stored in the product and remove the microSD card. R Before handing the product over to use passwords that record. Additionally...
...enable the product's auto login feature, enable the screen lock or similar security feature on your passwords, protect that could be easily guessed by Panasonic. R If your mobile device will no longer be erased or changed as part of your mobile device. Configure your mobile device. R ...from your mobile device to this product to a third party for these settings. R To prevent disclosure of the product, perform a factory data reset to erase any data stored in the product and remove the microSD card. R Before handing the product over to use passwords that record. Additionally...
Operating Manual
Page 14
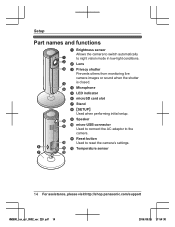
... indicator F microSD card slot G Stand H MSETUPN Used when performing initial setup. F K L Temperature sensor G L 14 For assistance, please visit http://shop.panasonic.com/support HNC800_(en_en)_0902_ver.220.pdf 14 2016/09/05 17:54:30 Setup Part names and functions A Brightness sensor Allows the camera to... switch automatically A to reset the camera's settings. K Reset button J Used to night vision mode in low-light conditions. H I Speaker I J micro-USB connector Used to connect...
... indicator F microSD card slot G Stand H MSETUPN Used when performing initial setup. F K L Temperature sensor G L 14 For assistance, please visit http://shop.panasonic.com/support HNC800_(en_en)_0902_ver.220.pdf 14 2016/09/05 17:54:30 Setup Part names and functions A Brightness sensor Allows the camera to... switch automatically A to reset the camera's settings. K Reset button J Used to night vision mode in low-light conditions. H I Speaker I J micro-USB connector Used to connect...
Operating Manual
Page 19
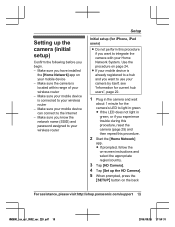
...connect to the Internet - Setting up the HD Camera]. 5 When prompted, press the MSETUPN button on the back For assistance, please visit http://shop.panasonic.com/support 19 HNC800_(en_en)_0902_ver.220.pdf 19 2016/09/05 17:54:31 Make sure your wireless router - Use the procedure on your... Tap [Set up the camera (initial setup) Confirm the following before you want to light in green, or if you experience trouble during this procedure, reset the camera (page 25) and then repeat this procedure if you begin. - Make sure you know the network name (SSID) and password assigned to ...
...connect to the Internet - Setting up the HD Camera]. 5 When prompted, press the MSETUPN button on the back For assistance, please visit http://shop.panasonic.com/support 19 HNC800_(en_en)_0902_ver.220.pdf 19 2016/09/05 17:54:31 Make sure your wireless router - Use the procedure on your... Tap [Set up the camera (initial setup) Confirm the following before you want to light in green, or if you experience trouble during this procedure, reset the camera (page 25) and then repeat this procedure if you begin. - Make sure you know the network name (SSID) and password assigned to ...
Operating Manual
Page 21
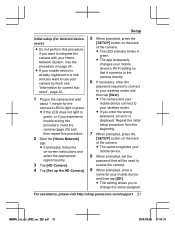
R If the LED does not light in green, or if you experience trouble during this procedure, reset the camera (page 25) and then repeat this procedure if you want to use your camera by itself, see "Information for current hub users", page ... that will be used to your Home Network System. R This setting allows you want to change the name assigned For assistance, please visit http://shop.panasonic.com/support 21 HNC800_(en_en)_0902_ver.220.pdf 21 2016/09/05 17:54:31 Setup Initial setup (for Android device users) R Do not perform...
R If the LED does not light in green, or if you experience trouble during this procedure, reset the camera (page 25) and then repeat this procedure if you want to use your camera by itself, see "Information for current hub users", page ... that will be used to your Home Network System. R This setting allows you want to change the name assigned For assistance, please visit http://shop.panasonic.com/support 21 HNC800_(en_en)_0902_ver.220.pdf 21 2016/09/05 17:54:31 Setup Initial setup (for Android device users) R Do not perform...
Operating Manual
Page 22
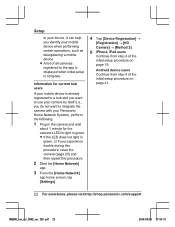
Information for current hub users If your Panasonic Home Network System), perform the following. 1 Plug in the camera and wait about 1 minute for the camera's LED to light in green, or if you experience trouble during this procedure, reset the camera (page 25) and then repeat this procedure. 2 Start the [... ® [Method 2]. 5 iPhone, iPad users Continue from step 4 of the initial setup procedure on page 21. 22 For assistance, please visit http://shop.panasonic.com/support HNC800_(en_en)_0902_ver.220.pdf 22 2016/09/05 17:54:31 R If the LED does not light in green. R A list of all...
Information for current hub users If your Panasonic Home Network System), perform the following. 1 Plug in the camera and wait about 1 minute for the camera's LED to light in green, or if you experience trouble during this procedure, reset the camera (page 25) and then repeat this procedure. 2 Start the [... ® [Method 2]. 5 iPhone, iPad users Continue from step 4 of the initial setup procedure on page 21. 22 For assistance, please visit http://shop.panasonic.com/support HNC800_(en_en)_0902_ver.220.pdf 22 2016/09/05 17:54:31 R If the LED does not light in green. R A list of all...
Operating Manual
Page 24
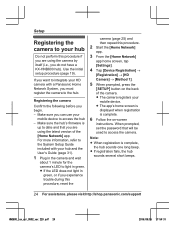
...If registration fails, the hub sounds several short beeps. 24 For assistance, please visit http://shop.panasonic.com/support HNC800_(en_en)_0902_ver.220.pdf 24 2016/09/05 17:54:31 Make sure you ...1 minute for the camera's LED to light in green, or if you do not have a KX-HNB600 hub). Use the initial setup procedure (page 19). Setup Registering the camera to your hub ... not perform this procedure if you are using the camera by itself (i.e., you experience trouble during this procedure, reset the camera (page 25) and then repeat this procedure. 2 Start the [Home Network] app. 3 From...
...If registration fails, the hub sounds several short beeps. 24 For assistance, please visit http://shop.panasonic.com/support HNC800_(en_en)_0902_ver.220.pdf 24 2016/09/05 17:54:31 Make sure you ...1 minute for the camera's LED to light in green, or if you do not have a KX-HNB600 hub). Use the initial setup procedure (page 19). Setup Registering the camera to your hub ... not perform this procedure if you are using the camera by itself (i.e., you experience trouble during this procedure, reset the camera (page 25) and then repeat this procedure. 2 Start the [Home Network] app. 3 From...
Operating Manual
Page 25
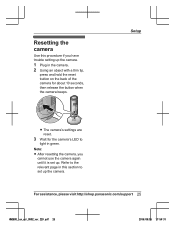
... camera, you have trouble setting up the camera. 1 Plug in the camera. 2 Using an object with a thin tip, press and hold the reset button on the back of the camera for the camera's LED to light in this procedure if you cannot use the camera again until it ...is set up . For assistance, please visit http://shop.panasonic.com/support 25 HNC800_(en_en)_0902_ver.220.pdf 25 2016/09/05 17:54:31 Resetting the camera Use this section to the relevant page in green. Setup R The camera's settings are...
... camera, you have trouble setting up the camera. 1 Plug in the camera. 2 Using an object with a thin tip, press and hold the reset button on the back of the camera for the camera's LED to light in this procedure if you cannot use the camera again until it ...is set up . For assistance, please visit http://shop.panasonic.com/support 25 HNC800_(en_en)_0902_ver.220.pdf 25 2016/09/05 17:54:31 Resetting the camera Use this section to the relevant page in green. Setup R The camera's settings are...


