
Mfp Laser Fax
Page 3
Location of each button, see page 10. Buttons (Listed in alphabetical order) BROADCAST B HELP N CALLER ID L LOWER D COLLATE E MANUAL BROAD C CONTRAST F MENU I COPY P MONITOR V DIRECTORY E Navigator key S FAX O PAUSE T FAX AUTO ANSWER M QUICK SCAN H FLASH U REDIAL T RESOLUTION G SCAN R SET Q START W Station keys A STOP K TONE J ZOOM H ii For a description of controls Please keep this page open when following operating instructions.
Location of each button, see page 10. Buttons (Listed in alphabetical order) BROADCAST B HELP N CALLER ID L LOWER D COLLATE E MANUAL BROAD C CONTRAST F MENU I COPY P MONITOR V DIRECTORY E Navigator key S FAX O PAUSE T FAX AUTO ANSWER M QUICK SCAN H FLASH U REDIAL T RESOLUTION G SCAN R SET Q START W Station keys A STOP K TONE J ZOOM H ii For a description of controls Please keep this page open when following operating instructions.
Mfp Laser Fax
Page 9
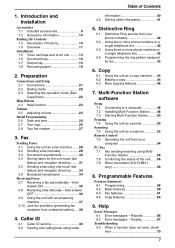
... 9 1.2 Accessory information 10 Finding the Controls 1.3 Description of the unit....... 56 7.9 Other information (KX-FLB811 only 56 8. Auto answer ON 36 3.8 Receiving a fax manually - Display 67 Troubleshooting 9.3 When a function does not work, check here 70 7 1. Distinctive Ring...59 8.3 Fax features 61 8.4 Copy features 65 9. Caller ID 4.1 Caller ID service 40 4.2 Viewing and calling back using one-touch dial feature and navigator directory......... 33 3.6 Broadcast transmission 34 Receiving Faxes 3.7 Receiving a fax automatically - Introduction and 1. Fax...
... 9 1.2 Accessory information 10 Finding the Controls 1.3 Description of the unit....... 56 7.9 Other information (KX-FLB811 only 56 8. Auto answer ON 36 3.8 Receiving a fax manually - Display 67 Troubleshooting 9.3 When a function does not work, check here 70 7 1. Distinctive Ring...59 8.3 Fax features 61 8.4 Copy features 65 9. Caller ID 4.1 Caller ID service 40 4.2 Viewing and calling back using one-touch dial feature and navigator directory......... 33 3.6 Broadcast transmission 34 Receiving Faxes 3.7 Receiving a fax automatically - Introduction and 1. Fax...
Mfp Laser Fax
Page 12
...page 40). L To return to tone temporarily during operation. To place an order online (for button locations. A Station keys L To use the one -touch dial feature (page 31, 33). H {ZOOM}{QUICK SCAN} L To enlarge or reduce a document when copying (page 46). L To ... number, expiration date and your name, shipping address and telephone number - 1. FA87/KX-FA85) - Optional handset unit (KX-FA103) *1 Approx. 2,500 sheets of Panasonic toner cartridge and drum unit. B {BROADCAST} L To send a document to multiple parties manually (page 34, 35). I {MENU} L To initiate or exit programming.
...page 40). L To return to tone temporarily during operation. To place an order online (for button locations. A Station keys L To use the one -touch dial feature (page 31, 33). H {ZOOM}{QUICK SCAN} L To enlarge or reduce a document when copying (page 46). L To ... number, expiration date and your name, shipping address and telephone number - 1. FA87/KX-FA85) - Optional handset unit (KX-FA103) *1 Approx. 2,500 sheets of Panasonic toner cartridge and drum unit. B {BROADCAST} L To send a document to multiple parties manually (page 34, 35). I {MENU} L To initiate or exit programming.
Mfp Laser Fax
Page 14
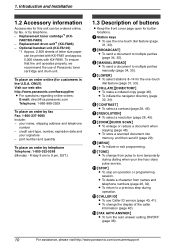
FLB801. 12 For assistance, please visit http://www.panasonic.com/consumersupport Introduction and Installation 1.4.2 Rear view B A CD E FGH A Recording paper guides B Handset unit (Optional) connection jack C Speaker D USB interface cover E Manual input tray F Telephone line jack G External telephone jack H Power inlet Removing the shipping tape Remove the shipping tape (1) and pad (2). 1 2 1 1 * The shipping tape on the output tray is for KX- 1.
FLB801. 12 For assistance, please visit http://www.panasonic.com/consumersupport Introduction and Installation 1.4.2 Rear view B A CD E FGH A Recording paper guides B Handset unit (Optional) connection jack C Speaker D USB interface cover E Manual input tray F Telephone line jack G External telephone jack H Power inlet Removing the shipping tape Remove the shipping tape (1) and pad (2). 1 2 1 1 * The shipping tape on the output tray is for KX- 1.
Mfp Laser Fax
Page 16
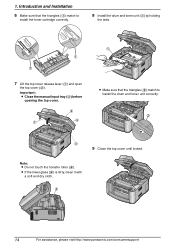
Important: L Close the manual input tray (3) before opening the top cover. 2 1 4 1 L Make sure that the triangles (1) match to install the drum and toner unit correctly. 2 3 9 Close the top cover ... not touch the transfer roller (4). L If the lower glass (4) is dirty, clean it with a soft and dry cloth. 4 14 For assistance, please visit http://www.panasonic.com/consumersupport 1. Introduction and Installation 6 Make sure that the triangles (2) match to install the toner cartridge correctly. 8 Install the drum and toner unit (1) by holding...
Important: L Close the manual input tray (3) before opening the top cover. 2 1 4 1 L Make sure that the triangles (1) match to install the drum and toner unit correctly. 2 3 9 Close the top cover ... not touch the transfer roller (4). L If the lower glass (4) is dirty, clean it with a soft and dry cloth. 4 14 For assistance, please visit http://www.panasonic.com/consumersupport 1. Introduction and Installation 6 Make sure that the triangles (2) match to install the toner cartridge correctly. 8 Install the drum and toner unit (1) by holding...

Mfp Laser Fax
Page 21
...paper is used only for the paper input tray L Do not drop the input tray. 1. Introduction and Installation 1.8.2 Using the manual input tray You can hold one page at a time. The input tray weights approximately 2 kg (4.4 lb.) when the recording paper is flat in the paper ...paper is fully installed. 1 2 Approx. 2 kg (4.4 lb.) For assistance, please visit http://www.panasonic.com/consumersupport 19 L Hold the paper input tray with the computer. 1 Pull open the manual input tray (1), then raise the extender (2) gently until it clicks into place. L Please refer to page...
...paper is used only for the paper input tray L Do not drop the input tray. 1. Introduction and Installation 1.8.2 Using the manual input tray You can hold one page at a time. The input tray weights approximately 2 kg (4.4 lb.) when the recording paper is flat in the paper ...paper is fully installed. 1 2 Approx. 2 kg (4.4 lb.) For assistance, please visit http://www.panasonic.com/consumersupport 19 L Hold the paper input tray with the computer. 1 Pull open the manual input tray (1), then raise the extender (2) gently until it clicks into place. L Please refer to page...
Mfp Laser Fax
Page 30
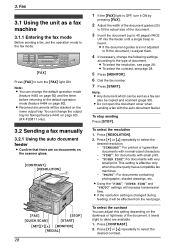
... of the document. 5 levels (light to fit the document, re-adjust them. 4 If necessary, change the output tray for faxing (Feature #441 on page 63) (KX-FLB811 only). 3.2 Sending a fax manually 3.2.1 Using the auto document feeder L Confirm that there are available. 1. Note: L You can adjust this setting depending on page 60). 3.
... of the document. 5 levels (light to fit the document, re-adjust them. 4 If necessary, change the output tray for faxing (Feature #441 on page 63) (KX-FLB811 only). 3.2 Sending a fax manually 3.2.1 Using the auto document feeder L Confirm that there are available. 1. Note: L You can adjust this setting depending on page 60). 3.

Mfp Laser Fax
Page 31
...fed into the unit and scanned into memory before inserting the document. Up to 3 reservations when sending - You must send the entire document manually. Fax Printing a journal report A journal report provides you need to refer to the document for the other party's fax number. 1. To print... mark on the scanner glass (2), matching the top edge of error messages, see page 66. 3.2.2 Using the scanner glass By using the dial keypad, one-touch dial or navigator directory. 3. For an explanation of the document to the type of error messages, see page 28. L To select the resolution, ...
...fed into the unit and scanned into memory before inserting the document. Up to 3 reservations when sending - You must send the entire document manually. Fax Printing a journal report A journal report provides you need to refer to the document for the other party's fax number. 1. To print... mark on the scanner glass (2), matching the top edge of error messages, see page 66. 3.2.2 Using the scanner glass By using the dial keypad, one-touch dial or navigator directory. 3. For an explanation of the document to the type of error messages, see page 28. L To select the resolution, ...

Mfp Laser Fax
Page 36
...STOP} to add. 6 Press {SET}. L To cancel erasing, press {STOP}. 6 Press {SET}. 7 Press {SET}. Fax 3.6 Broadcast transmission By storing one -touch dial function will remain in the broadcast memory, allowing frequent re-use. For BROADCAST 1-2: 1. Press {V} or {^} repeatedly to 7. 34 L To program...want to exit. Using stations 8-14: Press {LOWER}, then press the desired station key. Note: L When adding new items to the MANUAL BROADCAST memory, you can only select stored items. 3.6.3 Erasing a stored item from the broadcast memory 1 Press {DIRECTORY}. 2 Press {V} or...
...STOP} to add. 6 Press {SET}. L To cancel erasing, press {STOP}. 6 Press {SET}. 7 Press {SET}. Fax 3.6 Broadcast transmission By storing one -touch dial function will remain in the broadcast memory, allowing frequent re-use. For BROADCAST 1-2: 1. Press {V} or {^} repeatedly to 7. 34 L To program...want to exit. Using stations 8-14: Press {LOWER}, then press the desired station key. Note: L When adding new items to the MANUAL BROADCAST memory, you can only select stored items. 3.6.3 Erasing a stored item from the broadcast memory 1 Press {DIRECTORY}. 2 Press {V} or...

Mfp Laser Fax
Page 37
...the document cover. 2. Fax To cancel broadcast transmission 1. Press {STOP} repeatedly until "SEND CANCELED?" Press the desired {BROADCAST} (1-2) or {MANUAL BROAD}. Place the next page. 5. Receiving Faxes 35 The unit will be fed into the unit and scanned into the feeder. L After ... will then send the data to the desired resolution (page 28) and the desired contrast (page 28). 3 Press the desired {BROADCAST} (1-2) or {MANUAL BROAD}. To send the same document using the scanner glass L Confirm that there are no documents in the auto document feeder. 1. L To send multiple...
...the document cover. 2. Fax To cancel broadcast transmission 1. Press {STOP} repeatedly until "SEND CANCELED?" Press the desired {BROADCAST} (1-2) or {MANUAL BROAD}. Place the next page. 5. Receiving Faxes 35 The unit will be fed into the unit and scanned into the feeder. L After ... will then send the data to the desired resolution (page 28) and the desired contrast (page 28). 3 Press the desired {BROADCAST} (1-2) or {MANUAL BROAD}. To send the same document using the scanner glass L Confirm that there are no documents in the auto document feeder. 1. L To send multiple...

Mfp Laser Fax
Page 38
.... 1. document reception is heard, press {*} {#} {9} (default fax activation code) firmly. L The unit will temporarily switch to display the desired setting, and press {SET}. 3.8 Receiving a fax manually - When the extension telephone rings, lift the handset of the extension telephone. 2. no sound is required, - L The {FAX AUTO ANSWER} indicator is heard, or - When...
.... 1. document reception is heard, press {*} {#} {9} (default fax activation code) firmly. L The unit will temporarily switch to display the desired setting, and press {SET}. 3.8 Receiving a fax manually - When the extension telephone rings, lift the handset of the extension telephone. 2. no sound is required, - L The {FAX AUTO ANSWER} indicator is heard, or - When...

Mfp Laser Fax
Page 40
... parties, repeat steps 4 to 5. 6 Press {STOP} 2 times to Phone Companies Voice Mail (if you subscribed) Receiving a voice message and fax document in one call The caller can register up to 10 undesired numbers from the Caller ID list (page 40) if you do not show caller information. The... caller presses the start button to exit. L Keep the front cover page open for button locations. Important: L This feature does not work when manual reception is no room left in step 3 or step 5. Note: L If there is performed. 3.10.1 Activating the junk fax prohibitor 1 Press {MENU...
... parties, repeat steps 4 to 5. 6 Press {STOP} 2 times to Phone Companies Voice Mail (if you subscribed) Receiving a voice message and fax document in one call The caller can register up to 10 undesired numbers from the Caller ID list (page 40) if you do not show caller information. The... caller presses the start button to exit. L Keep the front cover page open for button locations. Important: L This feature does not work when manual reception is no room left in step 3 or step 5. Note: L If there is performed. 3.10.1 Activating the junk fax prohibitor 1 Press {MENU...

Mfp Laser Fax
Page 42
... * or #). - Make sure the following ring setting is stored by your PBX supplier. FAX ring setting (feature #210 on the display one -touch dial or navigator directory, the stored name will be displayed. "OUT OF AREA": The caller dialed from an area which does not ... number will automatically store caller information (name, telephone number and the time of the call) of whether or not to send caller information. - To print manually, see page 89. - The unit will be received properly. The caller information does not include a telephone number. {MENU} {STOP} {CALLER ID} ...
... * or #). - Make sure the following ring setting is stored by your PBX supplier. FAX ring setting (feature #210 on the display one -touch dial or navigator directory, the stored name will be displayed. "OUT OF AREA": The caller dialed from an area which does not ... number will automatically store caller information (name, telephone number and the time of the call) of whether or not to send caller information. - To print manually, see page 89. - The unit will be received properly. The caller information does not include a telephone number. {MENU} {STOP} {CALLER ID} ...

Mfp Laser Fax
Page 43
Local telephone number ("1" added) 2 Local telephone number only (area code omitted) 3 Area code - L "CALL LIST ERASE" will be displayed. 3 Press {SET}. Local telephone number ("1" added and area code omitted) To stop viewing Press {STOP} after step 2. L To cancel erasing, press {STOP}, then {MENU}. 4 Press {SET}. 5 Press {STOP} to exit. 4.2.2 Erasing specific caller information 1 Press {CALLER ID}. 2 Press {V} or {^} repeatedly to display "CALLER SETUP". 2 Press {SET}. Each time you press {*}, the telephone number will be changed as follows: 1 1 - Local telephone number 4 1 ...
Local telephone number ("1" added) 2 Local telephone number only (area code omitted) 3 Area code - L "CALL LIST ERASE" will be displayed. 3 Press {SET}. Local telephone number ("1" added and area code omitted) To stop viewing Press {STOP} after step 2. L To cancel erasing, press {STOP}, then {MENU}. 4 Press {SET}. 5 Press {STOP} to exit. 4.2.2 Erasing specific caller information 1 Press {CALLER ID}. 2 Press {V} or {^} repeatedly to display "CALLER SETUP". 2 Press {SET}. Each time you press {*}, the telephone number will be changed as follows: 1 1 - Local telephone number 4 1 ...
Mfp Laser Fax
Page 53
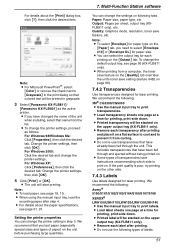
...Panasonic KX-FLB801] as follows. We recommend that have already been fed through and ejected without being printed on the other side. 7.4.3 Labels Use labels designed for each label after step 4. Quality: Graphics mode, resolution, toner save setting (feature #482 on the upper output tray (KX-FLB811 only). L Load transparency sheets one... page at a time for laser printing. L Remove each...the manual input tray to select [Envelope #10] or [Envelope DL] for printing, print-side down . L Load label sheets one page...
...Panasonic KX-FLB801] as follows. We recommend that have already been fed through and ejected without being printed on the other side. 7.4.3 Labels Use labels designed for each label after step 4. Quality: Graphics mode, resolution, toner save setting (feature #482 on the upper output tray (KX-FLB811 only). L Load transparency sheets one... page at a time for laser printing. L Remove each...the manual input tray to select [Envelope #10] or [Envelope DL] for printing, print-side down . L Load label sheets one page...
Mfp Laser Fax
Page 54
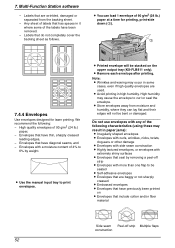
.... L Printed envelope will not be sealed L Self-adhesive envelopes L Envelopes that have previously been printed on the upper output tray (KX-FLB811 only). Labels that are baggy or not sharply creased L Embossed envelopes L Envelopes that seal by weight. We recommend the following characteristics... g/m2 (24 lb.) paper at a time for printing, print-side down (1). 1 7.4.4 Envelopes Use envelopes designed for laser printing. Envelopes with a moisture content of 90 g/m2 (24 lb.) paper, - L Use the manual input tray to be bent or damaged. Do not use envelopes with more than...
.... L Printed envelope will not be sealed L Self-adhesive envelopes L Envelopes that have previously been printed on the upper output tray (KX-FLB811 only). Labels that are baggy or not sharply creased L Embossed envelopes L Envelopes that seal by weight. We recommend the following characteristics... g/m2 (24 lb.) paper at a time for printing, print-side down (1). 1 7.4.4 Envelopes Use envelopes designed for laser printing. Envelopes with a moisture content of 90 g/m2 (24 lb.) paper, - L Use the manual input tray to be bent or damaged. Do not use envelopes with more than...
Mfp Laser Fax
Page 68
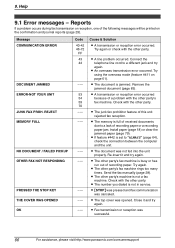
...transmission or reception error occurred because of this unit rejected fax reception. Send the fax manually (page 28). Close it and try again. Cause & Solution L A transmission or... A line problem occurred. L The document was successful. 66 For assistance, please visit http://www.panasonic.com/consumersupport L The other party. L The number you dialed is not a fax machine. L ... fax communication was opened. 9. Reports If a problem occurs during fax transmission or reception, one of recording paper or a recording paper jam. L The memory is busy or has run...
...transmission or reception error occurred because of this unit rejected fax reception. Send the fax manually (page 28). Close it and try again. Cause & Solution L A transmission or... A line problem occurred. L The document was successful. 66 For assistance, please visit http://www.panasonic.com/consumersupport L The other party. L The number you dialed is not a fax machine. L ... fax communication was opened. 9. Reports If a problem occurs during fax transmission or reception, one of recording paper or a recording paper jam. L The memory is busy or has run...

Mfp Laser Fax
Page 69
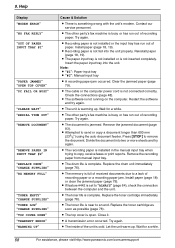
...See the other displayed message instructions to a lack of recording paper or misfeeding of the unit. 9. Display If the unit detects a problem, one or more of the unit. L There is extremely cold and cannot be printed out automatically when the unit warms up. Re-insert the ...inserted properly. L Copying has stopped due to print out the document. Use the unit in memory. Send the entire document manually. For assistance, please visit http://www.panasonic.com/consumersupport 67 Re-program. L Recording paper was not fed into the memory, and will appear on the display. Press...
...See the other displayed message instructions to a lack of recording paper or misfeeding of the unit. 9. Display If the unit detects a problem, one or more of the unit. L There is extremely cold and cannot be printed out automatically when the unit warms up. Re-insert the ...inserted properly. L Copying has stopped due to print out the document. Use the unit in memory. Send the entire document manually. For assistance, please visit http://www.panasonic.com/consumersupport 67 Re-program. L Recording paper was not fed into the memory, and will appear on the display. Press...
Mfp Laser Fax
Page 70
... for a while. 68 For assistance, please visit http://www.panasonic.com/consumersupport L The recording paper is full of received documents due to copy, receive faxes or print reports. Remove the recording paper from manual input tray. L The memory is installed in the manual input tray when trying to a lack of recording paper. Reinstall...
... for a while. 68 For assistance, please visit http://www.panasonic.com/consumersupport L The recording paper is full of received documents due to copy, receive faxes or print reports. Remove the recording paper from manual input tray. L The memory is installed in the manual input tray when trying to a lack of recording paper. Reinstall...
Mfp Laser Fax
Page 73
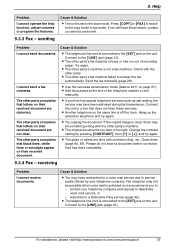
...these services. The other party's fax machine failed to the [EXT] jack on their received document are not clear. Send the fax manually (page 28). L If your telephone company. Change the contrast setting by your line has special telephone services such as call waiting, ...company and request to the [EXT] jack on their received document are dirty with the other party's machine. For assistance, please visit http://www.panasonic.com/consumersupport 71 subscribe to the scan mode. sending Cause & Solution L The unit is not a fax machine. I cannot receive documents. L...
...these services. The other party's fax machine failed to the [EXT] jack on their received document are not clear. Send the fax manually (page 28). L If your telephone company. Change the contrast setting by your line has special telephone services such as call waiting, ...company and request to the [EXT] jack on their received document are dirty with the other party's machine. For assistance, please visit http://www.panasonic.com/consumersupport 71 subscribe to the scan mode. sending Cause & Solution L The unit is not a fax machine. I cannot receive documents. L...


